CMSCIS
This online manual outlines the various processes involved in the management of the Credit Master Systems Complaint Information System (CMSCIS). The CMSCIS system was developed using MSSQL Server as the silo database with a browser based user interface using Microsoft ASP.NET MVC5.
Contents
- 1 System Security & Users Management
- 2 Debtor Information Management
- 2.1 New Debtor Creation
- 2.2 Searching Debtor Information Database
- 2.3 Addresses: Modify & Create Debtor Information
- 2.4 Employers: Modify & Create Debtor Information
- 2.5 Social Media Contacts: Modify & Create Debtor Information
- 2.6 Identification Sources: Modify & Create Debtor Information
- 2.7 Scanned Documents Management
- 2.8 Audit Trail: Search & View Activity
- 2.9 Debtor Details: Update Debtor Information
- 2.9.1 Comments: Create & Modify Debtor Comments Information
- 2.9.2 Tracking: Modify & Create Debtor Information
- 2.9.3 Deactivate & Activate Debtor Records
- 2.9.4 Debt History View
- 2.9.5 PCI (Personal Complaint Information) Issuance
- 2.9.6 Debtor CMS Online Search History
- 2.9.7 Debtor Information Quick Filters
System Security & Users Management
The management of users is an important aspect of any software system that can result in data leakage and mismanagement of system features by users. In an effort to provide a seamless user experience as well as control user access, a user group methodology was implemented in CMSCIS. A user will gain access to the features of the CMSCIS system by first using a set of assigned user credentials to login to the system from a network workstation.
The CMSCIS system is a browser based software system. This means that system users will utilize an internet browser on their workstations to navigate the system and utilize the system features to perform daily tasks. Internet browsers are of different types and may be Microsoft Internet Explorer, Mozilla Firefox or Google Chrome to name a few of the more widely used browsers. Microsoft Edge Browser or Google Chrome browser have been designated as the default Internet Browsers and have been verified to work with all system features. The URL to access the CMSCIS system on the local network is as follows:
Using the above URL address in Microsoft Edge Browser will direct the user to the login window as illustrated below.

The username and password provided to the user should be used to authenticate access to the CMSCIS system. The default landing page upon successful authenticate of credentials will be the “Dashboard”. The image below illustrates the Dashboard of a user belonging to the “Administrator” user group. Users of different groups will be presented with a different cluster of controls on their dashboard as shown below:

Restricted Dashboard
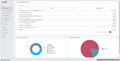
Administrator Dashboard


The main system menu used to navigate the CMSCIS system is located to the left of the browser window. The below image illustrates that the current system interface is the “DASHBOARD”. Left clicking on any of the menu navigation links will take you to the corresponding system module. This menu is collapsible using the collapse arrow located on the right of the system menu. The system menu is also scroll activated and allows for scrolling using a mouse scroll wheel.

Security Methodology
The CMSCIS system utilizes a “User Group – User” method of managing user access to system features. This method of user management is referred to as “Role Based Security” in ASP.NET MVC5. A user group is created in the CMSCIS system and system user accounts are then assigned to a created user group. Each user group is then assigned roles to perform a set of tasks specific to all users in the group.
Definitions:
- User – A user can be defined as a person who uses or operates something, especially a computer or other machine. “Users” of the CMSCIS system are those individuals who have been granted access to the system using a specified set of credentials known by them alone. These credentials include a username and a password. User names are assigned using the “creditmastersystems.com” domain name in the following format jdoe@creditmastersystems.com. This format includes the first initial and last name with the domain name appended.
- Role – A role is a system module that allows an authenticated user to perform a specific task in the CMSCIS system. An example of such a role, as it pertains to the CMSCIS system, is called “ADJOURNMENTS”. This role allows a user to “UPDATE COURT DATE (ADJOURNMENT)”. Roles in the CMSCIS system can be of two types either a “COMMAND” or a “MENU”. These designations refer to the role being a command button that executes a specific task or a menu option that gives access to a system window or interface respectively.
- User Group – A user group can be defined as a group of people with the same interests, who use a particular product or service. With this definition in mind a group of system users who all perform the same tasks in the CMSCIS system are therefore referred to as a “user group”. A user group is created in the CMSCIS and system “roles “ or “rights” are granted to the user group.
The diagram below is a visual representation of the implementation of roles, users and groups in the CMSCIS system. The diagram illustrates the existence of two user groups “User Group A” and “User Group B”. Both these user groups have been assigned system roles respectively. The diagram indicates that the user “jdoe@creditmastersystems” has been created in the CMSCIS system and has been assigned both defined system groups, “User Group A” and “User Group B”.

This diagram illustrates an important feature to be taken into consideration in the administration of system users. A user can be assigned to one or more groups at a time. This is a feature of the CMSCIS system. As illustrated above both user groups have “Role A” and “Role B” but are different in the existence of “Role C” and “Role D” in User Group A and “Role F” and “Role G” in User Group B. When assigned to both user groups, system user jdoe@creditmastersystems will have access to all features of both groups. This feature allows for flexibility in the assignment of groups to a user and allows for the potential for elevated or reduced accessibility at the discretion of the system administrator.
System Role Creation
Note: The steps outlined in this section are for information purposes on the usage of this system feature. All new system roles do not automatically become activated but will require implementation into the software code to become usable.
- Navigate the main menu option to select the "Security" sub menu. On the sub menu please select the “Security Roles” option and left click.
- The figure below is a representation of the main roles user interface. This page is used to create and update systems roles that allow users to perform work tasks in the CMSCIS system. The “Grid Filter Options” allows for quick filtering of the main grid to allow for fast location of systems roles based on the selected filter type. Each column on the grid can also be filtered by typing words in the columns. The grid will automatically begin to perform a search based on the provided word criteria and present results in the filtered grid. To clear all filters and reset the grid to its initial state the “ALL” filter in the left filter menu should be clicked.

- Please click on the button labeled “Create New Permission” to activate the role creation / edit popup window shown below.

- Please provide the name of the new role and the description of the new role. Please note that all fields are required on this window. (Note: Required fields will be indicated with a green asterix symbol.)
- Please the “Save New Permission” button to submit the new role with the details provided or click the “Cancel” button to exit the popup window and discard the details of the unsaved role.
- A confirmation window will be presented indicating the role has been saved successfully.
Editing System Roles
- Navigate the main menu option to select the "Security" sub menu. On the sub menu please select the “Security Roles” option and left click.
- Please click on the row in the roles grid list to select the role that is to be edited.
- Please click on the “Edit” grid button in the far right hand corner of the selected grid row. Clicking on the edit button will invoke the role popup window in “Edit” mode. In edit mode only two (2) fields will be updateable, “Description” and “Type”.

- Please click the “Update Permission” button to save the changes made to the security role.
Role Access List
- Navigate the main menu option to select the "Security" sub menu. On the sub menu please select the “Security Roles” option and left click.
- Please click on the row in the roles grid list to select the role that you would like to investigate.
- Please click on the “Details” grid button in the far right hand corner of the selected grid row. Clicking on the “Details” button will invoke the role “Permission User” popup window. This window, shown below, provides a list of all system user accounts that have been granted access to execute the selected grid role.

- The list of users with the granted role can be printed by clicking on the “Print Screen” button
User Group Creation
Note: For a more detailed explanation of the methods and concepts employed in the CMSCIS security system please see Section 1.1 of this manual.
- Navigate the main menu option to select the "Security" sub menu. On the sub menu please select the “Group Definition” menu option and left click.
- The figure below is a representation of the main user group user interface. This page is used to create and update system user groups that allow groups of users to perform similar work tasks in the CMSCIS system. The “Grid Filter Options” allows for quick filtering of the main grid to allow for fast location of systems groups based on the selected filter type. Each column on the grid can also be filtered by typing words in the columns. The grid will automatically begin to perform a search based on the provided word criteria and present results in the filtered grid. To clear all filters and reset the grid to its initial state the “ALL GROUPS” filter in the left filter menu should be clicked. (Note: Inactive groups will appear highlighted as shown below. User accounts cannot be have an inactive group assigned to them)

- Please click on the button labeled “Create User Group” to activate the group creation / edit popup window shown below.

- Please provide the name of the new group and the description of the new group. The “Inactive” checkbox can be used to set the new group as not active for assignment to user accounts. Please note that all fields are required on this window. (Note: Required fields will be indicated with a green asterix symbol.)
- The “In Role(s)” list is used to select “Roles” from the system that have been created in Section 1.2 and grant them to the new user group. Please carefully select the list of roles you would like to grant to the new user group by clicking on the checkbox next to the role in the list. Multiple roles can be selected at a time and saved.
- Please the “Save New Group” button to submit the new user group with the details provided or click the “Cancel” button to exit the popup window and discard the details of the unsaved user group.
- A confirmation window will be presented indicating the group has been saved successfully.
Editing System User Groups
- Navigate the main menu option to select the "Security" sub menu. On the sub menu please select the “Group Definition” option and left click.
- Please click on the row in the group grid list to select the user group that is to be edited.
- Please click on the “Edit” grid button in the far right hand corner of the selected grid row. Clicking on the edit button will invoke the user group popup window in “Edit” mode. In edit mode only two (2) fields will be updateable, “Description” and the “Inactive” checkbox. Additional roles here be added to the selected user group or revoked by either selecting or deselecting the checkbox options next to the pertinent roles in the list.

- Please click the “Update Group” button to save the changes made to the security user group.
Group Users List
- Navigate the main menu option to select the "Security" sub menu. On the sub menu please select the “Group Definition” option and left click.
- Please click on the row in the user group grid list to select the group that you would like to investigate.
- Please click on the “Details” grid button in the far right hand corner of the selected grid row. Clicking on the “Details” button will invoke the role “Group Permissions” popup window. This window, shown below, provides a list of all system access roles that have been granted to the selected user group and can be executed by its users.

- The list of roles granted to the user group can be printed by clicking on the “Print Screen” button.
User Account Creation
Note: For a more detailed explanation of the methods and concepts employed in the CMSCIS security system please see Section 1.1 of this manual. A user account is to be assigned to one system user only. All users of the CMSCIS system should be assigned a personal user account.
User accounts and passwords should never be shared!!
The CMSCIS system does not provide for individual user account creation through the usage of a “Register” feature. All user accounts must be created by a system administrator and granted an initial password. A user can change his or her password if it is compromised at any time once logged into the CMSCIS system.
- Navigate the main menu option to select the "Security" sub menu. On the sub menu please select the “User Definition” menu option and left click.
- The figure below is a representation of the main user management interface. This page is used to create and update system users that allow authenticated user to perform work tasks in the CMSCIS system. The “Grid Filter Options” allows for quick filtering of the main grid to allow for fast location of systems users based on the selected filter type. Each column on the grid can also be filtered by typing words in the columns. The grid will automatically begin to perform a search based on the provided word criteria and present results in the filtered grid. To clear all filters and reset the grid to its initial state the “ALL USERS” filter in the left filter menu should be clicked. (Note: Inactive user accounts will appear highlighted.)

- Please click on the button labeled “Create New User” to activate the system user creation / edit popup window shown below. The popup window is opened in the “Create” mode

- Please provide the email address of the new user account. The “Email” address is used as the “username” in the CMSCIS system. The email box is auto populated with the “@creditmastersystems.com” extension. The administrator is expected to add the first initial and last name of the user as the user email / username as follows, “jdoe@creditmastersystem.com”. If a user account email already exists with the first initial and last name it is possible to use the first name and last name separated by a period as follows, “john.doe@creditmastersystems.com”. Using the email extension is required.
- Please provide a password in the password entry box and retype the password in the confirmation box. All passwords must have at least one (1) upper case letter, one (1) digit numeric value and a non-letter or digit character such as follows (!,@,#,$,%,^,&,*,(,<,),~). If these criteria are not met you will be prompted to make changes to the password field. The administrator will assign a password in this first instance and supply the user email and password to the new system user. A suggested default password for use on new accounts is as follows “Password123$”.
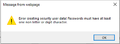
Error 1
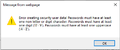
Error 2

- Please supply all require fields marked with a green asterix.
- Please select a user group to which the new user account will belong. (Note: A new user account can be created without being assigned to a user group. In that case the user will have no rights in the system and may have access to a few system functions.)
- Please assign any other special features that the user account will carry from the “User Options” section of the new user window.
- Please click the “Save New User” button once all data has been provided for the new user account.
- Successful creation of a new user account will result in a confirmation message from the system.
Edit System User Account Settings
- Navigate the main menu option to select the "Security" sub menu. On the sub menu please select the “User Definition” menu option and left click.
- Please click on the user account row in the user grid list to select the user account that is to be edited.
- Please click on the “Edit” grid button in the far right hand corner of the selected grid row. Clicking on the edit button will invoke the user account popup window in “Edit” mode. In edit mode all fields except the “User Name” field will be updateable.

- Please make the necessary changes to the user account and click the “Update User” button to save the changes to the account. Please note you will not be able to reset a password using this window. The user will need to edit their password after successful login in the far bottom left of the screen page. In this location the user can click on their user name and be taken to a password reset page.
User Details List
- Navigate the main menu option to select the "Security" sub menu. On the sub menu please select the “User Definition” option and left click.
- Please click on the row in the user account grid list to select the user account that you would like to investigate.
- Please click on the “Details” grid button in the far right hand corner of the selected grid row. Clicking on the “Details” button will invoke the role “User’s Group(s)” popup window. This window, shown below, provides a list of all user groups to which the selected user belongs.

- The list of user groups to which the selected user account belongs can be printed by clicking on the “Print Screen” button.
Reset/Change User Account Password
- Please login to the CMSCIS system using your user account credentials. The default landing page for all user accounts after successful authentication is the “Dashboard”. Located at the bottom left corner of all system pages in a section containing two (2) hyperlinks. The first hyperlink navigates to the “Account Settings” management window. The second link labeled “Log off” will terminate the current login session and logs the user out of the CMSCIS system.
- Please click on the hyperlink of the email address of the authenticated user. In the screenshot above the authenticated user is “admin@creditmastersystems.com”. Clicking on the email hyperlink will navigate the browser to the account settings page illustrated below.

- Please click on the “Change your password” hyperlink to be taken to the password reset page as shown below. (Note: The authenticated user is able to use the browser navigation controls to go back to the previous page or click “Dashboard” to be navigated to the system dashboard. The user is also able to “Log off” the CMSCIS system from the above illustrated page.)

- Please supply the current user password and the new user account password followed by a confirmation of the new password. (Note: The new password must conform to the same constraints as outline is step 5 of Section 1.8.)
- Please click the “Change password” button. After successfully changing the password the user will be navigated back to the Account Settings page in step 2. Please click the “Dashboard” link to be taken back to the main CMSCIS system interfaces.