CMSCIS
This online manual outlines the various processes involved in the management of the Credit Master Systems Complaint Information System (CMSCIS). The CMSCIS system was developed using MSSQL Server as the silo database with a browser based user interface using Microsoft ASP.NET MVC5.
Contents
- 1 System Security & Users Management
- 2 Debtor Information Management
- 2.1 New Debtor Creation
- 2.2 Searching Debtor Information Database
- 2.3 Addresses: Modify & Create Debtor Information
- 2.4 Employers: Modify & Create Debtor Information
- 2.5 Social Media Contacts: Modify & Create Debtor Information
- 2.6 Identification Sources: Modify & Create Debtor Information
- 2.7 Ownership Details: Modify & Create Debtor Information
- 2.8 Scanned Documents Management
- 2.9 Audit Trail: Search & View Activity
- 2.10 Debtor Details: Update Debtor Information
- 2.10.1 Comments: Create & Modify Debtor Comments Information
- 2.10.2 Tracking: Modify & Create Debtor Information
- 2.10.3 Deactivate & Activate Debtor Records
- 2.10.4 Debt History View
- 2.10.5 PCI (Personal Complaint Information) Issuance
- 2.10.6 Debtor CMS Online Search History
- 2.10.7 Debtor Information Quick Filters
- 3 Client Information Management
- 3.1 New Client Creation
- 3.2 Searching Client Information Database
- 3.3 Client Contact Persons: Modify & Create Contact Information
- 3.4 Client Email Addresses: Modify & Create Email Address Information
- 3.5 Scanned Document: Client Scanned Documents Management
- 3.6 Client Details: Update Client Information
- 3.7 Client Name: Update Client Debt Name Information
- 3.8 Client Debtor Listing Report
- 3.9 Client Outstanding Actions Listing Report
- 3.10 Client Listing: Export to Excel Format
- 3.11 Client Listing: Custom Grid Column Chooser
System Security & Users Management
The management of users is an important aspect of any software system that can result in data leakage and mismanagement of system features by users. In an effort to provide a seamless user experience as well as control user access, a user group methodology was implemented in CMSCIS. A user will gain access to the features of the CMSCIS system by first using a set of assigned user credentials to login to the system from a network workstation.
The CMSCIS system is a browser based software system. This means that system users will utilize an internet browser on their workstations to navigate the system and utilize the system features to perform daily tasks. Internet browsers are of different types and may be Microsoft Internet Explorer, Mozilla Firefox or Google Chrome to name a few of the more widely used browsers. Microsoft Edge Browser (Version 86.0.622.38 or later) or Google Chrome browser have been designated as the default Internet Browsers and have been verified to work with all system features. The URL to access the CMSCIS system on the local network is as follows:
Using the above URL address in Microsoft Edge Browser will direct the user to the login window as illustrated below.

The username and password provided to the user should be used to authenticate access to the CMSCIS system. The default landing page upon successful authenticate of credentials will be the “Dashboard”. The image below illustrates the Dashboard of a user belonging to the “Administrator” user group. Users of different groups will be presented with a different cluster of controls on their dashboard as shown below:

Restricted Dashboard
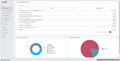
Administrator Dashboard


The main system menu used to navigate the CMSCIS system is located to the left of the browser window. The below image illustrates that the current system interface is the “DASHBOARD”. Left clicking on any of the menu navigation links will take you to the corresponding system module. This menu is collapsible using the collapse arrow located on the right of the system menu. The system menu is also scroll activated and allows for scrolling using a mouse scroll wheel.

Security Methodology
The CMSCIS system utilizes a “User Group – User” method of managing user access to system features. This method of user management is referred to as “Role Based Security” in ASP.NET MVC5. A user group is created in the CMSCIS system and system user accounts are then assigned to a created user group. Each user group is then assigned roles to perform a set of tasks specific to all users in the group.
Definitions:
- User – A user can be defined as a person who uses or operates something, especially a computer or other machine. “Users” of the CMSCIS system are those individuals who have been granted access to the system using a specified set of credentials known by them alone. These credentials include a username and a password. User names are assigned using the “creditmastersystems.com” domain name in the following format jdoe@creditmastersystems.com. This format includes the first initial and last name with the domain name appended.
- Role – A role is a system module that allows an authenticated user to perform a specific task in the CMSCIS system. An example of such a role, as it pertains to the CMSCIS system, is called “ADJOURNMENTS”. This role allows a user to “UPDATE COURT DATE (ADJOURNMENT)”. Roles in the CMSCIS system can be of two types either a “COMMAND” or a “MENU”. These designations refer to the role being a command button that executes a specific task or a menu option that gives access to a system window or interface respectively.
- User Group – A user group can be defined as a group of people with the same interests, who use a particular product or service. With this definition in mind a group of system users who all perform the same tasks in the CMSCIS system are therefore referred to as a “user group”. A user group is created in the CMSCIS and system “roles “ or “rights” are granted to the user group.
The diagram below is a visual representation of the implementation of roles, users and groups in the CMSCIS system. The diagram illustrates the existence of two user groups “User Group A” and “User Group B”. Both these user groups have been assigned system roles respectively. The diagram indicates that the user “jdoe@creditmastersystems” has been created in the CMSCIS system and has been assigned both defined system groups, “User Group A” and “User Group B”.

This diagram illustrates an important feature to be taken into consideration in the administration of system users. A user can be assigned to one or more groups at a time. This is a feature of the CMSCIS system. As illustrated above both user groups have “Role A” and “Role B” but are different in the existence of “Role C” and “Role D” in User Group A and “Role F” and “Role G” in User Group B. When assigned to both user groups, system user jdoe@creditmastersystems will have access to all features of both groups. This feature allows for flexibility in the assignment of groups to a user and allows for the potential for elevated or reduced accessibility at the discretion of the system administrator.
System Role Creation
Note: The steps outlined in this section are for information purposes on the usage of this system feature. All new system roles do not automatically become activated but will require implementation into the software code to become usable.
- Navigate the main menu option to select the "Security" sub menu. On the sub menu please select the “Security Roles” option and left click.
- The figure below is a representation of the main roles user interface. This page is used to create and update systems roles that allow users to perform work tasks in the CMSCIS system. The “Grid Filter Options” allows for quick filtering of the main grid to allow for fast location of systems roles based on the selected filter type. Each column on the grid can also be filtered by typing words in the columns. The grid will automatically begin to perform a search based on the provided word criteria and present results in the filtered grid. To clear all filters and reset the grid to its initial state the “ALL” filter in the left filter menu should be clicked.

- Please click on the button labeled “Create New Permission” to activate the role creation / edit popup window shown below.

- Please provide the name of the new role and the description of the new role. Please note that all fields are required on this window. (Note: Required fields will be indicated with a green asterix symbol.)
- Please the “Save New Permission” button to submit the new role with the details provided or click the “Cancel” button to exit the popup window and discard the details of the unsaved role.
- A confirmation window will be presented indicating the role has been saved successfully.
Editing System Roles
- Navigate the main menu option to select the "Security" sub menu. On the sub menu please select the “Security Roles” option and left click.
- Please click on the row in the roles grid list to select the role that is to be edited.
- Please click on the “Edit” grid button in the far right hand corner of the selected grid row. Clicking on the edit button will invoke the role popup window in “Edit” mode. In edit mode only two (2) fields will be updateable, “Description” and “Type”.

- Please click the “Update Permission” button to save the changes made to the security role.
Role Access List
- Navigate the main menu option to select the "Security" sub menu. On the sub menu please select the “Security Roles” option and left click.
- Please click on the row in the roles grid list to select the role that you would like to investigate.
- Please click on the “Details” grid button in the far right hand corner of the selected grid row. Clicking on the “Details” button will invoke the role “Permission User” popup window. This window, shown below, provides a list of all system user accounts that have been granted access to execute the selected grid role.

- The list of users with the granted role can be printed by clicking on the “Print Screen” button
User Group Creation
Note: For a more detailed explanation of the methods and concepts employed in the CMSCIS security system please see Section 1.1 of this manual.
- Navigate the main menu option to select the "Security" sub menu. On the sub menu please select the “Group Definition” menu option and left click.
- The figure below is a representation of the main user group user interface. This page is used to create and update system user groups that allow groups of users to perform similar work tasks in the CMSCIS system. The “Grid Filter Options” allows for quick filtering of the main grid to allow for fast location of systems groups based on the selected filter type. Each column on the grid can also be filtered by typing words in the columns. The grid will automatically begin to perform a search based on the provided word criteria and present results in the filtered grid. To clear all filters and reset the grid to its initial state the “ALL GROUPS” filter in the left filter menu should be clicked. (Note: Inactive groups will appear highlighted as shown below. User accounts cannot be have an inactive group assigned to them)

- Please click on the button labeled “Create User Group” to activate the group creation / edit popup window shown below.

- Please provide the name of the new group and the description of the new group. The “Inactive” checkbox can be used to set the new group as not active for assignment to user accounts. Please note that all fields are required on this window. (Note: Required fields will be indicated with a green asterix symbol.)
- The “In Role(s)” list is used to select “Roles” from the system that have been created in Section 1.2 and grant them to the new user group. Please carefully select the list of roles you would like to grant to the new user group by clicking on the checkbox next to the role in the list. Multiple roles can be selected at a time and saved.
- Please the “Save New Group” button to submit the new user group with the details provided or click the “Cancel” button to exit the popup window and discard the details of the unsaved user group.
- A confirmation window will be presented indicating the group has been saved successfully.
Editing System User Groups
- Navigate the main menu option to select the "Security" sub menu. On the sub menu please select the “Group Definition” option and left click.
- Please click on the row in the group grid list to select the user group that is to be edited.
- Please click on the “Edit” grid button in the far right hand corner of the selected grid row. Clicking on the edit button will invoke the user group popup window in “Edit” mode. In edit mode only two (2) fields will be updateable, “Description” and the “Inactive” checkbox. Additional roles here be added to the selected user group or revoked by either selecting or deselecting the checkbox options next to the pertinent roles in the list.

- Please click the “Update Group” button to save the changes made to the security user group.
Group Users List
- Navigate the main menu option to select the "Security" sub menu. On the sub menu please select the “Group Definition” option and left click.
- Please click on the row in the user group grid list to select the group that you would like to investigate.
- Please click on the “Details” grid button in the far right hand corner of the selected grid row. Clicking on the “Details” button will invoke the role “Group Permissions” popup window. This window, shown below, provides a list of all system access roles that have been granted to the selected user group and can be executed by its users.

- The list of roles granted to the user group can be printed by clicking on the “Print Screen” button.
User Account Creation
Note: For a more detailed explanation of the methods and concepts employed in the CMSCIS security system please see Section 1.1 of this manual. A user account is to be assigned to one system user only. All users of the CMSCIS system should be assigned a personal user account.
User accounts and passwords should never be shared!!
The CMSCIS system does not provide for individual user account creation through the usage of a “Register” feature. All user accounts must be created by a system administrator and granted an initial password. A user can change his or her password if it is compromised at any time once logged into the CMSCIS system.
- Navigate the main menu option to select the "Security" sub menu. On the sub menu please select the “User Definition” menu option and left click.
- The figure below is a representation of the main user management interface. This page is used to create and update system users that allow authenticated user to perform work tasks in the CMSCIS system. The “Grid Filter Options” allows for quick filtering of the main grid to allow for fast location of systems users based on the selected filter type. Each column on the grid can also be filtered by typing words in the columns. The grid will automatically begin to perform a search based on the provided word criteria and present results in the filtered grid. To clear all filters and reset the grid to its initial state the “ALL USERS” filter in the left filter menu should be clicked. (Note: Inactive user accounts will appear highlighted.)

- Please click on the button labeled “Create New User” to activate the system user creation / edit popup window shown below. The popup window is opened in the “Create” mode

- Please provide the email address of the new user account. The “Email” address is used as the “username” in the CMSCIS system. The email box is auto populated with the “@creditmastersystems.com” extension. The administrator is expected to add the first initial and last name of the user as the user email / username as follows, “jdoe@creditmastersystem.com”. If a user account email already exists with the first initial and last name it is possible to use the first name and last name separated by a period as follows, “john.doe@creditmastersystems.com”. Using the email extension is required.
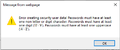
- Please provide a password in the password entry box and retype the password in the confirmation box. All passwords must have at least one (1) upper case letter, one (1) digit numeric value and a non-letter or digit character such as follows (!,@,#,$,%,^,&,*,(,<,),~). If these criteria are not met you will be prompted to make changes to the password field. The administrator will assign a password in this first instance and supply the user email and password to the new system user. A suggested default password for use on new accounts is as follows “Password123$”.
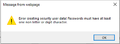
Error 1
Error 2

- Please supply all require fields marked with a green asterix.
- Please select a user group to which the new user account will belong. (Note: A new user account can be created without being assigned to a user group. In that case the user will have no rights in the system and may have access to a few system functions.)
- Please assign any other special features that the user account will carry from the “User Options” section of the new user window.
- Please click the “Save New User” button once all data has been provided for the new user account.
- Successful creation of a new user account will result in a confirmation message from the system.
Edit System User Account Settings
- Navigate the main menu option to select the "Security" sub menu. On the sub menu please select the “User Definition” menu option and left click.
- Please click on the user account row in the user grid list to select the user account that is to be edited.
- Please click on the “Edit” grid button in the far right hand corner of the selected grid row. Clicking on the edit button will invoke the user account popup window in “Edit” mode. In edit mode all fields except the “User Name” field will be updateable.

- Please make the necessary changes to the user account and click the “Update User” button to save the changes to the account. Please note you will not be able to reset a password using this window. The user will need to edit their password after successful login in the far bottom left of the screen page. In this location the user can click on their user name and be taken to a password reset page.
User Details List
- Navigate the main menu option to select the "Security" sub menu. On the sub menu please select the “User Definition” option and left click.
- Please click on the row in the user account grid list to select the user account that you would like to investigate.
- Please click on the “Details” grid button in the far right hand corner of the selected grid row. Clicking on the “Details” button will invoke the role “User’s Group(s)” popup window. This window, shown below, provides a list of all user groups to which the selected user belongs.

- The list of user groups to which the selected user account belongs can be printed by clicking on the “Print Screen” button.
Reset/Change User Account Password
- Please login to the CMSCIS system using your user account credentials. The default landing page for all user accounts after successful authentication is the “Dashboard”. Located at the bottom left corner of all system pages in a section containing two (2) hyperlinks. The first hyperlink navigates to the “Account Settings” management window. The second link labeled “Log off” will terminate the current login session and logs the user out of the CMSCIS system.
- Please click on the hyperlink of the email address of the authenticated user. In the screenshot above the authenticated user is “admin@creditmastersystems.com”. Clicking on the email hyperlink will navigate the browser to the account settings page illustrated below.

- Please click on the “Change your password” hyperlink to be taken to the password reset page as shown below. (Note: The authenticated user is able to use the browser navigation controls to go back to the previous page or click “Dashboard” to be navigated to the system dashboard. The user is also able to “Log off” the CMSCIS system from the above illustrated page.)

- Please supply the current user password and the new user account password followed by a confirmation of the new password. (Note: The new password must conform to the same constraints as outline is step 5 of Section 1.8.)
- Please click the “Change password” button. After successfully changing the password the user will be navigated back to the Account Settings page in step 2. Please click the “Dashboard” link to be taken back to the main CMSCIS system interfaces.
Debtor Information Management
The management of information collected on individual persons and companies is at the very heart of the core functions of the CMSCIS system. Credit Master Systems (CMS) gathers information on debtors primarily from its client contacts who may engage the collection services of CMS to recover outstanding collectible funds from its own clients.
CMSCIS allows for the collection and management of various data points on individual debtor information. The system allows for the recording of multiple debtor addresses, employer details, social media contacts and identification types. CMSCIS maintains a database of scanned debtor documents and allows for these documents to be catalogued, stored and retrieved in an integrated fashion.
The figure below is a representation of the main debtor information interface. This page is used to create and update debtors tracked by the CMSCIS system as well as all personal information data points such as address, employment details, social media contacts, identification types on file, ownership details for companies and scanned document sources. The main debtor information page auto loads with all debtors listed in a paged grid format sorted by “CMS Number” in ascending order.

New Debtor Creation
Note: New debtors are added to the CMSCIS system using a designed wizard interface that seeks to enforce data collection rules as well as performs a mandatory search of existing debtors before proceeding with the creation of new debtor details in the system database.
- Navigate the main menu option to the "Debtor Information" sub menu under the “File” section of the main navigation menu.
- Please locate the “New Debtor” button on the horizontal toolbar menu to initiate the “New Debtor Creation Wizard”. The first page of the creation wizard, “Step 1: Debtor Search”, is designed to perform a database search of existing records of the CMSCIS database. The purpose of this first step is to try to reduce the creation of duplicate records in the database for identical debtors. The figure below shows the first page of the debtor creation wizard completed with a last name “Smith”, a first name “John” and a date of birth “05-May-1956”. (Note: Date entry is expected in the format ‘dd-MMM-yyyy’). The CMSCIS system will use these three (3) parameters to perform a multi tiered search of the CMSCIS database to identify possible matches in the database.

- Please click the “Search” button on the first wizard page to perform the database search with the parameters supplied. Note: All boxes are required.
- The CMSCIS system will perform searches of the database based on an algorithm aimed at locating results on multiple factors (Please see the box “Name Search Algorithm” for more details).

- If the search algorithm produces search results the following two messages will be displayed to the user: • Search result count and advisory to review all search results before proceeding with new record.
Results Message
Review Prompt
- The figure below will be displayed to the user with search results if they are found in the database with an indication of what level search yield the resultant records. It is strongly recommended that search results produced by Level 1 or Level 2 searches be carefully reviewed before creating any new debtor in the CMCIS database to prevent record duplication.

- The search results grid presented in the above image provides a hyperlink on each “CMS#” row that can be used to navigate to the debtor information page for further review of the existing database debtor record, to ensure that the new intended debtor record does not already exist in the database. Note: Clicking on any hyperlink will close the debtor creation wizard and will require the wizard to be started again. Once it is confirmed that the new debtor record that is to be created does not already exist the CMSCIS database please click on the “Next – Debtor Details” button on the “New Debtor Creation Wizard” window. If there were previous search results loaded in the grid, CMSCIS will present a final warning as shown below.

- The below image illustrates “Step 3: Debtor Details” of the debtor creation wizard. Please fill in the required fields such as Last Name, First Name, DOB, Gender and Status. All required fields are noted with a green asterix to the left of the entry box caption.

- Please click the “Next – Address Details” button to be proceed to step four (4) of the creation wizard. The below image demonstrates the “Step 4: Address Details”.

- Please fill in the required fields on Step 4 of the debtor creation wizard. Please provide as much information as possible on the form and click the “Next – Employment Info” button when finished with data entry boxes. The image below is a depiction of the next step in the debtor creation wizard “Step 5: Employer Details”.

- Please fill in the required fields on Step 5 of the debtor creation wizard. Please provide as much information as possible on the form and click the “Next – Identification Details” button when finished with data entry boxes. The image below is a depiction of the next step in the debtor creation wizard “Step 6: Identification Details”.

- Step 6 of the debtor creation wizard defaults to the “SOCIAL SECURITY CARD” identification type and provides for the supply of the other supporting details available on the Social Security Board issued identification card. Please fill in the required fields on Step 6 of the debtor creation wizard. Please provide as much information as possible on the form and click the “Next – Social Media” button when finished with data entry boxes. The image below is a depiction of the final step in the debtor creation wizard “Step 7: Social Media & Maternal Details”.

- Please fill in the required fields on Step 7 of the debtor creation wizard. Please provide as much information as possible on the form and click the “Submit” button when finished with data entry boxes. The image below is a depiction of the final confirmation message that is presented before the submission of the wizard details are sent to the server for storage.

- Upon successful record submission you will be presented with the following confirmation message indicating that the new debtor has been successfully stored in the CMSCIS database.

- After successful submission of the new debtor information to the database the CMSCIS system will conduct an automatic search on the new CMS# issued to the debtor and automatically load the newly created debtor record in the browser window. You will see one record presented in the search grid.
Searching Debtor Information Database
Note: Two methods of searching the CMSCIS debtor information database have been implemented in the debtor information page. These methods are:
- Cross Column Searching
- Automatic grid column search filtering.
Cross Column Searching – The debtor information page has been designed with a “Cross Column Search Box” in the top right corner of the page. This search feature has been designed with the capacity to search multiple grid columns at the same time, looking for matches of search parameters provided by a user.
The debtor information search results grid has a total of 10 columns of displayable data. “Last Name”, “First Name”, “Middle Name”, “CMS Number”, “Social #”, “DOB”, “Status” and “Verified” grid columns are displayed by default. There are two (2) additional columns that are hidden “A.K.A” and “Gender” that can be dragged and dropped onto the grid from the column chooser window.
Please click the “Column Chooser” menu button from the top middle menu toolbar to display the column chooser window.

All grid columns can be dragged and dropped to and from the column chooser list to either add or remove visible columns to the debtor search grid. The cross column search box action is executed across the “Last Name”, “First Name”, “Middle Name”, “A.K.A”, “CMS Number”, “Social #” and “DOB” columns of the debtor information grid. This means that CMSCIS will actively look for matching records in each of these columns.
Please ensure all grid column filters are cleared by clicking the “Clear Grid Filters” button before proceeding with this search feature.
- Locate the Cross Column Search box in the top right hand corner of the Debtor Information page as illustrated in the below image.

- Please type the search text that you would like the CMSCIS system to locate in the debtor information database. (Note: The system is capable of locating records based on complete words and partial words or what is termed a “substring” of a word.) As an example lets type the following in the search box “john young” and hit the enter key on your keyboard. The system will return all records where the word “john” or the word “young” appears in any of the grid columns. (Note: Words must be separated by a single space for them to be treated as individual search words by the CMSCIS search system.)
- Let’s now type the words “joh youn” which represents substrings of both the first and last names to be located in the database. The search algorithm will return all columns where the search words are found in entirety or partially. This time you may note more records are retrieved from the database as the search parameters allow for a wider search range and subsequent potential matches.
- We can further add search parameters to fine tune the search results. In this case please type “john young 5”. In this case only one database record may be returned corresponding to one debtor having details matching the search combination.

- The above diagram shows the matching search result of “YOUNG JOHN ALEXANDER” with CMS# ‘745’ and Social Security number ‘000010895’, Date of Birth Jan-24-1938 who is ‘DECEASED’ and the record not verified. The system matched ‘YOUNG JOHN’ and the number 5 appearing in the CMS# and the Social# columns, a singular record was located. If the search string was changed to “joh youn 5”, the CMSCIS system would instead locate two (2) records as shown below. (Please scroll to the top of the results grid to view all returned search results.)

- The above screenshot shows that there are now two (2) records that match the “joh youn 5” pattern. The second record now qualifies and matches the pattern as the ‘Middle Name’ of the now included record has a value of ‘JOHANNA’ a social security number of ‘000365927’ and a date of birth of ‘Sep-25-1992’. The cross column search feature is therefore a powerful tool in locating records in the CMSCIS debtor information database.
- In order to clear the search results and refresh the grid to its original state, please clear all text from the search box and hit the “Enter” key on your keyboard.
Automatic grid column search filtering – The debtor information page has been designed with a debtor information grid that displays search results for debtors stored in the CMSCIS database. This grid is comprised of 10 columns that can be custom organized, hidden or displayed.
Each of the ten (10) grid columns is equipped with an editable filter box with a filter setting associated with it and can be accessed by clicking the filter icon next to the column filter box on each grid column. The default filter setting on nine (9) of the ten grid columns is “Contains”. This means the grid search will seek to find matching records that contain the provided search parameter in any part of the grid row data for that column.

The ‘CMS Number’ column is the only column that has a different filter setting. This column has a default filter setting of “Equals”. This setting will only locate records that exactly match the search parameter or CMS number in this case provided.

The “Last Name”, “First Name”, “Middle Name”, “CMS Number”, “Social #”, “DOB”, “Status” and “Verified” grid columns are displayed by default. There are two (2) additional columns that are hidden “A.K.A” and “Gender” that can be dragged and dropped onto the grid from the column chooser window.
Please click the “Column Chooser” menu button from the top middle menu toolbar to display the column chooser window. All grid columns can be dragged and dropped to and from the column chooser list to either add or remove visible columns to the debtor information search grid.
- On the Debtor Information page please click the “Clear Grid Filters” from the top tool bar menu. Please also clear the “Cross Column” search box located in the top right corner of the page by selecting all text in the box and deleting the contents.
- Click inside the ‘CMS Number’ column filter box and type ‘4321’. The gird will automatically begin to perform the filter operation on the grid based on the parameter provided within 3 seconds after typing has terminated in the box.
- The grid will display all records having a CMS number of 4321. In this case the debtor information record for ‘MIGUEL ANGEL VEGA’ will be presented in the filtered grid.
- We will now perform a search for all persons with the last name “YOUNG” and first name “ANN”. On the Debtor Information page please click the “Clear Grid Filters” from the top tool bar menu. Please also clear the “Cross Column” search box located in the top right corner of the page by selecting all text in the box and deleting the contents.
- Click inside the ‘Last Name’ column filter box and type ‘young’. The gird will automatically begin to perform the filter within 3 seconds. Please click inside the ‘First Name’ column filter box and type ‘ann’. The gird will automatically begin to perform the filter within 3 seconds. There will now be at least sixteen (16) records located in the debtor information database have a last name containing the word ‘young’ and a first name containing the word ‘ann’. There will also be records with first names including ‘ANN’, ‘ANNA’, ‘ANNA-FRID’, ‘ANNALEE’, ‘JOVANNIE’, ‘LYANN’ and ‘SHANNON’. This is based on the ‘Contains’ filter setting on the grids. The system will look for any and all first names where the search parameter is ‘contained’ in the name. (Please scroll to the top of the grid to view all search records.)
- Additional columns can be added be filters simultaneously to further fine tune and filter search results. Therefore the automatic grid filter search feature is a powerful tool in locating debtor information in the CMSCIS database.
- Please click the “Clear Grid Filters” button on the top toolbar menu to clear all grid filters and restore the grid to its original unfiltered state.
- There are a few preset filter options provided on the toolbar menu under the button “Quick Filters”. These filters can be a quick starting point in locating all “DECEASED” debtors or a list of all “VERIFIED” debtor records.
Addresses: Modify & Create Debtor Information
Note: New debtors are added to the CMSCIS system using a designed wizard interface that seeks to enforce data collection rules as well as performs a mandatory search of existing debtors before proceeding with the creation of new debtor details in the system database. During this process details of the current address of the debtor is gathered and stored under the “Addresses” tab page of the Debtor Information page. Additional address information can be added or updated under this section of the debtor information page.
- Navigate the main menu option to the "Debtor Information" sub menu under the “File” section of the main navigation menu.
- Perform a search for the debtor in the CMSCIS system using section 2.2 of this manual and select the debtor record from the results grid.
- Select the “Addresses” tab page on the lower half of the debtor information page to view and edit the existing addresses held on record for the selected debtor.
- If the selected debtor has address on file they will be presented in the “Address List” grid. The image below shows the “Addresses” tab page selected with the “Address List” displayed and showing the total list of address on file for the selected debtor.

- In the image above one (1) grid button option is available, “Edit”. Clicking on the “Edit” grid button will load the selected address record in the edit popup window as show below. In this window you are able to make changes to the debtor address record and update the CMSCIS database. Please make any necessary changes to the selected address record and click the “Update” button. (Note: Please note that only one (1) address record can be marked as “CURRENT” and will be reflected as the “Current Address” on all reports from the system as well as on the “Details” tab for the selected debtor information record. Updating any address with the “CURRENT” status will reset all other address on record to “PREVIOUS”.)

- Clicking the “Print” button on the above address details form popup will export a screenshot of the address form with its details to a printable form.
- Please click the “New Debtor Address” button to open the debtor address entry window as shown below. This form is used to create new address records in the database for the selected debtor.

- Please fill in all required fields on the form, as indicated by green asterix (*), and click the “Update” button to complete the creation process. The note at step 5 will still apply.
- The “Audit History” tab is also available to view the log of changes made to the debtor address records. Please select an employer record from the “Address List” grid. Please select the dates during which changes may have occurred to the selected address record and click the “Search” button. The grid results can then be exported to excel format using the “Export” button.
Addresses: Audit History
Note: Debtor address information can be updated by a user at any time. The process of updating the address information for a debtor is tracked and an audit trail of these changes is kept in the CMSCIS system. (Note: Debtor address information activity is not record by specific actions of updated fields but rather is stored as a snapshot of all fields at the time the update operation is performed. This means that a comparison of rows of audit records must be done to ascertain what field was updated and on what date.)
- Navigate the main menu option to the "Debtor Information" sub menu under the “File” section of the main navigation menu.
- Perform a search for the debtor in the CMSCIS system using section 2.2 of this manual and select the debtor record from the results grid.
- Select the “Addresses” tab page on the lower half of the debtor information page to view and edit the existing addresses held on record for the selected debtor.
- Please click on a specific address record as the first step to viewing the corresponding audit detail records for the selected debtor address record.
- A secondary tab page entitled “Audit History” is also available that allows you to see all the user changes and updates made to the selected customer address record. To view these records please click on the “Audit History” tab page to reveal the address details audit grid. On this new tab page there are two date boxes a “Search” button and an “Export” button.
- Please select a starting and ending date range that you would like to make a query audit information on. Based on the dates selected record may or may not be displayed. If records are located the “Export” button will become active that you can use to export the grid information into an Excel (.xlsx) file format for further investigation and review.
Employers: Modify & Create Debtor Information
Note: New debtors are added to the CMSCIS system using a designed wizard interface that seeks to enforce data collection rules as well as performs a mandatory search of existing debtors before proceeding with the creation of new debtor details in the system database. During this process details of the current employer of the debtor is gathered and stored under the “Employers” tab page of the Debtor Information page. Additional employment information can be added or updated under this section of the debtor information page.
- Navigate the main menu option to the "Debtor Information" sub menu under the “File” section of the main navigation menu.
- Perform a search for the debtor in the CMSCIS system using section 2.2 of this manual and select the debtor record from the results grid.
- Select the “Employers” tab page on the lower half of the debtor information page to view and edit the existing employer details held on record for the selected debtor.
- If the selected debtor has employers on file they will be presented in the “Employers List” grid. The image below shows the “Employers” tab page selected with the “Employers List” displayed and showing the total list of employers on file for the selected debtor.

- In the image above one (1) grid button option is available, “Edit”. Clicking on the “Edit” grid button will load the selected employer record in the edit popup window as show below. In this window you are able to make changes to the debtor employer record and update the CMSCIS database. Please make any necessary changes to the selected employer record and click the “Update” button. (Note: Please note that only one (1) employer record can be marked as “CURRENT” and will be reflected as the “Employer” on all reports from the system as well as on the “Details” tab for the selected debtor information record. Updating any employer record with the “CURRENT” status will reset all other employers on record to “PREVIOUS”.)

- Clicking the “Print” button on the above employer details form popup will export a screenshot of the employer form with its details to a printable form.
- Please click the “New Employer Details” button to open the debtor employer entry window as shown below. This form is used to create new employer records in the database for the selected debtor.

- Please fill in all required fields on the form, as indicated by green asterix (*), and click the “Update” button to complete the creation process. The note at step 5 will still apply.
- The “Audit History” tab is also available to view the log of changes made to the debtor employer records. Please select an employer record from the “Employers List” grid. Please select the dates during which changes may have occurred to the selected employer record and click the “Search” button. The grid results can then be exported to excel format using the “Export” button.
Employers: Audit History
Note: Debtor employer information can be updated by a user at any time. The process of updating the employer information for a debtor is tracked and an audit trail of these changes is kept in the CMSCIS system. (Note: Debtor employer information activity is not record by specific actions of updated fields but rather is stored as a snapshot of all fields at the time the update operation is performed. This means that a comparison of rows of audit records must be done to ascertain what field was updated and on what date.)
- Navigate the main menu option to the "Debtor Information" sub menu under the “File” section of the main navigation menu.
- Perform a search for the debtor in the CMSCIS system using section 2.2 of this manual and select the debtor record from the results grid.
- Select the “Employers” tab page on the lower half of the debtor information page to view and edit the existing employer held on record for the selected debtor.
- Please click on a specific employer record as the first step to viewing the corresponding audit detail records for the selected debtor employer record.
- A secondary tab page entitled “Audit History” is also available that allows you to see all the user changes and updates made to the selected customer employer record. To view these records please click on the “Audit History” tab page to reveal the employer details audit grid. On this new tab page there are two date boxes a “Search” button and an “Export” button.
- Please select a starting and ending date range that you would like to make a query audit information on. Based on the dates selected record may or may not be displayed. If records are located the “Export” button will become active that you can use to export the grid information into an Excel (.xlsx) file format for further investigation and review.
Social Media Contacts: Modify & Create Debtor Information
Note: New debtors are added to the CMSCIS system using a designed wizard interface that seeks to enforce data collection rules as well as performs a mandatory search of existing debtors before proceeding with the creation of new debtor details in the system database. During this process details of the current social media contact of the debtor is gathered and stored under the “Social Media” tab page of the Debtor Information page. Additional social media contact information can be added or updated under this section of the debtor information page.
- Navigate the main menu option to the "Debtor Information" sub menu under the “File” section of the main navigation menu.
- Perform a search for the debtor in the CMSCIS system using section 2.2 of this manual and select the debtor record from the results grid.
- Select the “Social Media” tab page on the lower half of the debtor information page to view and edit the existing social media details held on record for the selected debtor.
- If the selected debtor has social media details on file they will be presented in the “Social Media List” grid. The image below shows the “Social Media” tab page selected with the “Social Media List” displayed and showing the total list of social media contacts on file for the selected debtor.

- In the image above one (1) grid button option is available, “Edit”. Clicking on the “Edit” grid button will load the selected social media record in the edit popup window as show below. In this window you are able to make changes to the debtor social media record and update the CMSCIS database. Please make any necessary changes to the selected social media record and click the “Update” button.

- Clicking the “Print” button on the above social media details form popup will export a screenshot of the social media form with its details to a printable form.
- Please click the “New Social Media Contact” button to open the debtor social media entry window as shown below. This form is used to create new social media records in the database for the selected debtor.

- Please fill in all required fields on the form, as indicated by green asterix (*), and click the “Update” button to complete the creation process.
- The “Audit History” tab is also available to view the log of changes made to the debtor social media records. Please select a social media record from the “Social Media List” grid. Please select the dates during which changes may have occurred to the selected social media record and click the “Search” button. The grid results can then be exported to excel format using the “Export” button.
Social Media Contacts: Audit History
Note: Debtor social media information can be updated by a user at any time. The process of updating the social media information for a debtor is tracked and an audit trail of these changes is kept in the CMSCIS system. (Note: Debtor employer information activity is not record by specific actions of updated fields but rather is stored as a snapshot of all fields at the time the update operation is performed. This means that a comparison of rows of audit records must be done to ascertain what field was updated and on what date.)
- Navigate the main menu option to the "Debtor Information" sub menu under the “File” section of the main navigation menu.
- Perform a search for the debtor in the CMSCIS system using section 2.2 of this manual and select the debtor record from the results grid.
- Select the “Social Media” tab page on the lower half of the debtor information page to view and edit the existing social media contacts held on record for the selected debtor.
- Please click on a specific social media contact record as the first step to viewing the corresponding audit detail records for the selected debtor social media contact record.
- A secondary tab page entitled “Audit History” is also available that allows you to see all the user changes and updates made to the selected customer social media contact record. To view these records please click on the “Audit History” tab page to reveal the social media contact details audit grid. On this new tab page there are two date boxes a “Search” button and an “Export” button.
- Please select a starting and ending date range that you would like to make a query audit information on. Based on the dates selected record may or may not be displayed. If records are located the “Export” button will become active that you can use to export the grid information into an Excel (.xlsx) file format for further investigation and review.
Identification Sources: Modify & Create Debtor Information
Note: New debtors are added to the CMSCIS system using a designed wizard interface that seeks to enforce data collection rules as well as performs a mandatory search of existing debtors before proceeding with the creation of new debtor details in the system database. During this process details of the social security information of the debtor is gathered and stored under the “Identification Sources” tab page of the Debtor Information page. Additional ID types can be added or updated under this section of the debtor information page.
- Navigate the main menu option to the "Debtor Information" sub menu under the “File” section of the main navigation menu.
- Perform a search for the debtor in the CMSCIS system using section 2.2 of this manual and select the debtor record from the results grid.
- Select the “Identification Sources” tab page on the lower half of the debtor information page to view and edit the existing ID details held on record for the selected debtor.
- If the selected debtor has ID details on file they will be presented in the “Identification List” grid. The image below shows the “Identification Sources” tab page selected with the “Identification List” displayed and showing the total list of ID types on file for the selected debtor.

- In the image above one (1) grid button option is available, “Edit”. Clicking on the “Edit” grid button will load the selected ID record in the edit popup window as show below. In this window you are able to make changes to the debtor ID type record and update the CMSCIS database. Please make any necessary changes to the selected ID type record and click the “Update” button. (Note: ID type changes for Social Security #, Driver’s License, Passport and Voter ID types are synced with the “Details” tab page section labeled “Debtor Identification Information” and can only be edited from each individual record under the “Identification List” tab.)

- Clicking the “Print” button on the above ID details form popup will export a screenshot of the ID type form with its details to a printable form.
- Please click the “New Identification Type” button to open the debtor ID type entry window as shown below. This form is used to create new ID type records in the database for the selected debtor.

- Please fill in all required fields on the form, as indicated by green asterix (*), and click the “Update” button to complete the creation process.
- The “Audit History” tab is also available to view the log of changes made to the debtor ID type records. Please select an ID type record from the “Identification List” grid. Please select the dates during which changes may have occurred to the selected ID type record and click the “Search” button. The grid results can then be exported to excel format using the “Export” button.
Identification Sources: Audit History
Note: Debtor identification information can be updated by a user at any time. The process of updating the identification information for a debtor is tracked and an audit trail of these changes is kept in the CMSCIS system. (Note: Debtor employer information activity is not record by specific actions of updated fields but rather is stored as a snapshot of all fields at the time the update operation is performed. This means that a comparison of rows of audit records must be done to ascertain what field was updated and on what date.)
- Navigate the main menu option to the "Debtor Information" sub menu under the “File” section of the main navigation menu.
- Perform a search for the debtor in the CMSCIS system using section 2.2 of this manual and select the debtor record from the results grid.
- Select the “Identification Sources” tab page on the lower half of the debtor information page to view and edit the existing identification sources held on record for the selected debtor.
- Please click on a specific identification record as the first step to viewing the corresponding audit detail records for the selected debtor identification record.
- A secondary tab page entitled “Audit History” is also available that allows you to see all the user changes and updates made to the selected customer social media contact record. To view these records please click on the “Audit History” tab page to reveal the identification details audit grid. On this new tab page there are two date boxes a “Search” button and an “Export” button.
- Please select a starting and ending date range that you would like to make a query audit information on. Based on the dates selected record may or may not be displayed. If records are located the “Export” button will become active that you can use to export the grid information into an Excel (.xlsx) file format for further investigation and review.
Ownership Details: Modify & Create Debtor Information
Note: The CMSCIS system is designed to store individual debtor information as well as information on entities like companies. It is with this information in mind that ownership details of the entity can be entered and managed in the CMSCIS system.
- Navigate the main menu option to the "Debtor Information" sub menu under the “File” section of the main navigation menu.
- Perform a search for the debtor in the CMSCIS system using section 2.2 of this manual and select the debtor record from the results grid.
- Select the “Ownership” tab page on the lower half of the debtor information page to view and edit the existing ownership details held on record for the selected debtor.
- If the selected debtor has owner details on file they will be presented in the ownership grid. The image below shows the “Ownership” tab page selected showing the total list of owners on file for the selected debtor.

- In the image above one (1) grid button option is available, “Edit”. Clicking on the “Edit” grid button will load the selected ownership details record in the edit popup window as show below. In this window you are able to make changes to the debtor ownership record and update the CMSCIS database. Please make any necessary changes to the selected ownership record and click the “Update” button.

- Clicking the “Print” button on the above ownership details form popup will export a screenshot of the ownership form with its details to a printable form.
- Please click the “New Owner Details” button to open the ownership record entry window as shown below. This form is used to create new ownership records in the database for the selected debtor.

- Please fill in all required fields on the form, as indicated by green asterix (*), and click the “Update” button to complete the creation process. (Note: The ‘Owner PCR’ entry box is a searchable dropdown combo box that searches the database for debtors with PCR#s or names that match what is entered automatically. Three columns are displayed during searching to allow for ease of identification of the required debtor PCR number. Once a PCR selection is made from the list the ‘Owner Name’ box is automatically populated based on the debtor PCR selection.)
Scanned Documents Management
Note: The ‘Debtor Information’ module of the CMSCIS system is designed with features to upload and manage documents, photos, videos and audio files pertaining to specific aspects of a debtor that may be gathered over time and are required for reference. These documents and photos can be in the following format extensions: .jpg, .jpeg, .gif, .rtf, .txt, .avi, .png, .mp3, .xml, .doc, .pdf.
The management of these files is accomplished using the “files and folders” methodology of storage, meaning that file folders may be created and files can then be organized in their corresponding folders for ease of reference. A list of predefined folders has been created as a start and may be expanded as required. File folders may be renamed and moved to other folders for better organization.
On the “Details” tab page of the Debtor Information module window there is a ‘Photo’ control that is used to display a cropped picture of a debtor. This photo control will display one and only one picture once a photo is uploaded and stored under the ‘PERSONAL PHOTO’ folder of the ‘Scanned Documents’ tab page for a selected debtor. This photo must be cropped and centered before it is uploaded to the CMSCIS system.
The image below is an illustration of the “Scanned Documents” tab page and is used to upload and store documents, photos, videos and audio files that are desired for a debtor.

Scanned Documents File Upload (Personal Photo)
- Navigate the main menu option to the "Debtor Information" sub menu under the “File” section of the main navigation menu.
- Perform a search for the debtor in the CMSCIS system using section 2.2 of this manual and select the debtor record from the results grid.
- Select the “Scanned Documents” tab page on the lower half of the debtor information page to view and edit the existing scanned documents held on record for the selected debtor.
- Please select the “PERSONAL PHOTO” folder from the “Person Documents” file system located in the tree-view panel on the left side of the “Scanned Documents” tab page.
- Select the “Browse” button located in the bottom right corner of the “Scanned Documents” tab page. This button will open a file window that will allow you to locate the desired photo from the local PC file system. Please locate the desired file to attach to the selected debtor. (Note: The file used in this example is called ‘Headshot2.jpg’.)
- Once a desired file is selected from the local file structure of the PC the “Upload” link button will activate, located on the bottom right of the scanned documents tab page. Clicking on this button will upload the selected file to the CMSCIS database and store the uploaded file under the “PERSONAL PHOTO” file folder.
- Only one photo is required under the “PERSONAL PHOTO” folder. Once a photo is stored under this folder for a selected debtor record it will be displayed on the “Details” tab page for the debtor.
Scanned Documents File Renaming
- Navigate the main menu option to the "Debtor Information" sub menu under the “File” section of the main navigation menu.
- Perform a search for the debtor in the CMSCIS system using section 2.2 of this manual and select the debtor record from the results grid.
- Select the “Scanned Documents” tab page on the lower half of the debtor information page to view and edit the existing scanned documents held on record for the selected debtor.
- Please locate the “PERSONAL PHOTO” folder in the tree view left panel of the Scanned Documents tab page. Please locate the file with the name “Headshot2.jpg” from step 1 above.
- Right mouse click on the photo to display a mini menu as shown below.

- This menu can used to ‘Rename’ the selected file to a name that best matches what the file represents. In this case we can now rename the file to ‘Headshot.jpg’. Please note that the file extension is required and cannot be removed during the renaming process. To successfully rename the file it must have the ‘.jpg’ extension in this case. If the file has another file extension such as ‘.jpeg’, ‘.gif’ etc these file extension names must be preserved during the rename process.
Scanned Documents Create New Folder
- Navigate the main menu option to the "Debtor Information" sub menu under the “File” section of the main navigation menu.
- Perform a search for the debtor in the CMSCIS system using section 2.2 of this manual and select the debtor record from the results grid.
- Select the “Scanned Documents” tab page on the lower half of the debtor information page to view and edit the existing scanned documents held on record for the selected debtor.
- Please select the location where you would like to create the new folder. The main parent folder is called ‘Person Documents’. If a new folder is required under this main folder then right click on the ‘Person Documents’ folder from the tree view file folders panel located on the left side of the ‘Scanned Documents’ tab page. Type the name of the new folder and hit the enter key on your keyboard.
- The new file folder will now appear at the bottom of the tree-view and will be visible under all debtor records for the storage of documents.
Scanned Documents Download & View Uploaded Files
- Navigate the main menu option to the "Debtor Information" sub menu under the “File” section of the main navigation menu.
- Perform a search for the debtor in the CMSCIS system using section 2.2 of this manual and select the debtor record from the results grid.
- Select the “Scanned Documents” tab page on the lower half of the debtor information page to view and edit the existing scanned documents held on record for the selected debtor.
- Please select the file folder location to view all files stored under the file folder.
- Double click the file you want to view and the CMSCIS system will automatically perform a download of the file to your local PC. The downloaded file link will appear at the bottom of your web browser window in Microsoft Edge browser or a “Save As” window will appear in Chrome browser that will allow you to store the file download in a folder of your choice.
- The downloaded file will appear as a link at the bottom of your web browser. Please double click on the file to view its contents on your local PC.
Audit Trail: Search & View Activity
Note: The CMSCIS system has been designed to record edits and updates made to a debtor record using an audit trail. The activities performed on a debtor record can be viewed and exported using the “Audit Trail” tab page on the Debtor Information page. '(Note: Debtor information activity is not record by specific actions of updated fields but rather is stored as a snapshot of all fields at the time the update operation is performed. This means that a comparison of rows of audit records must be done to ascertain what field was updated and on what date.)'
- Navigate the main menu option to the "Debtor Information" sub menu under the “File” section of the main navigation menu.
- Perform a search for the debtor in the CMSCIS system using section 2.2 of this manual and select the debtor record from the results grid.
- Select the “Audit Trail” tab page on the lower half of the debtor information page to view the audit trail records held on for the selected debtor.
- The audit trail grid will not automatically load records for review, but instead loads records on demand based on a date range. The date range is preset to a span of three months based on the current system date. Please click the “Search” button to locate records based on the dates supplied to the “Start” and “End” date boxes.
- If search results are located for the selected date range they will be presented in the Audit Trail grid as shown below.

Audit Trail: Export Audit Activity
- Navigate the main menu option to the "Debtor Information" sub menu under the “File” section of the main navigation menu.
- Perform a search for the debtor in the CMSCIS system using section 2.2 of this manual and select the debtor record from the results grid.
- Select the “Audit Trail” tab page on the lower half of the debtor information page to view the audit trail records held on for the selected debtor.
- Please perform a search of the audit records as outlined above in section 2.9. (Note: The “Export” button will become active only after a search operation has been performed.)
- Please click the “Export” button to download an Excel (.xlsx) file version of the grid results.
Audit Trail: Print Audit Report
- Navigate the main menu option to the "Debtor Information" sub menu under the “File” section of the main navigation menu.
- Perform a search for the debtor in the CMSCIS system using section 2.2 of this manual and select the debtor record from the results grid.
- Select the “Audit Trail” tab page on the lower half of the debtor information page to view the audit trail records held on for the selected debtor.
- Please perform a search of the audit records as outlined above in section 2.9.
- Please click the “Print Audit Report” button to display the “Debtor Audit Report” form as shown below. This form is used to create a formatted printable report of debtor audit activity.

Debtor Details: Update Debtor Information
- Navigate the main menu option to the "Debtor Information" sub menu under the “File” section of the main navigation menu.
- Perform a search for the debtor in the CMSCIS system using section 2.2 of this manual and select the debtor record from the results grid.
- On the “Details” tab page on the lower half of the debtor information page the details of the debtor will be displayed as well as editable fields. (Note: Non-editable fields are colored with a light grey background. Please hover-over the mouse pointer on the greyed out boxes for an indication of what corresponding tab page to utilize to update the details displayed in the box.)
- Please update the details of the debtor as desired and click the “Update Debtor Information” button to save the changes. The debtor “Details” page will automatically be refreshed after successful save procedure.
Comments: Create & Modify Debtor Comments Information
Note: The Debtor Information module of the CMSCIS system has been designed with a comments tracking system for each debtor record stored in the database. This comments feature can be used to keep track of portions of information such as historical details pertaining to a debtor record including the reasons for address changes or any other details that you would like to be noted about a debtor record for future reference. The comments tracking system notes the date a comment is recorded as well as the user that performed the entry creation. Comments records can also be updated and modified.
- Navigate the main menu option to the "Debtor Information" sub menu under the “File” section of the main navigation menu.
- Perform a search for the debtor in the CMSCIS system using section 2.2 of this manual and select the debtor record from the results grid.
- On the “Details” tab page on the lower half of the debtor information page the details of the debtor will be displayed as well as editable fields.
- Please click on the “Comments” button located on the “Details” page of the selected debtor record. Clicking on this button will display the “Debtor Comments” popup window as shown below.

- The “Debtor Comments” window will automatically load will all comments that have previously been stored on the debtor sorted in descending order by “Date Recorded”.
- To update a debtor comment record, please select the comment record from the grid to display its details in the lower half of the comments window in the comments memo box. The mode of the window will switch to “UPDATE”. Please update the text in the comments memo box and click on the “Update Record” button to submit the changes to the database.
- To create a new comment record for the selected debtor please click on the “New Comment” button. The mode of the window will switch to “New”. Please insert the new comment(s) text into the comments memo box and click on the “Save New” button to submit the new debtor comment to the database.
Tracking: Modify & Create Debtor Information
Note: The Debtor Information module of the CMSCIS system has been designed with a tracking system for each debtor record stored in the database. This tracking feature can be used to mark a debtor record for a period of tracking defined by the user. Marking a debtor with a tracking record indicates that the debtor’s whereabouts are currently unknown and CMS is actively seeking the debtor on behalf of a client. The “Debt Manager” module of the CMSCIS system uses this information to display notifications to the user of the tracking status of a debtor.
- Navigate the main menu option to the "Debtor Information" sub menu under the “File” section of the main navigation menu.
- Perform a search for the debtor in the CMSCIS system using section 2.2 of this manual and select the debtor record from the results grid.
- On the “Details” tab page on the lower half of the debtor information page the details of the debtor will be displayed as well as editable fields.
- Please click on the “Tracking” button located on the “Details” page of the selected debtor record. Clicking on this button will display the “Tracking Status” popup window as shown below.
- The “Tracking Status” window will automatically load with all debtor tracking record entries that have previously been stored on the debtor, sorted in descending order by “Tracking #”.
- To update a debtor tracking record, please select the record from the grid to display its details in the lower half of the tracking window in the details section. The mode of the window will switch to “UPDATE”. Please update the text in the entry box and click on the “Update Record” button to submit the changes to the database.
- To create a new tracking record for the selected debtor please click on the “New Tracking” button. The mode of the window will switch to “New” and the cursor will be set on the “Starting Date” entry box. Please insert the tracking details into the entry boxes and click on the “Save New” button to submit the new debtor tracking record to the database
Deactivate & Activate Debtor Records
Note: Debtor records can be in two (2) states, Active and Deactivated. A notification will be presented to the user if a debtor record has been deactivated.
- Navigate the main menu option to the "Debtor Information" sub menu under the “File” section of the main navigation menu.
- Perform a search for the debtor in the CMSCIS system using section 2.2 of this manual and select the debtor record from the results grid.
- On the “Details” tab page on the lower half of the debtor information page the details of the debtor will be displayed as well as editable fields.
- The top menu bar of the Debtor Information module page is designed with a button captioned as either “Deactivate” or “Activate” depending on the state of the debtor record. To deactivate an active debtor record please click on the top menu button captioned “Deactivate”. The CMSCIS system will prompt you with a notification asking “Deactivate this PCR Account?” select “OK” from the system notification to proceed with the deactivation action. The CMSCIS system will thereafter notify you of the completion of the deactivation action with the following message “The selected person / company record has been ‘Deactivated’!”.
- To activate a deactivated debtor record please click on the top menu button captioned “Activate”. The CMSCIS system will prompt you with a notification asking “Activate this PCR Account?” select “OK” from the system notification to proceed with the activation action. The CMSCIS system will thereafter notify you of the completion of the activation action with the following message “The selected person / company record has been ‘Activated’!”.
Debt History View
Note: Debtor information collected by the CMSCIS system may be included on debts turned over to CMS by clients. A brief summary of these debts can be viewed using the “Debt History” tab page feature on the Debtor Information page.
- Navigate the main menu option to the "Debtor Information" sub menu under the “File” section of the main navigation menu.
- Perform a search for the debtor in the CMSCIS system using section 2.2 of this manual and select the debtor record from the results grid.
- On the “Debt History” tab page on the lower half of the debtor information page a listing of all debt records will be displayed in grid format. Each debt record is equipped with a “View” button that allows you to see a brief overview of the selected debt record.
- Please select the debt record desired from the history grid. Please click the “View” button on the selected debt record to display the “Debt Details Form” with the details of the selected debt record as shown below.

- The ‘Debt Details Form’ shown above is a non-editable form for information purposes only. Hitting the “Print” button will generate a screen capture of the ‘Debt Details Form’.
PCI (Personal Complaint Information) Issuance
Note: Debtors are scored in the CMSCIS system using a score called a C-Score made up of two (2) numbers combined, a count of complaints made by clients against a debtor combined with a count of complaints settled by the debtor.
The Debtor Information module of the CMSCIS system allows for the creation of a printed document bearing the C-Score of a debtor called a ‘PCI’ or Personal Complaint Information. Each PCI document is issued with an expiration date of three (3) days after issuance which is printed on the document in combination with a serial number located at the very bottom of the document. The serial number feature therefore renders each printed PCI document unique.
- Navigate the main menu option to the "Debtor Information" sub menu under the “File” section of the main navigation menu.
- Perform a search for the debtor in the CMSCIS system using section 2.2 of this manual and select the debtor record from the results grid.
- On the “Details” tab page on the lower half of the debtor information page the details of the debtor will be displayed as well as editable fields.
- The top menu bar of the Debtor Information module page is designed with a button captioned as “Issue PCI”. Please click on this button to display the “Issue PCI Certificate / Credit History” window as shown below.

- Please set the “Requested By” box to the name of the client or business requesting the document. This field is defaulted to “PERSONAL” to indicate the PCI document is being requested by the debtor. Searching this data entry combo box should be done using the name of the desired client and clicking the client name from the search results presented in the dropdown box.
- Please supply any additional comments in the “Additional Comments (Printed on PDI)” data entry box. As is stated in the caption of this data entry box, any comments supplied will be printed on the PCI document. All other fields on this form are read-only and cannot be edited.
- The ‘Complaint Date’ date entry box may be updated using the “Change Date” button. To change the ‘Complaint Date’ value on the form please supply a new date value into the “Change last settlement to” date entry box and click the “Change Date” button. The CMSCIS system will present a notification message asking ‘Are you sure you want to change the settlement date?’. If your user account has sufficient rights to change the settlement date field for the selected debtor the procedure will complete else the following message will be displayed “Error updating ‘Settlement Date’! Insufficient rights to ‘CHG_SETTLEMENT’”, in this case you will need to be granted rights by a system administrator to perform this procedure.
- Please click the “Issue PCI” to generate the PCI report in a new tab page window. The report window will have a control bar, as shown below, that allows for the printing and export of the PCI report document. Please click on the export button
 and select the ‘PDF’ format to save a pdf version of the PCI report.

- The ‘Issue PCI Certificate/Credit History’ form is also designed to provide a ‘Complaint History (Detailed)’ report. This report provides a detailed listing of complaint activity as a supporting document to the PCI score report. To generate this report please click on the “Details” button on the ‘Issue PCI Certificate/Credit History’ form.
Debtor CMS Online Search History
Note: The CMSCIS system has also been integrated into the CMS Online website data processes. The CMS Online system allows for registered clients of CMS to be able to search their online database for PCI reports and scores on debtors that may become CMS client customers. The CMS Online system is hosted using the following domain name https://www.creditmastersystems.com/.
Searches are conducted for debtors using the CMS Online website and this search data is pipelined to the CMSCIS system for review. There is an “Online History” button located on the main menu bar of the ‘Debtor Information’ index page. This button displays an “Online Search History” form that allows you to view the online search activity for a selected debtor.
- Navigate the main menu option to the "Debtor Information" sub menu under the “File” section of the main navigation menu.
- Perform a search for the debtor in the CMSCIS system using section 2.2 of this manual and select the debtor record from the results grid.
- On the “Details” tab page on the lower half of the debtor information page the details of the debtor will be displayed as well as editable fields.
- The top menu bar of the Debtor Information module page is designed with a button captioned as “Online History”. Please click on this button to display the “Online Search History” window as shown below.

- The “Online Search History” popup window is equipped with two (2) date edit boxes that are used to define a date range, start and end, within which online search entries can be retrieved from the CMS Online system. Please provide a date range and click the “Search” button to view the results. Online Search history results can then be exported to Excel format using the “Export to XLSX” button.
Debtor Information Quick Filters
Note: The Debtor Information page of the CMSCIS system has been designed with a few quick filters that will automatically sort the debtor information based on some preset filters as outlined below:

- ALL ALIVE – Show all debtors that are ‘ALIVE’.
- ALL DECEASED – Show all debtors that are ‘DECEASED’.
- ALL VERIFIED – Show all ‘VERIFIED’ debtor records.
- ALL UNVERIFIED – Show all ‘UNVERIFIED’ debtor records.
- ALL MALES – Show all ‘MALE’ gender debtors.
- ALL FEMALES – Show all ‘FEMALE’ gender debtors.
The above grid quick filters can be used in combination with the search features outline in ‘Section 2.2 – Searching Debtor Information Database’ of this manual. This means that a cross column search for all ‘Jones’ can be conducted on the debtor database and subsequent to finding those results, presented in the grid, you can next apply a quick grid filter such as ‘ALL DECEASED’ that would then display all debtors having the name ‘Jones’ and are currently deceased in the CMSCIS system.
When a quick filter is applied to the grid the CMSCIS system inserts a column value in the column filter box at the top of the column. In the case of the ‘ALL DECEASED’ filter the word ‘DECEASED’ is inserted into the column filter box and is used to filter debtor records based on their deceased status. (Note: To reset the debtor results grid and remove all filters please click the “Clear Grid Filters” button located on the top menu bar.)
Client Information Management
Credit Master Systems (CMS) gathers information on debtors primarily from its client contacts who may engage the collection services of CMS to recover outstanding collectible funds from its own clients.
CMSCIS allows for the collection and management of various data points on an individual client. The system allows for the recording of multiple client contact persons, email address and also allows for the maintenance of a database of scanned client documents. The CMSCIS system allows for these documents to be catalogued, stored and retrieved in an integrated fashion for quick reference and review by authorized CMS personnel.
The figure below is a representation of the main client information interface. This page is used to create and update clients that act as customers to Credit Master systems. The main client information management page auto loads with all CMS clients listed in a scrollable grid sorted by “CMS Number” in ascending order.

New Client Creation
Note: New CMS clients are added to the CMSCIS system using the "Client Details" section of the "Client Information" index page shown in the above section. This section of the form enforces entry box validation rules before proceeding with the creation of new a new client record in the system database.
- Please navigate the main menu to the "Client Information" sub menu under the “File” section of the main navigation menu.
- Please locate the “New Client” button on the top horizontal toolbar menu to clear the "Client Details" section of the Client Information page and set the cursor in the "Name" box.
- Please provide all required form data that is available on file for the new client. Required fields are marked with a green asterix (*). (Note: The "Contact Person" and the "Email Address" boxes will not be editable until after the creation of the client record. These two (2) fields will be defaulted to a 'NA' value. Please see sections 'Contact Persons: Modify & Create Client Contact Information' and 'Email Addresses: Modify & Create Client Email Address Information' to update these fields on the "Client Details" tab page.)
- Please click the "Save Details" button on the bottom right corner of the "Client Details" page to save the new client details to the CMSCIS database. (Note: The CMSCIS system will display a confirmation prompt, "Save client Record?", before the client details are stored to the system database. If the client details were saved to the system database successfully a confirmation prompt, "Record has been Saved/Updated.", will be displayed.)
Searching Client Information Database
Note: Two methods of searching the CMSCIS client information database have been implemented in the client information page. These methods are:
- Cross Column Searching
- Automatic grid column search filtering.
Cross Column Searching – The client information page has been designed with a “Cross Column Search Box” in the top right corner of the page. This search feature has been designed with the capacity to search multiple grid columns at the same time, looking for matches of search parameters provided by a user.
The client information search results grid has a total of five (5) columns of displayable data. “CMS #”, “Client Name”, “Address”, “City” and “Status” grid columns are displayed by default. There are twenty-four (24) additional columns that are hidden that can be dragged and dropped onto the grid from the column chooser window.
Please click the “Column Chooser” menu button from the top middle menu toolbar to display the column chooser window. (Note: The column chooser button is only visible by clicking the ellipsis button option on the top menu bar.)

All grid columns can be dragged and dropped to and from the column chooser list to either add or remove visible columns to the client information grid. The cross column search box action is executed across the “CMS #” and “Client Name” columns of the client information grid. This means that CMSCIS will actively look for matching records in each of these columns.
Please ensure all grid column filters are cleared by clicking the “Refresh List” button before proceeding with the 'Cross Column' search feature.
- Locate the Cross Column Search box in the top right hand corner of the Client Information page as illustrated in the below image.
- Please type the search text that you would like the CMSCIS system to locate in the client information database. (Note: The system is capable of locating records based on complete words and partial words or what is termed a “substring” of a word.) As an example lets type the following in the search box “Bel” and hit the enter key on your keyboard. The system will return all records where the combination “Bel”, "bel" or the word “Belize” appears in any of the grid columns. (Note: Words must be separated by a single space for them to be treated as individual search words by the CMSCIS search system.)
- In order to clear the search results and refresh the grid to its original state when it first was opened, please clear all text from the cross column search box in the top right corner of the browser window and hit the “Enter” key on your keyboard.
Automatic grid column search filtering – The client information page has been designed with a client information grid that displays search results for clients stored in the CMSCIS database. This grid is comprised of twenty-nine (29) columns that can be custom organized, hidden or displayed.
Each of the twenty-nine (29) grid columns is equipped with an editable filter box with a filter setting that can be accessed by clicking the filter icon next to the column filter box on each grid column. The default filter setting on all of the grid columns is “Contains”. This means the column search will seek to find matching records that contain the provided search parameter in any part of the grid row data for that column.
The ‘CMS #’ column is the only column that has a different filter setting. This column has a default filter setting of “Equals”. This setting will only locate records that exactly match the CMS number provided.
The “CMS #”, “Client Name”, “Middle Name”, “CMS Number”, “Social #”, “DOB”, “Status” and “Verified” grid columns are displayed by default. There are two (24) additional columns that are hidden that can be dragged and dropped onto the grid from the column chooser window as explained above.
Please click the “Column Chooser” menu button from the top middle menu toolbar to display the column chooser window. All grid columns can be dragged and dropped to and from the column chooser list to either add or remove visible columns to the client information search grid.
- On the Client Information page please click the “Refresh List” button from the top tool bar menu. Please also clear the “Cross Column” search box located in the top right corner of the page by selecting all text in the box and deleting the contents.
- Please click inside the ‘CMS #’ column filter box and type ‘9’. The gird will automatically begin to perform the filter operation on the grid based on the parameter provided within 3 seconds after typing has terminated in the box.
- The grid will display all records having a CMS number of '9'. In this case the client information record for ‘QUICK CASH CARD COMPANY’ will be presented in the filtered grid.
- We will now perform a search for all clients with the word 'limited' appearing in the client name using the automatic grid column search feature. On the Client Information page please click the “Refresh List” button from the top tool bar menu. Please also clear the “Cross Column” search box located in the top right corner of the page by selecting all text in the box and deleting the contents.
- Click inside the ‘Client Name’ column filter box and type ‘limited’. The gird will automatically begin to perform the filter within 3 seconds. Please click inside the ‘City’ column filter box and type ‘cayo’. The gird will automatically begin to perform the filter within 3 seconds. There will now be at least four (4) records located in the client information database having a client name containing the word ‘limited’ and located in 'cayo'. This is based on the ‘Contains’ filter setting on the grid columns. The system will look for any and all client names where the search parameter is ‘contained’ in the client name field. (Please scroll to the top of the grid to view all search records.)
- Additional columns can be added be filters simultaneously to further fine tune and filter search results. Therefore the automatic grid filter search feature is a powerful tool in locating client information in the CMSCIS database.
- Please click the “Refresh List” button on the top toolbar menu to clear all grid filters and restore the grid to its original unfiltered state.
Client Contact Persons: Modify & Create Contact Information
Note: The Client Information Manager of the CMSCIS system has been designed to record multiple client contact persons. However only one (1) client contact person will be displayed on the "Client Details" tab page in a selectable drop down box. It is common for companies to change staff and management, hence when this change occurs it is necessary to create a new contact person entry in the CMSCIS system and update the client information record. It is therefore not necessary to delete old contact records and replace or overwrite them so that a complete picture of all contact persons can be preserved as the years progress.
- Navigate the main menu option to the "Client Information" sub menu under the “File” section of the main navigation menu.
- Perform a search for the client in the CMSCIS system using section 3.2 of this manual and select the client information record from the results grid.
- Select the “Contact Persons” tab page on the lower half of the client information page to view and edit the existing client contact persons held on record for the selected client.
- If the selected client has contact person records on file they will be presented in grid. The image below shows the “Contact Persons” tab page selected with the contact persons displayed that are on file for the selected CMS client.

- In the image above one (2) grid button option are available, “Edit” and "Delete". Clicking on the “Edit” grid button will load the selected contact person record in the edit popup window as show below. In this window you are able to make changes to the client contact person record and update the CMSCIS database. Please make any necessary changes to the selected contact record and click the “Update Contact” button.

- Please click the “New Contact Person” button to open the contact person entry window as shown below. This form is used to create new contact person records in the database for the selected CMS client.

- Please fill in all required fields on the form and click the “Update Contact” button to complete the creation process.
Client Email Addresses: Modify & Create Email Address Information
Note: The Client Information Manager of the CMSCIS system has been designed to record multiple client email address. However only one (1) client email address will be displayed on the "Client Details" tab page in a selectable drop down box called "Email Address". It is possible for companies to change their preferred email address, hence when this change occurs it is necessary to create a new email address entry in the CMSCIS system and update the client information record. It is therefore not necessary to delete old email address and replace or overwrite them so that a complete picture of all email addresses can be preserved as the years progress.
- Navigate the main menu option to the "Client Information" sub menu under the “File” section of the main navigation menu.
- Perform a search for the client in the CMSCIS system using section 3.2 of this manual and select the client information record from the results grid.
- Select the “Email Addresses” tab page on the lower half of the client information page to view and edit the existing client email addresses held on record for the selected client.
- If the selected client has email address records on file they will be presented in grid. The image below shows the “Email Addresses” tab page selected with the email addresses displayed that are on file for the selected CMS client.

- In the image above two (2) grid button options are available, “Edit” and "Delete". Clicking on the “Edit” grid button will load the selected email address record in the edit popup window as show below. In this window you are able to make changes to the client email address record and update the CMSCIS database. Please make any necessary changes to the email address record and click the “Update Email” button.

- Please click the “New Contact Person” button to open the contact person entry window as shown below. This form is used to create new contact person records in the database for the selected CMS client.

- Please fill in all required fields on the form and click the “Update Email” button to complete the creation process.
Scanned Document: Client Scanned Documents Management
Note: The ‘Client Information’ module of the CMSCIS system is designed with features to upload and manage documents, photos, videos and audio files pertaining to specific aspects of a CMS client that may be gathered over time and are required for reference. These documents and photos can be in the following format extensions: .jpg, .jpeg, .gif, .rtf, .txt, .avi, .png, .mp3, .xml, .doc, .pdf.
The management of these files is accomplished using the “files and folders” methodology of storage, meaning that file folders may be created and files can then be organized in their corresponding folders for ease of reference. A list of predefined folders has been created as a start and may be expanded as required. File folders may be renamed and moved to other folders for better organization.
The image below is an illustration of the “Scanned Documents” tab page and is used to upload and store documents, photos, videos and audio files that are desired for a CMS client.

Client Scanned Documents File Upload (Trade License)
- Navigate the main menu option to the "Client Information" sub menu under the “File” section of the main navigation menu.
- Perform a search for the CMS client in the CMSCIS system using section 3.2 of this manual and select the CMS client record from the results grid.
- Select the “Scanned Documents” tab page on the lower half of the client information page to view and edit the existing scanned documents held on record for the selected client.
- Please select the “Trade License” folder from the “Client Documents” file system located in the tree-view panel on the left side of the “Scanned Documents” tab page.
- Select the “Browse” button located in the bottom right corner of the “Scanned Documents” tab page. This button will open a file window that will allow you to locate the desired file or document from your local PC file system. Please locate the desired file to attach to the selected client record. (Note: The file used in this example is called ‘TradeLicense.pdf’.)
- Once a desired file is selected from the local file structure of the PC the “Upload” link button will activate, located at the bottom right of the scanned documents tab page. Clicking on this button will upload the selected file to the CMSCIS database and store the uploaded file under the “Trade License” file folder.
Client Scanned Documents File Renaming
- Navigate the main menu option to the "Client Information" sub menu under the “File” section of the main navigation menu.
- Perform a search for the CMS client in the CMSCIS system using section 3.2 of this manual and select the CMS client record from the results grid.
- Select the “Scanned Documents” tab page on the lower half of the Client Information page to view and edit the existing scanned documents held on record for the selected CMS client.
- Please locate the “Trade License” folder in the tree view left panel of the Scanned Documents tab page. Please locate the file with the name “TradeLicense1.pdf” from the previous section above.
- Right mouse click on the uploaded document to display a mini menu as shown below.

- This menu can used to ‘Rename’ the selected file to a name that best matches what the file represents. In this case we can now rename the file to ‘TradeLicense.pdf’. Please note that the file extension is required and cannot be removed during the renaming process. To successfully rename the file it must have the ‘.pdf’ extension in this case. If the file has another file extension such as ‘.jpeg’, ‘.gif’ etc these file extension names must be preserved during the rename process.
Client Scanned Documents Create New Folder
- Navigate the main menu option to the "Client Information" sub menu under the “File” section of the main navigation menu.
- Perform a search for the CMS client in the CMSCIS system using section 3.2 of this manual and select the CMS client record from the results grid.
- Select the “Scanned Documents” tab page on the lower half of the client information page to view and edit the existing scanned documents held on record for the selected client.
- Please select the location where you would like to create the new folder. The main parent folder is called ‘Client Documents’. If a new folder is required under this main folder then right click on the ‘Client Documents’ folder from the tree view file folders panel located on the left side of the ‘Scanned Documents’ tab page. Type the name of the new folder and hit the enter key on your keyboard.
- The new file folder will now appear at the bottom of the tree-view and will be visible under all client records for the storage of documents.
Client Scanned Documents Download & View Uploaded Files
- Navigate the main menu option to the "Client Information" sub menu under the “File” section of the main navigation menu.
- Perform a search for the client record in the CMSCIS system using section 3.2 of this manual and select the CMS client record from the results grid.
- Select the “Scanned Documents” tab page on the lower half of the client information page to view and edit the existing scanned documents held on record for the selected client.
- Please select the file folder location to view all files stored under the file folder.
- Double mouse click the uploaded file you want to view and the CMSCIS system will automatically perform a download of the file to your local PC. The downloaded file link will appear at the bottom of your web browser window in Microsoft Edge browser or a “Save As” window will appear in Chrome browser that will allow you to store the file download in a folder of your choice.
- The downloaded file will appear as a link at the bottom of your web browser. Please double click on the file to view its contents on your local PC.
Client Details: Update Client Information
- Navigate the main menu option to the "Client Information" sub menu under the “File” section of the main navigation menu.
- Perform a search for the CMS client record in the CMSCIS system using section 3.2 of this manual and select the client record from the results grid.
- On the “Client Details” tab page on the lower half of the client information page the details of the client will be displayed as well as editable fields. (Note: Non-editable fields are colored with a light grey background.)
- Please update the details of the client as desired and click the “Save Details” button to save the changes. The “Client Details” page will automatically be refreshed after successful save procedure. (Note: Please see the .)
Client Detail Definitions
| Entry Captions | Definition |
|---|---|
| Name (Required) | Name used to identify the CMS client. |
| Sector (Required) | The business sector under which the client operates locally. (PRIVATE, GOVERNMENT, UTILITY). Additional options can be added to the CMSCIS system using the "Client Sector Types" module under the "Control Files" main menu option. |
| Contact Person | Primary contact person within the client's organization. Please see section 3.3 for more details on creating and updating the contact persons list. |
| Client Type (Required) | The type of client as categorized by CMS. Additional options can be added to the CMSCIS system using the "Client Type" module under the "Control Files" main menu option. |
| Address | The physical mailing address of the client. |
| Status (Required) | The status set for the CMS client set by CMS personnel. 'ACTIVE' is the default option. This status will determine if a client will show up in other modules in the CMSCIS system. |
| City / District | The City or District within which a client operates business. |
| Telephone | Telephone number for the CMS client. |
| Fax | Fax number for the CMS client. |
| Email Address | The primary email address for the CMS client. Please see section 3.4 for more details on creating and updating the email address list. |
| TIN# | Income tax Tax Identification Number issued by the local income tax department to the CMS client. |
| CMS# (Required) | A unique non-editable ID number issued to the CMS client by the CMSCIS system upon creation in the system. |
| Collection Rate Code (Required) | A code used to determine what type of collection arrangements have been established with a CMS client. These codes are defined under the "Client Collection Rates" modules of the "Control Files" menu option. The default code is "GEN0001". These codes are indicative of collection rules used by the CMSCIS system when interacting with complaints and debts managed for the client by CMS. |
| Date Created | An editable date value that indicates the date when a CMS client was created in the CMSCIS system. |
| Create credit for each bad debt transaction | Checkbox option that tells the CMSCIS system to create a credit transaction for each bad debt recorded in the CMSCIS system in behalf of the selected CMS client. |
| Additional Info | Comments box to be used for any additional information to be stored for reference on the client. |
| Accounting Details | |
| Statement (Required) | Type of statement the CMS client receives from CMS. |
| Agent (Required) | The CMS agent assigned to the the client. |
| Increase balance when additional expenses incurred | Checkbox option that indicated to the system that a bad debt balance will be increased with the inclusion of additional expenses. |
| Allow payment via Advice Sheet | Checkbox option that indicated to the system that payments can be made to a bad debt based on an Advice Sheet. |
| Include additional charges when preparing summons | Checkbox option that indicated to the system that additional charges should be included when preparing a summons for bad debts turned over to CMS by the client. |
| Provide collection services to this client | Checkbox option that indicated to the system that collection services will be provided to this client. |
| Increase balance after lodged in Court | Checkbox option that indicated to the system that bad debt balances will be increased after lodgment with the local courts. |
| Collect receivables for this client | Checkbox option that indicated to the system that CMS will collect receivables in behalf of the client. |
| Do not include in PDI Calculation | When checked this checkbox option indicated to the system that bad debts from this client will not be included in PDI calculations for debtors and therefore will not affect their PDI score. |
| Exempt from GST | When checked this checkbox option exempts the CMS client from GST tax calculation. |
| Remit full payment to this client | When checked this checkbox option indicates to the system that all payments made at the CMS cashier for debts turned over by this client to CMS should be remitted in their entirety to the client. |
| Issue Invoice for online services | When checked this checkbox option indicates to the system that invoices should be issued for the client for online CMS services. |
| Use Interest Format Letter | When checked this checkbox option indicates to the system that the "Interest Format Letter" should be used when creating letters for this client. |
| Mode | Non-editable field that indicates what status mode the client details form is in either 'MODIFY' or 'NEW'. |