GoneClear Storefront
Contents
- 1 Basics of GoneClear StoreFront
- 2 Inventory
- 2.1 Inventory Tab & Ribbon
- 2.2 View inventory
- 2.2.1 Inventory Data Window
- 2.2.2 Search For An Item
- 2.2.3 Adding a New Item to Inventory.
- 2.2.4 Item details
- 2.2.5 Add and Remove an Item Image
- 2.2.6 Order Information
- 2.2.7 Packaging
- 2.2.8 Price/Cost
- 2.2.9 Assembly and Companion
- 2.2.10 Changes
- 2.2.11 Serial Numbers Window
- 2.2.12 UPC window in Inventory Data
- 2.2.13 Deliveries in Inventory Data***
- 2.3 UPC Utilities Ribbon
- 2.4 Reports Ribbon
- 2.4.1 Stock Analysis
- 2.4.2 Assembly Item Report
- 2.4.3 Companion Items Report
- 2.4.4 Stock Adjustment
- 2.4.5 Inventory Custom Reposting Tool
- 2.4.6 Purchase History Report
- 2.4.7 12 Month Sales Report
- 2.4.8 12 Month Purchases Report
- 2.4.9 3 Period Comparison W/GP
- 2.4.10 Stock Value
- 2.4.11 UPC List
- 2.4.12 Weekly Trends
- 2.4.13 Location Sales
- 2.4.14 In Bond Stock
- 2.5 Brokerage Utilities
- 2.6 Customs/Electronic File Transfers
- 2.7 Incoming Shipment
- 2.7.1 Incoming Shipment Window
- 2.7.2 Create Shipment (Create/Shipment Panel)
- 2.7.3 Open and Receive Shipment
- 2.8 File Definitions
- 2.9 Utilities (Inventory)
- 2.10 System Repack
- 3 Sales
- 3.1 Create Cashier Session
- 3.2 Cashier Session/Sales Order UI
- 3.3 Sales Transaction (cashiers)
- 3.3.1 How to start a sale transaction (Cashier)
- 3.3.2 How to process multiple payment mode?
- 3.3.3 Manually look up a stock number (Sales Screen)
- 3.3.4 Add new stock number (Sales Screen)
- 3.3.5 Restocking Fee
- 3.3.6 Process Return(Sales Screen)
- 3.3.7 Sales Order Entry
- 3.3.8 Customer Search (Sales Panel)
- 3.3.9 How to apply a payment to a customer account?
- 3.3.10 Estimate Search Panel (Sales)
- 3.3.11 Finance Manager
- 3.4 Supervisor Utilities
- 4 Accounts
- 4.1 Customers (Accounts)
- 4.1.1 Customer Search Panel (Accounts)
- 4.1.2 Customer Account Window's Tab
- 4.2 Reports (Accounts)
- 4.2.1 Customer List (Accounts)
- 4.2.2 Customer Product Sales Analysis (Accounts)
- 4.2.3 Annual Customer Report (Accounts)
- 4.2.4 Print Statement (Accounts)
- 4.2.5 Customer Hardcopy Statement Tab (Accounts)
- 4.2.6 Email Statement Tab
- 4.2.7 Email Settings Tab
- 4.2.8 Sent Email History Tab
- 4.2.9 Email Error Tab
- 4.2.10 Aged Accounts (Accounts)
- 4.2.11 Reconcile Payment/Invoices (Accounts)
- 4.3 Cashier Transmittals
- 4.4 Month End
- 4.4.1 Close Month
- 4.4.2 Month End Accounts Reports
- 4.4.3 Month End Stock Reports
- 4.5 Account Recievable Utilities
- 4.6 Gift Cards
- 4.1 Customers (Accounts)
- 5 Purchase Orders
- 6 Logistics
- 7 System Defaults
- 7.1 System Messages
- 7.2 Administrator Tool
- 7.2.1 Auditor Tool Box
- 7.2.1.1 View Proforma Authorization
- 7.2.1.2 Proforma Items
- 7.2.1.3 Sales History
- 7.2.1.4 Return Records
- 7.2.1.5 Inventory/customer/security changes
- 7.2.1.6 Cash Manager
- 7.2.1.6.1 Search receipts/invoices
- 7.2.1.6.2 How to view sales in cash manager
- 7.2.1.6.3 How to view receipts in cash manager
- 7.2.1.6.4 How to view sessions in cash manager
- 7.2.1.6.5 Payment/check# search tab
- 7.2.1.6.6 View payments attached to receipts
- 7.2.1.6.7 Paid invoices
- 7.2.1.6.8 View all paid invoices for a selected date period
- 7.2.1.6.9 Edit Payment info
- 7.2.1.6.10 How to change payment method?
- 7.2.1.6.11 How to change check number?
- 7.2.1.6.12 How to change bank type?
- 7.2.1.6.13 How to change check date?
- 7.2.1.6.14 How to Reassign account?
- 7.2.1.6.15 How to Reassign session number?
- 7.2.1.6.16 Session Tab
- 7.2.1.6.17 How to view sessions?
- 7.2.1.6.18 Commission Worksheet Tab
- 7.2.1.7 Validate Invoice/Stock Totals
- 7.2.1.8 Pending Check Deposit
- 7.2.1.9 Pending Orders Over Sold
- 7.2.1 Auditor Tool Box
- 7.3 System Security
- 7.4 System Values
- 7.5 Customer Promotions
- 8 Gallery Page
Basics of GoneClear StoreFront
In This Chapter
Getting Started
To start GoneClear StoreFront, double-click the icon shown in Figure 1-1
.png)
A user name and a password must be entered in order to log into the company database. For audit purposes, user information is recorded in every new record or modification to an existing record that a user performs.
Knowing Where You Are
The Main Window
.png)
Toolbar and Ribbon

Quick Access Tool bar

The Status Bar
- The bottom left-hand side displays the version of GoneClear StoreFront, the user who signed in, the computer station's name in
- The bottom left-hand side will also display when a user is in "sales mode."

Windows and Panel
A new window will open by clicking on an active Ribbon. All windows would include the exit button to exit the active window. As mentioned earlier in this guide, it is possible to have many windows open at once.
Several windows have a panel that gives access to more choices within the active window.
.png)

Window Operation Modes
- Add: Add a new record or document
- View: View an existing record or document
- Update: Modify the data of a current record or document
Customizing Column Header
- Users can reorder the columns by clicking and dragging the column headers to new locations.

- Users can apply filters to one or more column headers.
- Use the filter menu to select which of the values currently in the column should be displayed. When you add a column filter, the description of the filter will be seen below the panel. You may use this to validate which column filters have been added to the current view and you may adjust the filter. For example:

| Terminology | Definition |
|---|---|
| Sort Ascending | Sorts the selected column in ascending order. |
| Sort Descending | Sorts the selected column in descending order. |
| Clear Sorting | Clears the ascending or descending sorting criteria currently set for a column. |
| Group By This Column | Groups the table using the data in the selected column. It does this by moving the data into expandable lists that are located in the body of the grid. One expandable list will be created for each possible column value.
If Group By Box is enabled, this will also create a "Group By" box in the area immediately above the column headers. Note: To turn off the Group By This Column feature and revert to the original view: Enable Group By Box, drag the Group By boxes back to the column header.
|
| Group By Box | Displays or hides an area immediately above the column headers that contains "Group By" boxes. One "Group By" box will be displayed for each column header for which Group By This Column is currently enabled. You can also drag column headers to and from this area.
|
| Column Chooser | Enables you to add and hide information within a table. When you select Column Chooser the Customization dialog is displayed. This dialog is used to store the columns you don't currently want displayed within the table. Simply click and drag the desired column headers from the table to the Customization dialog. For example, if you decide

|
| Best Fit | Resize the width of the selected column so that the header text is displayed in the optimal amount of space. |
| Best Fit (all columns) | Resizing the width of all columns in the table so that the header text is displayed in the optimal amount of space. |
| Filter Editor | The Filter Editor dialog will show any filters that are currently active in the column headers. You can use the editor to modify the existing filter criteria and to build new criteria using the available filter conditions and logical operators. |
Inventory
In This Chapter
Inventory Tab & Ribbon
The inventory tab consists of Eight(8) Ribbons which provide access to more choices. We're going to go over each ribbon as precisely as possible.
_.png)
| Terminologies | Definitions |
|---|---|
| Stock Number | Identification number used in the physical warehouse or inventory method for the item. |
| Catalog | A complete collection of products organized with descriptive descriptions systematically. |
| Catalog Code | Code for entering and describing in a catalog a collection of items. |
| Catalog Description | The full descriptions specifics of the item and should include everything you want customer to see. |
| Item Name | Name provided to the item. This is a smaller field that the item description |
| Item Description | The descriptions are full specifics of the item and should include everything you want to know. |
| Packaging Code | A packaging code indicates the form of packaging transported. Box, can, bags, bucket, etc. |
| Manufacturer | The person or business that produces products for sale. |
| Supplier | The entity or association supplying your company's product or service. Note: Manufacturer and Supplier may be the same person or business. |
| Department | A part of a store selling a certain class or category of products. Eg. The sportswear department. |
| Discount | A deduction from the usual cost of something. |
| Promo code | A phrase or set of letters and numbers to be used for discount purposes. |
| GST | The goods and services tax (GST) is a value-added tax charged on most goods and services sold for domestic consumption. The GST is paid by cutomers, but it is given back to the government by the businesses selling the goods and services. |
| Target Price | The company's selling price with GST. |
| US Cost | The supplier cost price. |
| FOB Miami | Shipping cost for item. |
| Bz Cost | The item's overall cost including US Cost, FOB Miami, and additional cost when it arrives in Belize. |
| Retailed | The sale of goods to the public in relatively small quantities for use or consumption rather than for resale. |
| Wholesale | The selling of goods in large quantities to be retailed by others. |
| Distributor | An agent who supplies goods to stores and other businesses that sell to customers |
| Duty Free | Duty-free refers to the act of being able to purchase an item in particular circumstances without paying import, sales, value-added, or other taxes. |
| Salesman | a man whose job involves selling or promoting commercial products, either in a store or visiting locations to get orders. |
| Reducible | Inventory deduct in stock amount. For e.g., an oxiclean product may and can be taken out of stock which reduces quantity, whereas a freight charge cannot be taken out of stock in order to reduce quantity. |
| Warranty | A written guarantee given by the producer to the customer of the item, agreeing to restore or replace it, if required, within a specified period of time. |
| Serial Number | A number showing the position of an item in a series, especially one printed on paper currency or on a manufactured article for the purposes of identification. |
| Discontinued | A discontinued product is no longer sold. |
| Shelf Stable | Items which do not have an expiry date. |
| Supplier Reorder # | This is the Manufacture number. |
| BAHA Regulated | Requires license to import an item |
View inventory
Since we have an idea of what a window is and how it functions. Let's go into the inventory data window for view inventory. Users can check for an item in this window to obtain more details about that specific item, whether it be product updates, prices, etc. Furthermore, a user can quickly add a new item to inventory using this window.
Inventory Data Window
To open Inventory Data window, click the view inventory ribbon shown in Figure 2-2.


- Search for an item
- View item details
- Add an item
- View order information from manufacture
- Set Packaging size and weight
- View Price and Cost of Item
- Add as Assembly
- Add as a companion
- View Changes to item
- Search Serial Number for item
- View UPCs
- View deliveries for item
The inventory data consist of 5 forms. Below are figures of these forms and a brief description of its functions

.png)

.png)

Search For An Item


Adding a New Item to Inventory.
- From the tab inside GoneClear StoreFront navigate to: Inventory > view inventory.
- The Inventory Data window will open navigate to: inventory options>new item. ("New inventory creation” window will open)


| Terminologies | Definitions |
|---|---|
| Length, width, height | The package length, width and height. An Oxiclean product, for example, may be packed at 10 per box. The box's length, width and height is what is required in the packaging information option. |
| Net Weight | The weight of the item inside the package. |
| Gross Weight | Both item and package weight together. |
| Stock & Price | The user is asked in this field to indicate how this item is sold in the store. By box, each, bucket, etc. |
| Package Unit | In this field, the user is asked to enter the type of product package, i.e. box, bucket, etc. For eg, an oxiclean product may be sold "each" in the store, however it is packed 10 per package by the vendor. |
| Package Qty | The amount that comes in the package. |
| Tariff | A tariff is tax on imports or exports within sovereign countries. It is a kind of international trade and policy control that taxes external goods in order to promote or protect the internal economy. |
| Tariff Number | A tariff number is a product-specific number, as documented in the Belize Customs Organization's Code System. A tariff number guarantees consistency in the country's product classification. For example regular orange juices share the same tariff number. |
| Tax code | This program includes three tax codes:
|


Item details


Remember to always save updates after any adjustments have been made.

| Terminologies | Definitions |
|---|---|
| Max | Maximum quantity of item that each business location can store. |
| Min | Minimum quantity of item that each business location can store. |
| Bin | The name of the storage location where the items are stored. |
| In Stock | The quantity of item available. |

.png)

| Terminologies | Definitions |
|---|---|
| Stocked & Price | Shows how items are sold. By package, container, each, etc. |
| Available | Overall inventory amount in all departments and branches.
|
| Physical | Physically available for sale.
|
| Held for Del. | Complete sum to be held for delivery. |
| On order | Pending supplier order. |
| Expected | Day when the on order shipment is supposed to arrive. |
| Packed | Shows how it is packed by vendor. |
| Committed | Displays the entire amount held for delivery, order, salesman, etc. |
| Last Sale | Last selling date on item. |

Add and Remove an Item Image
- Add an item picture
- Go to Picture Options Search
- Click Add Picture
- Select picture from your computer
- Click open or choose.
- Click Save Picture in Picture Options
.png)
- Remove an item picture
- Go to Picture Options Search
- Click Remove
- Click Save Picture in Picture Options
Order Information
| Terminologies | Definitions |
|---|---|
| Remaining Stock | It may also be referred to as "OLD STOCK." In other terms, stock before last shipment. |
| PO/Purchase Order | A purchase order is a document submitted from the customer to the supplier to confirm a particular purchase of products. |
| Last Shipment | The latest goods from the supplier. |


| Terminologies | Definitions |
|---|---|
| Control Retail | The governments fixed price per item. Items are not permitted, by law, to exceed government rates. |
| Control Wholesale | The governments fixed price for wholesale products. Items are not permitted, by law, to exceed government rates. |
| Reducible | Inventory deduct in stock amount. For e.g., an oxiclean product may and can be taken out of stock which reduces quantity, whereas a freight charge cannot be taken out of stock in order to reduce quantity. |
| Random Measure | Use to incorporate quantity decimals for goods not determined by whole numbers. E.g. sugar, rice, etc. |
| BAHA Regulated | Requires license to import an item |
| Shelf Stable | Items which do not have an expiry date. |
| Companion Items | Companion items are priced and sold individually, but mostly purchased together. For eg, a brand smartphone purchase, the case and screen protector may have different prices but purchased together. |
| Assembly Items | Assembly items are items that are sold together with one package price. This may be a bundled plan the company offers. |
| Discontinued | A discontinued product is no longer sold. |
.png)


| Terminologies | Definitions |
|---|---|
| Minimum Supply | Minimum amount of item a location should hold. |
| Maximum Order | The maximum quantity a location should hold. |
| Turn Around | The period it takes to sell the entire item stock. |
| Lead Time | Time it takes to get the goods after ordering from the supplier. |
| Order Status | Specify the status of the item, be it clearance, special order, open order etc. |
| Order multiple | Minimum quantity to order from supplier. |
| Special Order | Normally, a special order is not sold in store, typically ordered by the company for a customer who requested it. |

Packaging

.PNG)
Price/Cost


Assembly and Companion
Assembly
- Go to Order info window
- Check the box “Assembly Item” under item option
- Go to Assembly Window
- Click New Code button
- Type in the stock number you want to add as an assembly to current item and push enter on your keyboard
- Click Save

- Go to Order info window
- Uncheck the box “Assembly Item” under item option
- Go to Assembly Window
- Click on the item you want to remove
- Uncheck “Include” box
- Click Save
Companion
- Go to Order info window
- Check the box “Companion Item” under item option
- Go to companion Window
- Click New Code button
- Type in the stock number you want to add as a companion to current item and push enter on your keyboard
- Click Save

- Go to Order info window
- Uncheck the box “Companion Item” under item option
- Go to companion Window
- Click on the item you want to remove
- Uncheck “Include” box
- Click Save
Changes
Below is an example of the view change table

Serial Numbers Window
_.png)
_.png)
UPC window in Inventory Data
| Terminologies | Definitions |
|---|---|
| UPC | A UPC, short for universal product code, is a type of code printed on retail product packaging to help identify an item. It consists of two parts — the machine-readable barcode, a sequence of unique black bars, and the unique 12-digit number beneath.
 |

Link Wholesale to retail stock numbers (Child to Parent)
How to link wholesale stock number to Retial Stock number
- Go to Inventory
- Select the "Utilities" ribbon. (This should not be confused with the UPC utilities.)
- Choose “inventory report - 4 locations” from the drop down list.
- Select department
- Click search
- Copy the retail stock number from the list after locating it.
- Find the wholesale stock number that corresponds to the retail number and double click (this will open the inventory data window)
- Choose UPC from the inventory data window's tabs.
- Select the "assign child number" button
- Paste the retail stock number in the "child stock number" field.
- Click the "assign" button.

Deliveries in Inventory Data***
UPC Utilities Ribbon
The UPC Utilities Ribbon provides a broad range of options for users utilizing UPCs. Depending on the licensed user, users can scan a UPC code to verify retail price, confirm UPC, display the company purchasing price of the scanned item, take stock and do quick transfer (This transfer method is typically used to quickly correct the stock). Users can also scan orders and shipments here.
Below is a UPC Utility Startup window that opens after clicking UPC Utilities Ribbon.

UPC Utilities Ribbon- Price Check
See the first button, "Price Check." Price check is very straightforward, enabling users to scan UPC code and see item selling price.
After selecting any of these buttons, a new window labeled UPC Control would open. Depending on the selected button, choices differ.
Below is a view of PRICE CHECK operation mode in the UPC Control window

UPC control window first section displays item name and description. Users may print item labels in various formats in this section; moreover, price adjustment can be made here. Below is a display of item details in UPC Control window first section.

As stated earlier, the printing option gives a range of choices to print an item label. Below is an example of the first option, Product label.

To adjust the retail price easily, simply click the three-dot box at the top right corner. This will open the "Adjust Retail Price" window.


As stated earlier, the UPC control window has many tabs, and these tabs are available based on the user's operating mode. In this situation, we're looking at Price Check mode, which gives access to only 3 tabs; scan, packed and bin.
The scan tab in the Price Check Operation mode displays the item brand, Supplier, Price including Tax, Package Unit, Stock Amount, Bin Number and Picture

The packed tab displays the item dimensions
,weight, and expiration date. These are all fields that can be edited. See section 2.2.7 Packaging x to better understand their function.

The Bin tab displays the number of the item in stock and the current and previous Bin. It also allows users to update Bin.
To update the Bin simple enter the current Bin and select update button. When the update completes, the previous Bin is added to "Bin 2."
"Bin 2" is where the item was previously kept

UPC Utilities Ribbon- UPC Validation
Since we now have a clear understanding of the Price Check and UPC Control window, let 's look at another button; UPC Validation. You may notice that more tabs are accessible under the UPC Control Window, assign tab, and update tab.
Assign Tab: under this tab, users may add a new UPC number to an item, or swap an existing UPC code to another item. This tab also enables the user to add a new item to the inventory.
- Scan the UPC number or enter the UPC number manually.
- Click the button Scan. (System immediately brings you to Assign tab)
- Enter stock number to assign UPC number
- Select the search button (The search window will open)
- Double click on the item in the search window (Search window would close automatically)
- Click the assign button
- Click OK on the "Assign UPC" pop-up message


- Scan the UPC number or enter the UPC number manually.
- Click the button Scan.
- Go to Assign Tab
- Enter stock number to assign UPC number
- Select the search button (The search window will open)
- Double click on the item in the search window (Search window would close automatically)
- Click the assign button
- Click OK on the "Assign UPC" pop-up message
- Click OK on the "Reassign" pop-up message

Utilities Ribbon- Purchasing

UPC Utilities Ribbon- Stock Take
- Enter correct stock quantity
- Click on the button "Adjust Stock"
- Click YES on the pop-up message

- Click on the button “Confirm Count"
- Click YES on the pop-up message
UPC Utilities Ribbon- Transfer
This section is not designed for large transfers. It is generally used to adjust stocks between locations quickly. For example, if the system records 25 oxiclean in warehouse 1 but only 24 are physically in warehouse 1 and the missing 1 is located in warehouse 2. Users can easily transfer 1 from warehouse 1 to warehouse 2 quickly. That'd balance the stock. See the illustration below.
- Select the destination for the items to be transferred.
- Select where the products come from.
- After both locations have been set, click the "transfer" button. (UPC Control window will open)
- Scan the UPC number or enter the UPC number manually.
- Click the button Scan.
- Under the transfer tab, enter the amount you wish to transfer.
- Click transfer button.
- Click YES on the pop-up message


Scan Orders/Shipment
This section is designed to scan orders or shipments.
- Navigate to the Inventory tab.
- Select the "UPC Utilities" ribbon. (The UPC Utility Startup window will open)
- Enter the document number under Scan Orders/Shipments.
- Choose the type of document to scan.
- Scan the UPC barcode and press enter on your keyboard.
- On the popup box, click OK.
- Enter the quantity of the item you want to order.
Reports Ribbon
GoneClear StoreFront offers the resources and monitoring features you need to handle the company's financing efficiently and according to Generally Accepted Accounting Principles (GAAP).
The main incentive to use Report Ribbon is the opportunity to run reports to evaluate your departments for profitability and performance. Multiple reports are available:
- Stock Analysis
- FIFO Report
- Average Costing
- Promotional Analysis
- Assembly Items Report
- Proforma Activity
- Stock Adjustment
- Inventory custom Reporting tool
- Annual Reports
- Weekly Trends
- Location Sales
- In Bond Stock
Stock Analysis
Stock Analysis allows users to monitor stock sales and costs over a selected period. This option also enables you to view which products are sold more steadily than others.
See the terminology table below for an understanding of the Stock Analysis table layout.
| Terminologies | Definitions |
|---|---|
| Quantity Stock Beginning | Number of stock at the beginning of the period selected. |
| Value Beginning | Value Beginning refers to the company's total expense for the item at the beginning of the period selected.
|
| SaleValue Beginning | The amount of revenue the company would make if all items were sold at the beginning of the selected period.
|
| Quantity Received | The amount of stocks received, if any, at the end of the selected period. |
| Value Received | Value Received refers to the company's total expense for the item at the ending of the period selected.
|
| Quantity Sold | Amount of stock sold. |
| Total Sale | The company's revenue from Quantity Sold
|
| Total Cost | The company's total expense form Quantity Sold
|
| Ending Stock | This is the number of stock remaining after all transactions at the end of the selected period. |
| Ending Value | Ending Value refers to the company's total expense for the item at the ending of the period selected.
|
| SaleValue Ending | The amount of revenue the company would make if all items were sold at the end of the selected period.
|
| Stock Now | The quantity of item currently in stock. |
| Replacement Cost | Gross Profit display made in dollars for the selected period.
|
| GP% | Gross Profit display made in percentage for the selected period.
|
| %Dept Sales | Percentage of sale by department. |
Navigate to the Inventory tab / Report button and choose "Stock Analysis" from the drop down. To access the table for stock analysis, enter a start and end date. If you wish, search by department, supplier, and or catalog number. Before clicking on the button “Apply”, choose whether you want to view moved items during selected period or items not moved. The default is set to items moved during selected period.

????? AND INFO TABLE HERE WHEN MS PATT ADD MORE INFO IN SYSTEM???
Assembly Item Report
Earlier in this chapter, we discussed what assembly is and how an item is assembled. We will now discuss how to display a list of all assembly items. Navigate to the Inventory tab / Report button and choose "Assembly Items Report" from the drop down.

????? AND INFO TABLE HERE WHEN MS PATT ADD MORE INFO IN SYSTEM???
Companion Items Report
Similar to Assembly Item Report, the companion item report displays a list of all items under companion. Navigate to the Inventory tab / Report button and choose "Companion Item" from the drop down

????? AND INFO TABLE HERE WHEN MS PATT ADD MORE INFO IN SYSTEM???
Stock Adjustment
Under UPC Utilities Ribbon, we spoke about stock take; adjust stock and confirm count. This section gives a report on who made the adjustment or count, and when. This report would reflect the quantity short or over after the adjustment has been made.

????? AND INFO TABLE HERE WHEN MS PATT ADD MORE INFO IN SYSTEM???
Inventory Custom Reposting Tool
In section 2.2.2, we discuss how to search for an item. Inventory Custom Reposting Tool another method of searching an item. However, the previous method limited users to a number of search results, with this Inventory Custom Reposting Tool users have a wider range of search results, and it hardly restricts users to search results. The various search results are-companion item, updated, and UPC to name a few. Select column chooser for more column choices.

Purchase History Report
The purchase history segment enables users to view four quarters of the selected history from the beginning period. Simply select a starting date and the system will automatically split it into four quarters.
- Select a Period Beginning (System will automatically split it into four quarters.)
- Choose a scope from the drop down menu. (Summary or Detail)
- Choose a group from the drop down menu. (Supplier, Department or Category)
- Click Apply

Summary Scope displays a total of "purchase history," showing overall amount depending on the selected group, supplier or department.
Detail Scope displays a detailed "purchase history" report, listing items, quantity, department, etc.
See the example for both reports below. (This report may be printed if the user wishes to print.)
.png)
12 Month Sales Report
Within each year, users can generate sale reports for 12 months. Report may be displayed in two methods, Summarize Group and Product detail. Let's look at each of them.
Summarize Group: Display of department or supplier sales, cost, and profit, based on the user's choice.
- Select a year from the drop-down menu.
- Select the starting month and end month. (Default is from January to December)
- Select a location from the drop down menu.
- Select group from the drop down menu.
- Click display

Product detail: Shows a detailed report on "Sales". Depending on how it is filtered, users can view item name, stock number, department, sales, cost and gross profit for each month.

12 Month Purchases Report
Within each year, users can generate purchase reports for 12 months.

3 Period Comparison W/GP
This section enables users to view revenue for 3 selected periods to compare revenues. Based on user option, the table may be sorted by location, department summarization, category summarization or details.
| Terminology | Definition |
|---|---|
| Period 1 | The first period of revenue comparison. Cannot surpass Period 2 and Period 3. |
| Period 2 | The second period of revenue comparison. Cannot surpass Period 3 or less than Period 1. |
| Period 3 | The Third period of revenue comparison. Cannot be less than Period 1 and Period 2. |
| Summarize Department | This allows users to view reports by department in a summary format. |
| Summarize Category | This allows users to view reports by category in a summary format. |
| Detail | This allows users to display reports in full detail for each selected period. Note that this can be sorted by department. |
| Show Cost and GP | Allows the user to include the cost of items and gross profit in the report. |
| Show more Detail | Allows users to customize column with "column chooser." |
- Choose period 1
- Choose period 2
- Choose Period 3
- Choose either to “Summarize departments”, “summarize category” or “detail” from the radio buttons.
- Choose location from the drop down menu (Click the “All location" box to see all locations.)
- Click “generate report” button.

????? AND INFO TABLE HERE WHEN MS PATT ADD MORE INFO IN SYSTEM???
Stock Value
GoneClear Shop front offers users a function to see the value of the items for the selected date. This is shown according to department or item details.
Department: Displays a stock value list per department.
Item Details: Display the amount of the item in stock and its location, the Belize Cost, the dollar value, the value of the distributor, the supplier and the bin.
Dollar value: This is the value of the entire stock including shipment and handling.
- Choose the date you want the stock value to display.
- Choose location from the drop down menu (Click the “All location" box to see all locations.)
- Click Display

????? TABLE WILL NEED TO CHANGE WHEN MS PATT ADD MORE INFO IN SYSTEM???
- Choose the date you want the stock value to display.
- Choose location from the drop down menu (Click the “All location" box to see all locations.)
- Click Display
- Click Item Detail

????? TABLE WILL NEED TO CHANGE WHEN MS PATT ADD MORE INFO IN SYSTEM???
UPC List
As mentioned earlier, many different UPC codes can be applied to one stock number. Another valuable tool GoneClear Store front offers is the "UPC List" that allows users to view all UPCs for each item.
Using the UPC list tool is quite straightforward; simply input stock number, category, description, department or supplier.
- Enter either stock number, category, description, department or supplier. (We searched by department in this example.)
- Hit f2 on your keyboard or click "search." (Check "show photo" and "show discontinued" if you want these included.)

Weekly Trends
Another useful GoneClear Storefont method is our weekly trends report. Weekly trends report is just that, it provides a weekly trend report. This may be searched by category or department.
- Choose an ending week date
- Select a department or category
- Click Apply

????? AND INFO TABLE HERE WHEN MS PATT ADD MORE INFO IN SYSTEM???
Location Sales
Location Sales is a powerful method to track revenue by relevant location as it allows users select a particular location to display location sales. In this quest, users are able to filter by department to monitor the income of each department at that location.
- Choose a date to see the revenue figures of the location.
- To see Salesman, check the box "Person Group Sales".
- Select Apply

????? AND INFO TABLE HERE WHEN MS PATT ADD MORE INFO IN SYSTEM???
In Bond Stock
Brokerage Utilities
For any company that imports freight, a customs broker is strongly recommended, as there are regulations and clearance specifications that can become rather tedious. A custom broker would save the owner a lot of work and time. However, during the process, you may want to view this custom entry. For this reason, our team provides you with a means of displaying custom entry at your desk utilizing our GoneClear StoreFront POS System. This function not only allows you to view but also to make adjustments to prevent a lengthy wait for the customs broker to finalize the procedure since changes to the price of the product are allowed before the broker completes the process. When the broker completes his entry, he will provide you with the final price list, the Cost Sheet. More regarding the cost sheet is mentioned later in this guide.
| Terminologies | Definitions |
|---|---|
| Custom Broker | Customs brokers are private individuals, partnerships, organizations or businesses that are authorised, regulated and empowered by the Country. Customs and border protection (CBP) assists importers and exporters in complying with Government import and export requirements. |
| Custom Entry | A Customs entry is an official statement of specific information regarding your imported merchandise. If you're working with a Customs broker as the importer, they'll typically fill this out for you. The Customs entry form lists information like: Country of origin. Description of the goods. |
| Electronic Invoice | Electronic invoicing (e-Invoicing) is the transfer of the invoice paper between the supplier and the buyer in an integrated electronic format. |
| Cost Sheet | A cost sheet is a statement displaying the different components of total cost for a product, showing previous information for comparison. This will be provided to you by your broker when the procedure is complete. |
| Retail Pricing Sheet | This is a worksheet listing retail prices. Users with rights can adjust retail price while broker is preparing custom entry. |
| Incoming Shipment | Goods ordered from supplier. |
Here is an overview of how this process operates.

Preview Custom Entry/Create Pricing WorkSheet
As described above, users may display Electronic Invoice immediately after broker imports into brokerage software utilizing the "Preview Custom Entry" feature.
- Enter the entry number (This number is generated in the Goneclear Brokerage Program)
- Click "display"
- From drop down, select "Create New Retail Worksheet"
- Click OK on the "Current Retail will be saved with this worksheet" pop-up message

Open Existing Pricing Worksheet
After creating a new retail sheet, the Preview Entry window closes. In this section, we will go through the process of updating this new retail sheet and making appropriate adjustments. The table below gives a clearer understanding of the Pricing Worksheet columns and their functions.
| Column Name | Functions |
|---|---|
| Current US$ | This is the current cost for the item from its previous shipment. |
| US$ Unit Cost | This is the unit price of the item in the current shipment. The amount shown is in US currency. |
| Invoice Total | This is the total cost of the item in the current shipment. The amount shown is in US currency. |
| Shipment Cost BZ$ | This is the total shipping cost in Belize currency that includes all duty charges. (No GST added). |
| BZ Cost | This is the unit price of the item in the current shipment that includes all duty charges. The amount shown is in Belize currency. (NO GST added) |
| Current BZ Cost | This is the current cost for the item from its previous shipment in belize currency. This total includes all duty charges. |
| Mark Up | The current markup percentage on the last shipment. |
| Current Retail | The current selling price before GST. |
| W/GST | The current selling price with GST. |
| New Mark Up | This is the new markup. The new markup percentage calculates immediately after entering the "NewGST" column. |
| Off Margin | This is the target margin. The (<<) sign indicates that the MarkUP is under margin. (Margin is 50%) |
| New Retail | This is the new updated retail price. The column is set to the current retail price by default that changes immediately after entering the "NewGST" column. |
| New GST | Users are allowed to adjust the current price of the item in this column. Enter your new price with GST and the new retail, and the markup will calculate instantaneously. |
| Notes | This column allows users to enter notes for an item. |
| ID Rate | Import Duty is one of the main duties applied to imported products. This column displays percentage of import duty. |
| Duty | This column displays import duty in currency. |
| RRD Rate | Revenue Replacement Duty (RRD) is one of the main duties applied to imported products. This is installed as a cost recovery mechanism for the Government.
This column displays the percentage of RRD. |
| Duty Rev | This column displays RRD in currency. |
| Ex Rate | Excise (Ex) taxes are taxes required on specific goods like fuel, tobacco, and alcohol. It is designed to discourage the purchase of products that are deemed to be detrimental to consumers' health or the environment. This column displays the percentage of Excise Tax. |
| Excise | This column displays Excise Tax in currency. |
| ET Rate | Environmental tax (ET) measures aim to place a tax cost on products or any activity that may be detrimental to the environment. This column displays the percentage of ET. |
| ET | This column displays Environmental tax (ET) in currency. |
| GST Rate | This column displays the percentage of GST. |
| GST | This column displays GST in currency. |
| Supplier | This column displays the item supplier. |
| Company | This column displays the item company. |
| Value CIF | The Cost, Insurance, and Freight (CIF) value is the actual cost of the goods when they are shipped. As duties are calculated based on the CIF value, it is vital that it is calculated correctly. This column displays the Value CIF. |
- Hover over "Select Retail Worksheet"
- Select the worksheet corresponding to the entry number on the drop-down panel.
- Select display (The worksheet will display)
- Update the price as necessary.
- Click Save WorksheetPrices

Customs/Electronic File Transfers
In the previous chapter, we discussed custom entries and the function to view and make adjustments to them while in the brokerage process. Now we'll look at how to transfer the broker's final pricing list, called a cost sheet, to the GoneClear StoreFront POS system utilizing the "Custom/Electronic File Transfers" feature. "Custom/Electronic File Transfers" is a valuable function eliminating the long, tedious process of manually transferring cost sheets. This functionality transfers TXT and Excel data.

Import Cost Sheets
- Hover over the Locate Entries panel
- Select the button New Entry (Import File window will open)
- Choose GoneClear Customs Entry from the option drop-down menu.
- Click the three dots icon under the file location. (File explorer window will open immediately after clicking the three dots button)
- Locate TXT file in the file explorer
- Select TXT-file.
- Click Open on the bottom right corner.
- On the Import File Window, select Import. (Entry header window will open)
- Complete the necessary details in the entry header and click OK.
- On the Import successful pop-up message window, click the OK button.
- Hover over the Locate Entries panel and double click on the entry from the list.

- Hover over the Locate Entries panel
- Select the button New Entry (Import File window will open)
- Choose Excel Cost Sheet Version 1 or Excel Cost Sheet Version 2 from the option drop-down menu.
- Click the three dots icon under the file location. (File explorer window will open immediately after clicking the three dots button)
- Locate Excel File in the file explorer
- Select Excel File.
- Click Open on the bottom right corner. TO BE CONTINUED>>>
Import Customs Entry window
Following the "import cost sheet" procedures, the list of products would appear in the "Import Customs Entry" window. This window allows users to make changes to stock numbers, make changes to category and department, display inventory, repack the item and fragment this list before sending to incoming shipment.
| Button/Field | Function |
|---|---|
| Use Our Stock # | This field allows users to use existing stock number from inventory. This feature can be very useful especially for stock numbers that were entered wrong on the cost sheet by the broker. |
| PO Number | |
| Save | Save button saves any changes made to the item. |
| Inventory | Opens selected item inventory details. |
| Fragment | Fragment allows users to separate quantity and value. For example, you might buy a set of pans from your supplier, but your company sells them separately. The fragment function lets you separate and add value to the item. The incoming shipment will also allow you to do this in greater depth. We'll discuss this later in the guide. |
| Repack | This feature allows the user to adjust the quantity and stock value. For example, the supplier can sell a product per case, but the company sells it each. Use this useful tool to display items for each and its price. Enter the number of quantities in one package then the system calculates the cost automatically. |
| Update Inventory | This functionality automatically adds the new stock number. Before clicking "Update Inventory," users need to update department and category. |
| Send to Incoming | After the cost sheet update is complete, the next process is to send your entry to incoming shipments. This feature sends data to the incoming shipment automatically. |
| Exit | To close the “Import Customs Entry” window. |
- Select the item
- Enter the stock number in the "Use our Stock #" field
- Select save

- Select the item
- Change department and category
- Select Update Inventory

- Select the item
- Select "Repack" (A repack window will open)
- Enter the quantity of one case in the repack window (This will automatically calculate the cost for each)
- Select ok

- Select the item
- Select "Fragment" (A fragment window will open)
- Enter the quantity to split
- Enter the FOB Value (Freight On Board)
- Select ok (This will automatically break it up and make another line)

Incoming Shipment
When a shipment arrives, users can track and receive the orders in GoneClear StoreFront POS with the “Incoming Shipment” function. Our GoneClear team worked tirelessly to develop four different methods of importing orders that would reduce the time wasted rewriting orders made to the supplier.
| Term | Definition/Function |
|---|---|
| Purchase Order (PO) | Purchase Orders (POs) are documents provided by you, as a buyer, to a supplier requesting goods or services as an order. |
| Backorder | A request for goods that are not available now but will be available in the |
| Orphan List | An “orphan list” is a list of items that were not on the order sheet but was sent by the supplier. |
| Repack | This feature allows the user to adjust the quantity and stock value. For example, the supplier can sell a product per case, but the company sells it each. Use this useful tool to display items for each and its price. Enter the number of quantities in one package then the system calculates the cost automatically. |
| Reconciliation | Reconciliation is an accounting procedure that combines two information sets to ensure that the documents are accurate and consistent. Reconciliation of accounts often guarantees consistency, precision and completeness of reports in the general ledger. |
| Variance Report | Variance reports are meant to compare the amount of the initial invoice and the cost with the actual quantity received. |
| Multi-line Variance Report | If multiple invoices are in a shipment with the same item on multiple invoice lines, the multi-line variance report compares the total shipped for the item with the total received. The user is likely to enter the total amount received on the first occurrence of the invoice line item, but it must be reconciled with the total amount invoiced. |
In This Chapter
- Incoming Shipment Window
- Four methods for generating the incoming shipment
- Add Serial Numbers
- Add Expiration Dates
Incoming Shipment Window
To open Incoming shipment window, click the Incoming Shipment ribbon shown in Figure below. The Incoming Shipment Window contains 2 panels and 6 sub-tabs. It also displays the batch number, order number, reference number, quantity in the entire order (item count), line count, shipping cost, and freight on board (FOB).
- Item Editor Tab
- Customs Detail Tab
- Serial Number Tab
- Expiration Dates Tab
- Item PO Records
- Sales/Receiving History Tab

Create Shipment (Create/Shipment Panel)
There are four methods of creating an incoming shipment: Import from Purchased Orders, Import from Custom Entry, Import from Subsidiary Business Server, and Import without a PO. In this segment, we will discuss the layout of the “create/shipment” panel and how to create a shipment using any of the four methods.
Create/Shipment Panel
The create/select shipment panel enables users to create a shipment using any of the four shipping methods. To open, hover over it. This panel consist of 5 tabs: Shipments Pending, Pending Orders, New Shipment from Electronic File types, and New Shipment Not from PO.

Create Incoming Shipment Methods
Import from Purchase Order
After forming a Purchase Order and closing it, the P.O. will be listed under the Pending Orders tab.
- Double click on the Purchase order.
- Enter Reference Number.
- Select the transaction date.
- Select Create New Shipment.

Customs Entry Shipment
After generating a cost sheet or an excel sheet, the document is then listed under the New Shipment from Electronic File types tab.
- Double click on the Cost Sheet
- Enter Reference Number.
- Select the transaction date.
- Select Create New Shipment.

Import from Subsidiary Business Server
This approach is used for subsidiary business with different servers.
- Enter invoice number.
- Choose the server.
- Select “Get Invoice”
- Type the reference number.
- Enter the date of goods received.
- Choose the right supplier from a drop down menu.
- Select "Create Shipment"

Import without PO
This approach may be used to do a quick incoming shipment without PO’s.
- Enter the quantity of the items
- Tap on the drop-down menu to search for a specific item. (The search box will be lowered).
- Select Go Search on the search engine.
- Enter reference number
- Enter the transaction date.
- From the drop-down menu, choose the supplier.
- Click the Add button.
- Select the "Create New Shipment" button.

Open and Receive Shipment
Once a shipment has been created, it remains in pending status, enabling the user to make necessary adjustments to each item on the shipment. When all changes are accurate and complete, the user must receive stock to update the Goneclear StoreFront POS. In this segment, we will cover the steps to open a shipment, and all the precautions a user may take before receiving the shipment.
- Hover over “create/select shipment” panel
- Click the shipment pending tab
- Double click on shipment. (This will automatically close panel and display item editor)
Item Editor Tab
The item editor window will display by default when the incoming shipment is open. The purpose of the item editor is to display each item and make appropriate adjustments such as quantity, supplier and pricing before receiving it in stock. (Items are viewed individually)
Item editor tab is consisting of several forms. Let us discuss each.

Stock number and description: The item editor displays one item at a time, and this section of the window is a description of the item.

Quantity display: This portion of the window allows users to change the amount received, repack the item, and set the item on backorder. It also indicates the overall sum on order and the amount in stock.

Cost and pricing: This segment enables users to adjust the item's price. All shipments that are generated using the PO option, the supplier's cost, and the Belize cost must be entered.

Navigation Arrows: The navigation arrows allow users to navigate easily through the items of the shipment.

Expiration date: The expiry date must be indicated in this section and entered correctly. A single item can have multiple expiry dates, but on this part of the window, it only displays the first date entered. In another tab, the other dates can be added. We will discuss how to include more expiry date later in this guide.

Mark up and PO#: This section a read-only display of current percentage markup and suggested retail price. It also allows users to add originating PO.
NOTE: All "Pending Order" values must correctly reference to its original PO. Using PO option to create shipment will be updated automatically.

Manufacturer Number: In this section it displays the manufacturer number of the item. It also allows users to add a new manufacturer number. The form below displays the status and date of the item.

Bin location: This section of the item editor shows the item's current and previous bins. It also allows the user to add a new location if the location has to be updated.

Inventory Supplier: The name of the item's supplier is stated in this section of the item's editor.

Shipment information: The shipment details can be found above. This section can be changed at any moment. It is necessary to remember, though, that the supplier can only update with this shipment, not those already in stock.

Selected Item: This section only impacts the item in the item editor and does not extend to the whole shipment. It provides the user with the ability to save, view inventory, view history, and print labels.

Process shipment: This portion impacts the whole shipment, not the item in the item editor. It provides the user with the ability to print report, add other options, and receive stock.
Print Options for Reports: A variety of shipping reports may be printed under the process shipment, below is a table with a summary of each report.

| Term | Definition/Function |
|---|---|
| Register by Invoices | After the shipping has been prepared and received, this report provides users with the complete shipping list, indicates whether an item is on backorder, and displays the shipment value. |
| Cost reconciliation | This report allows users to reconcile the cost of shipment. |
| Warehouse receiving sheet | If the warehouse cannot scan the items received from the shipment, the warehouse sheet may be used to receive the goods manually. |
| Unscanned items | Allows users to print a report of all items that were not scanned. |
| Stock Worksheet | Allows users to print a sheet to take stock of the shipment. |
| Orphan List | Allow users to print an orphan list report. |
| Shelf Labels | Allows users to print labels for items from shipment. |
| Print all multiline items | Allows users to print all multiline items. |
| Multiline Variance Report | allow user to print multiline variance. |
| Variance Report | Allows users to print variance report. |
| Serial Worksheet | Allows users to print a sheet to fill in serial numbers for all items form the shipment. |
| Attached Serial Number | Displays a record of all serial numbers added to the shipment. |
| Repack Price List | (DON’T DO ANYTHING IN POS – MS P WILL CHECK) |
| Export to Excel | Allows user to export shipment list to excel. |
| Quick Print/ Export to Excel | Allows user to print shipment list or export to excel. |
The Utilities Options: A variety of shipping utilities may be selected under the process shipment, below is a table with a summary of each utility.

| Term | Definition/Function |
|---|---|
| Set Received to Zero | This method is used to set all items to 0. It can be convenient when checking goods. For e.g., you might not want the individual you sent to check the product to know the amount. |
| Default US Cost | Apply the previous supplier prices to the items. (MS PAT WASN’T SURE ABOUT THIS BECAUSE OF THE “0” MESSAGE. Will have to look at it over) |
| Retail Price Changes | Display all items that have changed retail prices. |
| Orphan List | Use to add any item that is considered orphaned. |
| Get New Retail Prices from Worksheet | (WAS NOT CLEARLY DEFINE… MS P NEEDS TO GO OVER) |
| Update New Prices | This tool was designed to update all items with new shipping prices. |
| Reset Original Costs | - (WAS NOT CLEARLY DEFINE… MS P NEEDS TO GO OVER) |
Select Item panel
After shipment is open each item will be displayed on the item editor. The select item panel allows the user to access and select items in this shipment.

Add Item from another P.O to current shipment
- In the search item engine, enter the stock number.
- Enter the quantity of the item.
- Enter the price of the item.
- From the down-menu, choose the P.O.

Customs Detail Tab
The customs detail tab displays the selected item prices and rate of customs such as FOB and CIF.

Serial Number Tab
The serial tab is a sub-tab of the incoming shipment window. This tab allows users to enter more than one serial number for a single item. It shows whether or not it requires a serial number, and how many are expected.

How to add serial number to an item in shipment?
- Enter the serial number.
- Click the add button.
.png)
How to remove serial number to an item in shipment?
- Click on the number you want to delete from the list.
- Click the remove button.
.png)
Expiration Dates tab
This tab allows users to enter more than expiration dates for a single item. It shows whether or not it requires an expiry date, and how many are expected.

How to add expiration dates to an item in shipment?
- Add the expiration date
- Enter quantity of the item
- Click the add button
.png)
How to remove expiration date from an item in shipment?
- Click on the date you want to delete from the list.
- Click the remove button.
.png)
Item PO Records Tab
This tab allows users to view Purchase Order records of shipment that was created using the PO method.

Sales/ Receiving History
This tab allows users to view sales and receiving history.(NEEED MS P TO EXPLAIN MORE) .
File Definitions
Tables that populate the inventory controls are all found under the File Definitions tab. These controls are Department, Headings, Categories, Suppliers, Manufacturers, Commission Codes, and currency codes.
To view file definitions options: Navigate to the Inventory tab and click the file definitions button.

***Department, Heading and Category is being update. When new codes publish need to add. (Ms P)
Supplier (File Definitions)
The supplier tab enables users to maintain a list of suppliers' contact details and addresses. In this section, we will address the method of introducing new suppliers and editing current suppliers.
To open the supplier window: Navigate to the Inventory tab/click the file definitions button and click supplier.
.png)
How to add a New Supplier?
- Click the New Code button on the side. This would clear the bottom segment fields, allowing them able to be filled.
- Enter details regarding the supplier.
- Click the save button.
.png)
How to edit existing Supplier information?
- Choose the supplier from the list that you want to modify.
- Navigate to the field you want to edit.
- After making adjustments, click the Save button
.png)
How to Remove existing supplier?
- Choose the supplier from the list that you want to remove.
- Click the delete button
.png)
Manufacturer (File Definitions)
The manufacturer tab enables users to maintain a list of manufacturers. In this section, we will address the method of introducing new manufacturer and editing current manufacturers.
To open the manufacturer window: Navigate to the Inventory tab/click the file definitions button and click manufacturer.
.png)
How to add a New Manufacturer?
- Click the New Code button on the side. This would clear the bottom segment fields, allowing them able to be filled.
- Enter manufacturer name and manufacturer of code.
- Click the save button.
.png)
How to edit existing Manufacturer information?
- Choose the manufacture from the list that you want to modify.
- Navigate to the field you want to edit.
- After making adjustments, click the Save button
.png)
How to Remove existing Manufacturer?
- Choose the manufacturer from the list that you want to remove.
- Click the delete button
.png)
Package Description (File Definitions)
The package description tab enables users to maintain a list of package type. In this section, we will address the method of introducing new package type, removing and editing current package type.
To open the Package Descriptions window: Navigate to the Inventory tab/click the file definitions button and click Package Descriptions.
.png)
How to add a New Package Type?
- Click the New Code button on the side. This would clear the bottom segment fields, allowing them able to be filled.
- Enter package code and package description.
- Click the save button.
.png)
How to edit existing package description?
- Choose the package from the list that you want to modify.
- Navigate to the field you want to edit.
- After making adjustments, click the Save button
.png)
How to Remove existing package description?
- Choose the package from the list that you want to remove.
- Click the delete button
.png)
Commission (File Definitions)
The commission tab provides the possibility of setting a commission rate for sales clerks. The commission rate may reflect the amount of discount that the sales clerk has offered.
*MS. P have to fix because as of right now this tab does nothing in the system.
*Will skip currency code for now because Ms. P is still deciding if it is needed in the POS
Utilities (Inventory)
The inventory utilities are various collections of tools that enable the user to carry out a number of inventory-related activities. Users who do not have the license right to access certain reports but may have the duty of completing the list of utilities can use it.
Label Maker
The GoneClear StoreFront POS system offers users a way to create a random list of any stock numbers to print a batch of labels in varying quantities, or perhaps one of a variety of reports. This feature is called a label maker.
*To be continued
Missing Pictures
This tool provides users with a list of all items that do not have pictures.
To open the missing pictures window: Navigate to the Inventory tab/click the utilities button and click missing pictures.
How to view the list of missing pictures?
- Navigate to the Inventory tab
- Select the utilities button
- Click missing pictures. (The missing pictures window will open)
- Click the View all photo records button
- Click the export to excel button. (You can copy stock number and search for items on inventory to add images.)

Price changes/new item
This section allows users to view new products as well as changes in prices on a particular date. It also allows users to filter by supplier or/and category.
To open the ‘price changes/new item’ window: Navigate to the Inventory tab/click the utilities button and click missing pictures.
How to view new items and prices?
- Navigate to the Inventory tab
- Select the utilities button
- Click “price changes/new item”
- Enter date under the form ‘New items’. (The date entered would show all new items applied to the system from the date entered to the current date.)
- Click the 'Generate Report' button. (A new window will open with the list of new items and their prices.)
.png)
How to view price changes?
- Navigate to the Inventory tab
- Select the utilities button
- Click “price changes/new item”
- Enter date under the form ‘Price changes’. (The date entered would show all new items applied to the system from the date entered to the current date.)
- Click the 'Generate Report' button. (A new window will open with the list of new items and their prices.)
.png)
Stock Take
System Repack
Where your company sells goods by the case at Wholesale prices and similar products individually at Retail prices, the products are inventoried under distinct stock numbers with their own unit list prices. The first is a case price, whereas the second is an each pricing. If your business distinguishes between retail and wholesale sales forces and the goods are sold only via retail or wholesale outlets, each inventory item must be labeled R(retail) or W(wholesale) in the Type of Inventory field (wholesale). This allows product lookups to be restricted to the proper class of goods for each sales center.
When products are transferred from a wholesale warehouse stocked per case to a retail outlet, they must be repacked from the cases deducted from the warehouse inventory to the number of single units to be stocked on the retail shelf. This is accomplished most easily by transferring cases from the wholesale warehouse to the warehouse of the retail store. When cases need to be transferred from the retail warehouse to the retail store shelf, the system converts the case quantities to the individual item amounts required to stock the retail store shelves.
When a link is established between the two stock numbers, it allows the appropriate stock number to be ordered from the warehouse, as well as the automated conversion of case units to retail units when case units are taken from the Retail Warehouse and placed on the Retail shelf stock.
Sales
Nowadays, the sales process is not relatively as easy as selling a product to one customer one at a time over the counter. Instead, it has become a dynamic network of connected processes that can require any, if not all, of the following: inventory, and logistics management, ordering, billing, and customer relationship management, as well as searching out new sales opportunities. The sales phase begins with sales opportunities being nurtured, sales quotes being generated, sales orders being entered, and customers being invoiced. This chapter addresses the crucial measures that must be completed after a transaction has been concluded, including how to turn a quote into a sales order, guarantee that an order is delivered correctly, and maintain prompt invoicing to improve positive cash flow.
Create Cashier Session
The cashier session ribbon launches the 'salesmain' cashier window used for cashiers to process transactions. To open the salemain window, a supervisor or someone with access must create a cashier session. The session is quite critical as it maintains track of all cashier transactions. Let us explore how to create a cashier's session.
How to create a cashier session?
- Navigate to the Accounts tab
- Select the 'Cashier Transmittals' button.
- Click New
- Select the date for session. (The current date is displayed by default.)
- Choose the name you want to create the session in the 'cashier' drop-down menu.
- Click the 'save' button (a popup window titled "confirmation" will appear)
- On the popup window, select 'Ok.'

Cashier Session/Sales Order UI
As previously mentioned, the cashier session ribbon launches the 'salesmain' cashier window used for cashiers to process transactions and to create sales orders. In this section, we will look at the interface of this window and its features.
The ‘salesmain' window is used for cashier, retail, and wholesale transactions. Features vary based on which session is selected.

Salesmain Window
The'salesmain' window has eight sections. Let us review each section and its roles.

Section One: This section consists of three panels; customer search panel, estimate panel, and finance panel. See section (…CONT) to learn about these panels.

Section Two: This section is used to scan all items purchased from the customer. There is a quantity, scan code, and stock number field accompanied by a lookup button and three checkboxes. Following are the functions for each:

| Fields | Function |
|---|---|
| Quantity Field | requires users to add the amount of the item that the customer purchases. |
| Scan Code Field | scan an item with its UPC. It is also possible for users to manually input the item's UPC or stock number in this field. |
| Stock Number Field | allows users to enter a stock number manually. |
| Lookup Button | Searching for a particular item is the key objective of the lookup button. |
| Add On Scan | Enabling the "add on scan" checkbox will add any scanned products to the order list. |
| Quantity First | Enabling the “quantity first” checkbox will set the starting point on the quantity field instead of the default scan code field. |
| Scan Off | Enabling the “scan off” checkbox will take off the scan code field |
Section Three: This section of the salemain window consists of eight sub-tabs; the invoice tab, Estimate tab, Invoices tab, Item History tab, Availability tab, Delivery Instructions tab, Estimate Record, Terms/Condition tab, and locations test tab.

Let us go through the eight sub tabs in section 3 briefly and their function.
- This invoice tab: This window shows a selection of the items that customers have ordered. It displays the quantity for each item, retail price, special price, rate, delivery type, unit code, discount, discount code, and, if necessary, serial numbers.
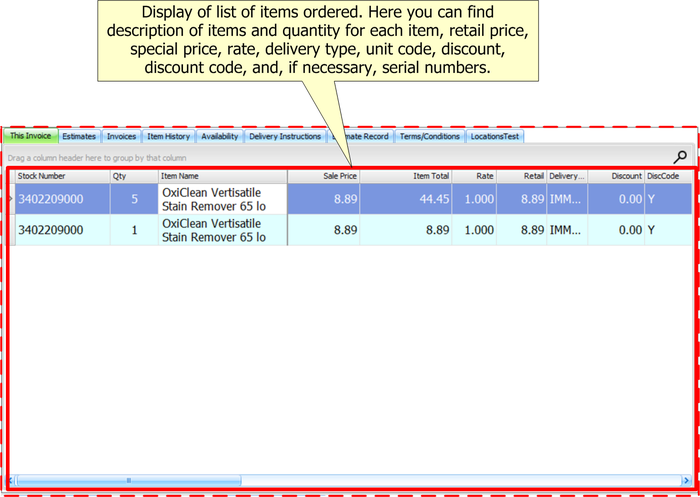 Section 3, This Invoice tab
 - Estimate tab: Allow users to locate all other Sales Order current customer has in the system. The Pending Orders All Customers button on this page locates all other customers who are wanting on the selected product – can be useful when there is a limited supply of the item and sales person may need to do some bargaining about who is going to get the item first.
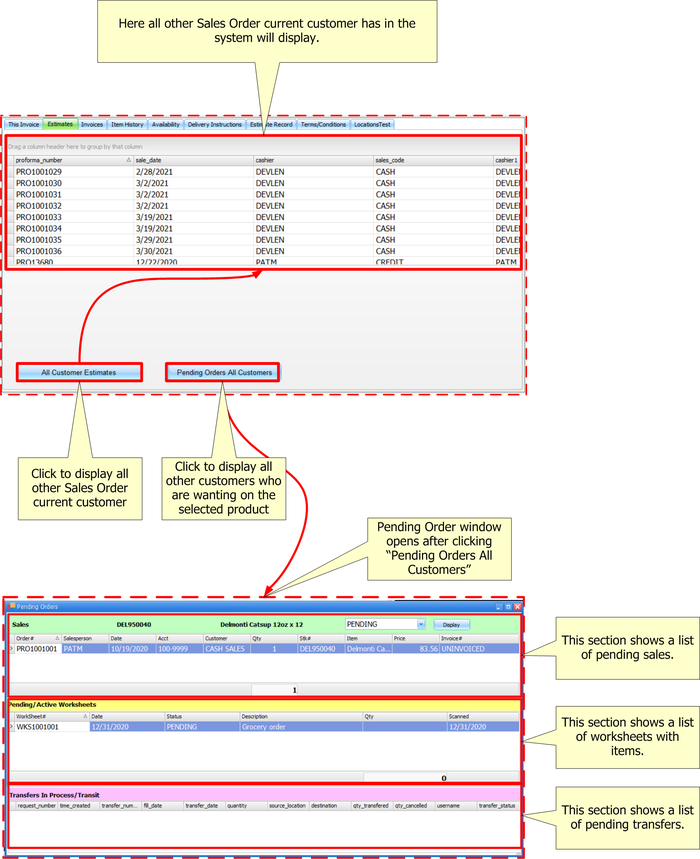 Section 3, Estimate tab
 - Invoices tab Display a list of invoices issued to the selected customer.
- Item History tab: This tab lists the selected item's sales history as well as other items recently purchased by the current customer.
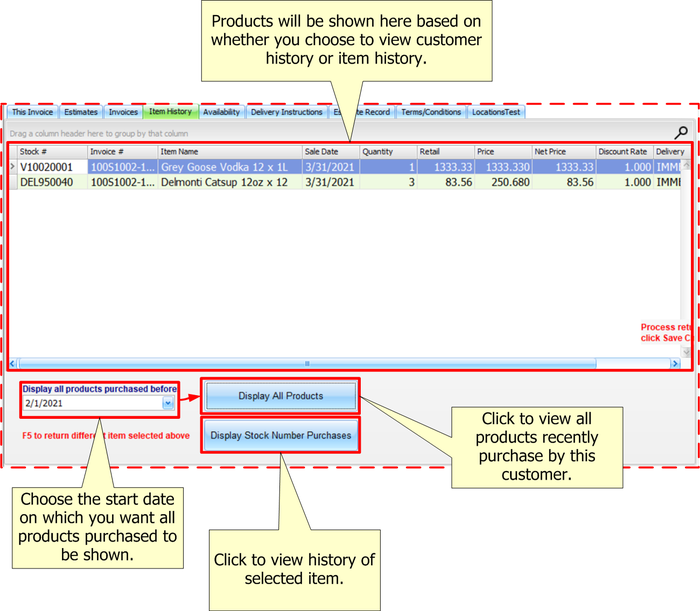 Section 3, Item History Tab
- Availability tab: Display the selected item location as well as the quantity in stock at each location.
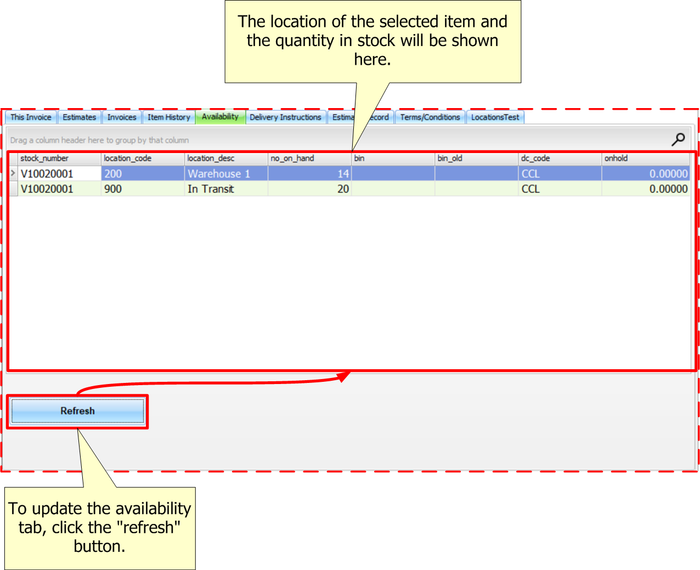 Section 3, Availability tab
- Delivery Instructions tab: Users may enter any delivery instructions in this tab. This instruction would be included in the delivery order.
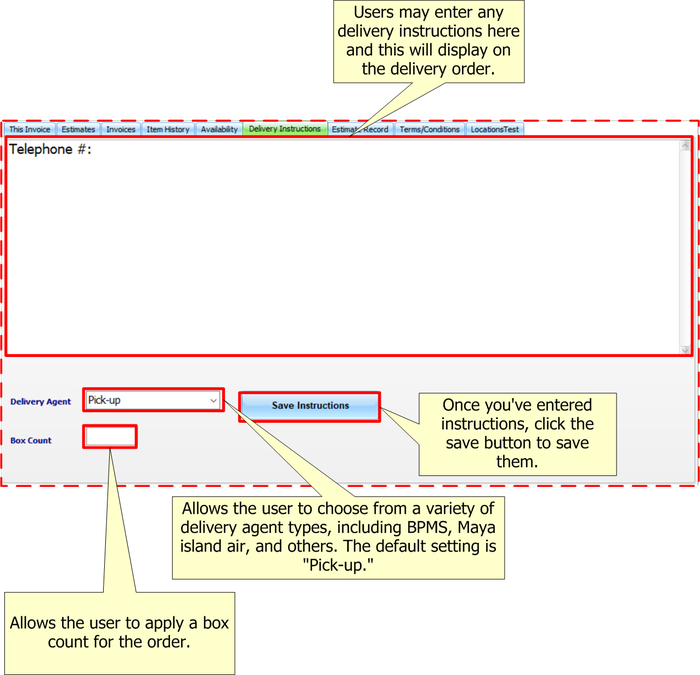 Section 3, Delivery Instructions tab
- Estimate Record: This tab provides a list of events connected with the latest order, such as estimate printed, discounts added, change of sale type (Case or Credit), change of account, deleted items, and any other notable events associated with the invoice. Additionally, a date and time stamp will be shown, as well as the user name ID.
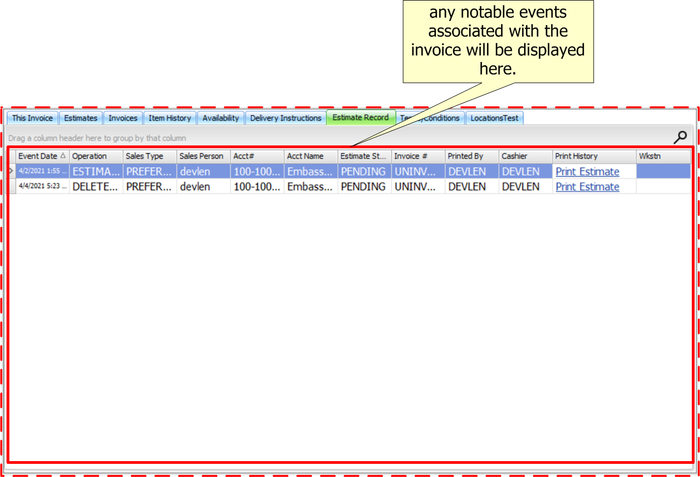 Section 3, Estimate Record
 - Terms/Condition tab:
.png)
.png)
.png)
.png)
.png)
.png)
Section Five: Nine action buttons and an exit button consist of this section. Let us examine the action buttons and their functions.
| Term | Definition/Function |
|---|---|
| Cash Sales | This action button is to start a sale transaction. Ergo users must click this button to initiate any sale transaction. The defined "f2" is the shortcut key for this feature. |
| Clone | An invoice order can be cloned, and changes can be made to the new order. The clone button is used to create a duplicate sales order. Users have the choice to clone the entire order or to split the order by using the select option. |
| Cancel | Enables users to cancel selected orders. |
| Customer | Provides access to client details and makes adjustments to the information such as selecting a new account or choosing a sales transaction type, i.e., credit card, cash, preferred. |
| Cashier Release | This action button enables cashiers to access sales orders. Ergo, after a salesperson completes an order and the warehouse verifies that all products are in stock, "Release to Cashier" changes the status to CASHIER so that the sales order will then be accessible for the cashier. |
| Price Change | Allow the salesperson to see if the price of the selected item has changed. The salesperson may allow the invoice to proceed with the current price or adjust the price to reflect the new value. |
| Reset | this action button enables users to reassign/assign a discount, delivery type, and sales type. |
| Reassign | Enables users to reassign the salesperson, P.O number, and the "referred by." (After clicking, the button will change to "save" to enable users to save changes.) |
| Quick Print | Allows users to print Proforma listing. |

Section Five: This section is a view of the total cost, GST cost and total count of items. Here is also, where users issue invoice.

Section 6: A brief description and price of the selected item is displayed in this section. Users are allowed create a new item line, save adjustments to a selected item, remove a selected item, add a new item to the system, issue a serial number and expiration date if necessary.

Section 7:This section displays the account number, sale type, account codes, discount codes, credit limits, and account balance. This section is color coded to indicate the form of transaction.
| Color Code | Definition |
|---|---|
| Green | preferred or cash transaction |
| Red | Credit transaction |
| Peach | Layaway transaction |

Section 8: Displays the PO number, invoice number, referred by, user status, sales order number, and the name of the salesperson selling the products. Using the reassign button in section four, you may adjust the PO#, referred option, and salesperson.

Sales Transaction (cashiers)
In the previous section, we covered the sections of the sales window and their associated functions. In this chapter, we will go over how to start and complete a sale transaction and the process of return items.
How to start a sale transaction (Cashier)
Note: Before any cashier may initiate a sale transaction, a cashier session must be created. (See section 2.10 to learn how to create a cashier session)
- Navigate to the Sales tab.
- Choose the "cashier session" ribbon. (The salesmain window will open)
- At the bottom of the window, click the 'cash sales button or hit 'f2' on your keyboard.
- Scan your products or manually input the product's stock number.
- Add the product's quantity.
- Press enter on your keyboard to add the scanned item to the order list.
- Click the "new line" button or press f4 on your keyboard to add another item to the order.
- Click the "save" button or press f6 on your keyboard to save item list.
- Click the "invoice" button to invoice sale.
- Choose a method of payment.
- Apply the amount paid by customer
- Click "Pay to Acct"

How to process multiple payment mode?
- Click the "begin entering payments" button.
- In the "amt of this payment" field, enter the amount paid.
- Select the payment method from the drop-down menu
- Enter the check number if necessary and choose the bank form from the drop-down menu.
- Click the "enter next payment method" button
- Repeat this procedure until all payment options have been entered. After that, print the sale.

Manually look up a stock number (Sales Screen)
Users can also use the "lookup" feature to perform a manual search for an item. The following are the steps for using the "lookup" function:
- Select the 'lookup' option. (The item search window would appear.)
- Enter a description, a supplier, or a manufacturer, for example. (There are several ways to search for an item in this window.)
- After you've entered your search method, click the search button or f2 on your keyboard.
- Select the item from the table.
- Click the “Add item” button.
- Press enter on your keyboard to add the item to the order list.

Add new stock number (Sales Screen)
How do I add a stock number that does not exist in the system?
- Click the "newline" button or press f4 on your keyboard.
- Click the “Non Stocked” button (The new inventory creation window will open)
- Enter the item information.(See Section 2.2.3 to understand this window.)
- Click the “save” button.

Restocking Fee
A restocking fee is a cost charged to a customer when they return items for a refund. To charge a stocking fee, the restocking fee feature must be activated.
Activate Restocking Fee
- Navigate to the System Defaults tab.
- From the "System Values" drop-down menu, choose the "Company Data" (The Company Default Values window will open)
- Click the "Account and Sales Defaults" tab
- In the restocking fee revenue code field, enter a restocking fee code. (The default value is "R000001," which you may keep or modify.)
- Create a stock number without pricing for the restocking charge code and deactivate the "reducible" option. (To create stock number See Adding a New Item to Inventory section)
Process Return(Sales Screen)
How to process return?
- Click the ‘cash sales’ button or hit 'f2' on your keyboard to activate the sales screen
- Locate the customer account number or the item's invoice number.
- Select the client or invoice by double-clicking on it and selecting chosen.
- Enter a negative value for the return amount in the quantity field. For example, -2.
- Scan the item or enter the stock number manually. (If you are unable to locate an item in stock via scan, navigate to item history, click the "show all items" button, and conduct a search there.)
- On the "return an item" pop-up message, click "ok."
- Double-click on the line under the "item history" tab (a pop-up window titled "item return" will appear).
- If required, enter a charging fee. (Verify that your restocking fee is configured correctly. See Restocking Fee section)
- Click Accept return Item


How to process a delivery return return?
- Click the ‘cash sales’ button or hit 'f2' on your keyboard to activate the sales screen
- Locate the customer account number or the item's invoice number.
- Select the client or invoice by double-clicking on it and selecting chosen.
- Enter a negative value for the return amount in the quantity field. For example, -2.
- Scan the item or enter the stock number manually. (If you are unable to locate an item in stock via scan, navigate to item history, click the "show all items" button, and conduct a search there.)
- On the "return an item" pop-up message, click "ok."
- Double-click on the line under the "item history" tab (a pop-up window titled "item return" will appear).
- If required, enter a charging fee. (Verify that your restocking fee is configured correctly. See Restocking Fee section)
- Select a Reason.
- Change return location to "unclaimed goods"
- Click Accept return Item
- Click the ‘save’ button or hit 'f6' on your keyboard to save Note: When in sales mode, click the "release to cashier" button to create an invoice.
Sales Order Entry
This feature enables users to generate estimates for customers and then invoice those estimates. Additionally, it allows users to look up items bought by customers and check inventory prices and availability.
How to create a sales order? (Retail)
- Navigate to the Sales tab.
- Choose the "Retail" ribbon. (The salesmain window will open)
- At the bottom of the window, click the 'cash sales button or hit 'f2' on your keyboard.
- Scan your products or manually input the product's stock number.
- Add the product's quantity.
- Press enter on your keyboard to add the scanned item to the order list.
- Click the "new line" button or press f4 on your keyboard to add another item to the order.
- Click the "save" button or press f6 on your keyboard to save item list.
- When the estimate is ready to be charged, click the "release to cashier" button to enable it for the cashier.

How to create a sales order? (Wholesale)
How to create a sales order for Delivery?
- Navigate to the Sales tab.
- Choose the "Retail" ribbon. (The salesmain window will open)
- At the bottom of the window, click the 'cash sales button or hit 'f2' on your keyboard.
- Scan your products or manually input the product's stock number.
- Add the product's quantity.
- Press enter on your keyboard to add the scanned item to the order list.
- Click the "new line" button or press f4 on your keyboard to add another item to the order.
- Click the "save" button
- When finish adding all items, click "reset" button
- Under "delivery type" select the delivery option
- Click "reset delivery type" button
- Click the "save" button or press f6 on your keyboard to save item list.
- When the estimate is ready to be charged, click the "release to cashier" button to enable it for the cashier.
Customer Search (Sales Panel)
This panel is used to locate an existing customer in the database. Users may create an order on credit, cash, or make a payment to a customer account.
To use this panel, simply insert the customer account number or name and click credit, preferred (cash), layaway, or make a payment to initiate a transaction.
| Terms | Definition |
|---|---|
| Credit | Credit purchases are those in which the customer agrees to pay the balance of the purchase price at a later date. |
| Prefered | A preferred sale is completed and paid for immediately. |
| Pay Acct. | Pay Account is for those customers who owe the company money and want to deposit that owed amount. |
| Layaway | Layaway is a payment system through which a customer deposits an item to "lay it away" before they are physically able to settle the balance. |
| Gift Certificate | A store can sometimes sell gift coupons (and gift cards) for cash to a customer. The customer may then redeem the gift card or transfer it to another person who may redeem it for goods or services. |

How to apply a payment to a customer account?
- Locate the customer account using the customer's name or account number.
- Double click on the customer information.
- Click the "Pay Acct." button. (The sales transaction window will open.)
- Under the "Outstanding invoices/Invoice listing" tab. Double-click the invoice on which you want to apply for the payment
- Choose a method of payment.
- Apply the amount paid to the customer account.
- Click the "Pay to Acct" button.

Estimate Search Panel (Sales)
This panel is used to search for pending, canceled, or issued invoices.Users may conduct an invoice search using the proforma number, the salesperson's name, or the document's status.
.png)
Finance Manager
Financing is a matter between the customer and the lender; the Finance Manager utility provides an estimation of the additional cost of financing, creates a record for the lender, and when invoiced, it keeps note of how much the lender owes the business for the purchased goods while these invoices are billed to the loan agency for payment.
How to get a quote in Finance Manager?
- Locate the customer account using the customer's name or account number. (User is allowed to skip this option)
- Scan item
- Enter the amount of months for finance. (Default is set at 12 months)
- Click “Get Quote” button
- If the customer agrees to finance, then click the “submit application” button.
- Fill out customer information

Supervisor Utilities
The Supervisor Utilities feature enables users to create invoice-related records such as delivery, shipment, and reprint promotions after invoicing. This chapter would address three key components: suplimental delivery, file for shipment, and reward document.
Suplimental Delivery
This feature enables users to create a delivery after currently invoiced items. It may be advantageous for a customer who has already purchased merchandise and realized that not all products would fit in his car, requiring the delivery of an item.
How to create a delivery after the goods have been invoiced?
- Navigate to the Sales tab
- Click the supervisor utilities ribbon
- Click suplimental delivery
- Enter the invoice number and click search
- Select the items you wish to deliver
- Click the create delivery button

File for Shipment
This feature exports invoice data in a comma-delimited format. In other words, it exports invoice details to a file that can be interpreted and recognized by the Goneclear Storefront software. The user will create a file shipment for companies that use GoneClear StoreFront POS on different servers. For instance, if location A purchases merchandise from location B but the two locations do not share servers, location B will take the invoice data and convert it to a format that can be conveniently saved electronically for location A's GoneClear StoreFront software.
How to create a shipment file for DC invoice
- Navigate to the Sales tab
- Click the supervisor utilities ribbon
- Click File for Shipment
- Enter invoice number
- Choose the location to save the file
- Click the ‘create file’ button to save the file
.png)
Reward Document
Designed to allow for the reprinting of promotions such as coupons, raffle tickets, and gifts after goods are invoiced.
How to reprint promotions after invoiced?
- Navigate to the Sales tab
- Click the supervisor utilities ribbon
- Click Reward Document
- To find invoices, click the magnifying glass icon.
- Enter the invoice number.
- Click the promotion you wish to reprint. (Users can also view invoice details and reprint invoices by double-clicking on the customer's arrow line.)

Credit Notes
This feature enables a customer to receive a refund of a certain amount due to an error on the initial invoice or other reasons.
How to create a Credit Note?
- Navigate to the Sales tab.
- Click the Credit Note ribbon.
- Enter the invoice number.
- Click the search button or press the enter key on your keyboard.
- Choose whether the customer paid in cash from the drop-down menu.
- Enter the amount of the discount. (The system will calculate the tax).
- Enter the name of the person who approved the refund.
- Choose a credit type from the drop-down menu.
- Click the "approve" button.

Re-Print Documents
Users may use this feature to reprint a sales document such as an invoice, credit note, special order, delivery control form, and so on.
How to rep-rint sales document?
- Navigate to the Sales tab.
- Click the Re-print ribbon.
- Choose the document type from the drop-down menu.
- Enter the document number.
- Click the "Print" button. (A preview window would automatically open).
- On the toolbar, click the print button.

Return Merchandise Authorization (RMA)
Goneclear developed this feature to facilitate the tracking of returned items. It can be advantageous for businesses to use a manufacturer's warranty, among other factors.
Accounts
Customers (Accounts)
This feature enables users to create new customer accounts and update existing ones. Additionally, it allows users to view customer invoice history, sales history, unpaid invoices, customer memos, and modifications made to the customer account.
A window labeled customers will open when you click the customer ribbon. There is one panel and eight tabs in this window. Let us examine these attributes.

Customer Search Panel (Accounts)
This panel is used to do a customer account search. Users may conduct searches using the customer number, the customer's name, the customer's address, or the account type.
.png)
How to search for customer account?
- Navigate to the Accounts tab.
- Choose the "Customers" ribbon. (The customers' window will open)
- Hover your cursor over the "customer search panel."
- You may search by customer number, customer name, customer address, or account type. Enter data into any field.
- Click Search.

Customer Account Window's Tab
As previously stated, this window contains eight tabs. These tabs allow users to view a customer's sales history, outstanding balance, and changes to their account, among other things. See the table below for a complete list of tabs and their associated functions.
| Tab label | Function |
|---|---|
| Customer Information Tab | This tab allows users to view and edit customer account information, generate new customer accounts and merge existing customer accounts. |
| Invoice History Tab | This tab allows users to search for and print any invoices generated for a particular customer. |
| Customer Sales History Tab | This tab allows users to search for items by date and view a list of items purchased by the customer on the selected date. |
| Daily Balances Tab | This tab allows users to view payment transactions and outstanding balances for the selected customer. |
| Customer Memo Tab | Users can use this tab to create memos for specific customer accounts. |
| Changes Tab | This tab allows users to view any changes made to the customer's account and who made them. |
| Upaid Invoice Tab | This tab allows users to view the selected customer's unpaid invoices. |
| Archives Tab | Searching for extremely old transactions made under the customer account is made possible via this tab. |
Customer Information Tab (accounts)
This tab allows users to view and edit customer account information, generate new customer accounts and merge existing customer accounts. Let's take a look at the four forms under this tab.
.png)


| Terms | Defintion |
|---|---|
| Account Type | Users may choose a customer account type from the drop-down menu in this field. There are about five types listed.
|
| Tax Code | In this scenario, a tax code is utilized to determine whether the customer is required to pay tax or is tax-exempt. There are two types of tax codes listed under this field:
|
| Tax ID | Identification number for tax. |
| Exemption Type | If a customer is tax-exempt, there are many types of tax exemptions allowed. To activate this option, the discount code must be set to "duty-free." The user is prompted to select a type:
|
| Control Goods Type | This option is available to customers who need a GOB permit to purchase certain products. |
| License Expires | This is where users input the expiry date of the customer's license for the GOB permit under 'control goods type'. |
| Payment Terms | This is where you may specify the number of days a customer has to pay their bill. |
| Discount Code | As the name implies, this is a promotional code. Whether it's a wholesale discount, a retail discount, or a duty-free discount, etc. |
| Discount % | As implied by the name, here is where you enter the percentage for the discount you want to apply to the customer account. |
| Preferred Delivery Agent | This option allows you to choose the customer delivery agent, if applicable. |
| Current Balance | The current balance of the customer account is displayed here. |
| Credit Limit | This option enables you to set the customer account's credit limit. |
| Available | |
| Previous Balance | |
| Payments to date | |
| Last Paid | The date of the most recent payment made to the customer's account is displayed here. |
| Invoice format | The term "invoice format" refers to the layout of an invoice. There are two types of layouts available:
|
| Statement Option | This option enables users to choose how their customers will receive their statements, whether printed or sent through email. |
| Email Stmt Sent | The date of the most recent email statement is displayed here. |
| Include Invoice Copy with Stmt | Enabling this option will include a copy of all invoices in the email statement. |
| Track Paid Invoice | When a customer makes a payment, it is applied to an outstanding invoice. Enabling this option keeps track of all invoices that have been paid. |
| Allow Cash Sale | As the name suggests, this option enables the customer to make a cash payment. (By default, this is enabled). |
| Allow Charge Sale | As implied by the name, this option enables the customer to do a charge sale. (By default, this is enabled). |
| Accept Paym. to Acct. | As indicated by the name, this option allows payment to be accepted on the customer account. (This is enabled by default). |
| Account Status | Users may utilize this option to activate or deactivate a customer account. |
| Date Open | This section details the date the customer's account was opened. |
.png)
How to create a customer account?
- Navigate to the Accounts tab.
- Choose the "Customers" ribbon. (The customers' window will open)
- Select the "New Customer" button.
- Fill in all the necessary information. (For a description of these forms, see Section 4.1.1 )
- Select the "save customer" button.

How to do a miscellaneous debit?
- Navigate to the Accounts tab.
- Choose the "Customers" ribbon. (The customers' window will open)
- Search for the customer to whom you want to make a miscellaneous debit.
- Select the "misc debit" button.
- Enter the adjustment amount
- Fill out a description
- Click the "enter adjustment" button
Invoice History Tab (accounts)
This tab allows users to search for and print any invoices generated for a particular customer. It is developed in a search engine manner to allow users to search for invoices by date.
.png)
How to view customer account invoice history?
- Navigate to the Accounts tab.
- Choose the "Customers" ribbon. (The customers' window will open)
- Search for the required customer in the "customer search" panel.(To learn how to do a customer search, see "Customer Search Panel")
- Go to the "invoice history" tab.
- Choose the dates you'd like to view.
- Select "display". **Note that you may print this list by selecting the "print/export" button.

Customer Sales History Tab
This tab allows users to search for items by date and view a list of items purchased by the customer on the selected date
.png)
How to view a list of items purchased by the customer?
- Navigate to the Accounts tab.
- Choose the "Customers" ribbon. (The customers' window will open)
- Search for the required customer in the "customer search" panel.(To learn how to do a customer search, see "Customer Search Panel")
- Go to the "Customer Sales History" tab.
- Choose the dates you'd like to view.
- Select "display". **Note that you may print this list by selecting the "print/export" button.

Daily Balances Tab
This tab allows users to view payment transactions and outstanding balances for the selected customer
How to view customer account payment transactions and outstanding balance?
- Navigate to the Accounts tab.
- Choose the "Customers" ribbon. (The customers' window will open)
- Search for the required customer in the "customer search" panel.(To learn how to do a customer search, see "Customer Search Panel")
- Go to the "Daily Balances" tab.
- Choose the dates you'd like to view.
- Select "display". **Note that you may print this list by selecting the "print report" button.

Customer Memos Tab
Users can use this tab to create memos for specific customer accounts.
How to create memos in customer account?
- Navigate to the Accounts tab.
- Choose the "Customers" ribbon. (The customers' window will open)
- Search for the required customer in the "customer search" panel.(To learn how to do a customer search, see "Customer Search Panel")
- Go to the "Customer Memos" tab.
- Enter your memo in the "notes" box.
- Select "save memo information".

Changes Tab
This tab allows users to view any changes made to the customer's account and who made them.
How to view the modifications made to a customer's account?
- Navigate to the Accounts tab.
- Choose the "Customers" ribbon. (The customers' window will open)
- Search for the required customer in the "customer search" panel.(To learn how to do a customer search, see "Customer Search Panel")
- Go to the "Changes" tab.
- Select "display changes".

Unpaid Invoices Tab
This tab enables users to examine the unpaid invoices of the specified customer as well as any invoices made under the selected account.
How to view a customer's unpaid invoices?
- Navigate to the Accounts tab.
- Choose the "Customers" ribbon. (The customers' window will open)
- Search for the required customer in the "customer search" panel.(To learn how to do a customer search, see "Customer Search Panel")
- Go to the "Unpaid Ivoices" tab.
- Select "outstanding invoice".

Archives Tab
Searching for extremely old transactions made under the customer account is made possible via this tab.
How to do a customer account archive search?
- Navigate to the Accounts tab.
- Choose the "Customers" ribbon. (The customers' window will open)
- Search for the required customer in the "customer search" panel.(To learn how to do a customer search, see "Customer Search Panel")
- Go to the "Archives" tab.
- Select the date range you wish to view.
- Click the display button.

Reports (Accounts)
This feature enables users to see a list of all customer accounts in the POS system and produce reports on product sales analysis, annual customer sales, and customer payments that are past due. Additionally, it enables users to print statements, email them, and reconcile payments.
Customer List (Accounts)
The customer list reports enable users to search for customer accounts and see a list of all accounts created in the POS system.
*To view a list of all clients in the GoneClear Storefront POS, click "show all."
Search for customer account
- Navigate to the Accounts tab.
- Choose the "customer list" from the report drop-down menu. (The customer list will open)
- You may search by customer number, customer name, customer address, business type, or account type. Enter data into any field.
- Click Search.
Customer Product Sales Analysis (Accounts)
Annual Customer Report (Accounts)
A customer product analysis is a monthly and yearly financial overview of a customer's activities over a specified year.
view annual customer report
- Navigate to the Accounts tab.
- Choose the "annual customer report" from the report drop-down menu. (The customer sales report window will open)
- Choose format type
- Customer 12 month report -
- Customer Sales Summary -
- Click Search.
Print Statement (Accounts)
The print statement function enables users to print hardcopies of customer statements or electronically send them through email.
There are five tabs under this window that we will discuss in this section: customer hardcopy statement, email statement, email settings, sent email history, and email error.
Customer Hardcopy Statement Tab (Accounts)
Users may print hardcopies under customer statements from this tab. It enables users to print a single customer statement, a range of customer statements, or all customer statements in the GoneClear Storefront POS.
How to print customer statement
- Navigate to the Accounts tab.
- Choose the "annual customer report" from the report drop-down menu. (The customer sales report window will open)
- Go to Customer Hardcopy Statement Tab.
- Choose your printer from the drop-down menu.
- Select the account type.
- Choose an option from the drop-down menu
- Single - Select this option to print a statement for a specific customer.
- Customer range - This option allows you to print a range of customer statements based on the account number.
- All Customer - This option allows you to view and print a list of all customer statements in the system.
- Click apply.
- Click the "print hard copy statement" button.
Email Statement Tab
Users may send statements through email under this tab. It enables users to email a single customer statement, a range of customer statements, or all customer statements in the GoneClear Storefront POS.
How to send email statement?
*Note: Only customers who have their customer account defined as EMAIL Statements are grouped in the Email batch. It is recommended that you configure your email settings before sending statements.
- Navigate to the Accounts tab.
- Choose the "annual customer report" from the report drop-down menu. (The customer sales report window will open)
- Go to Email Statement Tab.
- Select the account type.
- Choose an option from the drop-down menu
- Single - Select this option to email a statement for a specific customer.
- Customer range - This option allows you to email a range of customer statements based on the account number.
- All Customer - This option allows you to email all customer statements in the system.
- Click apply.
- Click Group Email Batch (If there is a customer in the batch to whom you do not want to send a statement, uncheck the Send Email box to omit them from the batch.)
- Click Send Statement Email Batch
Email Settings Tab
This tab allows users to create an email subject line and a message to include in the body of the email. It is recommended that you configure your email settings before sending statements.
Create subject line and message for statement emails.
- Navigate to the Accounts tab.
- Choose the "annual customer report" from the report drop-down menu. (The customer sales report window will open)
- Go to Email Setting Tab.
- Enter your email subject and body.
- Click Save Email Settings
Sent Email History Tab
This feature enables users to view an email history based on the dates selected.
*NOTE: Microsoft Outlook must be installed on the workstation.
How to view email history?
- Navigate to the Accounts tab.
- Choose the "annual customer report" from the report drop-down menu. (The customer sales report window will open)
- Go to Sent Email History Tab.
- Choose the dates for which you wish to view history.
- Click Search Simply click the "export" button to export this list to an excel file.
Email Error Tab
This feature enables users to view a history of email errors based on the dates selected.
How to view history of email errors?
- Navigate to the Accounts tab.
- Choose the "annual customer report" from the report drop-down menu. (The customer sales report window will open)
- Go to Sent Email Error Log Tab.
- Choose the dates for which you wish to view history.
- Click Search Simply click the "export" button to export this list to an excel file.
Aged Accounts (Accounts)
An aging account report summarizes customers' outstanding balances and the length of time the bills have been overdue. The aging method is base on the three-period start dates entered. The defaults are determined based on the current accounting month, which is similar to how a utility provider would calculate the payment due.For example, all charges made during an operational month are billed on the 30th, and the customer balance is expected to be settled by the end of the following month. In the example below, the current operational month is July 1 – 31, it might be the 10th of July, and any invoices charged since July 1 are not due for more than 30 days ('30 days' being the description of the current month). Any bills charged in June (the month for which statements were recently sent) are characterized as 30-60. May bills are all in the 60-90 range. Any invoice issued before to 1 May is more than 90.
*NOTE: If your aging is based on individual invoices regardless of the month charged, which implies that your aged accounts will vary daily, you should adjust the starting dates for the periods each time you calculate the aging report.
There are three distinct options available in the aging report. Below is a table outlining the definitions for each option.
| Terminologies | Definitions |
|---|---|
| Collections | This option will show only accounts that have a balance, and therefore will exclude accounts with a zero balance or a credit balance. |
| Last Ending Period | This option will display all accounts in either debit or credit mode, thus documenting stated balances for account reconciliation. |
| Statement List | This option displays all accounts that have had activity during the most recent statement period or that have a debit balance. |
View aged accounts
- Navigate to the Accounts tab.
- Choose the "Aged Accounts" from the report drop-down menu. (The aged account window will open)
- Enter the start and end dates. (The 60 and 90 day periods will be calculated automatically)
- Choose the account type from the drop-down menu.
- Choose an option from the drop-down menu.
- Click Apply. Note: "Create Interest Worksheet" is a feature that enables users to generate interest on all customer balances that exceed a certain number of days in a worksheet format.
How to Create Interest Worksheet
"Create Interest Worksheet" is a feature that enables users to generate interest on all customer balances that exceed a certain number of days in a worksheet format.
- Navigate to the Accounts tab.
- Choose the "Aged Accounts" from the report drop-down menu. (The aged account window will open)
- Enter the start and end dates. (The 60 and 90 day periods will be calculated automatically)
- Choose the account type from the drop-down menu.
- Choose an option from the drop-down menu.
- Click Apply.
- Click create interest worksheet (Charge interst window will open)
- Set your interest rate and days exceed
- Select create worksheet button
To view this worksheet
- Navigate to the Accounts tab.
- Click "Month End" button.
- From the report "Month End Accounts Reports" drop-down menu, choose the "Process interest charges" For more on information on this window and how it operates see section PROCESS INTEREST CHARGES.
Reconcile Payment/Invoices (Accounts)
This feature analyzes each payment made to the customer's account and generates a list of the account balances for GoneClear POS system reconciliation.
View reconciliation reports.
- Navigate to the Accounts tab.
- Choose the "Reconcile Payment/invoices" from the report drop-down menu.
Cashier Transmittals
Cashier Transmittals is the primary focus of the accounts, providing them with all the data necessary for daily posting to their accounting system. Additionally, it is used to open cashier sessions. See section 3.1.1 to learn how to create a cashier session
| Terminologies | Definitions |
|---|---|
| Post | |
| Unpost |
Journals
- Selected cashier session - Allows the user to view journal reports based on the session number.
- Select a day - Allows the user to view journal reports according to a specified date.
- Period sales - Allows the user to view journal reports based on specified start and end dates.
How to find Journals?
- Navigate to the Accounts tab.
- Choose the "cashier Transmittal". (The manage cashier window will open)
- Choose your session date
- Click display
- Select the cashier session (This will activate the journal button at the bottom.)
- Click the journal button.
- Review the journal's sections to get a thorough knowledge of each option and report.
Selected Cashier Session Reports
| Report | Definition |
|---|---|
| Cashier Session Report | A brief report summarizing the total sales made during the selected cashier session will be displayed. This report does not include customer names or payment methods. |
| Cashier Transmittal | This report summarizes all credit notes, invoices, direct deposit payments, and cash sales for the selected cashier session. Additionally, it shows customer balances and cash drawer reconciliation. This report will only include the date of the cashier session, not the date of each transaction completed within the session. |
| Cash/Sales Journal (One Cashier) | This report will detail each transaction that occurred during the selected session, including the date of the transaction, the amount received, the tax rate, whether the transaction was tax-exempt, the invoice number, the account name, and the account number. It does not include the payment method. |
| Cashier Transmittal (Summary) | This report contains summary of the cashier terminal. It does not have the same level of detail as the cashier terminal. It only shows the total amount for cash sales, credit notes, and account payments, etc. |
| Payments Reconcilation | The Payment Reconciliation Report is a report that summarizes the amount collected by payment type. |
Select a day Reports
| Report | Definition |
|---|---|
| Daily Journals | This is a report that summarizes the daily journal entries for the selected date. |
| Cash/Sales Journal (One Cashier) | This report enables users to select by date on a particular cashier transaction. It will detail each transaction for the selected cashier that occurred during the specified date, including the amount received, the tax rate, whether the transaction was tax-exempt, the invoice number, the account name, and the account number. It does not include the mode of payment. |
| Cash/Sales Journal (Location Cashiers) | This report allows users to select all cashier transactions by location and date. It summarizes each cashier's total sales for the given location and date, including the amount received on a customer's account, the tax rate, whether the transaction was tax-exempt, the invoice number, the account name, and the account number. It does not include the mode of payment. |
| Cash/Sales Journal (Multiple Cashiers) | This report allows users to select all cashier transactions by date. It summarizes each cashier's total sales for the given date, including the amount received on a customer's account, the tax rate, whether the transaction was tax-exempt, the invoice number, the account name, and the account number. It does not include the mode of payment. |
| Sales Register | The Sales Register report contains information on the item purchases for Business in the Goneclear Storefront Point of Sale. The Sales Register report combines the sales data for effective management of company activities. This report contains four options:
|
| GST Supplimental | |
| Invoice Register | |
| Return Goods Report | This is a report detailing all goods returned on the specified date. |
| Non-Stock Items | This report details all products that lacked a stock number and were added by a cashier using the Non-Stock Items function. |
| Discount Report | This report summarizes all customers who received a discount on the specified date, as well as the individual who gave the discount. |
| Stock Movement Report | This report summarizes the items sold in a particular location. It contains the category of the item, the stock number, the description, the quantity, and the total sales. |
| All Required Report |
Period sales
| Report | Definition |
|---|---|
| Cash/Sales Journal (One Cashier) | This report allows users to choose a start and end date for a specific cashier transaction. It will detail each transaction for the selected cashier that occurred during the specified date, including the amount received, the tax rate, whether the transaction was tax-exempt, the invoice number, the account name, and the account number. It does not include the mode of payment. |
| Cash/Sales Journal (Multiple Cashiers) | This report allows users to choose a start and end date for all cashier transactions. It summarizes each cashier's total sales for the given date, including the amount received on a customer's account, the tax rate, whether the transaction was tax-exempt, the invoice number, the account name, and the account number. It does not include the mode of payment. |
| GST Supplimental | |
| Stock Movement Report | This report summarizes the items sold in a specific location over a specified period. It contains the category of the item, the stock number, the description, the quantity, and the total sales. |
| Summarize Daily AR Transactions Report | This report contains a summary of the totals for each day of the specified period and location. |
| Summarize Daily (Excel) | This report includes a summary of the daily totals for the selected period and location, which can be exported to Excel. |
| Summarize Daily (Stock Only) | |
| Department Summary | This is a report on the department's total sales for the specified location and period. |
| Return Goods Report | This is a report detailing all goods returned on the specified period. |
Void Invoice (Cashier Transmittals)
Authorized users may void invoices, unlock cashier sessions, and view half-hour sales by using the void invoice feature in the cashier transmittal.
How to void an invoice?
- Navigate to the Accounts tab.
- Choose the "cashier Transmittal". (The manage cashier window will open)
- Select void invoice button. (The voiding feature window will open)
- Select the cashier session from the left-hand side of the window.
- Locate the invoice you want to void in the window's list on the right.
- Select the void button.
- Select "yes" on the void invoice pop-up box.
How to unlock a cashier session?
Unlocking a cashier grants access to the proforma to others.
- Navigate to the Accounts tab.
- Choose the "cashier Transmittal". (The manage cashier window will open)
- Select void invoice button. (The voiding feature window will open)
- Click the who's working button
- Choose the session that you want to access.
- Click unlock
- Select "yes" on the pop-up box.
How to view half hour sales?
- Navigate to the Accounts tab.
- Choose the "cashier Transmittal". (The manage cashier window will open)
- Select void invoice button. (The voiding feature window will open)
- Click the half hour sales button. (The hourly sales window will open)
- Select the date and time range for viewing.
- Click apply
Month End
At the end of each month, a company should examine its accounts to ensure that all transactions for that month have been properly recorded and reconciled. This component of the GoneClear StoreFront aids in the organization, accuracy, and completion of all accounting data.
Close Month
This function, as the name implies, allows users to close the month at the ending of each month. This procedure stores and manages all customers' ending balances and forwards them to the following month. When this is done properly, users can view reports, records, and balances, etc.
How to close month?
- Navigate to the Accounts tab.
- Click "Month End" button.
- Choose the "Close Month" from the report drop-down menu.
- Confirm your closing date, if necessary.
- Click Proceed
Month End Accounts Reports
As stated before, after the month has closed, users may access reports, records, and balances, etc. This is the tool that allows users to view monthly financial reporting. This chapter will explain the reports listed in this tool and their function.
Month End Summaries
As the name implies, this feature generates a monthly summary report. It enables reconciliation, account analysis, viewing of reassigned invoices, and viewing and printing previous month reports.
How to print/view Account Transaction Summary for Month Ending?
Print All Account button - This feature enables users to print/view month-end account transaction summaries. This record will include cash transactions, layaway deposit/credit notes, and receivables for the current and previous month. Additionally, it will identify, if any, a reconciliation error for account receivables.
- Navigate to the Accounts tab.
- Click "Month End" button.
- From the report "Month End Accounts Reports" drop-down menu, choose the "Month End Summaries"
- Select the "print all account" button. (Preview window will open)
- Select the printer icon on the toolbar to print document
How to view reconciled accounts?
Reconcile Accounts button - This feature enables users to print/view any accounts that are out of balance at the end of the month, allowing users to reconcile these accounts.
- Navigate to the Accounts tab.
- Click "Month End" button.
- From the report "Month End Accounts Reports" drop-down menu, choose the "Month End Summaries"
- Select the "reconcile accounts" button. (Preview window will open)
- View or export the list for reconciliation.
View the month-end list of all reassigned invoices.
Reassigned Invoices button - This feature allows users to print/view any invoices that have been reassigned to another invoice.
- Navigate to the Accounts tab.
- Click "Month End" button.
- From the report "Month End Accounts Reports" drop-down menu, choose the "Month End Summaries"
- Select the "Reassigned Invoice" button. (Reassigned Invoice window will open)
- Select the start and ending dates you want to view/print
- Click apply
Print/view the month-end account transaction summary by account type.
Account Type button - This feature enables users to Print/view the month-end account transaction summary by account type.
- Navigate to the Accounts tab.
- Click "Month End" button.
- From the report "Month End Accounts Reports" drop-down menu, choose the "Month End Summaries"
- Select the "account type summary" button. (Month end summary window will open)
- Select the account type you want to view/print
- Click print. (Preview window will open)
- Select the printer icon on the toolbar to print document
How to view account analysis?
Account Analysis button - This feature enables users to view the details of all their customers' accounts and balances. It displays whether or not an account is out of balance and requires reconciliation.
- Navigate to the Accounts tab.
- Click "Month End" button.
- From the report "Month End Accounts Reports" drop-down menu, choose the "Month End Summaries"
- Select the "accounts analysis" button. (Reconcile Accounts window will open)
Accounts Summary
Allow users to view and print a separate list of end-of-month account types, such as receivables, stock removal, layaways, and gift cards.
How to print a summary of accounts receivables for end of month?
Note: This function enables users to print individual accounts receivables, layaways, stock removal, or gift cards.
- Navigate to the Accounts tab.
- Click "Month End" button.
- From the report "Month End Accounts Reports" drop-down menu, choose the "Accounts Summary"
- Select the account type you want to print
- Select the print summary button
Credit Note Report
As the name suggests, this feature allows users to view/print a report of credit notes for a selected period.
How to view credit note report?
- Navigate to the Accounts tab.
- Click "Month End" button.
- From the "Month End Accounts Reports" drop-down menu, choose the "Credit Note Report"
- Select the start and ending date
- Click apply
Miscellaneous Debit Posting
A miscellaneous debit is a transaction that a business manually enters on a customer's account for reconciliation or a variety of other reasons, hence the term miscellaneous. This feature is used to generate a report detailing all of those miscellaneous debits.
How to view/print Miscellaneous Debit Posting
- Navigate to the Accounts tab.
- Click "Month End" button.
- From the "Month End Accounts Reports" drop-down menu, choose the "Miscellaneous Debit Posting"
- Select the start and ending date
- Click apply
GST/GOB Reports
This feature enables users to get any monthly GST/GOB report. Users may get reports on exempt GST, stock transfer costs, and others.
How to print GST/GOB Reports?
- Navigate to the Accounts tab.
- Click "Month End" button.
- From the "Month End Accounts Reports" drop-down menu, choose the "GST/GOB Reports"
- Select the start and ending date
- Select an option from report type
- Click "print register"
Salesman Performance Analysis
This report enables you to monitor the performance of your sales reps. This way, you can track results and optimize your sales approach. Additionally, it estimates the total commission earned by each individual on the selected date.
How to print Salesman Performance Analysis?
- Navigate to the Accounts tab.
- Click "Month End" button.
- From the "Month End Accounts Reports" drop-down menu, choose the "Salesman Performance Analysis".
- Choose a the commision code.
- Select the start and ending date.
- Choose a report format.
- Click print.
Process Interest Charges
Here, an interest charges worksheet will be displayed. The aging tool is used to generate the worksheet.
How to Process Interest Charges worksheet?
- Navigate to the Accounts tab.
- Click "Month End" button.
- From the "Month End Accounts Reports" drop-down menu, choose the "Process Interest Charges"
- Check the box next to any accounts you don't wish to include in your worksheet.
- Select Process
Location Cost Analysis
How to print Location Cost Analysis?
- Navigate to the Accounts tab.
- Click "Month End" button.
- From the "Month End Accounts Reports" drop-down menu, choose the "Location Cost Analysis".
- Select the start and ending date.
- Click Apply.
- Click print.
Month End Stock Reports
End of Month Stock Value Worksheet
This tool reconciles the value of inventory from month to month to ensure that expenses are computed correctly each time an item is received or goes out.
How to view End of Month Stock Value Worksheet?
- Navigate to the Accounts tab.
- Click "Month End" button.
- From the "Month End Accounts Reports" drop-down menu, choose the "End of Month Stock Value Worksheet".
Stock Analysis
Stock analysis analyzes sales reports to determine which products sold well and which did not. The analysis may be used to decide how to stock inventory.
How to view Stock Analysis?
- Navigate to the Accounts tab.
- Click "Month End" button.
- From the "Month End Accounts Reports" drop-down menu, choose the "Stock Analysis".
- Select the start and ending date.
- Choose a department or supplier.
- Choose whether to view only items that have been moved or include items that have not been moved.
- Click Apply
- The print option button allows users to print only sales, stock received, all stock moved, etc.
FIFO report
The FIFO report keeps track of your inventory using the 'First In First Out' system, allowing the company to determine the valuer of the inventory. This implies that the oldest inventory items are reported as sold first, regardless of whether this is done in actuality.
For instance, if 100 items were bought for $10 and then 100 more goods were purchased for $15, FIFO would allocate a cost of $10 to the first item resold. After 100 items are sold, the item's new cost is $15, regardless of further inventory purchases.
How to view FIFO Report?
- Navigate to the Accounts tab.
- Click "Month End" button.
- From the "Month End Accounts Reports" drop-down menu, choose the "FIFO Reports".
Stock Value-real time
This tool can be used to get a quick glimpse of the stock's value, which is the current price of the stock at that moment in time. It multiplies the number of items in stock by the current cost and provides an approximate estimate.
How to view Stock Value-real time?
- Navigate to the Accounts tab.
- Click "Month End" button.
- From the "Month End Accounts Reports" drop-down menu, choose the "Stock Value-real time".
- Users may print this report by selecting the print option.
Stock Value-any previous date
This feature lets users view the stock's value by location for any prior date. It allows users to view and export a detailed report on location inventories grouped by user preferences such as department, supplier, and so on.
How to view Stock Value-any previous date?
- Navigate to the Accounts tab.
- Click "Month End" button.
- From the "Month End Accounts Reports" drop-down menu, choose the "Stock Value-any previous date".
- Select the date you wish to view.
- Click display
- Click "view details" for the location you would like to see.
Stock Moved
Purchases
This feature enables users to choose a start and end date for viewing a report on the supplier's incoming shipments.
View incoming shipment report by supplier.
- Navigate to the Accounts tab.
- Click "Month End" button.
- From the "Month End Accounts Reports" drop-down menu, choose the "Purchase".
- Choose a beginning and ending date
- Click apply
- Clicking the "export" button allows users to export this list.
Account Recievable Utilities
Tax Rate
View Tax Rate
- Navigate to the Accounts tab.
- Click "Account Receivable Utilities." button.
- Click Tax Rate.
Discount Definition
View Discount Rates and it's code
- Navigate to the Accounts tab.
- Click "Account Receivable Utilities." button.
- Click Discount Definitions. (The Discount Rates window will open)
Create a new Discount Rates
- Navigate to the Accounts tab.
- Click "Account Receivable Utilities." button.
- Click Discount Definitions. (The Discount Rates window will open)
- Select New Rate
- Fill in the discount code and discount type in the "discount information" box.
Account Type
Open Account Type
- Navigate to the Accounts tab.
- Click "Account Receivable Utilities." button.
- Click Account Type.
Business Type
Open Business Type
- Navigate to the Accounts tab.
- Click "Account Receivable Utilities." button.
- Click Business Type.
Commission Rates
Open Commission Rates
- Navigate to the Accounts tab.
- Click "Account Receivable Utilities." button.
- Click Commission Rates.
Gift Cards
A gift card is a prepaid debit card loaded with a specified amount of money that may be used for a number of purposes. We will discuss two processes in this section: customer relations and accounting.
Customer Relations Process:
- Create - cards can be customized for purchaser.
- Issue - Giver 'Purchases cards.
- Redeem - Recipient uses as payment on purchs
- Collect customer contact information at the time of first use of card.
Notify of balance remaining and pending expiration.
Continue to send sale and special notices on social media.
Note: Records to date indicate gift card users will spend 70% more than the value of the card
Accounting Process:
- Create - print and have cards ready.
- Issue - ‘Purchase’ cards $ received and credited to the Gift Card Acct 400-100 Expiration date is from date of issue – payment is collected. A record for each card is initialized with purchase date and amount.
- Redeem - Recipient of gift card uses the card as a form of payment on purchase. The full amount of sale is booked as usual for the purchase and total received for the cash sale. Only the portion used from the gift card is debited to the Gift Card Account 400-100 thereby reducing the credit balance in the ‘master account’ for gift cards
The individual card used also has the portion used recorded to complete the records of when card was used, the invoice used for and remaining balance.
Month End Reporting The Gift cards debited are reported in the Misc Debit Posting report and reflected in the total Misc Debits totals. Issuing (‘Purchase’) of a card is not a sale until the card is used
Complete records for each card’s purchase and use is found in the Gift Card Manager module The balance in Gift Card Account 400-100 will always equal the detailed list of cards with an available balance in the Gift Card Manager
Gift Cards features
Users may use this feature to create gift card batches, print gift cards, and monitor reports, including Un-issued cards, Issued Cards, and Printed Cards, to mention a few. It also allows users to view the card's history and balance.
How to create gift card?
- Navigate to the Accounts tab.
- Click the "Gift Card" button.
- Click the "create New Cards" Tab
- Enter the number of cards you want to produce in the "number of cards" field.
- In the default denomination field, enter the denomination amount.
- In the default company field, enter the company name if there is any.
- Select the "Create Batch" button.
- Select the "Update card list" to add the batch to be printed and issued
Purchase Orders
Numerous functions are available under the tab "Purchase order." It enables users to construct worksheets for buying goods, creating purchase orders, and generating internal transfers.
| Terminologies | Definitions |
|---|---|
| Pending Status | If the status of a document is pending, it is being prepared by the user. |
| Active Status | If the status of a document is active, it has been released to the Warehouse. |
| In Process Status | If the status of a document is in process, the user is processing this document. |
| Close Status | If the status of a document is close, the document's processing is complete and it cannot be changed or processed further. |
| Received Status | |
| Cancelled Status | If the status of a document is cancelled, it was generated and cancelled by a user for a variety of reasons. |
| Voided Status" | If a document's status is voided, it was generated and void by a user for a variety of reasons. |
| Fill below Minumum Checkbox" | This is a selection option in the inventory selection window. If this option is selected, the store reorder list will display all products that are less than the minimum quantity. For instance, if an item's minimum capacity is set to 10 and there are only 5 available, this option instructs the software to display the item on the store's reorder list. |
| Hide Discontinued Items Checkbox" | As the name implies, when activated, this option hides discontinued products. As a result, discontinued products will not appear on your store's ordering list. |
| Hide Discontinued Items Checkbox | As the name implies, when activated, this option hides discontinued products. As a result, discontinued products will not appear on your store's ordering list. |
| Wse in stock only Checkbox | When activated, the store reorder list will only display items that are currently in stock at the warehouse. |
| Hide Seasonal Items | As the name implies, when this option is activated, it conceals seasonal products such as Christmas, Easter, Valentine, etc. When deactivated, however, it enables users to choose a season. |
Re-Order Worksheet
This function is used to create a list of products that the company or a specific location within the company needs. There are three methods of reordering worksheets:
- Create a worksheet for ordering items from the company's warehouse internally by converting worksheet to transfer request (RSO).
- Create a worksheet for placing orders with the company's suppliers by converting worksheet to purchase order (PO).
- Create a worksheet for a sales order.
How to create a worksheet?
Creating a worksheet involves adding items to it. There are two methods to populate a worksheet with items:
- Manually add items.
- Scan Items
Create worksheet (Manually add items)
- Navigate to the Purchase Order tab.
- Choose the "Re-order Worksheet" ribbon. (The worksheet window will open)
- Click the "open" button on the right corner
- Enter a description for the worksheet
- Click Create new worksheet. (A worksheet will be generated with its unique number.)
- To locate the worksheet you generated, go to the worksheet dropdown panel and enter the worksheet number or browse the pending status list.
- Click Add Items button
- Enter items by supplier, manufacturer, stock number, department or categories.
- Select Display. If you see any items on your worksheet that you wish to delete, select the item and click the "Delete Group" option. To select several items simultaneously, hold CTRL and select the item.
- Click Add to Worksheet
- Enter the quantity of each item you want to order.
- Click Save
Create worksheet (Scan Items)
- Navigate to the Purchase Order tab.
- Choose the "Re-order Worksheet" ribbon. (The worksheet window will open)
- Click the "open" button on the right corner
- Enter a description for the worksheet
- Click Create new worksheet. (A worksheet will be generated with its unique number.)
- To locate the worksheet you generated, go to the worksheet dropdown panel and enter the worksheet number or browse the pending status list.
- Navigate to Inventory tab
- Click the UPC Utilities ribbon
- Enter the worksheet number in the "batch#" field under scan orders/shipments.
- In the "type" option select purchase order
- Click fill order
- Scan item
- On the pop-up message "add item to worksheet," click yes.
- Enter the quantity of the item and click ok.
- Repeat steps 12–14 until all items needed have been successfully added to the worksheet.
- Go back to the worksheet window and click save.
Worksheet to Transfer Request
- Navigate to the Purchase Order tab.
- Choose the "Re-order Worksheet" ribbon. (The worksheet window will open)
- Click the "open" button on the right corner
- Enter a description for the worksheet
- Click Create new worksheet. (A worksheet will be generated with its unique number.)
- To locate the worksheet you generated, go to the worksheet dropdown panel and enter the worksheet number or browse the pending status list.
- Click Add Items button
- Enter items by supplier, manufacturer, stock number, department or categories.
- Select Display. If you see any items on your worksheet that you wish to delete, select the item and click the "Delete Group" option. To select several items simultaneously, hold CTRL and select the item.
- Click Add to Worksheet
- Enter the quantity of each item you want to order.
- Click Save
- Under the create document button, choose the "Tranfer request" option.
- On the pop-up window select the supplier and destination
- Select the "create document for all quantities selected" button.
Worksheet to Purchase Order
- Navigate to the Purchase Order tab.
- Choose the "Re-order Worksheet" ribbon. (The worksheet window will open)
- Click the "open" button on the right corner
- Enter a description for the worksheet
- Click Create new worksheet. (A worksheet will be generated with its unique number.)
- To locate the worksheet you generated, go to the worksheet dropdown panel and enter the worksheet number or browse the pending status list.
- Click Add Items button
- Enter items by supplier, manufacturer, stock number, department or categories.
- Select Display. If you see any items on your worksheet that you wish to delete, select the item and click the "Delete Group" option. To select several items simultaneously, hold CTRL and select the item.
- Click Add to Worksheet
- Enter the quantity of each item you want to order.
- Click Save
- Under the create document button, choose the "purchase order" option.
- Select a supplier from the pop-up window and click one of the buttons. The buttons are as follows:
- Create a document for selected supplier - Select this option if you want to create a purchase order for just the products in the specified supplier's inventory.
- Create a document for all quantities selected - Select if you want to create a purchase order for all products.
- Create a document for scanned items only - Select if you want to generate a purchase order for only scanned items.
Worksheet to Sales Order
There are two ways in completeting this process:
- Navigate to the Purchase Order tab.
- Choose the "Re-order Worksheet" ribbon. (The worksheet window will open)
- Go to the customer search panel and search for the customer for whom you want to create the order.
- Double click on the customer name (the panel will close)
- Click the "open" button on the right corner
- Enter a description for the worksheet
- Click Create new worksheet. (A worksheet will be generated with its unique number.)
- To locate the worksheet you generated, go to the worksheet dropdown panel and enter the worksheet number or browse the pending status list.
- Add items using the manual method (see step 7 to 10) or scan method (see step 7 to 16)
- If required, print a picklist for the picker.
- Select the "removal order (invoice)" option under the "create document" button.
Scan Items to Worksheet
- Navigate to the Purchase Order tab.
- Choose the "Re-order Worksheet" ribbon. (The worksheet window will open)
- Click the "open" button on the right corner
- Enter a description for the worksheet
- Click Create new worksheet. (A worksheet will be generated with its unique number.)
- Open worksheet and copy worksheet number at the top. (go to the worksheet dropdown panel and enter the worksheet number or browse the pending status list)
- Navigate to the Inventory tab.
- Select the "UPC Utilities" ribbon. (The UPC Utility Startup window will open)
- Enter the document number under Scan Orders/Shipments.
- Choose the type of document to scan.
- Scan the UPC barcode and press enter on your keyboard.
- On the popup box, click OK.
- Enter the quantity of the item you want to order.
Purchase Orders
Purchase Orders (POs) are documents provided by you, as a buyer, to a supplier requesting goods or services as an order. There are two methods to create a purchase order:
- Create a purchase order from a worksheet. (See Worksheet Section)
- Create a Purchase Order directly from the Purchase Order function.
Close purchase order from worksheet.
Once a worksheet has been converted to a PO (See Worksheet Section), the procedures below will help you save and close the PO.
- Navigate to the Purchase Order tab.
- Select the "Purchase Order" ribbon. (The Purchase Order window will open)
- Click the "locate order" panel
- Located the PO created and double click to open
- Click close (This will close the PO and enter all items as "on order" in the system.)
Create PO's using purchase order function
- Navigate to the Purchase Order tab.
- Select the "Purchase Order" ribbon. (The Purchase Order window will open)
- Click the "new" button on the right corner
- Select Supplier
- Click Save
- Add Items and quantity you want to purchase
- Click close (This will close the PO and enter all items as "on order" in the system.)
How to search for a Purchase Order (PO)
- Navigate to the Purchase Order tab.
- Select the "Purchase Order" ribbon. (The Purchase Order window will open)
- Click the "locate order" Panel
- Select a search mode. (In this example, we'll use the document number mode.)
- Type in the ducument number
- Click locate
- Select PO from the search results.
Transfers and Requisitions
When a company grows, it may become necessary to manage several warehouses. Transfer Requests are thus likely to be a regular occurrence in your company. A transfer request is a process through which items are requested between company locations. This feature enables users to create this request, which, when done properly, maintains the system current and accurate.
In this segment, we will learn to create a transfer request (RSO).
| Terminologies | Definitions |
|---|---|
| Supplier | In a transfer request, the supplier is the item's source location. |
| Destination | In a transfer request, the Destination is the location where the items will be delivered. |
| RSO | Commonly, an RSO is referred to as a transfer Request. |
| Redirect | |
| Show stock Other Location |
- Create a transfer from a worksheet. (See Worksheet Section)
- Create a transfer directly from the transfer request function.
Create an RSO
- Navigate to the Purchase Order tab.
- Select the "Transfer and Requisitions" ribbon. (The transfer request window will open)
- Click the "new" button on the right corner
- Select Supplier. (The source of the item(s).)
- Select Destination. (The location where the items will be delivered.)
- Click Save
- Click "yes" on the pop up window to add items
- Add Items and quantity you want to transfer/li>
- Click Print
- Click Release Request
- On the pop up window select release. (This request will be sent to your source location, who will prepare your item.)
How to search for a Transfer Request (RSO)
- Navigate to the Purchase Order tab.
- Select the "Transfer and Requisitions" ribbon. (The transfer request window will open)
- Click the "locate request" Panel
- Select a search mode. (In this example, we'll use the document number mode.)
- Type in the ducument number
- Click display
- Select RSO from the search results.
Logistics
Logistics, in a broad business sense, is the management of the flow of goods between the point of origin and the point of consumption to satisfy customer needs.
Deliveries
Delivery is the process of transporting goods from a company location to a customer location. This feature enables users to create the necessary documentation for customers and drivers, as well as track deliveries.
| Terms | Definition |
|---|---|
| Waybill | A document created by the company for a delivery that includes information on the delivery, its route, and the costs associated with it. A waybill is generated each time a truck is sent out. Simply stated, all items on the truck are listed on the waybill.
|
| Manifest | A manifest is a list of all the items loaded onto the truck. |
| zone group | |
| delivery zone | |
| DCF (Delivery Control Form) | DCF is a list of all goods ordered by customers. A DCF may be split depending on the manner of delivery. For instance, a customer may want to have just a few items on the DCF delivered on a specific day and the others on a different date. As a result, a DCF may have multiple waybills. |
The delivery function is comprised of four processes:
- Create a waybill
- Load Truck
- Send truck
- Return Truck
Create Waybill
- Navigate to the logistics tab.
- Select the "view deliveries" panel.
- Select the Invoice you want to be delivered
- Click the "dispatch way bill" button
- Select the schedule date, the zone group and the delivery zone
- Click Next
- Make any necessary adjustments. (This option allows you to alter the quantity or remove an item)
- Click Next
- Click finish (By activating the "print picklist" option, you can print a picklist.)
Load Truck
- Go to the Dispatch Center tab
- Click on the way bill and assign a truck
- Click on the load option or double click on the waybill line
- Click next
- Select the waybill discharge location
- Click deliver all goods.
- Click next
- Click finish
Send Truck
- Navigate to the send truck tab
- Select the truck
- Click manifest
- Enter the time the truck will depart, the driver's name, and the mileage out.
- Click the enroute button (There will be two manifests and three waybills printed.)
Return Truck
This procedure is carried out after the completion of the truck delivery. This process is repeated for all manifests taken on the truck and returned. It is to verify that all goods were delivered in their whole and in the amounts specified.
- Navigate to the return truck tab
- choose the return option on the manifest line.
- Enter the time and mileage in.
- Click the Returned button.
- Double click on the manifest line. (This will take you to the tab for confirming the delivery of items.)
- Double click on the waybill. (A confirm pop-up window will open)
- Make any necessary adjustments. (If not all items have been delivered, this window allows you to modify the quantity.) Note: If the customer did not get the amount indicated on the waybill and the quantity was adjusted throughout this process, the system will automatically generate a new waybill for the quantity of the pending item. To access the new DCF, go to the dispatch center tab and then to the check goods/load truck tab.
- Enter the name of the individual who received the items.
- Click the confirm button.
How to split a DCF during delivery?
DCF is a list of all goods ordered by customers. A DCF may be split depending on the manner of delivery. For instance, a customer may want to have just a few items on the DCF delivered on a specific day and the others on a different date. As a result, a DCF may have multiple waybills. This section will detail the procedures necessary to do this.
- Navigate to the logistics tab.
- Select the "view deliveries" panel.
- Select the Invoice you want to be delivered
- Click the "dispatch way bill" button
- Select the schedule date, the zone group and the delivery zone
- Click Next
- Remove any goods you do not want to be delivered at this time. (The system will generate a new DCF for the pending items.)
- Click Next
- Click finish (By activating the "print picklist" option, you can print a picklist.)
- The next step will be loading the truck. See Load Truck section Note: Both DCF will be accessible under the Dispatch Center tab.
How to cancel a delivery?
- Go to the Dispatch Center tab
- Click on the DCF you wish to cancel and assign the truck as cancel delivery
- Click on the load option or double click on the waybill line
- Enter a reason for cancellation
- On the pop-up window select cancel remaining items on this waybill
- The sales team will credit the customer. (See process delivery retun)
Customer Pickup
This feature was implemented to facilitate users to create an invoice for a customer and schedule the customer's pickup of the invoiced goods. Likewise, the customer may have made a payment at one location but will pick it up at another.
Create Waybill for Pickup
- Navigate to the logistics tab.
- Select the "view pick-ups" panel.
- Select the Invoice you want
- Click the "dispatch way bill" button
- Click Next
- Make any necessary adjustments. (This option allows you to alter the quantity or remove an item)
- Click Next
- Click finish (By activating the "print picklist" option, you can print a picklist.)
Release to customer
- Go to the Dispatch Center tab
- Double click the way bill
- Click next
- Select the waybill discharge location
- Click deliver all goods.
- Add comments, if necessary, and enter the recipient's name. (If you have installed your signature pad, you can have the recipient sign.)
- Click next
- Click finish (This will print documents automatically.)
Transfers
This feature has three sub-menus: transfer manager, new/pending requests, and transfer reports. To learn how to create a transfer request RSO, see the transfers and requisitions section.
- Transfer Manager - This feature is used to fill and receive RSO orders.
- New/Pending Requests - This feature enables users to create RSOs or view those that are already pending.
- Transfer reports - As the name implies, this function enables the user to view all transfer reports.
Transfer Manager
This feature is used to fill and receive RSO orders. In this segment we will discuss steps to fill an order, receieve an order, view orders and create variances. There four sub-tabs under the transfer manager window:
- Transfer Request - use to create a WTO
- Fill Order - Use to process the order
- Receive Order - use to received the order.
- View Orders - Use to view orders and variances.
| Terms | Definition |
|---|---|
| Tranfer Request (RSO) | A transfer request is a process through which items are requested between company locations. Commonly, an RSO is referred to as a transfer Request. |
| Warehouse Transfer Request (WTO) | A WTO is a document that the warehouse creates in response to the transfer request (RSO). This document will include a list of all goods delivered to the receiving location, along with their quantities. |
| Picklist | A picklist is a document that is assigned to a warehouse picker. It contains a list of items and their quantities that must be picked from a particular warehouse in order to fulfill orders. It includes just the information necessary for a warehouse picker to do his or her task. |
| Request Variance | A request variance occurs when the WTO records an incorrect amount of stock goods compared to what is physically transferred. Typically, a request variance will be found when the receiver does his count. |
| In Transit | The term "in transit" refers to products that have been sent from the supplier's warehouse but are not yet at the receiving location. As long as the receiver does not click received in the system, the goods will be recorded as "in transit" in the GoneClear POS. |
Transfer Process
This section will explain the transfer procedure that occurs once the RSO is created. The following are the four primary processes:
- Print Picklist
- Create WTO
- Fill Order
- Receive Order
- If necessary, print and resolve a transfer variance.
Print Picklist
- Navigate to the logistics tab.
- Under transfers, select transfer manager.
- Select the RSO or RSOs for which you want to print a picklist.(Note: by selecting multiple RSOs, you may print a single Picklist including items from all selected RSOs.)
- Click the "print picklist for selected items" button
Create a WTO
After the picker has completed the picklist, the user may create a WTO. Note, unlike the picklist, a multiple WTO cannot be formed by selecting all RSOs simultaneously. Converting an RSO to a WTO must be done individually.
- Select the RSO or RSOs for which you want to create a WTO.
- Click select all
- Click the "create transfer order (WTO)" button
- On the pop-up message, click ok
Fill Order
Following the creation of the WTO, the procedure of fulfilling the order starts. This is the area where users may input the quantity they will send based on the RSO. The WTO quantity may differ from the RSO quantity for a variety of reasons. For example, an order of six items may contain seven in the entire box. As a result, the warehouse may think it is more reasonable to ship the entire box.
- Navigate to the fill order tab
- Select the locate order panel
- Double click on order you want to fill. (If you are unable to see the order, click "refersh data.")
- There are three ways to complete this step.
- Scan the item and input the quantity, then press enter on your keyboard or click the "Add" button.
- Double click on the item and enter the quantity, then press enter on your keyboard or click the "Add" button.
- If you are certain of the contents of all the items, click "deliver all."
- Click "send goods/print WTO"
- On the pop-up message, click yes
Receive Order
After the order has been completed and sent to the receiving location, the receiving location will physically check the items and then register them as received in the system.
- Navigate to the receive goods tab
- Select the locate order panel
- Double click on order you want to receive.
- There are two ways to complete this step.
- Scan the item and press enter on your keyboard or click the "Add" button.
- Double click on the item and press enter on your keyboard or click the "Add" button.
- If the quantity recorded differs from the quantity physically received, adjust the quantity in the column "quantity received." (This will result in a variance for any incorrect items.)
- Click "receive goods/complete transfer"
- On the pop-up message, click yes
Sales-Shipping
Manage Expired Stock
Issue Serial Numbers
This feature enables users to add, remove, and reassign a serial number to an item.This section will cover the procedures necessary to add, delete, and reassign a serial number.
Add Serial Numbers to an existing product.
- Navigate to the logistics tab.
- Click the serial number ribbon.
- Enter the stock number in the search criteria feild.
- Click the "Add Serial #" button. (The "add serial number" window will popup)
- Enter the serial number
- Choose the location
- Click ok
Reassign a serial number to a different stock number
- Navigate to the logistics tab.
- Click the serial number ribbon.
- Under the search by field choose the serial number option
- Enter the serial number
- Click the "search serial number" button
- In search results double click on the serial number
- Click the "reassign" button
- Choose the "reassign serial # to another stock number#" option
- On the pop up window, enter the new stock number
- Click ok
Issue a Serial Number to an invoice
This is often done for a sales order or for any legitimate cause that prevents the cashier from issuing a serial number at checkout.
- Navigate to the logistics tab.
- Click the serial number ribbon.
- Under the "search by" field choose the "serial number" option
- Enter the serial number
- Click the "search serial number" button
- In search results double click on the serial number
- At the bottom, enter the invoice number to which the serial number should be added.
- Click the "issue serial #" button
Release a Serial Number from invoice
- Navigate to the logistics tab.
- Click the serial number ribbon.
- Under the "search by" field choose the "serial number" option
- Enter the serial number
- Click the "search serial number" button
- In search results double click on the serial number
- At the bottom, enter the invoice number to which the serial number should be remove.
- Click the "release serial #" button
Change the serial number on an invoice
- Navigate to the logistics tab.
- Click the serial number ribbon.
- Under the "search by" field choose the "serial number" option
- Enter the serial number on the already invoiced document.
- Click the "search serial number" button
- In search results double click on the serial number
- From the reassign button option, choose "reassign invoice to alternate #" (the "choose replacement serial" window will open)
- Select the replacement serial number
- Click ok
File Utilities
System Defaults
System Messages
All messages shown on customer-provided documents are controlled by system messages. Seven different message types are available: Discount, Credit, Disclaimer, Invoice, Proforma, Sale, and Statement. Any of these message types may be enabled and edited by users.
Add System Messages
- Navigate to the "system defaults" tab
- Select the 'system messages' ribbon.
- Select the message type you want to edit or enable.
- Enter your message
- Click Save
Administrator Tool
The Administrative Tool is a system default feature that includes tools for system administrators and advanced users.
Auditor Tool Box
Auditor toolbox elements are essential since they support an auditor's findings. It is ideal for viewing sales history, returns, modifications made, and operations performed by users, etc. This section will examine each of these components and their operation.
View Proforma Authorization
This feature enables users to access all proforma created on a particular date. The following table summarizes the statuses utilized in this tool and their associated meanings.
| Status | Definition |
|---|---|
| Pending | The user is entering items, creating an estimate and/or a pick list, or pulling orders from the warehouse. |
| Cashier | The salesperson has released the sales order to the cashier, who will create the invoice. |
| Recalled | The order was placed at the CASHIER but will not be invoiced at this time, since it was removed from the cashier queue. |
| Invoice | Invoice has been created from this order. |
| Cancelled | Order cancelled. |
View a proforma for a certain date period
- Navigate to the "system defaults" tab
- Select the 'Administrator tools' ribbon.
- From the 'auditor toolbox' choose the 'View Proforma Authorization' option .
- Choose your start and end dates
- Select display Note: Double click on any proforma to print/view.
Proforma Items
This feature enables users to view all item from all proforma
View all items and it's proforma for a certain date period
- Navigate to the "system defaults" tab
- Select the 'Administrator tools' ribbon.
- From the 'auditor toolbox' choose the 'Proforma Items' option .
- Choose your start and end dates
- Select display
Sales History
This feature enables users to view all items from all stock removal and invoices for a selected date period.
View all items from all stock removal and invoices
- Navigate to the "system defaults" tab
- Select the 'Administrator tools' ribbon.
- From the 'auditor toolbox' choose the 'Sales History' option .
- Choose your start and end dates
- Select display Note: Double click on any item to open inventory.
Return Records
This feature enables users to view all return items for a selected date period.
View all return items
- Navigate to the "system defaults" tab
- Select the 'Administrator tools' ribbon.
- From the 'auditor toolbox' choose the 'Return Record' option .
- Choose your start and end dates
- Select display
Inventory/customer/security changes
Users can view records of any modifications made to inventory, customer, and security files through this function.
View Inventory Changes
This report will display the list of all items that have been added, edited, or removed, as well as who did each of these actions.
- Navigate to the "system defaults" tab
- Select the 'Administrator tools' ribbon.
- From the 'auditor toolbox' choose the 'Inventory/customer/security changes' option .
- Select the 'Inventory' subtab
- Choose a date (All modifications made after the chosen date will be displayed).
- Select the 'Apply' button
View Customer Account Changes
This report will show the customer accounts that have been added, edited, or removed, as well as who did each of these actions.
- Navigate to the "system defaults" tab
- Select the 'Administrator tools' ribbon.
- From the 'auditor toolbox' choose the 'Inventory/customer/security changes' option .
- Select the 'Customer' subtab
- Choose a date (All modifications made after the chosen date will be displayed).
- Select the 'Apply' button
View User Changes
This report will show the user IDs that have been added, edited, or removed, as well as who did each of these actions.
- Navigate to the "system defaults" tab
- Select the 'Administrator tools' ribbon.
- From the 'auditor toolbox' choose the 'Inventory/customer/security changes' option .
- Select the 'User' subtab
- Choose a date (All modifications made after the chosen date will be displayed).
- Select the 'Apply' button
View Rights Changes
This report will display the rights granted or revoke from user.
- Navigate to the "system defaults" tab
- Select the 'Administrator tools' ribbon.
- From the 'auditor toolbox' choose the 'Inventory/customer/security changes' option .
- Select the 'Rights' subtab
- Choose a date (All modifications made after the chosen date will be displayed).
- Select the 'Apply' button
View Workstation Changes
- Navigate to the "system defaults" tab
- Select the 'Administrator tools' ribbon.
- From the 'auditor toolbox' choose the 'Inventory/customer/security changes' option .
- Select the 'Workstation' subtab
- Choose a date (All modifications made after the chosen date will be displayed).
- Select the 'Apply' button
View Proforma Changes
- Navigate to the "system defaults" tab
- Select the 'Administrator tools' ribbon.
- From the 'auditor toolbox' choose the 'Inventory/customer/security changes' option .
- Select the 'Proformas' subtab
- Choose a date (All modifications made after the chosen date will be displayed).
- Select the 'Apply' button
Cash Manager
The Cash Manager is essential for every company that wishes to grow. With the help of an efficient cash manager offered by our GoneClear StoreFront point-of-sale system, your company will not only save time but will also be able to detect the trends that contribute to its success. It's much simpler to expand your company when the POS keeps track of daily expenses and income. As a result, the cash management maintains an accurate record of cash flow.
- Search receipts/invoices
- Payment/check# search
- Paid invoices
- Edit payment info
- Sessions
- Create a bank deposit
- Commission worksheet
Search receipts/invoices
This tab enables users to view sales, sessions and receipts for a selected date. The tabs Search receipts/invoices, Payment/check # search, and Paid invoices are all linked.
This tab have three option: Receipts, Sales and Session
- Receipts - Displays records such as receipt number, transaction date, payment date, receipt date, cashier ID, Amount, Session number, and many more.
- Sales - Displays records such as invoices, credit note, sales person, discount, tax , and more. (This option enables users to modify information such as the salesperson, the purchase order number, the customer account, and the session number.)
- Session - Display a transaction log for a specific cashier session.
How to view sales in cash manager
- Navigate to the "system defaults" tab
- Select the 'Administrator tools' ribbon.
- From the 'auditor toolbox' choose the 'cash manager' option .
- Select the 'Search receipts/invoices' tab
- Choose a date.
- Choose 'sales' under the option field.
- Select the 'Search' button **Double click any invoice to modify information such as the salesperson, the purchase order number, the customer account, and the session number.
How to view receipts in cash manager
- Navigate to the "system defaults" tab
- Select the 'Administrator tools' ribbon.
- From the 'auditor toolbox' choose the 'cash manager' option .
- Select the 'Search receipts/invoices' tab
- Choose a date.
- Choose 'receipts' under the option field. (You have the option to enter the receipt number)
- Select the 'Search' button **Double click any receipt number to view invoices applied, payment method and reprint receipts.
How to view sessions in cash manager
- Navigate to the "system defaults" tab
- Select the 'Administrator tools' ribbon.
- From the 'auditor toolbox' choose the 'cash manager' option .
- Select the 'Search receipts/invoices' tab
- Choose a date.
- Choose 'session' under the option field.
- Enter the session number in the 'session number' area.
- Select the 'Search' button **Note that you may print this list by selecting the "print/export" button.
Payment/check# search tab
This tab lists all payments associated with the receipts on the Search receipts/invoices tab.
View payments attached to receipts
- Navigate to the "system defaults" tab
- Select the 'Administrator tools' ribbon.
- From the 'auditor toolbox' choose the 'cash manager' option .
- Select the 'Search receipts/invoices' tab
- Choose a date.
- Choose 'receipts' under the option field.
- Select the 'Search' button
- Select the 'Payment/check# search' tab
Paid invoices
This tab lists all paid invoices.
View all paid invoices for a selected date period
- Navigate to the "system defaults" tab
- Select the 'Administrator tools' ribbon.
- From the 'auditor toolbox' choose the 'cash manager' option .
- Select the 'Search receipts/invoices' tab
- Choose a date.
- Choose 'receipts' under the option field.
- Select the 'Search' button
- Select the 'Paid invoices' tab
Edit Payment info
This tab enables users to modify payment details associated with a sale. Users may modify the payment method, check number, bank information, and date, as well as reassign the account, session number, and receipt.
How to change payment method?
- Navigate to the "system defaults" tab
- Select the 'Administrator tools' ribbon.
- From the 'auditor toolbox' choose the 'cash manager' option .
- Select the 'Edit Payment info' tab
- Enter the receipt number
- Under the 'Method of payment' field, select the option you want to change to.
- Click Save
How to change check number?
- Navigate to the "system defaults" tab
- Select the 'Administrator tools' ribbon.
- From the 'auditor toolbox' choose the 'cash manager' option .
- Select the 'Edit Payment info' tab
- Enter the receipt number
- Under the 'check number' field, enter the new check number.
- Click Save
How to change bank type?
- Navigate to the "system defaults" tab
- Select the 'Administrator tools' ribbon.
- From the 'auditor toolbox' choose the 'cash manager' option .
- Select the 'Edit Payment info' tab
- Enter the receipt number
- Under the'bank' field, choose the bank type you want.
- Click Save
How to change check date?
- Navigate to the "system defaults" tab
- Select the 'Administrator tools' ribbon.
- From the 'auditor toolbox' choose the 'cash manager' option .
- Select the 'Edit Payment info' tab
- Enter the receipt number
- Under the 'check date' field, select the new date.
- Click Save
How to Reassign account?
- Navigate to the "system defaults" tab
- Select the 'Administrator tools' ribbon.
- From the 'auditor toolbox' choose the 'cash manager' option .
- Select the 'Edit Payment info' tab
- Enter the receipt number
- Navigate to the 'administrator authorize changes' form
- Under the 'account' field, choose the account you want
- Click the 'Reassign Receipt' button.
How to Reassign session number?
- Navigate to the "system defaults" tab
- Select the 'Administrator tools' ribbon.
- From the 'auditor toolbox' choose the 'cash manager' option .
- Select the 'Edit Payment info' tab
- Enter the receipt number
- Under the 'Re-Assign Session #' field, enter the new session number
- Click the 'Reassign Session #' button.
Session Tab
This tab enables users to view a list of sessions that have been created and their state for a specified period.
How to view sessions?
- Navigate to the "system defaults" tab
- Select the 'Administrator tools' ribbon.
- From the 'auditor toolbox' choose the 'cash manager' option .
- Select the 'sessions' tab
- Choose the start and ending date
- Click the 'Apply' button.
Commission Worksheet Tab
Validate Invoice/Stock Totals
This feature enables users to view a report of invoice-related errors. Users simply select a date and an error type.
How to validate invoices?
- Navigate to the "system defaults" tab
- Select the 'Administrator tools' ribbon.
- From the 'auditor toolbox' choose the 'Validate Invoice/Stock Totals' option .
- Chose the start and ending date
- Select the error type
- Click the 'Located' button.
Pending Check Deposit
Occasionally, businesses may accept a post-dated check from a customer. This feature enables users to access a list of all post-dated checks the company received.
| Status | Definition |
|---|---|
| Post-dated Check | A post-dated check is a type of check that is drawn on a future date. To put it simply, a post-dated check is one that is drawn with a date later than the day on which the check was written. |
How to view Pending Check Deposit?
- Navigate to the "system defaults" tab
- Select the 'Administrator tools' ribbon.
- From the 'auditor toolbox' choose the 'Pending Check Deposit ' option .
- Chose the date
- Click the 'Display' button.
Pending Orders Over Sold
This feature enables users to view a list of pending sales orders due to items being out of stock and needing to be purchased from suppliers.
How to view Pending Orders Over Sold ?
- Navigate to the "system defaults" tab
- Select the 'Administrator tools' ribbon.
- From the 'auditor toolbox' choose the 'Pending Orders Over Sold' option .
- Chose the start and ending date
- Click the 'Display' button.
System Security
The GoneClear POS's system security feature is used to prevent unauthorized access to the system and to establish restricted user privileges. The administrator configures the user's workstation, roles, and privileges in this feature. This chapter will cover how to configure these components.
The system security window is divided into five tabs: User Definition, Group Definition, Modules, Workstations, and Locate Users.
Workstation
Before a user can log into the Goneclear Point of Sale system, the workstation on which they will be working must be registered. This is the feature for administrators to register workstations. In this section will go through the processes involved in setting this up.
How do I configure a workstation for GoneClear Point of Sale (POS)?
- Navigate to the "system defaults" tab
- Select the 'System Security' ribbon.
- Choose the workstation tab
- Select the "define workstation" button.
- Set a default printer, as well as a cash and credit printer. (For a definition of each printer, see the section Printers.)
- Select the company location of the user.
- If the user requires access to the cashier function, enable the "cashier station."
- Click Save Data
Printers
| Status | Definition |
|---|---|
| Default Printer | When you use Quick Print, your print jobs are immediately delivered to the default printer. |
| Cash Printer | This is where the thermal printer is configured. |
| Credit Printer | Credit printers are used to print invoices, quotes, and other documents. |
How to disable a workstation?
- Navigate to the "system defaults" tab
- Select the 'System Security' ribbon.
- Choose the workstation tab
- Click the switch "workstation has been set to inactive" on the bottom left.
- Click Save Data
User Definition Tab
Almost all applications need a login and password to access them. Similarly, in order for anybody to use our Goneclear POS system, a username and password must be generated. Administrators may use this unique ID to restrict users and track their transactions. As a result, this feature enables users to examine a list of all currently registered users and to create new ones.
How to create a login
- Navigate to the "system defaults" tab
- Select the 'System Security' ribbon.
- Choose the user definition tab
- Click the "new user" button
- Enter the user's first and last names, their username, their group, their location and their maximum discount.
- Enable the functionalities on the left that you want to make available to the user. (To view the functions and their significance, go to the section User definition functions.)
- click the "password" option to allow the new user to enter his or her login password.
- Select the "save user" button
User definition functions
| Status | Definition |
|---|---|
| Default Scanner On | This function enables customers to check out an item in scanning mode rather than manually inputting an item's stock number. |
| Grant Access to all sales group | This function allows users to view all sales groups. As a result, they'll have access to what other cashiers and salespeople are selling. |
| Attach to list of Cashiers | This function adds users to the list of cashiers and grants them access to the functionalities available to cashiers. |
| Attach to list of Salespersons | This function adds users to the list of salespersons and grants them access to the functionalities available to salespersons. **NOTE: If the user is a cashier, he or she must also be added to the list of salesperson. |
| Pay Sales Commission | If the user will be paid on commission, enable this feature. |
| Super Salesman | This function allows users to view all account types, such as layaway, stock removable, gift certificate, etc. |
How to close a user account?
- Navigate to the "system defaults" tab
- Select the 'System Security' ribbon.
- Choose the user definition tab
- Click the user you want to close from the list
- Enable the account close option on the bottom left.
- Select the "save user" button
Group Definition Tab
This feature contains a list of groups and their associated privileges. Each user is assigned to the appropriate group. This chapter will cover the following topics:
How to create a group
- Navigate to the "system defaults" tab
- Select the 'System Security' ribbon.
- Choose the group definition tab
- Select the "new group" button
- Enter the group name
- Enter the description
- Click the "save group" button
How to assign right to a group?
- Navigate to the "system defaults" tab
- Select the 'System Security' ribbon.
- Choose the group definition tab
- Select the group for which you want to adjust permissions from the list. On the right-hand side of the group list is a form with two tabs:
- Assigned Rights - This section contains a list of all the rights that have been assigned to the selected group.
- Unassigned Rights - This section contains a list of all the rights that have not been assigned to the selected group.
- Select the Assigned Rights tab
- Search for the rights to which you want to remove.
- Select the checkbox in the column labeled "revoke." (Multiple checkboxes may be chosen concurrently.)
- Click the "Revoke Rights to Selected Group" button
How to unassign right from a group?
- Navigate to the "system defaults" tab
- Select the 'System Security' ribbon.
- Choose the group definition tab
- Select the group for which you want to adjust permissions from the list. On the right-hand side of the group list is a form with two tabs:
- Assigned Rights - This section contains a list of all the rights that have been assigned to the selected group.
- Unassigned Rights - This section contains a list of all the rights that have not been assigned to the selected group.
- Select the Unassigned Rights tab
- Search for the rights to which you want to provide access.
- Select the checkbox in the column labeled "grant." (Multiple checkboxes may be chosen concurrently.)
- Click the "Grant Rights to Selected Group" button
How to effectively close a group.
- Navigate to the "system defaults" tab
- Select the 'System Security' ribbon.
- Choose the group definition tab
- At the bottom, click the "Group account set to inactive" button
- Click the "save group" button
How to enable group members to view costs.
- Navigate to the "system defaults" tab
- Select the 'System Security' ribbon.
- Choose the group definition tab
- At the bottom, click the "Allow group to view cost" button
- Click the "save group" button
Modules Tab
The module tab enables the user to activate or deactivate a system function.
How to disable a function/module?
- Navigate to the "system defaults" tab
- Select the 'System Security' ribbon.
- Choose the Modules tab
- From the list, select the module you want to deactivate.
- Select the button, "Module set to inactive"
- Click the "save module" button.
How to enable a function/module?
- Navigate to the "system defaults" tab
- Select the 'System Security' ribbon.
- Choose the Modules tab
- From the list, select the module you want to activate. (Note:Verify that the inactive fliter is turned off.)
- Select the button, "Module set to inactive"
- Click the "save module" button.
Locate User Tab
This feature enables users to access a list of all GoneClear POS system users.
System Values
Customer Promotions