GoneClear Storefront

From GoneClear Wiki
Revision as of 18:07, 30 October 2020 by DHerrera (talk | contribs) (→‎Packaging: Price/Cost Window)
Welcome to GoneClear User Guide.
GoneClear StoreFront version 1.6
User-guide-book-icon-outline-style-vector-26240285.jpg


Basics of GoneClear StoreFront

In This Chapter


Getting Started

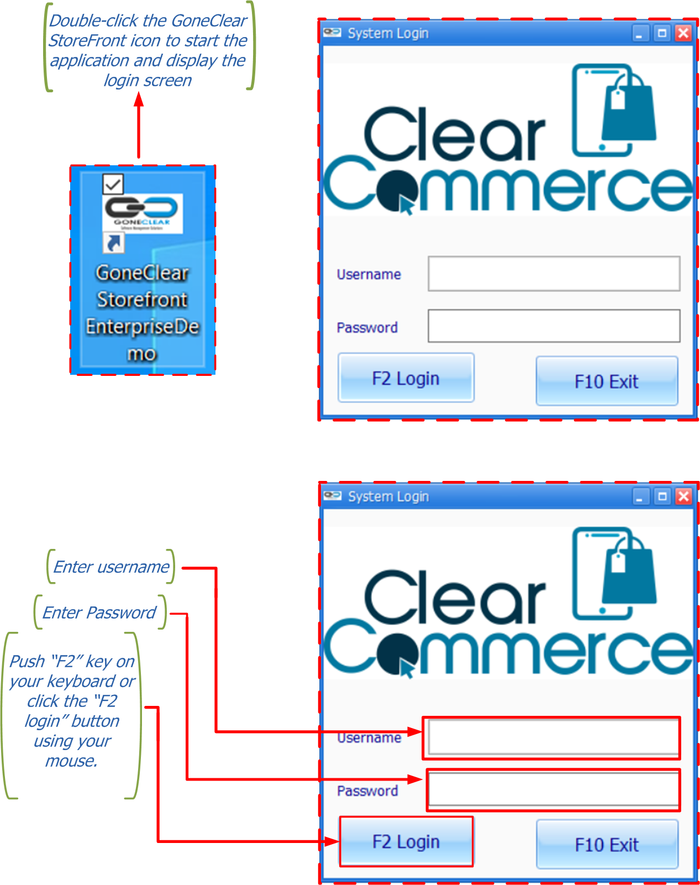
To start GoneClear StoreFront, double-click the icon shown in Figure 1-1


Figure 1-1 (Launch Goneclear Store Front).png
Figure 1-1: Starting GoneClear StoreFront, and logging in.


The first screen that you see is the login window where you enter your user name and password.
A user name and a password must be entered in order to log into the company database. For audit purposes, user information is recorded in every new record or modification to an existing record that a user performs.


left center NOTE: User setup: User names are created for the employees that will log into GoneClear StoreFront. Each user must be assigned a valid license and the user’s activities are restricted based on the license type.

Knowing Where You Are

One powerful aspect of GoneClear StoreFront is that it is possible to have many windows open at once, each of which may show a different document or master data record.

The Main Window

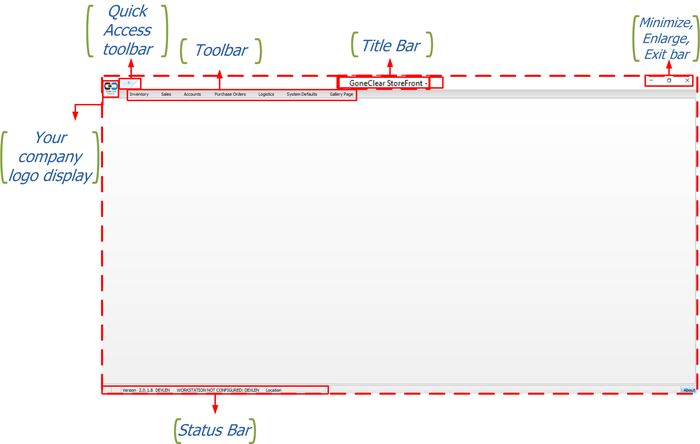
The main window opens automatically upon launching GoneClear Store Front and is the central place where you can initiate any task. Only the main window has a Ribbon along the top.


Figure 1-2 (Main Window).png
Figure 1-2: Main Window.

Toolbar and Ribbon

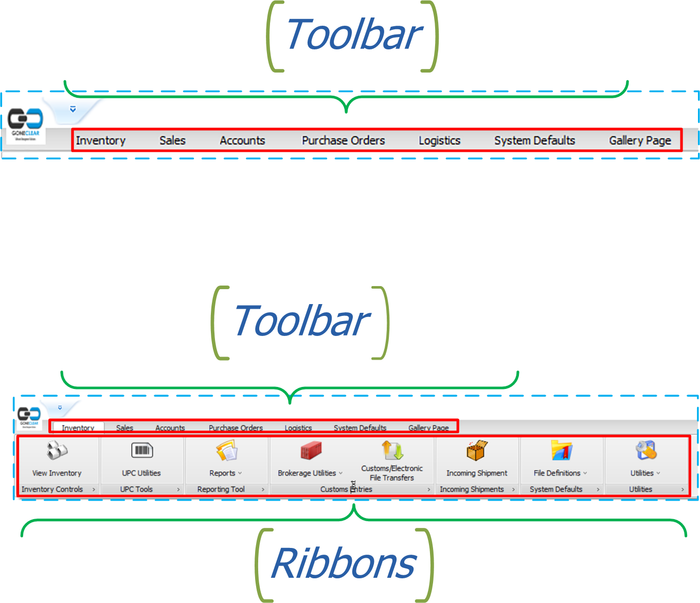
The GonClear StoreFront toolbar is displayed across the top of the main window. Clicking on each tool item will show the ribbons that lead to more choices.


Toolbar and Ribbons figure 1-3.png


Figure 1-3: Toolbar and Ribbons.


The Ribbon is just below the toolbar. It is a collection of buttons that provide access to more choices. Active buttons display in color while inactive or unauthorized buttons appear in gray. To display the Ribbon, place your cursor on the toolbar and click one of the tabs. If you forget what a particular button does, simply move the cursor over the button to display a tooltip.

Quick Access Tool bar

To minimize or hide the Ribbon, position your cursor over the quick access Toolbar and right-click to see the Options menu. Choose the option "Minimize Ribbon."


Figure 1-4: Quick Access Toolbar.

The Status Bar

The status bar runs along the bottom of the GoneClear StoreFront main window and includes a number of fields.
  • The bottom left-hand side displays the version of GoneClear StoreFront, the user who signed in, the name of the computer station in use and the location of the shop.
  • The bottom left-hand side will also display when a user is in "sales mode".


Figure 1-5: Status Bar.


Windows and Panel

Now that you've got a big picture of the main window, it's time to explain other window modes.


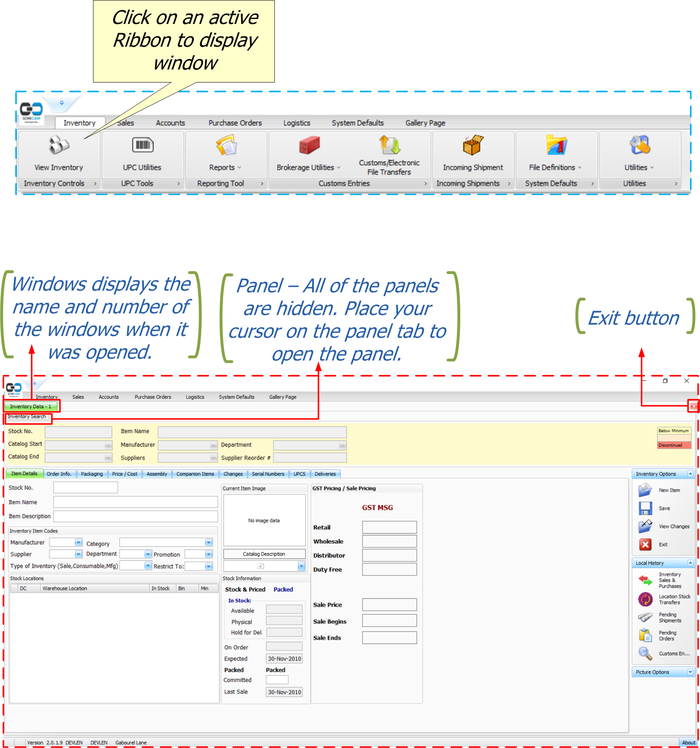
A new window will open by clicking on an active Ribbon. All windows would include the exit button to exit the active window. As mentioned earlier in this guide, it is possible to have many windows open at once.

left center NOTE: Windows may have sub windows to display further options (Same windows will not open twice.)


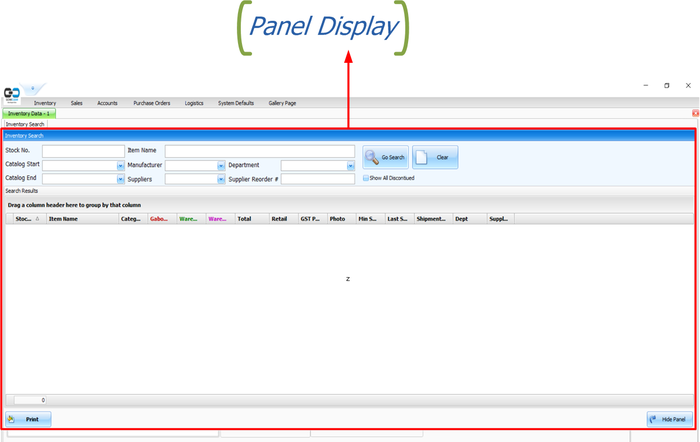
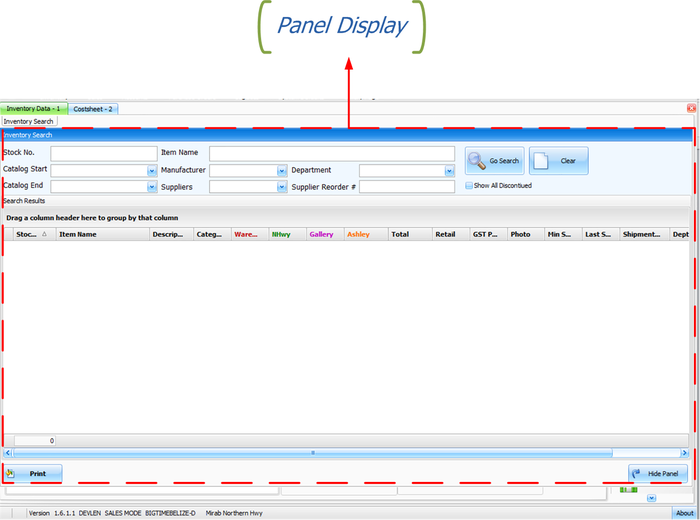
Several windows have a panel that gives access to more choices within the active window.

left center NOTE: Select the "Hide Panel" icon to hide the panel.


New Window (labels).png


Panel display.png
Figure 1-6: Windows and Panel.

Window Operation Modes

There are three possible window operation modes in GoneClear StoreFront:
  • Add: Add a new record or document
  • View: View an existing record or document
  • Update: Modify the data of an existing record or document

Customizing Column Header

User can easily customize the way information is displayed within any of the panel.
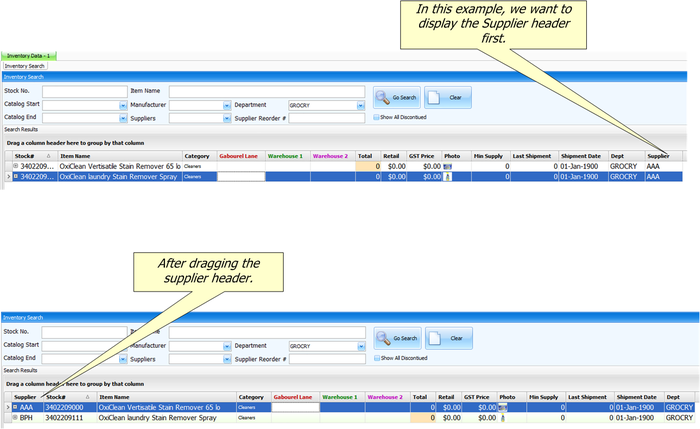
  • Users can reorder the columns by clicking and dragging the column headers to new locations.
For example, if you want to display the supplier column first, simply click and drag the supplier header to the first column. See figure 2-5:


Arrange column header.png
Figure 1-7: Rearrange columns.
  • Users can apply filters to one or more column headers.
Hover over a column header and then click the filter icon located in the upper-right corner. For example:


Filter icon.png
Figure 1-8: Rearrange columns


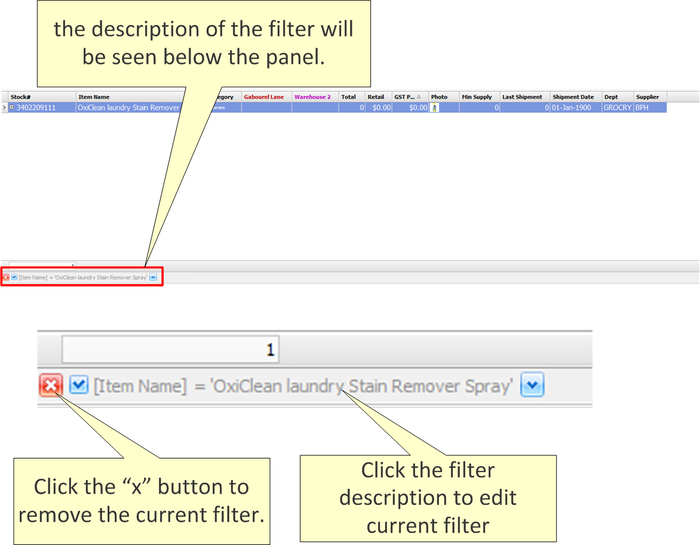
  • Use the filter menu to select which of the values currently in the column should be displayed. When you add a column filter, the description of the filter will be seen below the panel. You may use this to validate which column filters have been added to the current view and you may adjust the filter. For example:


Edit and remove filter..png
Figure 1-9: Edit and Remove filter


Terminology Definition
Sort Ascending Sorts the selected column in ascending order.
Sort Descending Sorts the selected column in descending order.
Clear Sorting Clears the ascending or descending sorting criteria currently set for a column.
Group By This Column Groups the table using the data in the selected column. It does this by moving the data into expandable lists that are located in the body of the grid. One expandable list will be created for each possible column value.


If you perform this action on any subsequent columns, that data will be presented as nested groups at increasingly lower levels within the expandable lists.

If Group By Box is enabled, this will also create a "Group By" box in the area immediately above the column headers. Note: To turn off the Group By This Column feature and revert to the original view: Enable Group By Box, drag the Group By boxes back to the column header.

Note: To turn off the Group By This Column feature and revert to the original view: Enable Group By Box, drag the Group By boxes back to the column header.
Group By Box Displays or hides an area immediately above the column headers that contains "Group By" boxes. One "Group By" box will be displayed for each column header for which Group By This Column is currently enabled. You can also drag column headers to and from this area.


The table will be grouped according to the data in the box. If there are two or more boxes then the grouping will be nested, with the left-most box presented at the highest level, the second box presented at the second level, etc.

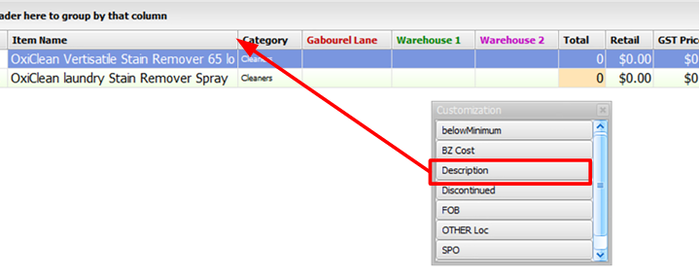
Column Chooser Enables you to add and hide information within a table. When you select Column Chooser the Customization dialog is displayed. This dialog is used to store the columns you don't currently want displayed within the table. Simply click and drag the desired column headers from the table to the Customization dialog. For example, if you decide


Column chooser.png


NOTE: Column Chooser will not work on panels.
Best Fit Resize the width of the selected column so that the header text is displayed in the optimal amount of space.
Best Fit (all columns) Resizing the width of all columns in the table so that the header text is displayed in the optimal amount of space.
Filter Editor The Filter Editor dialog will show any filters that are currently active in the column headers. You can use the editor to modify the existing filter criteria and to build new criteria using the available filter conditions and logical operators.

Inventory

In This Chapter


Inventory Tab & Ribbon

The inventory tab consists of seven (7) Ribbons which provide access to more choices. We're going to go over each ribbon as precisely as possible.


Figure 2-1: Inventory tab and inventory tab ribbons.


Terminologies Definitions
Stock Number Identification number used in the physical warehouse or inventory method for the item.
Catalog A complete collection of products organized with descriptive descriptions systematically.
Catalog Code Code for entering and describing in a catalog a collection of items.
Catalog Description The full descriptions specifics of the item and should include everything you want customer to see.
Item Name Name provided to the item. This is a smaller field that the item description
Item Description The descriptions are full specifics of the item and should include everything you want to know.
Packaging Code A packaging code indicates the form of packaging transported. Box, can, bags, bucket, etc.
Manufacturer The person or business that produces products for sale.
Supplier The entity or association supplying your company's product or service. Note: Manufacturer and Supplier may be the same person or business.
Department A part of a store selling a certain class or category of products. Eg. The sportswear department.
Discount A deduction from the usual cost of something.
Promo code A phrase or set of letters and numbers to be used for discount purposes.
GST The goods and services tax (GST) is a value-added tax charged on most goods and services sold for domestic consumption. The GST is paid by cutomers, but it is given back to the government by the businesses selling the goods and services.
Retailed The sale of goods to the public in relatively small quantities for use or consumption rather than for resale.
Wholesale The selling of goods in large quantities to be retailed by others.
Distributor An agent who supplies goods to stores and other businesses that sell to customers
Duty Free Duty-free refers to the act of being able to purchase an item in particular circumstances without paying import, sales, value-added, or other taxes.
Salesman a man whose job involves selling or promoting commercial products, either in a store or visiting locations to get orders.
Reducible Inventory deduct in stock amount. For e.g., an oxiclean product may and can be taken out of stock which reduces quantity, whereas a freight charge cannot be taken out of stock in order to reduce quantity.
Warranty A written guarantee given by the producer to the customer of the item, agreeing to restore or replace it, if required, within a specified period of time.
Serial Number A number showing the position of an item in a series, especially one printed on paper currency or on a manufactured article for the purposes of identification.
Discontinued A discontinued product is no longer sold.
Shelf Stable Items which do not have an expiry date.
Supplier reorder # ???
BAHA Regulated ???


View inventory

Since we have an idea of what a window is and how it functions. Let's go into the inventory data window for view inventory. Users can check for an item in this window to obtain more details about that specific item, whether it be product updates, prices, etc. Furthermore, a user can quickly add a new item to inventory using this window.

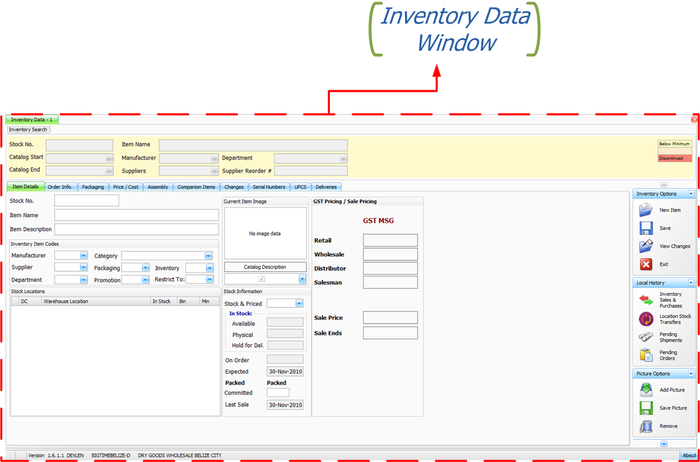
Inventory Data Window

To open Inventory Data window, click the view inventory ribbon shown in Figure 2-2.

How to open Inventory data window.png
Inventory Data Window.png


Figure 2-2: View inventory Ribbon and Inventory Data Window.


The Inventory Data window allows users to::
  • Search for an item
  • View item details
  • Add an item
  • View order information from manufacture
  • Set Packaging size and weight
  • View Price and Cost of Item
  • Add as Assembly
  • Add as a companion
  • View Changes to item
  • Search Serial Number for item
  • View UPCs
  • View deliveries for item

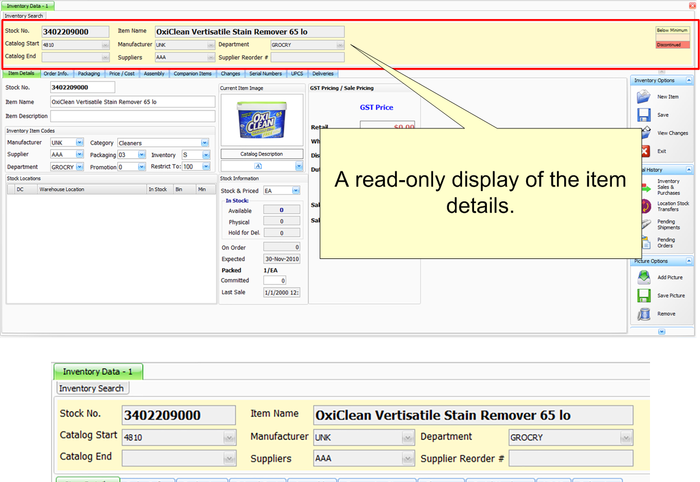
The inventory data consist of 5 forms. Below are figures of these forms and a brief description of its functions

Inventory data label 1.png
Figure 2-3


Figure 2-3: Information about the item is displayed in this section of the inventory data windows. This is a read-only display, so users can not make modifications to the item here.


Figure 2-4


Figure 2-4: This window contains sub tabs in a form with additional information. More on each of these tabs and their functions will be discussed later in this Guide.


Inventory data label 3.png
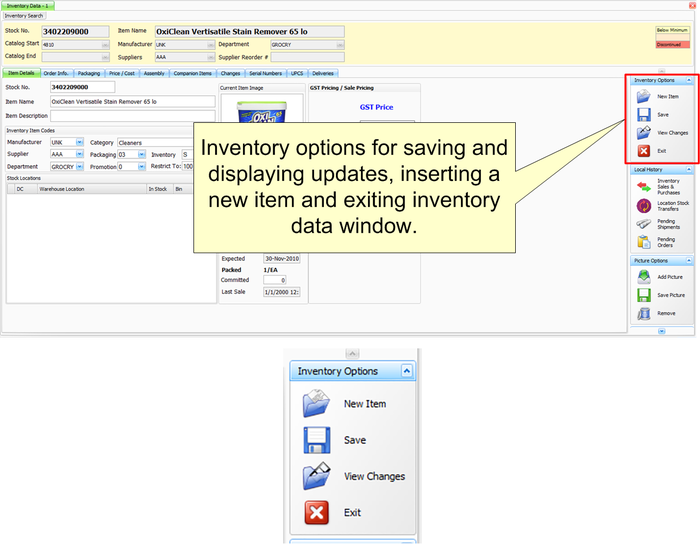
Figure 2-5


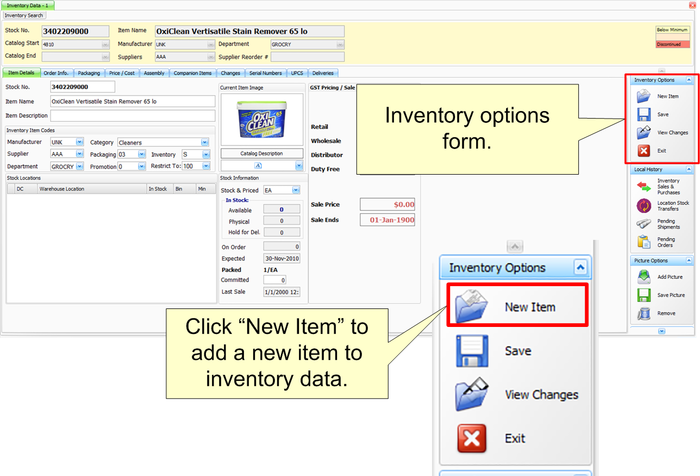
Figure 2-5: The inventory options form is used to save and display updates, insert a new item and exit inventory data window. These function will be further discuss later in this Guide.


Figure 2-6


Figure 2-6: Local history form is used to view products transferred and pending orders within and for sales of the company. These function will be further discuss later in this guide.


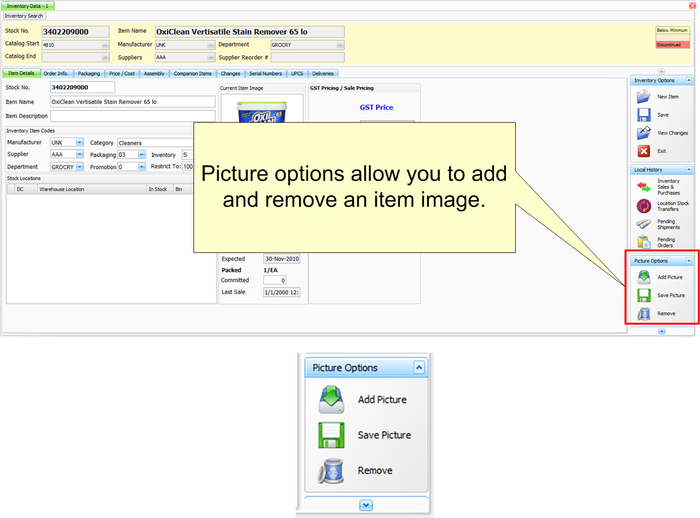
Inventory data label 5.png
Figure 2-7


Figure 2-7: Picture Options form allows you to add and remove an item image. This function and how it works will be discussed later in this guide.


Search For An Item

It can be very difficult to search for a specific item, particularly if there are thousands of items in the inventory list. The GoneClear StoreFront makes it easier to search for item in the inventory database that is available or discontinued. Furthermore, reports from the data table may be sorted and grouped according to your wishes. (See section 1.3 Customizing Column Header for sorting and grouping)


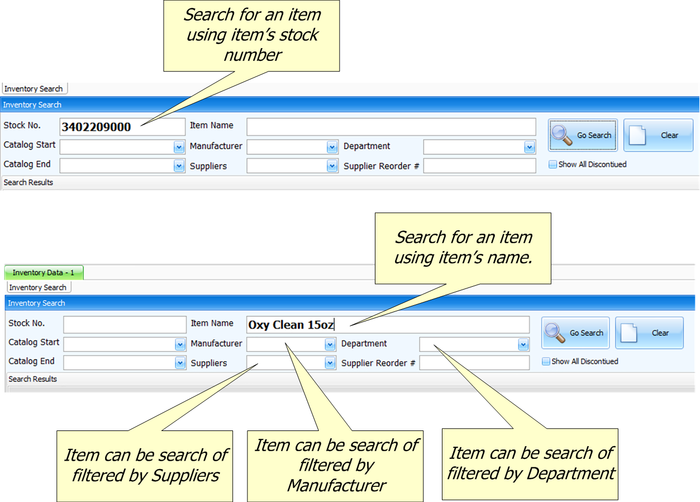
To search for an item move your cursor over the inventory search panel


Panel for search.png
Figure 2-8: Inventory Search Panel


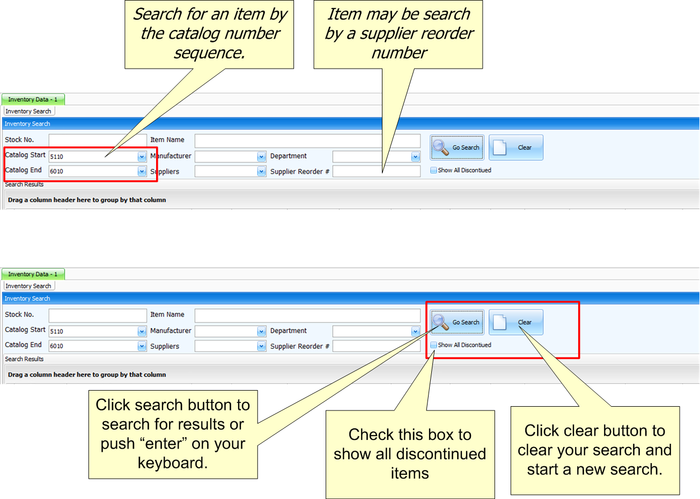
GoneClear StoreFront provides several avenues to search an item such:


Search.png


Search item.png


Search Results table.png
Figure 2-9: Search item and Search Results Table


Double click on the item you want to view. Item information will be displayed in the inventory data window.


left center NOTE: There is another method to search for an item that is discussed later on. This search method is called live data searches. The other approach is delayed by around 20 seconds.


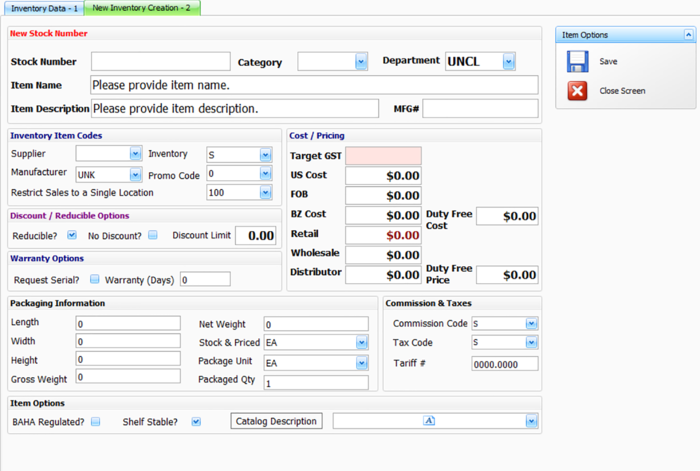
Adding a New Item to Inventory.

  1. From the tab inside GoneClear StoreFront navigate to: Inventory > view inventory.
  2. The Inventory Data window will open navigate to: inventory options>new item. ("New inventory creation” window will open)
Add a new item.png


Add a new item window.png
Figure 2-10: Search item and Search Results Table


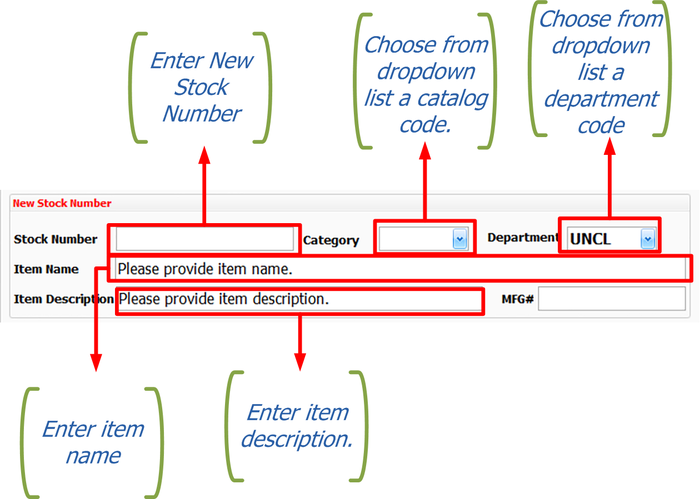
New Stock Number form: input the stock number of the item, the name of the item and the description, then select the catalog code and the packaging code from the drop-down menu.


New stock number form.png
Figure 2-11: New Stock Number


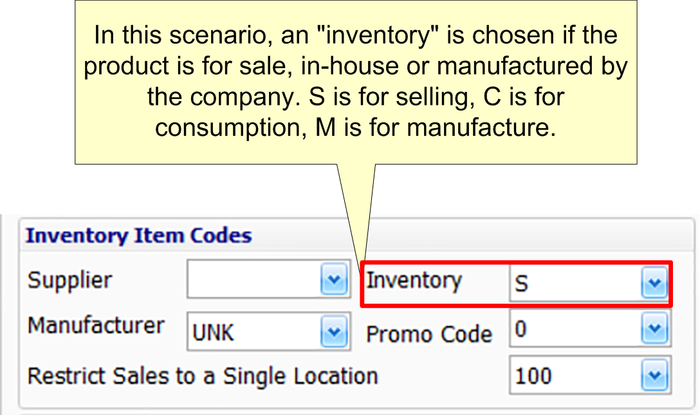
Inventory Item Codes: select from the drop-down menu the supplier,manufacturer, department, restricted location for item, inventory and promo codes.


left center NOTE: To see context, click on each of those field names. Furthermore, in this scenario, an "inventory" is chosen if the product is for sale, in-house or manufactured by the company. S is for selling, C is for consumption, M is for manufacture.


Inventory item code.png
Figure 2-12: Inventory Item codes


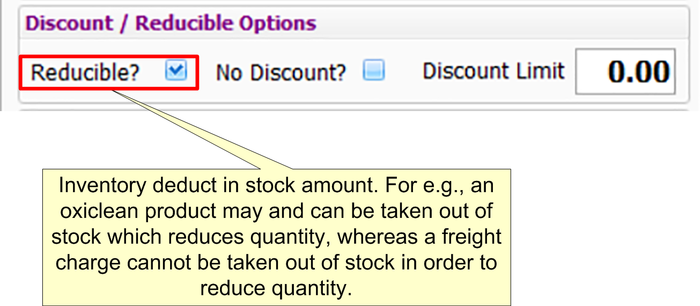
Discount/Reducible Options: users can add a discount to the item with its limit and indicate whether the item is reducible.


Discount and reducible option.png
Figure 2-13: Discount/Reducible Options


Warranty Options: If the item has a warranty on it, the warranty options are set. User would indicate whether a serial number is required and the number of days for warranty .


Warranty Options.png
Figure 2-14: Warranty Options


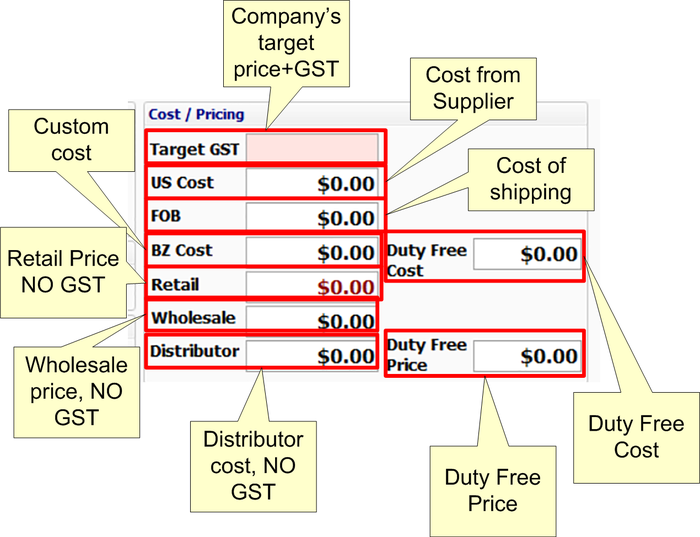
COST/PRICING: Costs for products and shipping and handling costs are included in this option. Part of this section is a bit like a calculator. The prices without GST is calculated automatically when a user enters the target price with GST.


Cost and pricing.png
Figure 2-15: Cost/Pricing form


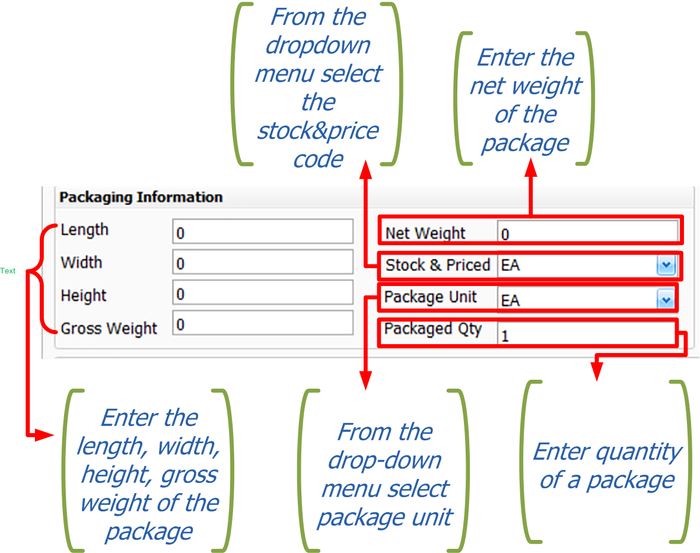
Packaging information: The packaging information form is set to indicate the package's size, type, quantity and weight. Furthermore, users can set the shelf stock type. For more detail on the fields in the packaging information form, see the terminology table' below to help complete this portion.


Terminologies Definitions
Length, width, height The package length, width and height. An Oxiclean product, for example, may be packed at 10 per box. The box's length, width and height is what is required in the packaging information option.
Net Weight The weight of the item inside the package.
Gross Weight Both item and package weight together.
Stock & Price The user is asked in this field to indicate how this item is sold in the store. By box, each, bucket, etc.
Package Unit In this field, the user is asked to enter the type of product package, i.e. box, bucket, etc. For eg, an oxiclean product may be sold "each" in the store, however it is packed 10 per package by the vendor.
Package Qty The amount that comes in the package.
Packing information.png


Figure 2-16:Packaging information


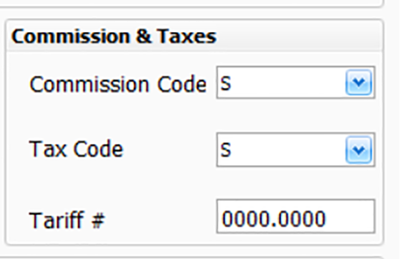
Commission & Taxes: This option allows the user to choose tax and commission codes and enter tariff number.


Commision and taxes.png
Figure 2-17: Commission & Taxes


Item options:In this segment, user may indicate if the new item being added is BAHA regulated and/or stable and add a catalog description.


Item options.png
Figure 2-18: Item options


Item details

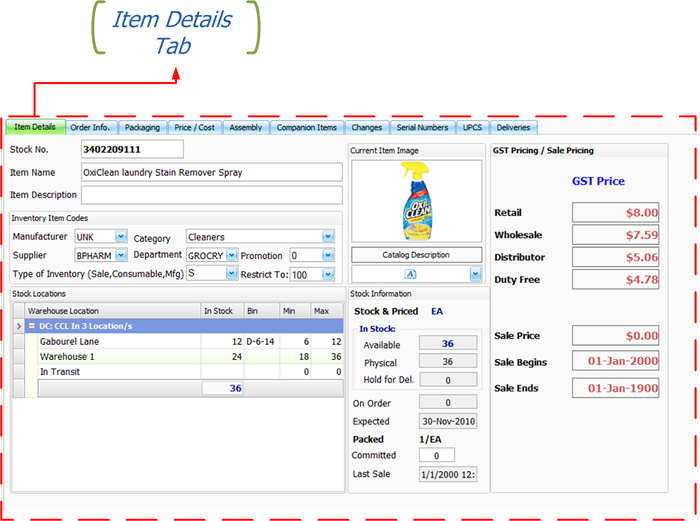
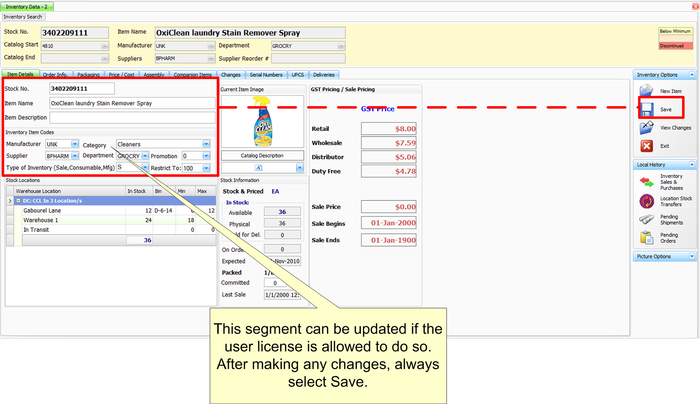
In the item details section, users are not restricted to the information display of the items, but to making quick adjustments to the items. That is, of course, whether the user has the license right to do so. Let's take a brief peek at what's seen in this pane.


Item details .png


Figure 2-19: Item Details


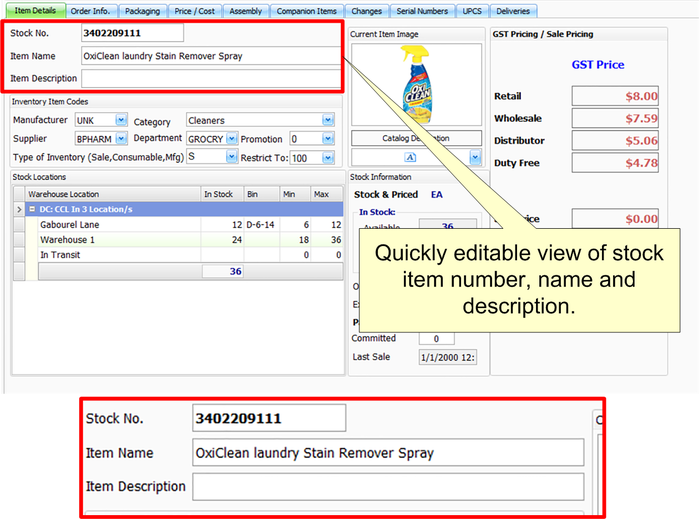
Let’s discuss each segment of the item detail tab. First of all, a simple view of the current stock number, item name and item summary is given. This section allows licensed rights users to easily modify these areas
left center Note: Remembering that the Item Details is an Inventory Data subsection, users who have made changes from Item Details have to click on the Save button in the Inventory options form to update the changes.


Item details Stock number.png


Item details save changes.png
Figure 2-20: Item Details Stock form and update changes.


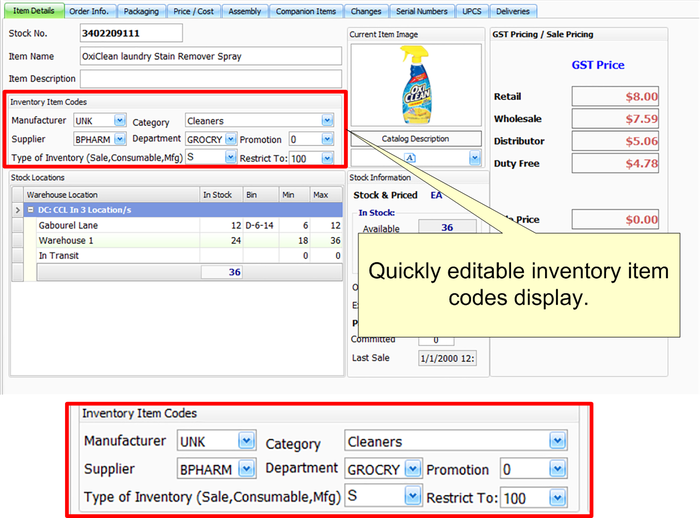
Item inventory codes on Item Details window display manufacturer, supplier, category, department, inventory type, promotion and item location restricted. Again, modifying an item in these areas is often a quick method, if users have licenses to do so.
Remember to always save updates after any adjustments have been made.


Item details inventory item codes.png
Figure 2-21: Item Details: inventory item codes.


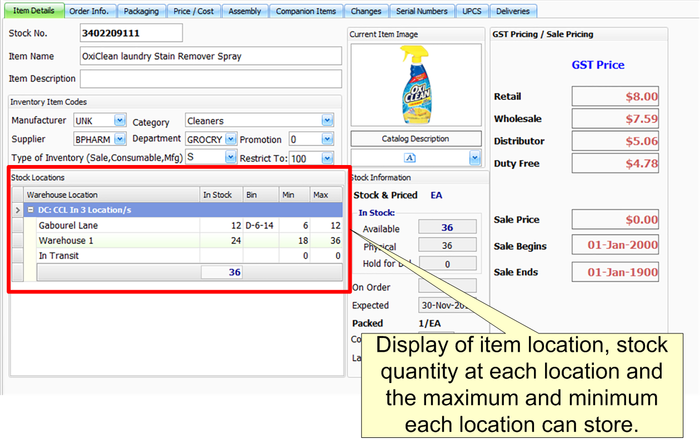
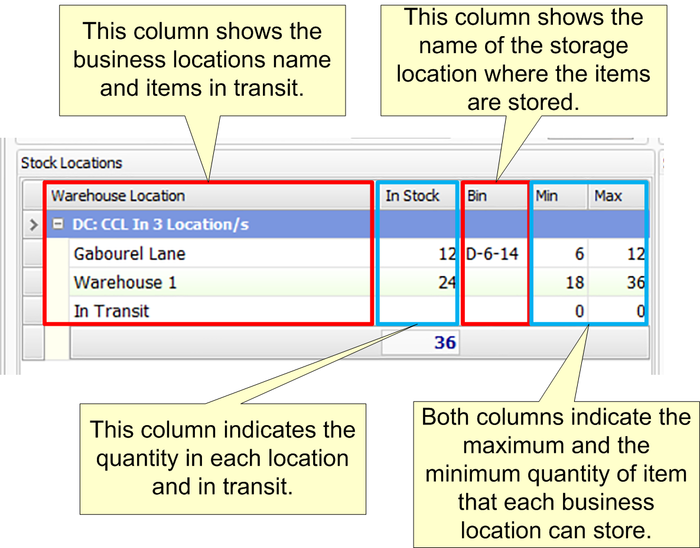
Stock location: In this area, it displays all the company branches that store the item and precisely where the item is held in that branch. It also shows stock quantity at-location and the minimum and maximum number - location can hold.


Item detail STOCK LOCATION.png


Item details STOCK LOCATION (2).png
Figure 2-22: Item Details: Stock location.


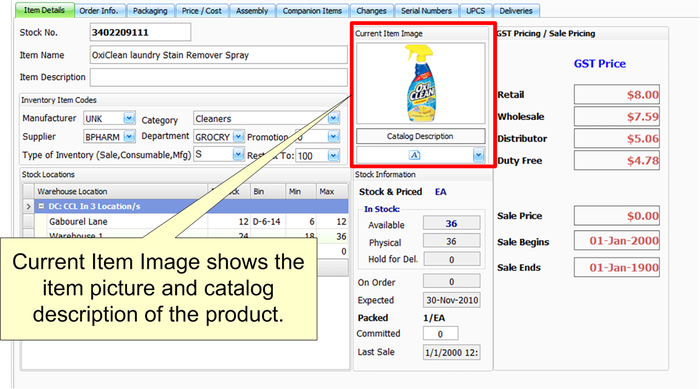
Current Item Image: Here we can see the item picture and catalog description. To add or remove an image is not done here; it is done in the Picture Options form. We'll explore how to remove and add a picture later. Catalog description can be modified here, however. Remember to save always when updates have been made.


Item details current image item.png
Figure 2-23: Item Details, Current Item Image.


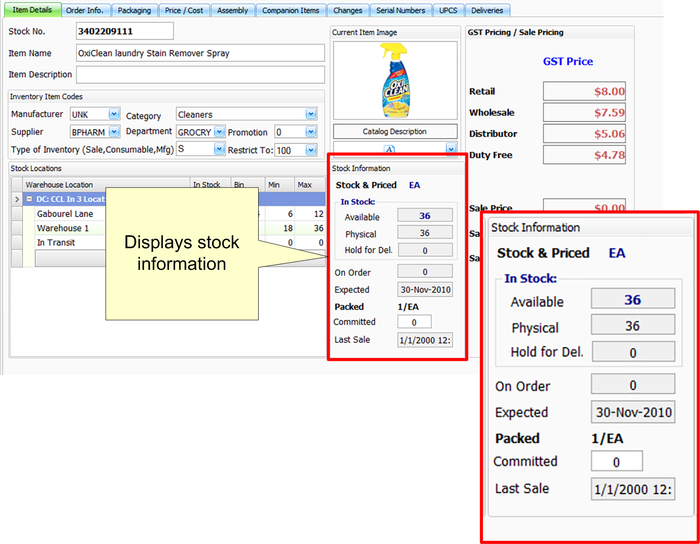
Stock Information: This is a read-only display of the overall inventory quantity, amount held for delivery, etc. See the terminology table below for a clearer explanation of all these words.


Terminologies Definitions
Stocked & Price Shows how items are sold. By package, container, each, etc.
Available Overall inventory amount in all departments and branches.


Note: this would not indicate the quantity of item on hold for consumers.

Physical Physically available for sale.


Note: The quantity of item held for customer would not be applied to this section.

Held for Del. Complete sum to be held for delivery.
On order Pending supplier order.
Expected Day when the on order shipment is supposed to arrive.
Packed Shows how it is packed by vendor.
Committed Displays the entire amount held for delivery, order, salesman, etc.
Last Sale Last selling date on item.


Item detail STOCK INFORMATION.png
Figure 2-24: Item Details: Stock Information.


Add and Remove an Item Image

  • Add an item picture
  1. Go to Picture Options Search
  2. Click Add Picture
  3. Select picture from your computer
  4. Click open or choose.
  5. Click Save Picture in Picture Options


  • Remove an item picture
  1. Go to Picture Options Search
  2. Click Remove
  3. Click Save Picture in Picture Options
Figure 2-26: Process to add an image to item.


Order Information

In order information, user may search details regarding recent shipment, item update history, stock calculations, and order & supply levels. Let us discuss each section of the window.
Terminologies Definitions
Remaining Stock It may also be referred to as "OLD STOCK." In other terms, stock before last shipment.
PO/Purchase Order A purchase order is a document submitted from the customer to the supplier to confirm a particular purchase of products.
Last Shipment The latest goods from the supplier.
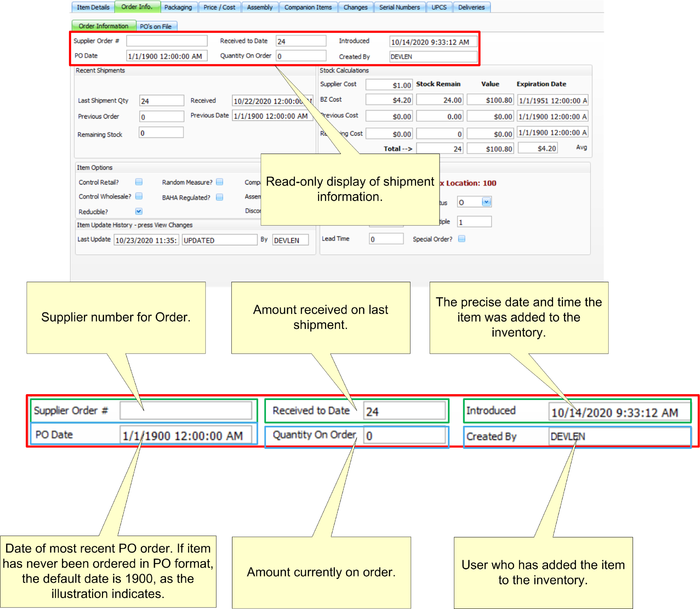
A short overview of the top section of the order information window is shown in Figure 2-27 below.


Order info - first section.png
Figure 2-27: Order information


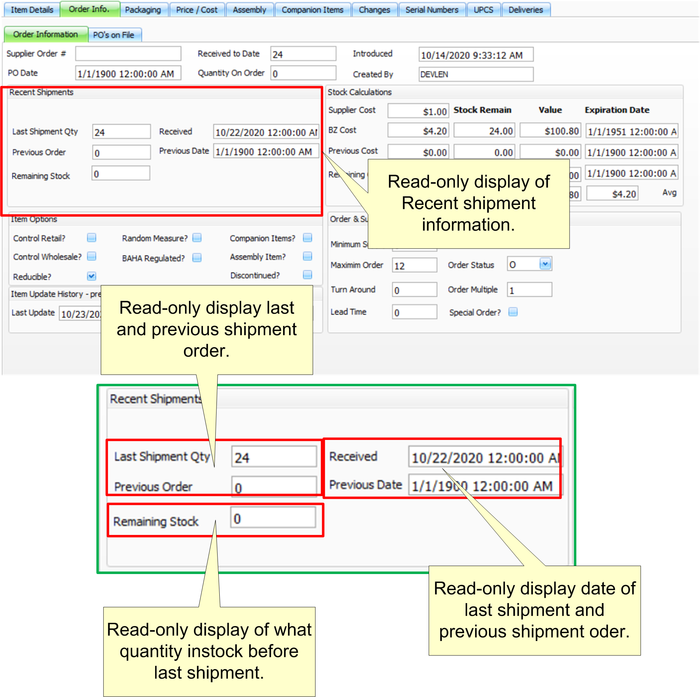
Recent Shipments: Users can view the amount that came in on the last and prior shipment, as well as the date and time of the shipment. Also, users can see the remaining stock amount.


Order info - recent shipment.png
Figure 2-28: Order information – Recent Shipment form


Item Options: There are many ways to get more control over products. This segment includes a list of choices. See the terminology table below to help grasp each choice and select wisely.
Terminologies Definitions
Control Retail The governments fixed price per item. Items are not permitted, by law, to exceed government rates.
Control Wholesale The governments fixed price for wholesale products. Items are not permitted, by law, to exceed government rates.
Reducible Inventory deduct in stock amount. For e.g., an oxiclean product may and can be taken out of stock which reduces quantity, whereas a freight charge cannot be taken out of stock in order to reduce quantity.
Random Measure Use to incorporate quantity decimals for goods not determined by whole numbers. E.g. sugar, rice, etc.
BAHA Regulated Requires license to import an item
Companion Items Companion items are priced and sold individually, but mostly purchased together. For eg, a brand smartphone purchase, the case and screen protector may have different prices but purchased together.
Assembly Items Assembly items are items that are sold together with one package price. This may be a bundled plan the company offers.
Discontinued A discontinued product is no longer sold.


Figure 2-29: Order information – Item Option Form


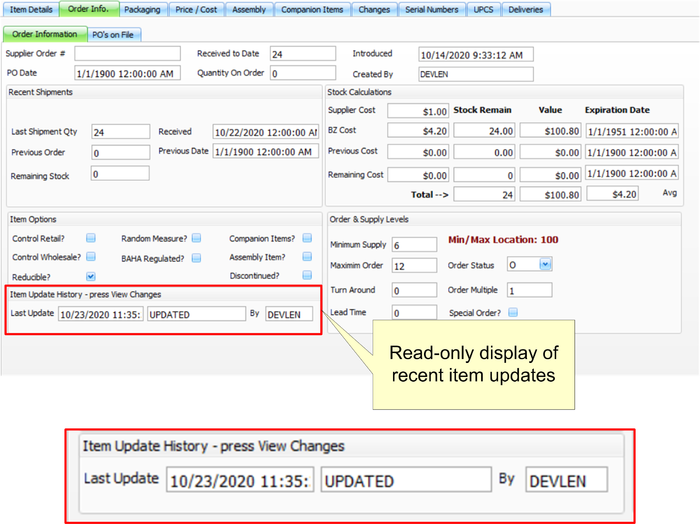
Item Update History: This segment displays the date and period of the last update to the item preceded by the user that made the update.


Order info - item update history.png
Figure 2-30: Order information – Item Update History


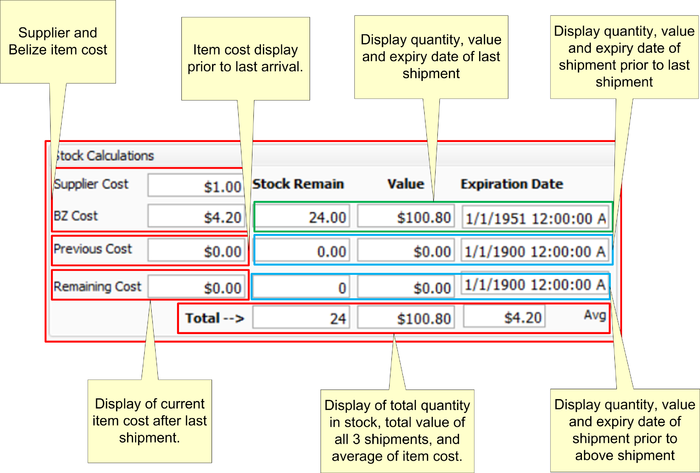
Stock Calculation: In stock calculation users can see supplier expense, Belize expense, previous cost, remaining cost, remaining stock, value and expiry date. For a better explanation of these fields, see the illustration below.


Order info - stock calculation.png
Figure 2-31: Order information – Stock Calculation


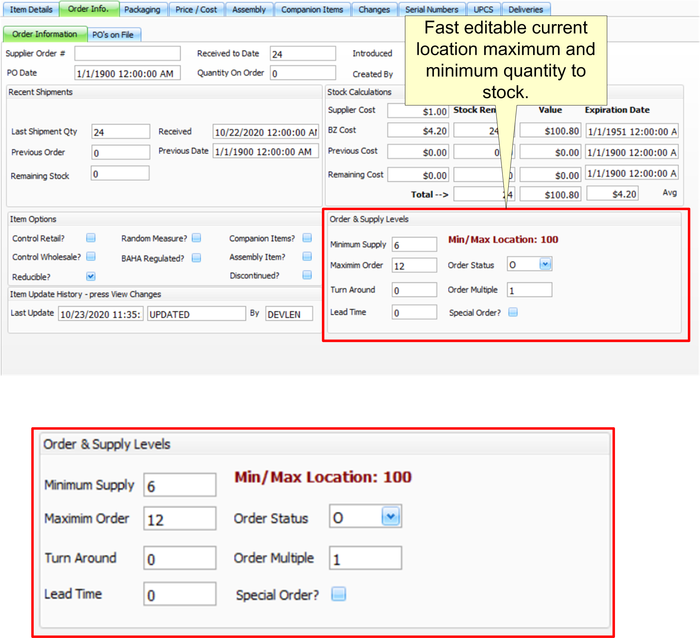
Order & supply levels: Within this segment, the user may adjust the maximum and minimum amount the current location can hold. And specify the status of the item, be it clearance, special order, open order etc.
Terminologies Definitions
Minimum Supply Minimum amount of item a location should hold.
Maximum Order The maximum quantity a location should hold.
Turn Around The period it takes to sell the entire item stock.
Lead Time Time it takes to get the goods after ordering from the supplier.
Order Status Specify the status of the item, be it clearance, special order, open order etc.
Order multiple Minimum quantity to order from supplier.
Special Order Normally, a special order is not sold in store, typically ordered by the company for a customer who requested it.


Order info - Order and supply levels.png
Figure 2-31: Order information – Order and supply levels


Packaging

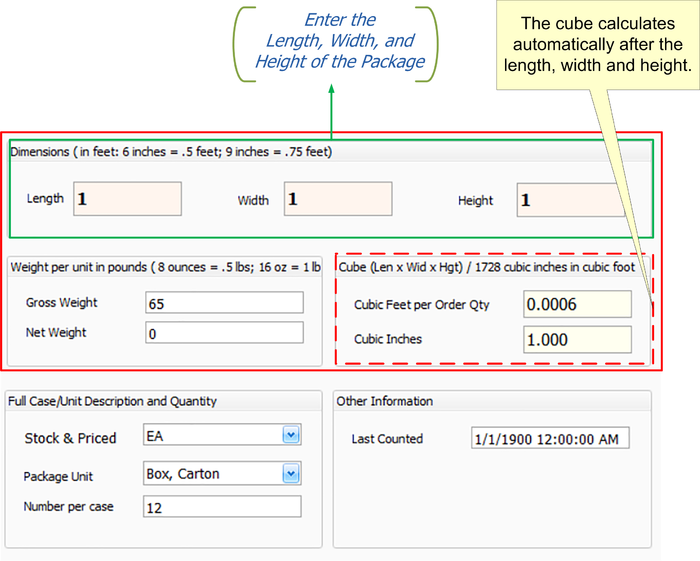
GoneClear StoreFront's capacity to store the dimensions, weight and cube of a package is another aspect that makes it such reliable, unique POS software. If correctly implemented, this function can be very useful when making several deliveries to customers and/or ordering several supplier products since it will be easy to calculate how many different items of different measurements can fit in a truck.


Dimensions: Enter the length, width and height of the package and the cube will automatically calculate. Then enter the gross weight and net weight in the weight per unit in pounds form.


Remember to always save after any updates have been made
Packaging.PNG
Figure 2-32: Packaging Size


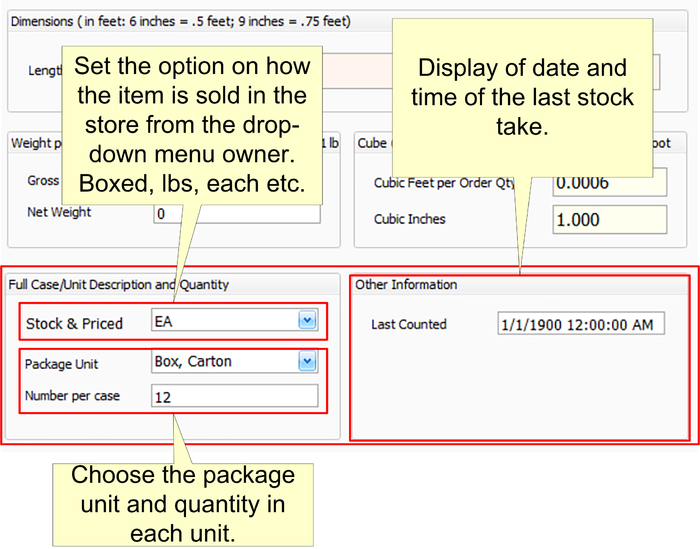
Full Case/Unit Description and Quantity: Choose Storage & Price, Package Unit and enter quantity in one unit.
left center NOTE:These fields would have already been filled out when adding item to the inventory.


Other information: This segment indicates the date and time of the last item count.


Packaging (2).PNG
Figure 2-33: Packaging- Full Case/Unit Description and Quantity and Other information:

Price/Cost
License rights users can access and change item prices in this window. In this chapter we will address the structure of the forms and not all their meaning. However, you will have links to the section that explains the significance of each field.

System Control Files

Sales

Accounts

Purchase Orders

Logistics

System Defaults

Gallery Page