Difference between revisions of "GoneClear Storefront"
(→Import Customs Entry window: add pics for repack and fragment) |
(→Import Customs Entry window: add note) |
||
| Line 1,596: | Line 1,596: | ||
[[File:Fragment_cost_sheet.png|700px|frameless|center]] | [[File:Fragment_cost_sheet.png|700px|frameless|center]] | ||
<div style="color: #004b64; font-size: 20px; text-align: center;">Figure ???: Fragment in cost sheet</div> | <div style="color: #004b64; font-size: 20px; text-align: center;">Figure ???: Fragment in cost sheet</div> | ||
| + | <br> | ||
| + | |||
| + | {|style="width:100%; background-color: #f8f9fa; border:1px double #eeeeee; text-align:left;" | ||
| + | |[[File:Clipart note.png|30px|frameless|left center]] NOTE: After correcting all invalid numbers and making necessary adjustments, click on "Send to Incoming" to start the next step. | ||
| + | |} | ||
== Sales == | == Sales == | ||
Revision as of 01:17, 23 December 2020
Contents
- 1 Basics of GoneClear StoreFront
- 2 Inventory
- 2.1 Inventory Tab & Ribbon
- 2.2 View inventory
- 2.2.1 Inventory Data Window
- 2.2.2 Search For An Item
- 2.2.3 Adding a New Item to Inventory.
- 2.2.4 Item details
- 2.2.5 Add and Remove an Item Image
- 2.2.6 Order Information
- 2.2.7 Packaging
- 2.2.8 Price/Cost
- 2.2.9 Assembly and Companion
- 2.2.10 Changes
- 2.2.11 Serial Numbers Window
- 2.2.12 "UPC window in Inventory Data
- 2.2.13 Deliveries in Inventory Data
- 2.3 UPC Utilities Ribbon
- 2.4 Reports Ribbon
- 2.4.1 Stock Analysis
- 2.4.2 Assembly Item Report
- 2.4.3 Companion Items Report
- 2.4.4 Stock Adjustment
- 2.4.5 Inventory Custom Reposting Tool
- 2.4.6 Purchase History Report
- 2.4.7 12 Month Sales Report
- 2.4.8 12 Month Purchases Report
- 2.4.9 3 Period Comparison W/GP
- 2.4.10 Stock Value
- 2.4.11 UPC List
- 2.4.12 Weekly Trends
- 2.4.13 Location Sales
- 2.4.14 In Bond Stock
- 2.5 Brokerage Utilities
- 2.6 Customs/Electronic File Transfers
- 3 Sales
- 4 Accounts
- 5 Purchase Orders
- 6 Logistics
- 7 System Defaults
- 8 Gallery Page
Basics of GoneClear StoreFront
In This Chapter
Getting Started
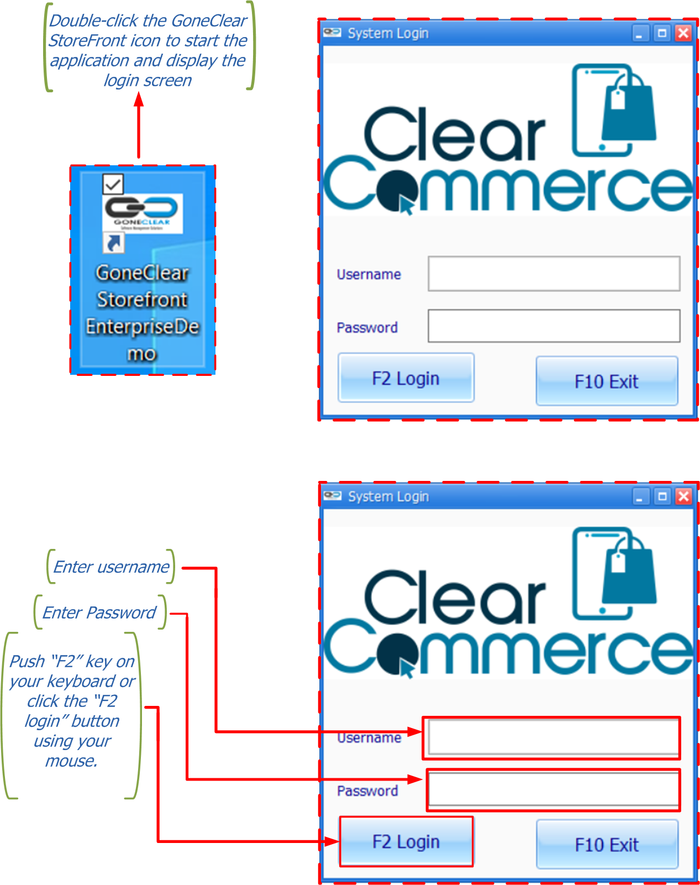
To start GoneClear StoreFront, double-click the icon shown in Figure 1-1
A user name and a password must be entered in order to log into the company database. For audit purposes, user information is recorded in every new record or modification to an existing record that a user performs.
Knowing Where You Are
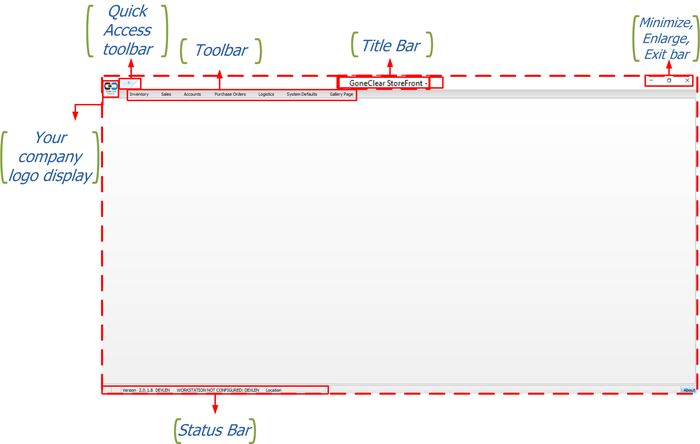
The Main Window
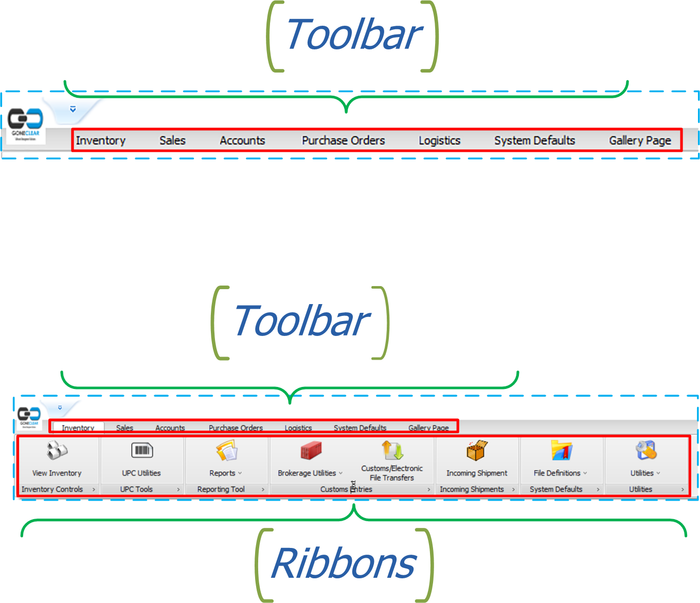
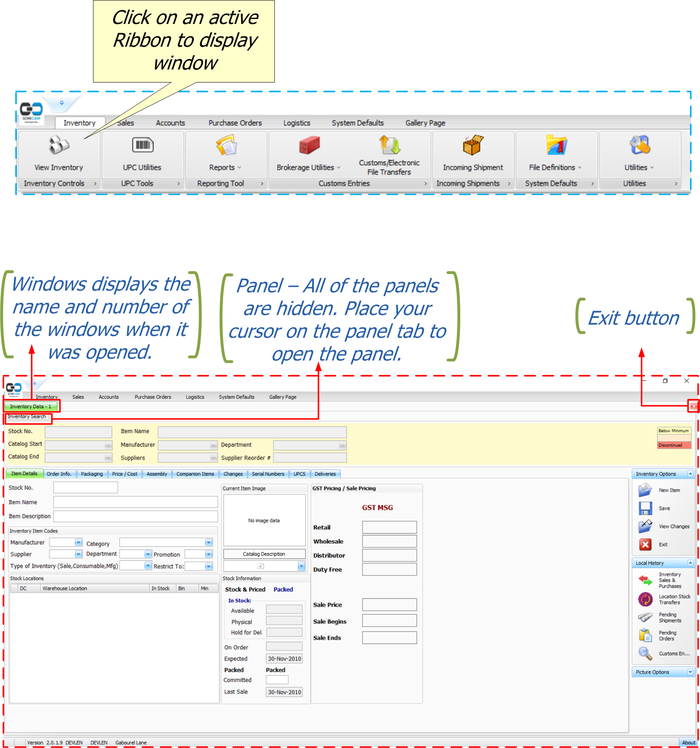
Toolbar and Ribbon
Quick Access Tool bar
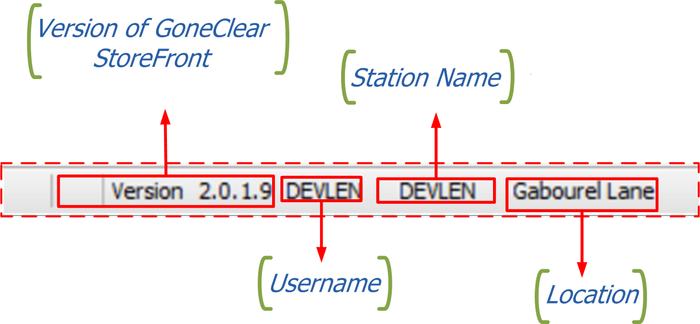
The Status Bar
- The bottom left-hand side displays the version of GoneClear StoreFront, the user who signed in, the name of the computer station in use and the location of the shop.
- The bottom left-hand side will also display when a user is in "sales mode".
Windows and Panel
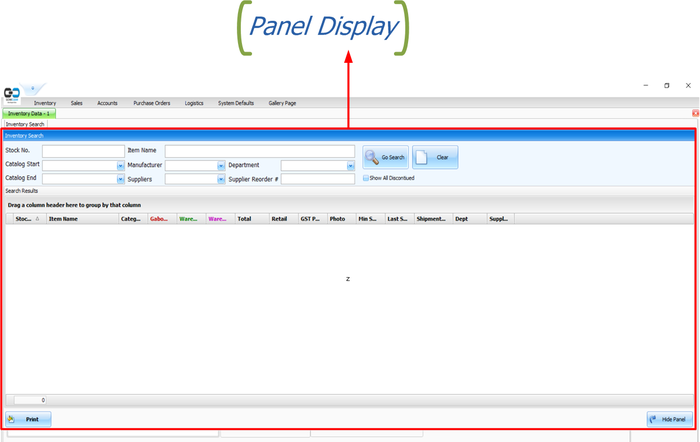
A new window will open by clicking on an active Ribbon. All windows would include the exit button to exit the active window. As mentioned earlier in this guide, it is possible to have many windows open at once.
Several windows have a panel that gives access to more choices within the active window.
Window Operation Modes
- Add: Add a new record or document
- View: View an existing record or document
- Update: Modify the data of an existing record or document
Customizing Column Header
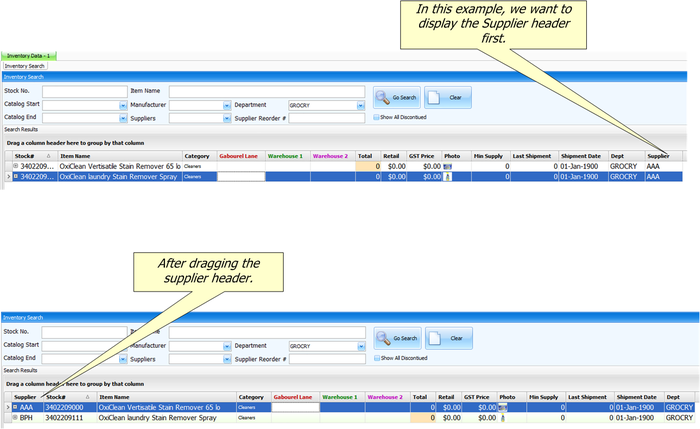
- Users can reorder the columns by clicking and dragging the column headers to new locations.
- Users can apply filters to one or more column headers.
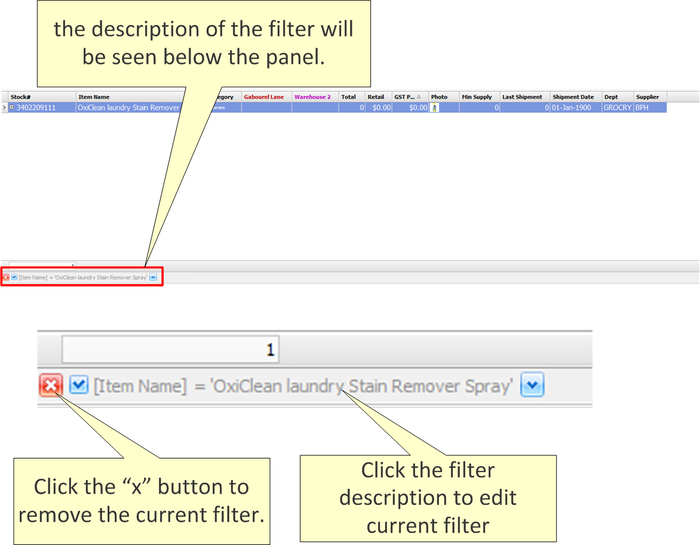
- Use the filter menu to select which of the values currently in the column should be displayed. When you add a column filter, the description of the filter will be seen below the panel. You may use this to validate which column filters have been added to the current view and you may adjust the filter. For example:
| Terminology | Definition |
|---|---|
| Sort Ascending | Sorts the selected column in ascending order. |
| Sort Descending | Sorts the selected column in descending order. |
| Clear Sorting | Clears the ascending or descending sorting criteria currently set for a column. |
| Group By This Column | Groups the table using the data in the selected column. It does this by moving the data into expandable lists that are located in the body of the grid. One expandable list will be created for each possible column value.
If Group By Box is enabled, this will also create a "Group By" box in the area immediately above the column headers. Note: To turn off the Group By This Column feature and revert to the original view: Enable Group By Box, drag the Group By boxes back to the column header.
|
| Group By Box | Displays or hides an area immediately above the column headers that contains "Group By" boxes. One "Group By" box will be displayed for each column header for which Group By This Column is currently enabled. You can also drag column headers to and from this area.
|
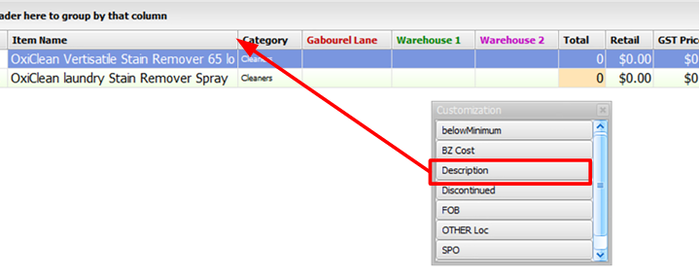
| Column Chooser | Enables you to add and hide information within a table. When you select Column Chooser the Customization dialog is displayed. This dialog is used to store the columns you don't currently want displayed within the table. Simply click and drag the desired column headers from the table to the Customization dialog. For example, if you decide
|
| Best Fit | Resize the width of the selected column so that the header text is displayed in the optimal amount of space. |
| Best Fit (all columns) | Resizing the width of all columns in the table so that the header text is displayed in the optimal amount of space. |
| Filter Editor | The Filter Editor dialog will show any filters that are currently active in the column headers. You can use the editor to modify the existing filter criteria and to build new criteria using the available filter conditions and logical operators. |
Inventory
In This Chapter
Inventory Tab & Ribbon
The inventory tab consists of seven (7) Ribbons which provide access to more choices. We're going to go over each ribbon as precisely as possible.
| Terminologies | Definitions |
|---|---|
| Stock Number | Identification number used in the physical warehouse or inventory method for the item. |
| Catalog | A complete collection of products organized with descriptive descriptions systematically. |
| Catalog Code | Code for entering and describing in a catalog a collection of items. |
| Catalog Description | The full descriptions specifics of the item and should include everything you want customer to see. |
| Item Name | Name provided to the item. This is a smaller field that the item description |
| Item Description | The descriptions are full specifics of the item and should include everything you want to know. |
| Packaging Code | A packaging code indicates the form of packaging transported. Box, can, bags, bucket, etc. |
| Manufacturer | The person or business that produces products for sale. |
| Supplier | The entity or association supplying your company's product or service. Note: Manufacturer and Supplier may be the same person or business. |
| Department | A part of a store selling a certain class or category of products. Eg. The sportswear department. |
| Discount | A deduction from the usual cost of something. |
| Promo code | A phrase or set of letters and numbers to be used for discount purposes. |
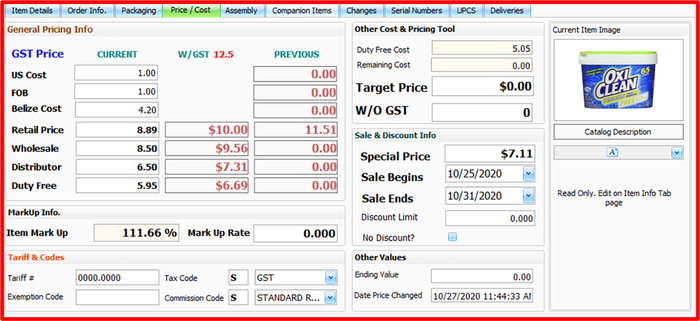
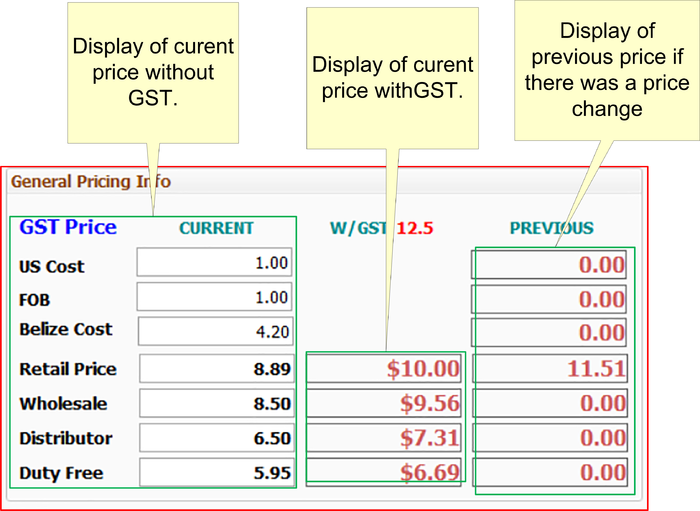
| GST | The goods and services tax (GST) is a value-added tax charged on most goods and services sold for domestic consumption. The GST is paid by cutomers, but it is given back to the government by the businesses selling the goods and services. |
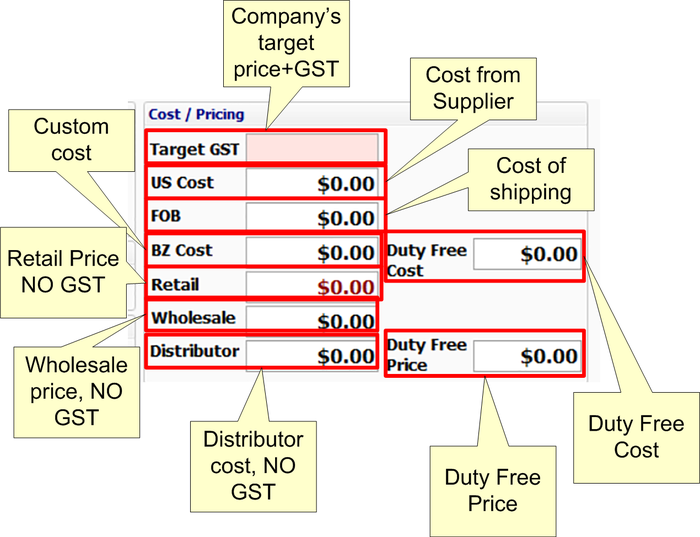
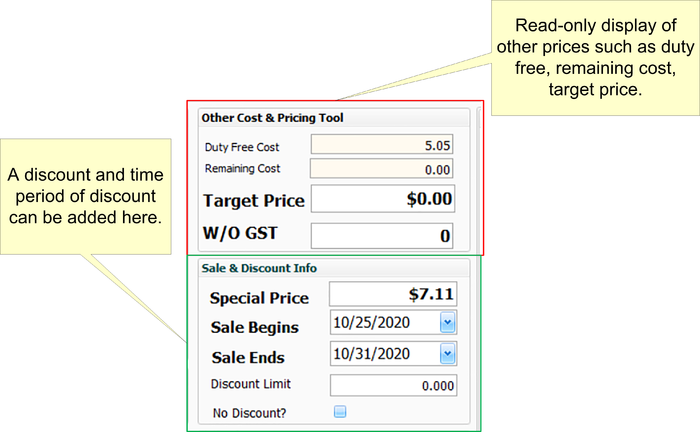
| Target Price | The company's selling price with GST. |
| US Cost | The supplier cost price. |
| FOB Miami | Shipping cost for item. |
| Bz Cost | The item's overall cost including US Cost, FOB Miami, and additional cost when it arrives in Belize. |
| Retailed | The sale of goods to the public in relatively small quantities for use or consumption rather than for resale. |
| Wholesale | The selling of goods in large quantities to be retailed by others. |
| Distributor | An agent who supplies goods to stores and other businesses that sell to customers |
| Duty Free | Duty-free refers to the act of being able to purchase an item in particular circumstances without paying import, sales, value-added, or other taxes. |
| Salesman | a man whose job involves selling or promoting commercial products, either in a store or visiting locations to get orders. |
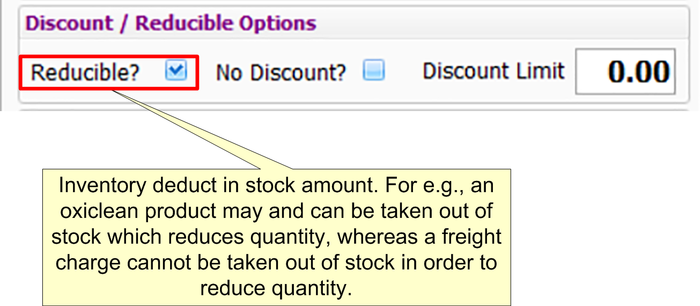
| Reducible | Inventory deduct in stock amount. For e.g., an oxiclean product may and can be taken out of stock which reduces quantity, whereas a freight charge cannot be taken out of stock in order to reduce quantity. |
| Warranty | A written guarantee given by the producer to the customer of the item, agreeing to restore or replace it, if required, within a specified period of time. |
| Serial Number | A number showing the position of an item in a series, especially one printed on paper currency or on a manufactured article for the purposes of identification. |
| Discontinued | A discontinued product is no longer sold. |
| Shelf Stable | Items which do not have an expiry date. |
| Supplier reorder # | ??? |
| BAHA Regulated | ??? |
View inventory
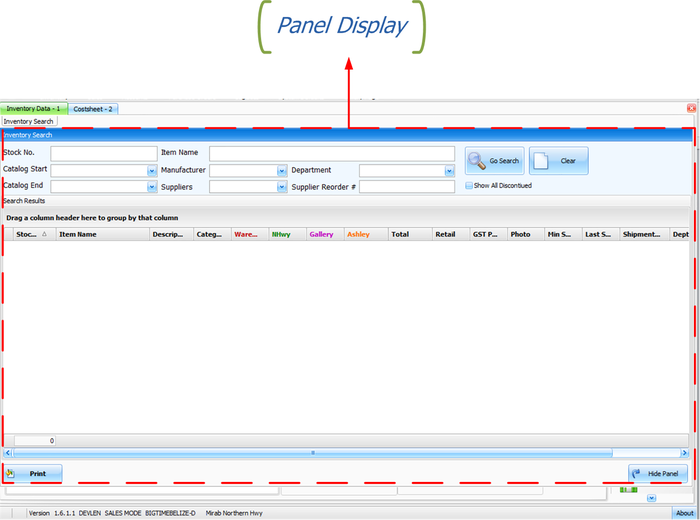
Since we have an idea of what a window is and how it functions. Let's go into the inventory data window for view inventory. Users can check for an item in this window to obtain more details about that specific item, whether it be product updates, prices, etc. Furthermore, a user can quickly add a new item to inventory using this window.
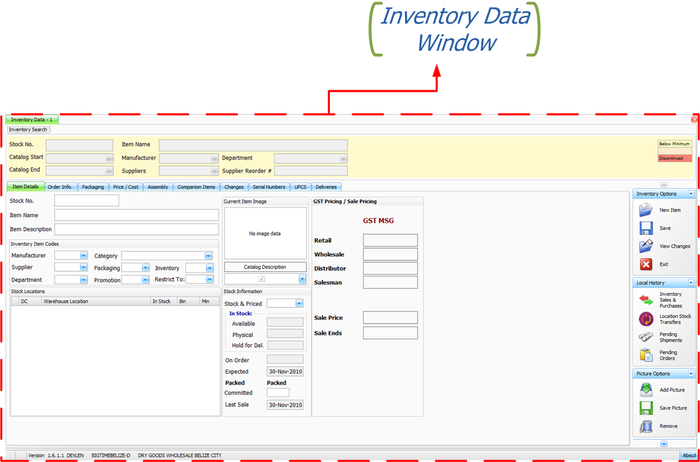
Inventory Data Window
To open Inventory Data window, click the view inventory ribbon shown in Figure 2-2.
- Search for an item
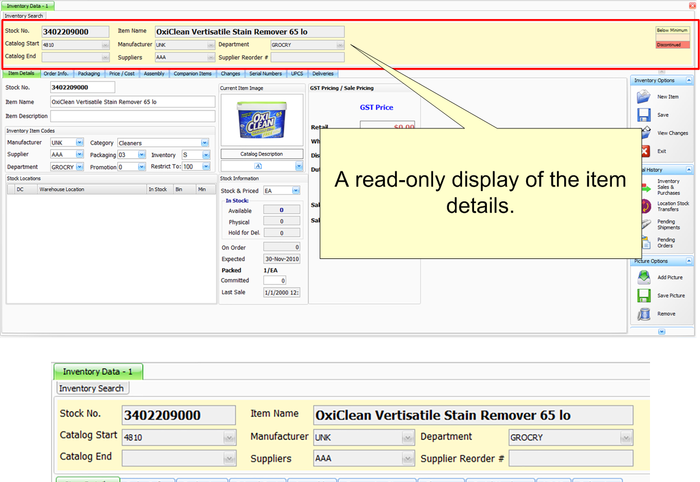
- View item details
- Add an item
- View order information from manufacture
- Set Packaging size and weight
- View Price and Cost of Item
- Add as Assembly
- Add as a companion
- View Changes to item
- Search Serial Number for item
- View UPCs
- View deliveries for item
The inventory data consist of 5 forms. Below are figures of these forms and a brief description of its functions
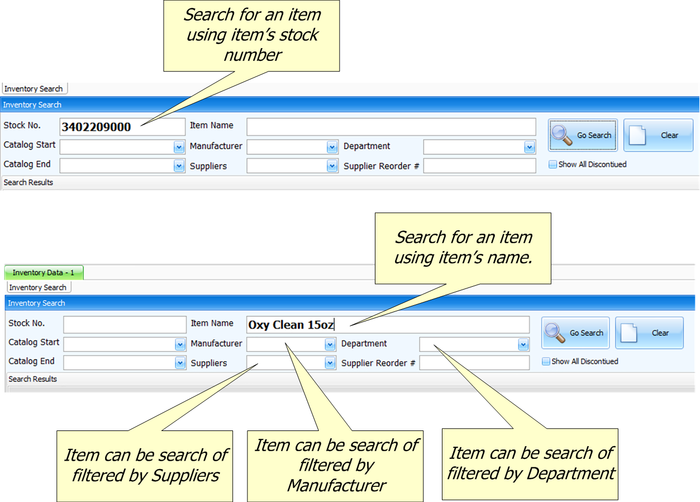
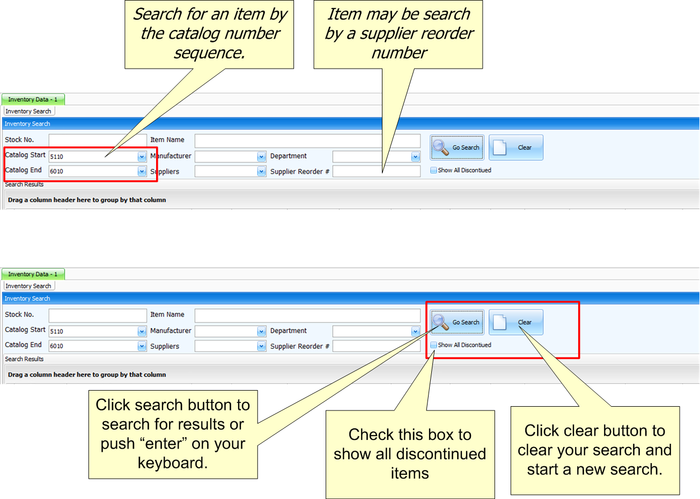
Search For An Item
Adding a New Item to Inventory.
- From the tab inside GoneClear StoreFront navigate to: Inventory > view inventory.
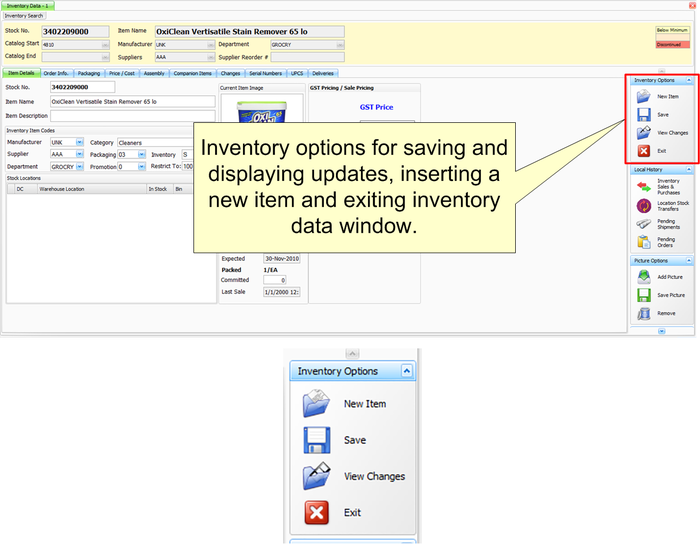
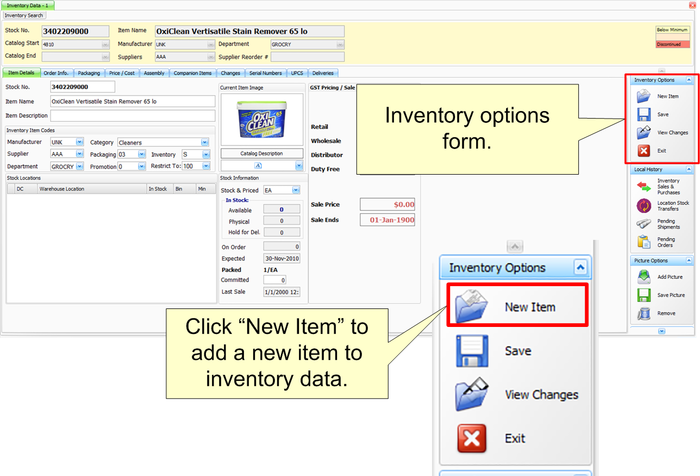
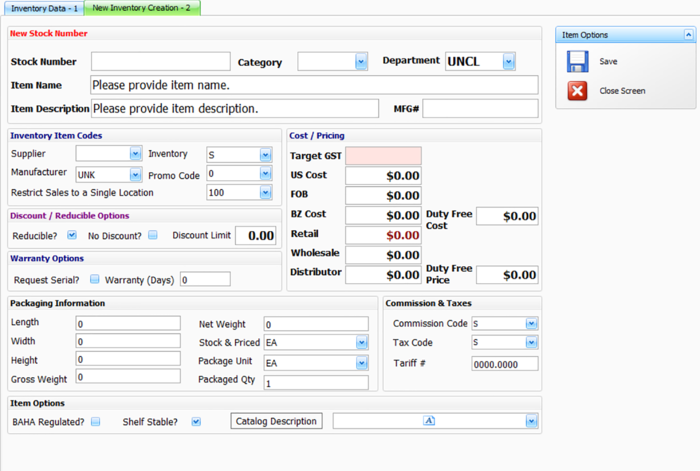
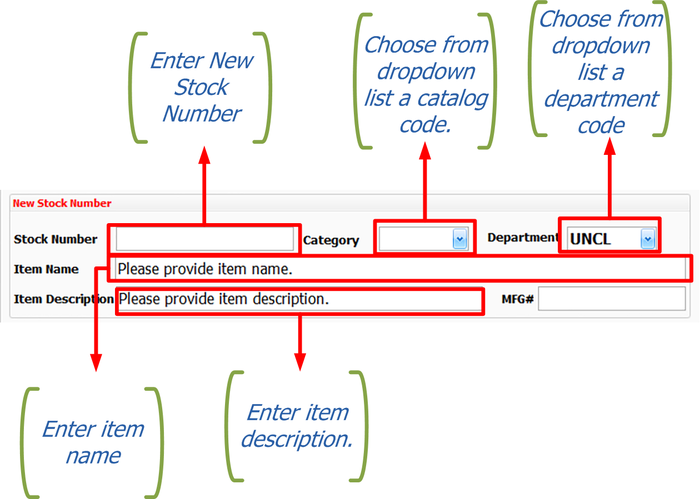
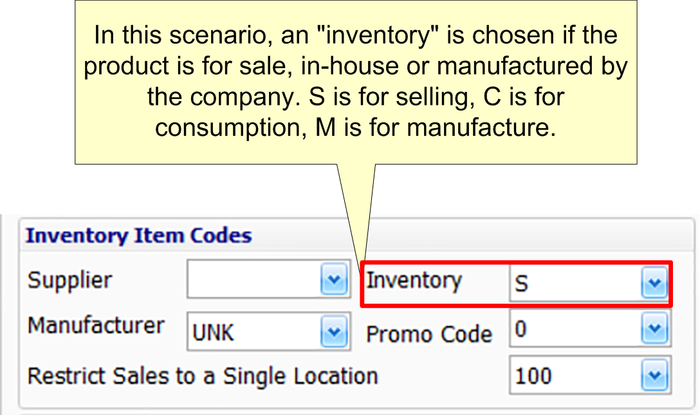
- The Inventory Data window will open navigate to: inventory options>new item. ("New inventory creation” window will open)
| Terminologies | Definitions |
|---|---|
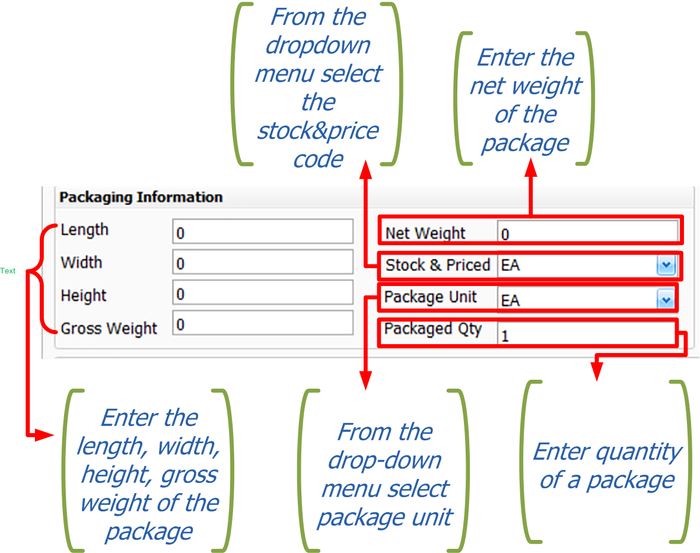
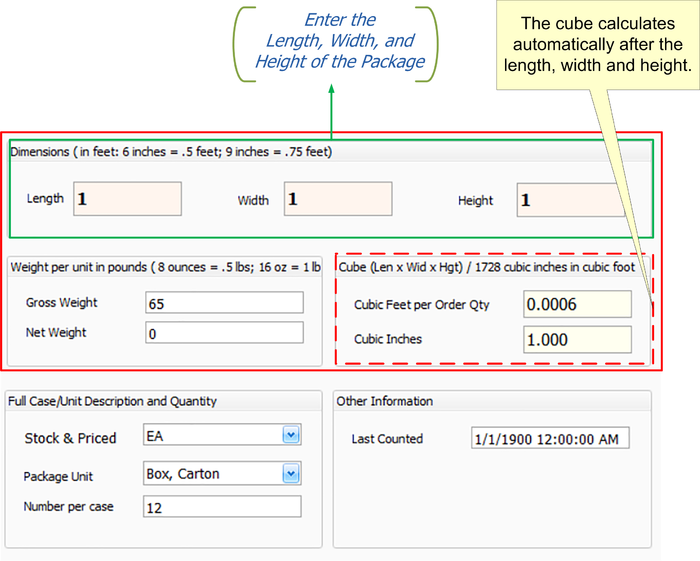
| Length, width, height | The package length, width and height. An Oxiclean product, for example, may be packed at 10 per box. The box's length, width and height is what is required in the packaging information option. |
| Net Weight | The weight of the item inside the package. |
| Gross Weight | Both item and package weight together. |
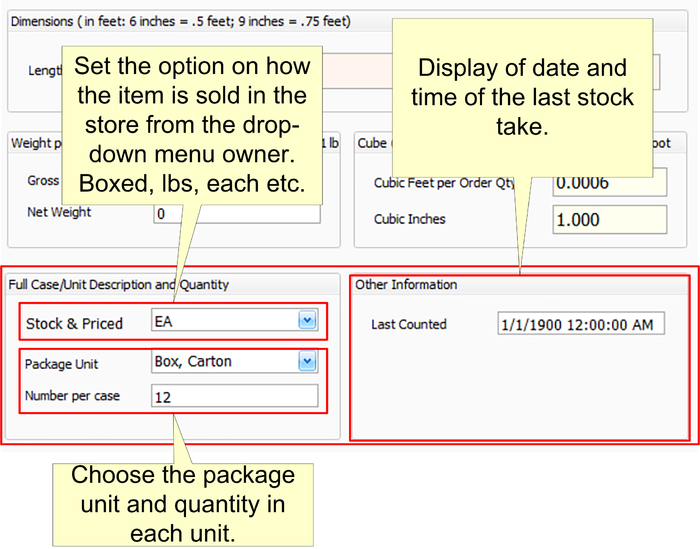
| Stock & Price | The user is asked in this field to indicate how this item is sold in the store. By box, each, bucket, etc. |
| Package Unit | In this field, the user is asked to enter the type of product package, i.e. box, bucket, etc. For eg, an oxiclean product may be sold "each" in the store, however it is packed 10 per package by the vendor. |
| Package Qty | The amount that comes in the package. |
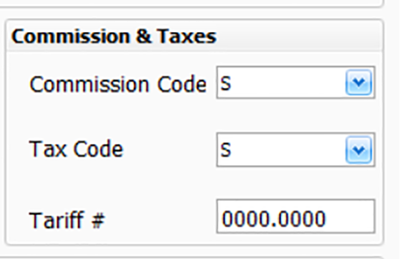
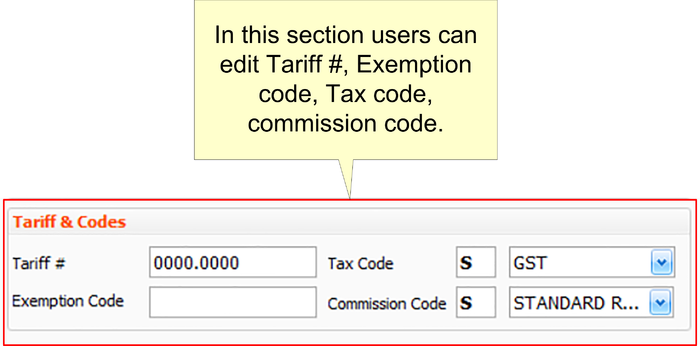
| Tariff | A tariff is tax on imports or exports within sovereign countries. It is a kind of international trade and policy control that taxes external goods in order to promote or protect the internal economy. |
| Tariff Number | A tariff number is a product-specific number, as documented in the Belize Customs Organization's Code System. A tariff number guarantees consistency in the country's product classification. For example regular orange juices share the same tariff number. |
| Tax code | This program includes three tax codes:
|
Item details
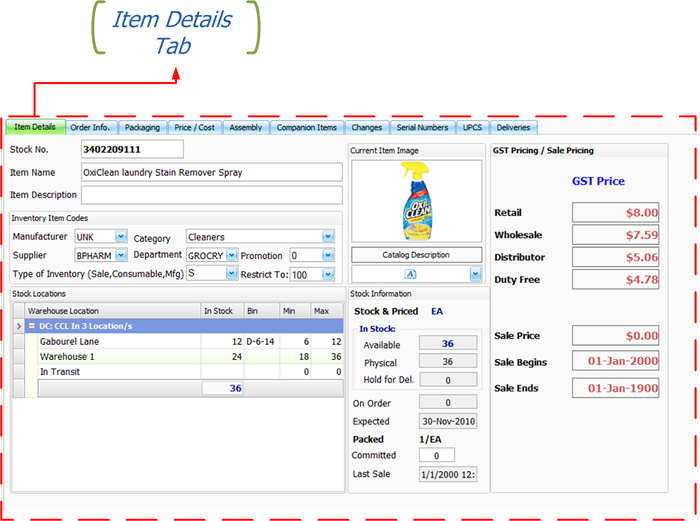
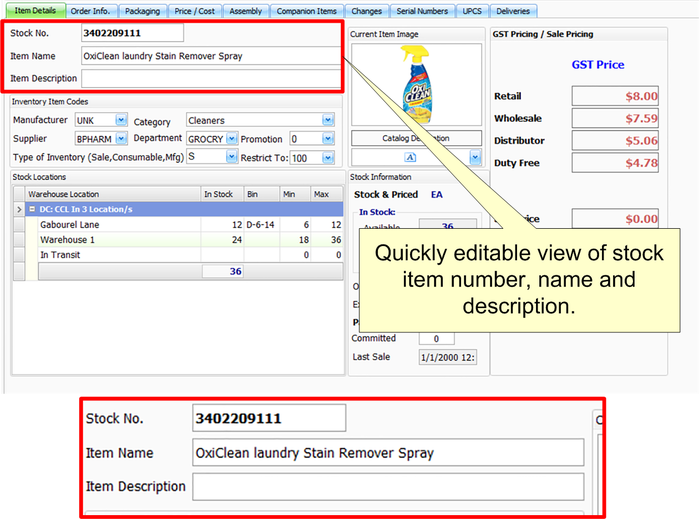
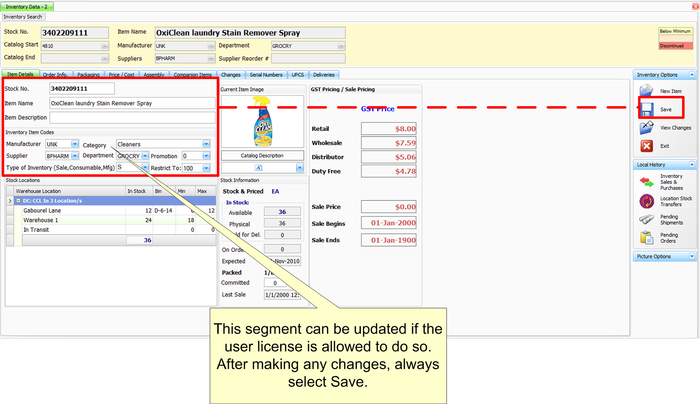
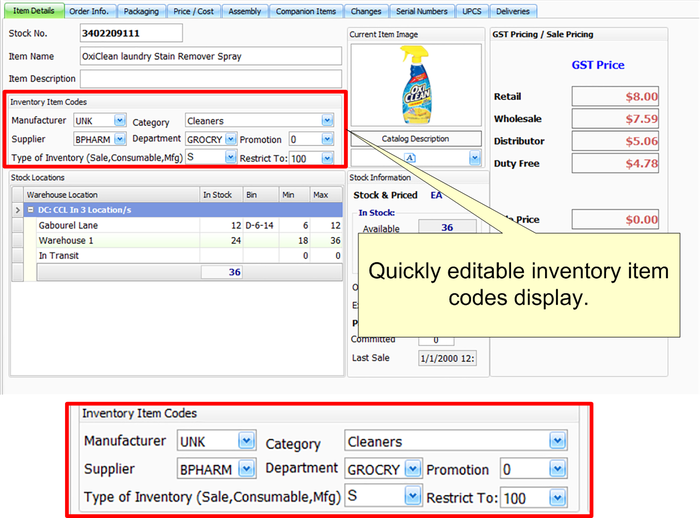
Remember to always save updates after any adjustments have been made.
| Terminologies | Definitions |
|---|---|
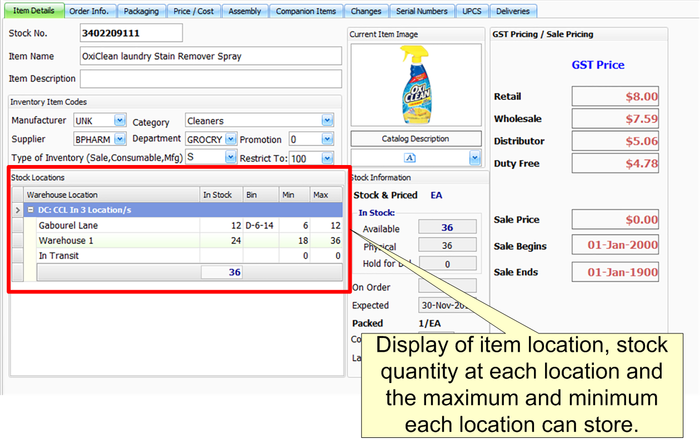
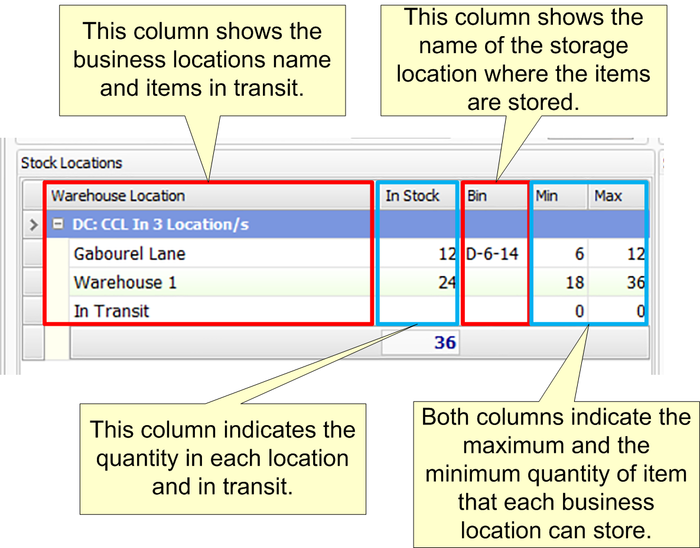
| Max | Maximum quantity of item that each business location can store. |
| Min | Minimum quantity of item that each business location can store. |
| Bin | The name of the storage location where the items are stored. |
| In Stock | The quantity of item available. |
| Terminologies | Definitions |
|---|---|
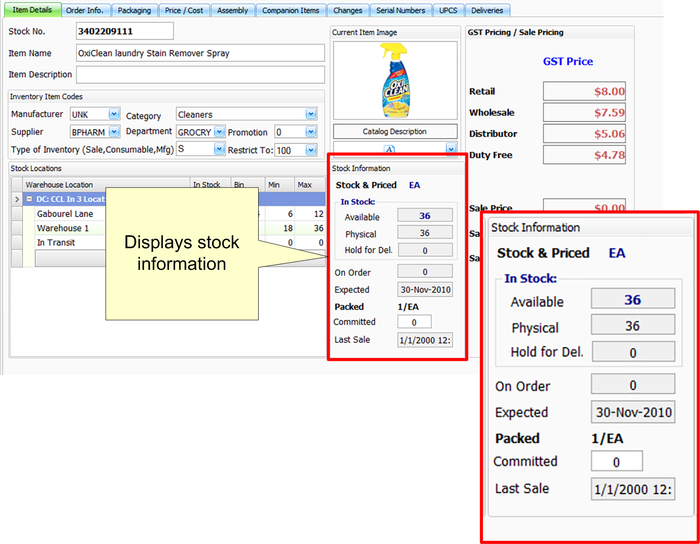
| Stocked & Price | Shows how items are sold. By package, container, each, etc. |
| Available | Overall inventory amount in all departments and branches.
|
| Physical | Physically available for sale.
|
| Held for Del. | Complete sum to be held for delivery. |
| On order | Pending supplier order. |
| Expected | Day when the on order shipment is supposed to arrive. |
| Packed | Shows how it is packed by vendor. |
| Committed | Displays the entire amount held for delivery, order, salesman, etc. |
| Last Sale | Last selling date on item. |
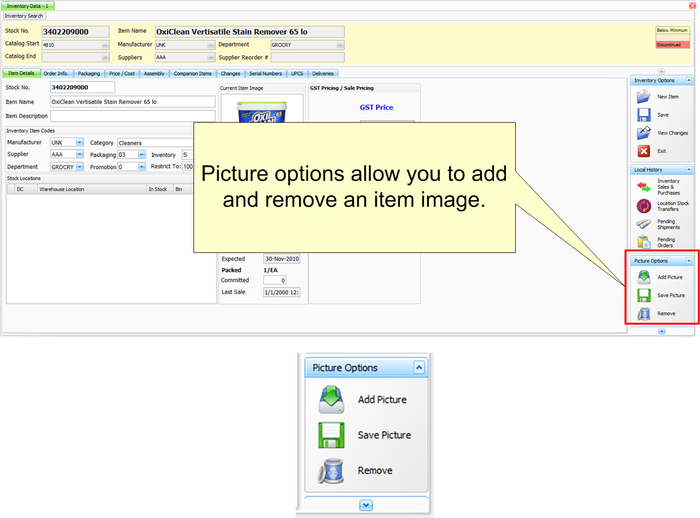
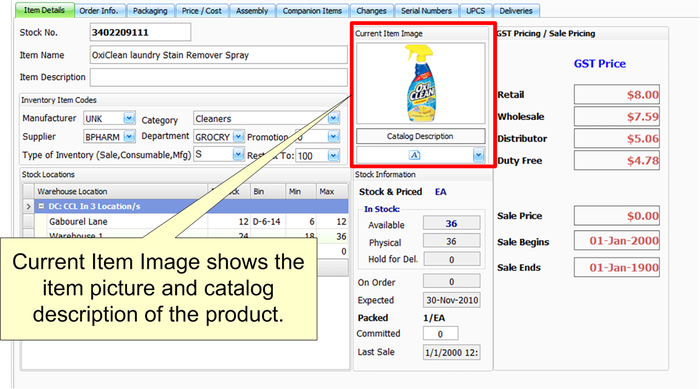
Add and Remove an Item Image
- Add an item picture
- Go to Picture Options Search
- Click Add Picture
- Select picture from your computer
- Click open or choose.
- Click Save Picture in Picture Options
- Remove an item picture
- Go to Picture Options Search
- Click Remove
- Click Save Picture in Picture Options
Order Information
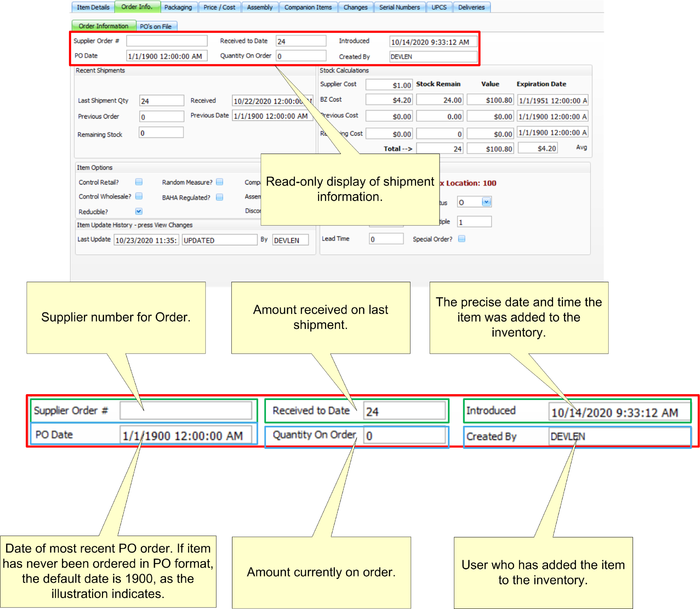
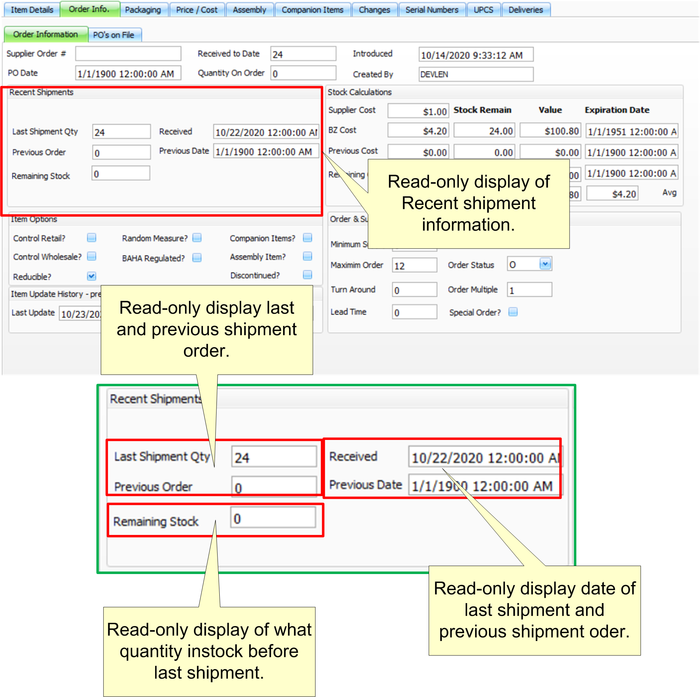
| Terminologies | Definitions |
|---|---|
| Remaining Stock | It may also be referred to as "OLD STOCK." In other terms, stock before last shipment. |
| PO/Purchase Order | A purchase order is a document submitted from the customer to the supplier to confirm a particular purchase of products. |
| Last Shipment | The latest goods from the supplier. |
| Terminologies | Definitions |
|---|---|
| Control Retail | The governments fixed price per item. Items are not permitted, by law, to exceed government rates. |
| Control Wholesale | The governments fixed price for wholesale products. Items are not permitted, by law, to exceed government rates. |
| Reducible | Inventory deduct in stock amount. For e.g., an oxiclean product may and can be taken out of stock which reduces quantity, whereas a freight charge cannot be taken out of stock in order to reduce quantity. |
| Random Measure | Use to incorporate quantity decimals for goods not determined by whole numbers. E.g. sugar, rice, etc. |
| BAHA Regulated | Requires license to import an item |
| Companion Items | Companion items are priced and sold individually, but mostly purchased together. For eg, a brand smartphone purchase, the case and screen protector may have different prices but purchased together. |
| Assembly Items | Assembly items are items that are sold together with one package price. This may be a bundled plan the company offers. |
| Discontinued | A discontinued product is no longer sold. |
| Terminologies | Definitions |
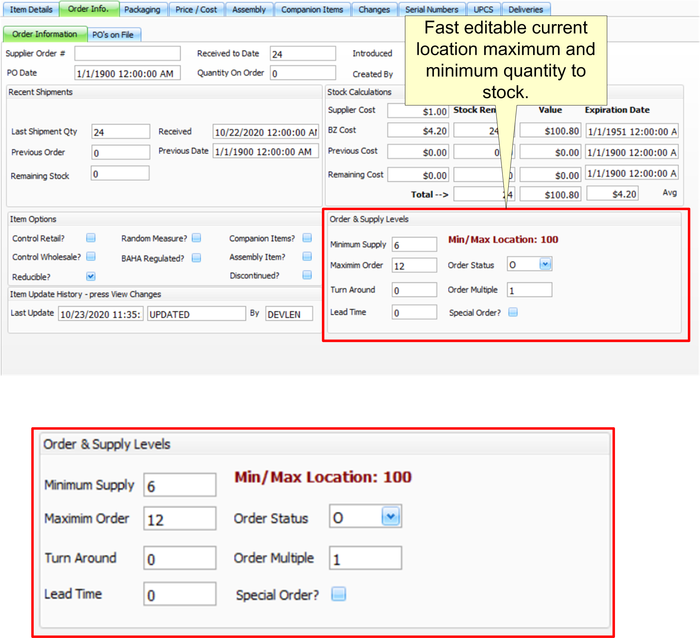
|---|---|
| Minimum Supply | Minimum amount of item a location should hold. |
| Maximum Order | The maximum quantity a location should hold. |
| Turn Around | The period it takes to sell the entire item stock. |
| Lead Time | Time it takes to get the goods after ordering from the supplier. |
| Order Status | Specify the status of the item, be it clearance, special order, open order etc. |
| Order multiple | Minimum quantity to order from supplier. |
| Special Order | Normally, a special order is not sold in store, typically ordered by the company for a customer who requested it. |
Packaging
Price/Cost
Assembly and Companion
Assembly
- Go to Order info window
- Check the box “Assembly Item” under item option
- Go to Assembly Window
- Click New Code button
- Type in the stock number you want to add as an assembly to current item and push enter on your keyboard
- Click Save
- Go to Order info window
- Uncheck the box “Assembly Item” under item option
- Go to Assembly Window
- Click on the item you want to remove
- Uncheck “Include” box
- Click Save
Companion
- Go to Order info window
- Check the box “Companion Item” under item option
- Go to companion Window
- Click New Code button
- Type in the stock number you want to add as a companion to current item and push enter on your keyboard
- Click Save
- Go to Order info window
- Uncheck the box “Companion Item” under item option
- Go to companion Window
- Click on the item you want to remove
- Uncheck “Include” box
- Click Save
Changes
Below is an example of the view change table
Serial Numbers Window
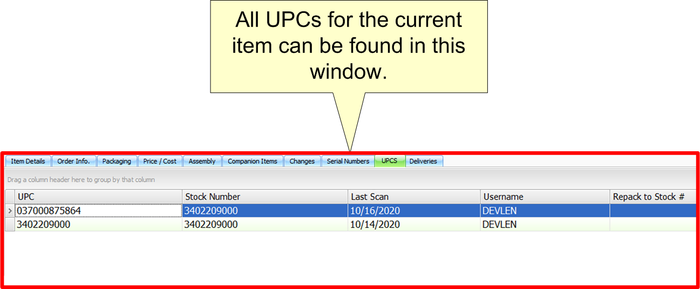
"UPC window in Inventory Data
| Terminologies | Definitions |
|---|---|
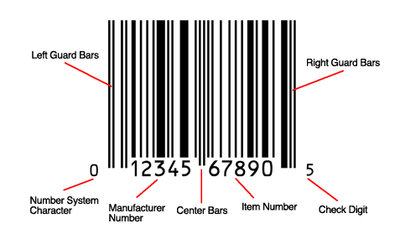
| UPC | A UPC, short for universal product code, is a type of code printed on retail product packaging to help identify an item. It consists of two parts — the machine-readable barcode, a sequence of unique black bars, and the unique 12-digit number beneath.
|
Deliveries in Inventory Data
UPC Utilities Ribbon
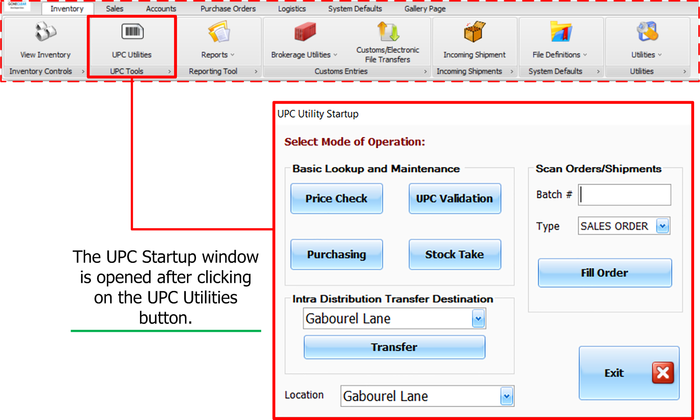
The UPC Utilities Ribbon provides a broad range of options for users utilizing UPCs. Depending on the licensed user, users can scan a UPC code to verify retail price, confirm UPC, display the company purchasing price of the scanned item, take stock and do quick transfer (This transfer method is typically used to quickly correct the stock). Users can also scan orders and shipments here.
Below is a UPC Utility Startup window that opens after clicking UPC Utilities Ribbon.
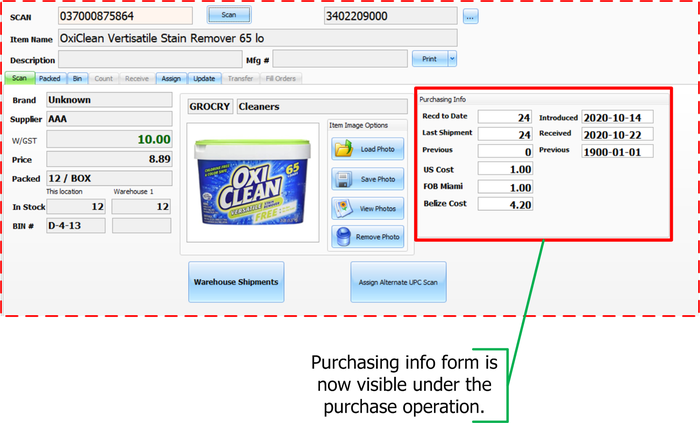
UPC Utilities Ribbon- Price Check
See the first button, "Price Check." Price check is very straightforward, enabling users to scan UPC code and see item selling price.
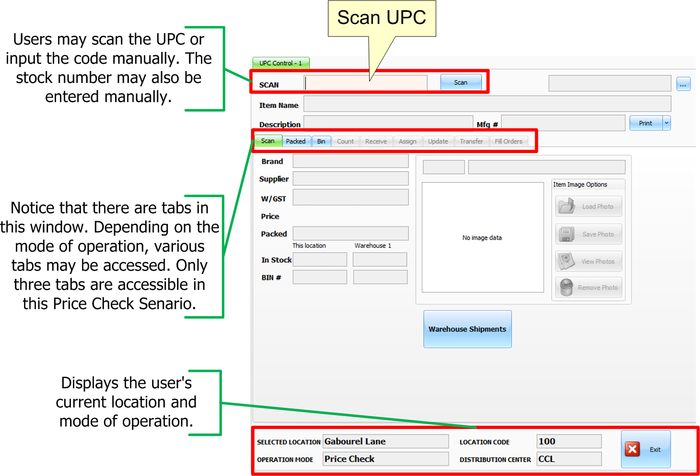
After selecting any of these buttons, a new window labeled UPC Control would open. Depending on the selected button, choices differ.
Below is a view of PRICE CHECK operation mode in the UPC Control window
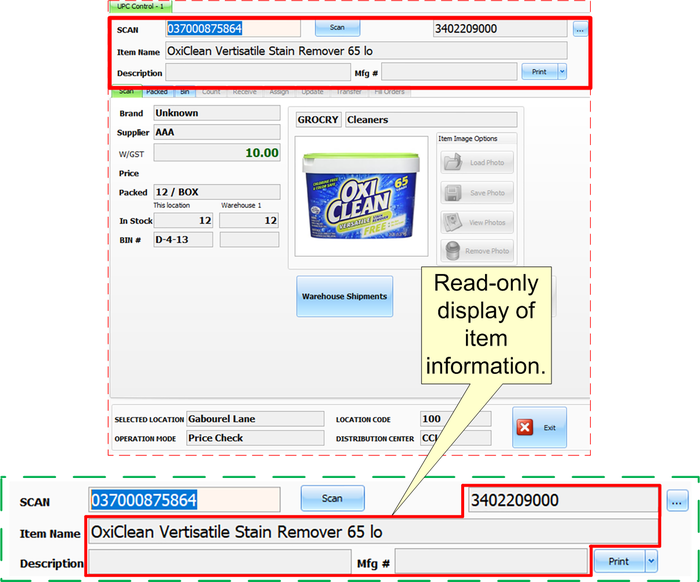
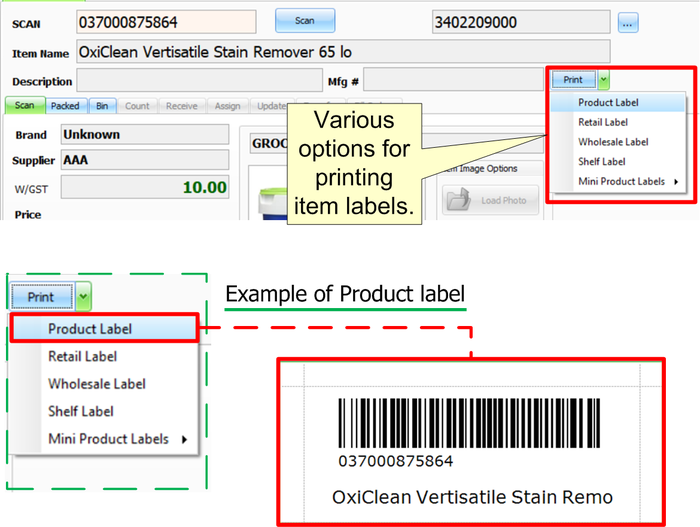
UPC control window first section displays item name and description. Users may print item labels in various formats in this section; moreover, price adjustment can be made here. Below is a display of item details in UPC Control window first section.
As stated earlier, the printing option gives a range of choices to print an item label. Below is an example of the first option, Product label.
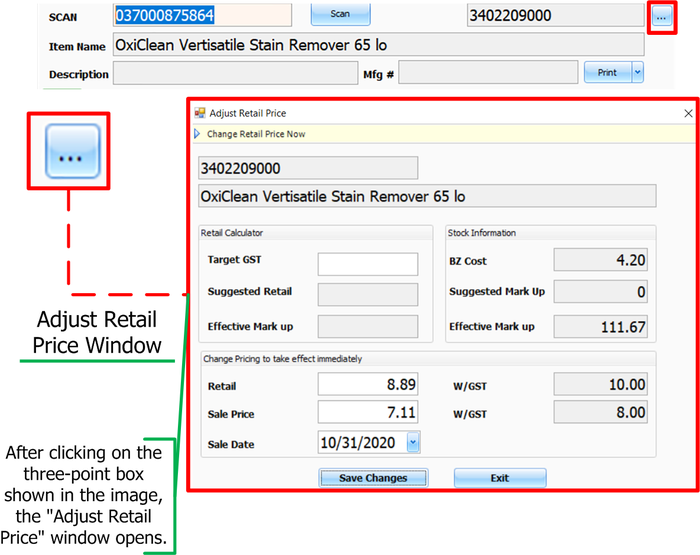
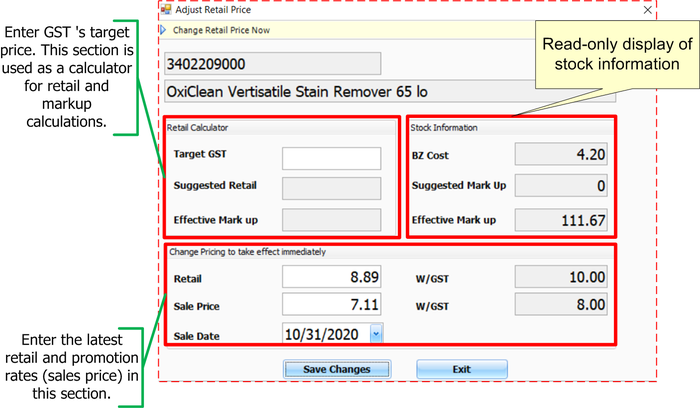
To adjust the retail price easily, simply click the three-dot box at the top right corner. This will open the "Adjust Retail Price" window.
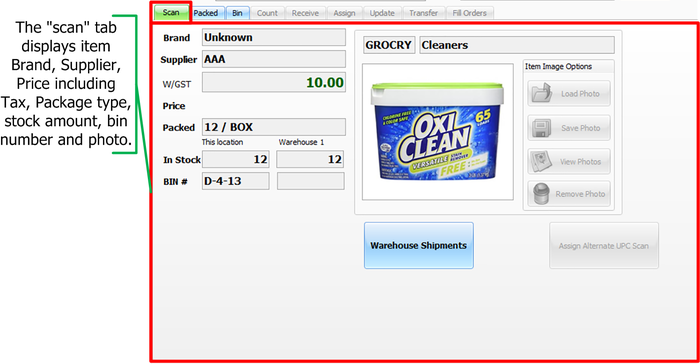
As stated earlier, the UPC control window has many tabs, and these tabs are available based on the user's operating mode. In this situation, we're looking at Price Check mode, which gives access to only 3 tabs; scan, packed and bin.
The scan tab in the Price Check Operation mode displays the item brand, Supplier, Price including Tax, Package Unit, Stock Amount, Bin Number and Picture
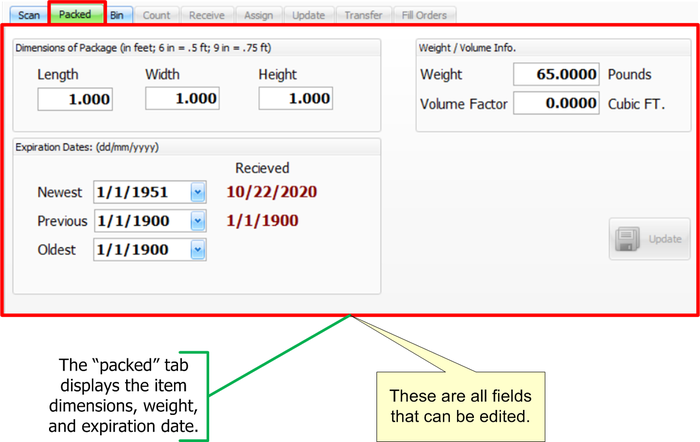
The packed tab displays the item dimensions
,weight, and expiration date. These are all fields that can be edited. See section 2.2.7 Packaging x to better understand their function.
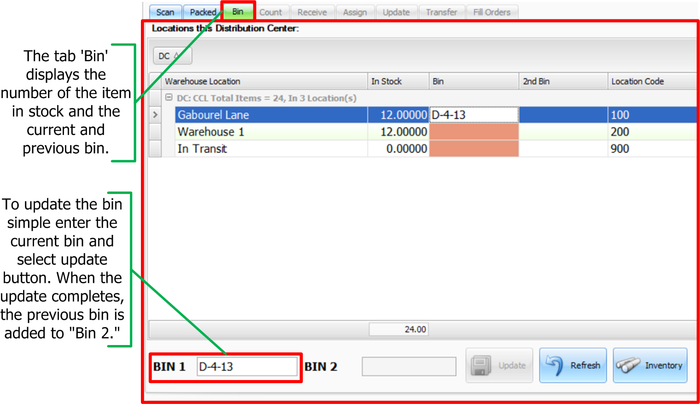
The Bin tab displays the number of the item in stock and the current and previous Bin. It also allows users to update Bin.
To update the Bin simple enter the current Bin and select update button. When the update completes, the previous Bin is added to "Bin 2."
"Bin 2" is where the item was previously kept
UPC Utilities Ribbon- UPC Validation
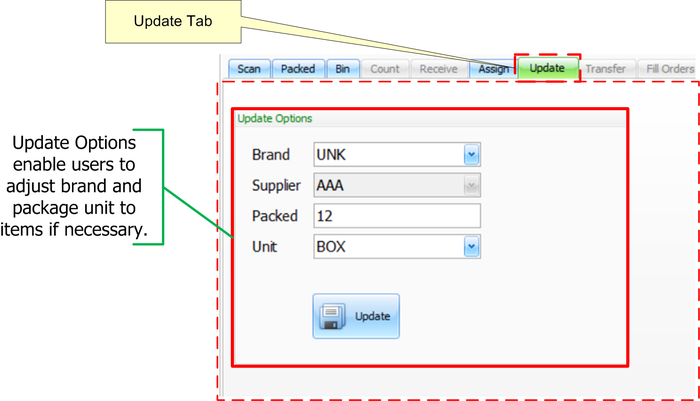
Since we now have a clear understanding of the Price Check and UPC Control window, let 's look at another button; UPC Validation. You may notice that more tabs are accessible under the UPC Control Window, assign tab, and update tab.
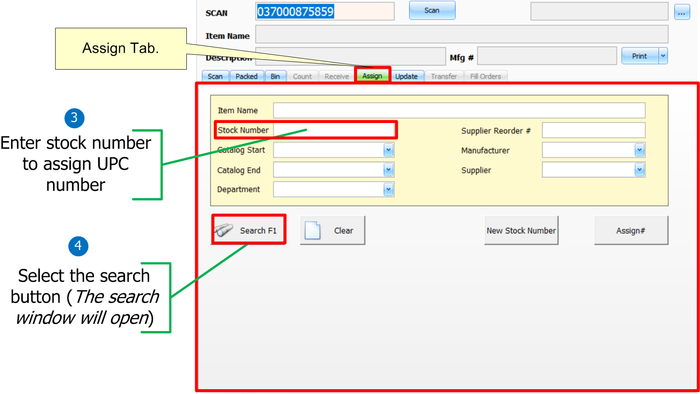
Assign Tab: under this tab, users may add a new UPC number to an item, or swap an existing UPC code to another item. This tab also enables the user to add a new item to the inventory.
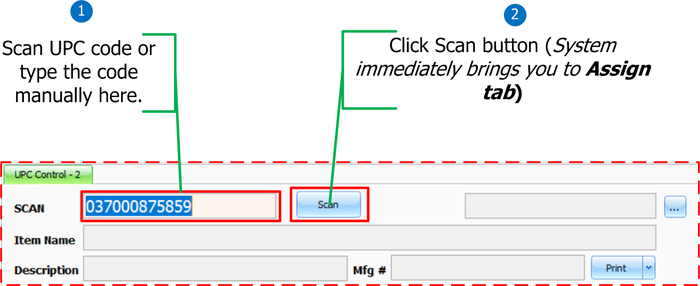
- Scan the UPC number or enter the UPC number manually.
- Click the button Scan. (System immediately brings you to Assign tab)
- Enter stock number to assign UPC number
- Select the search button (The search window will open)
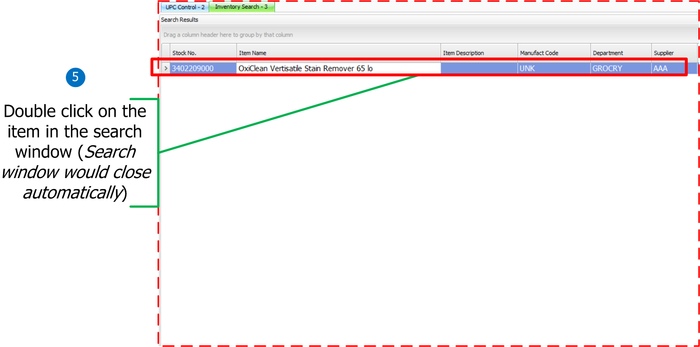
- Double click on the item in the search window (Search window would close automatically)
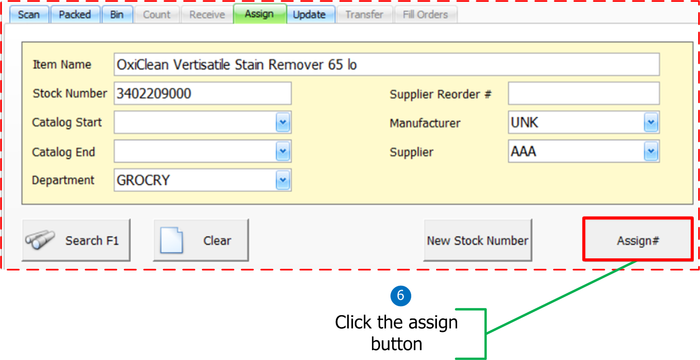
- Click the assign button
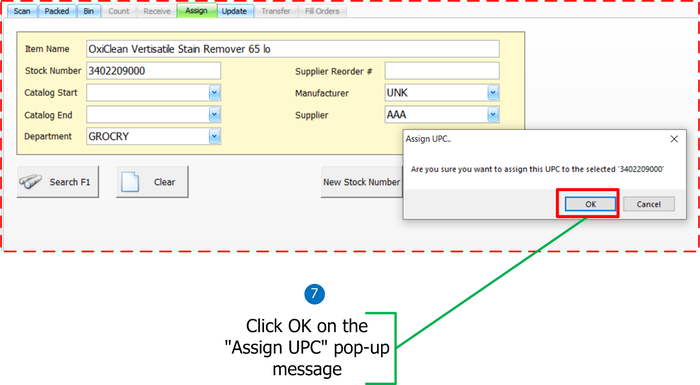
- Click OK on the "Assign UPC" pop-up message
- Scan the UPC number or enter the UPC number manually.
- Click the button Scan.
- Go to Assign Tab
- Enter stock number to assign UPC number
- Select the search button (The search window will open)
- Double click on the item in the search window (Search window would close automatically)
- Click the assign button
- Click OK on the "Assign UPC" pop-up message
- Click OK on the "Reassign" pop-up message
Utilities Ribbon- Purchasing
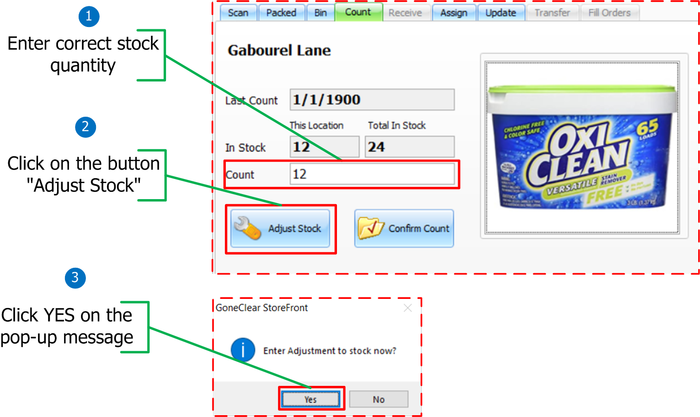
UPC Utilities Ribbon- Stock Take
- Enter correct stock quantity
- Click on the button "Adjust Stock"
- Click YES on the pop-up message
- Click on the button “Confirm Count"
- Click YES on the pop-up message
UPC Utilities Ribbon- Transfer
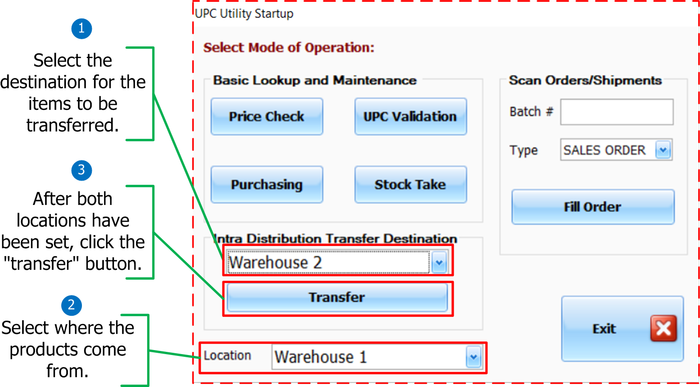
This section is not designed for large transfers. It is generally used to adjust stocks between locations quickly. For example, if the system records 25 oxiclean in warehouse 1 but only 24 are physically in warehouse 1 and the missing 1 is located in warehouse 2. Users can easily transfer 1 from warehouse 1 to warehouse 2 quickly. That'd balance the stock. See the illustration below.
- Select the destination for the items to be transferred.
- Select where the products come from.
- After both locations have been set, click the "transfer" button. (UPC Control window will open)
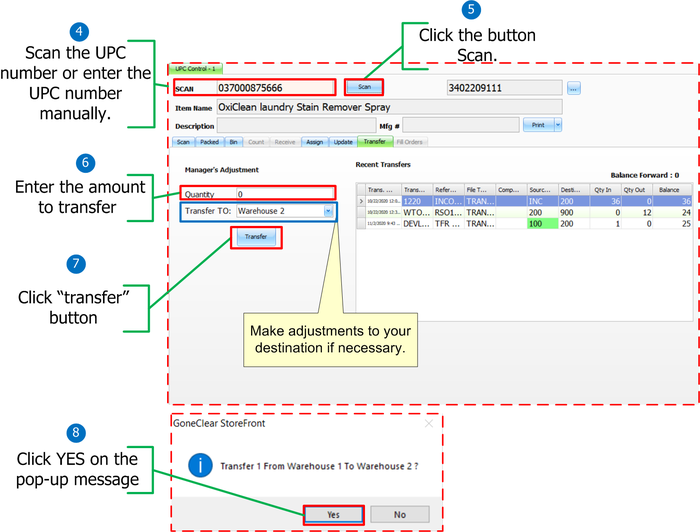
- Scan the UPC number or enter the UPC number manually.
- Click the button Scan.
- Under the transfer tab, enter the amount you wish to transfer.
- Click transfer button.
- Click YES on the pop-up message
Reports Ribbon
GoneClear StoreFront offers the resources and monitoring features you need to handle the company's financing efficiently and according to Generally Accepted Accounting Principles (GAAP).
The main incentive to use Report Ribbon is the opportunity to run reports to evaluate your departments for profitability and performance. Multiple reports are available:
- Stock Analysis
- FIFO Report
- Average Costing
- Promotional Analysis
- Assembly Items Report
- Proforma Activity
- Stock Adjustment
- Inventory custom Reporting tool
- Annual Reports
- Weekly Trends
- Location Sales
- In Bond Stock
Stock Analysis
Stock Analysis allows users to monitor stock sales and costs over a selected period. This option also enables you to view which products are sold more steadily than others.
See the terminology table below for an understanding of the Stock Analysis table layout.
| Terminologies | Definitions |
|---|---|
| Quantity Stock Beginning | Number of stock at the beginning of the period selected. |
| Value Beginning | Value Beginning refers to the company's total expense for the item at the beginning of the period selected.
|
| SaleValue Beginning | The amount of revenue the company would make if all items were sold at the beginning of the selected period.
|
| Quantity Received | The amount of stocks received, if any, at the end of the selected period. |
| Value Received | Value Received refers to the company's total expense for the item at the ending of the period selected.
|
| Quantity Sold | Amount of stock sold. |
| Total Sale | The company's revenue from Quantity Sold
|
| Total Cost | The company's total expense form Quantity Sold
|
| Ending Stock | This is the number of stock remaining after all transactions at the end of the selected period. |
| Ending Value | Ending Value refers to the company's total expense for the item at the ending of the period selected.
|
| SaleValue Ending | The amount of revenue the company would make if all items were sold at the end of the selected period.
|
| Stock Now | The quantity of item currently in stock. |
| Replacement Cost | Gross Profit display made in dollars for the selected period.
|
| GP% | Gross Profit display made in percentage for the selected period.
|
| %Dept Sales | Percentage of sale by department. |
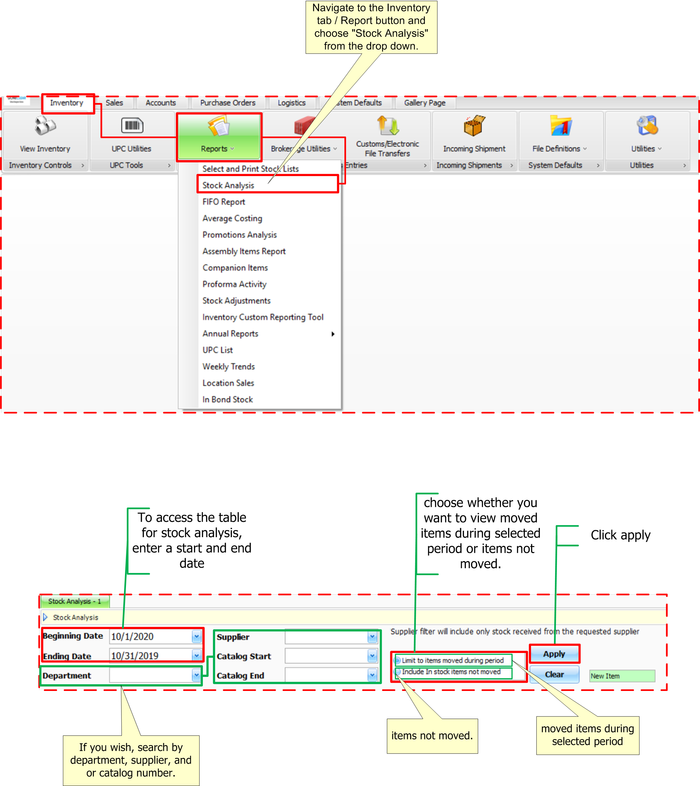
Navigate to the Inventory tab / Report button and choose "Stock Analysis" from the drop down. To access the table for stock analysis, enter a start and end date. If you wish, search by department, supplier, and or catalog number. Before clicking on the button “Apply”, choose whether you want to view moved items during selected period or items not moved. The default is set to items moved during selected period.
????? AND INFO TABLE HERE WHEN MS PATT ADD MORE INFO IN SYSTEM???
Assembly Item Report
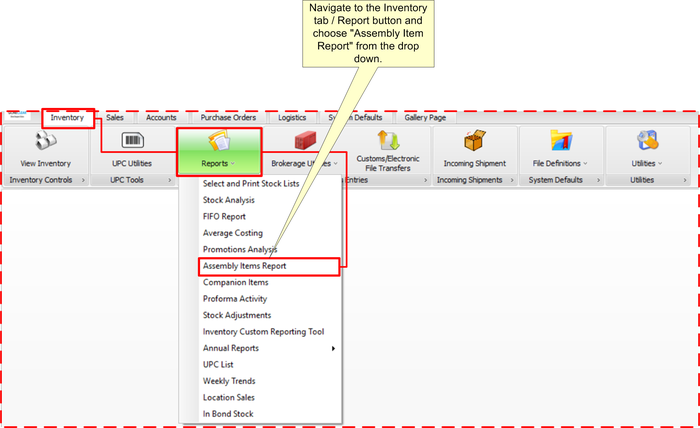
Earlier in this chapter, we discussed what assembly is and how an item is assembled. We will now discuss how to display a list of all assembly items. Navigate to the Inventory tab / Report button and choose "Assembly Items Report" from the drop down.
????? AND INFO TABLE HERE WHEN MS PATT ADD MORE INFO IN SYSTEM???
Companion Items Report
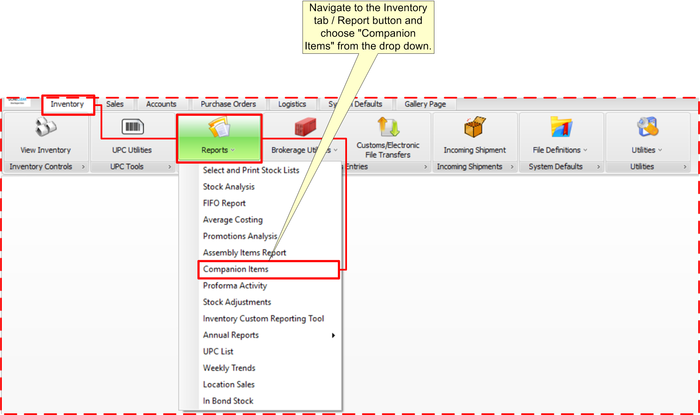
Similar to Assembly Item Report, the companion item report displays a list of all items under companion. Navigate to the Inventory tab / Report button and choose "Companion Item" from the drop down
????? AND INFO TABLE HERE WHEN MS PATT ADD MORE INFO IN SYSTEM???
Stock Adjustment
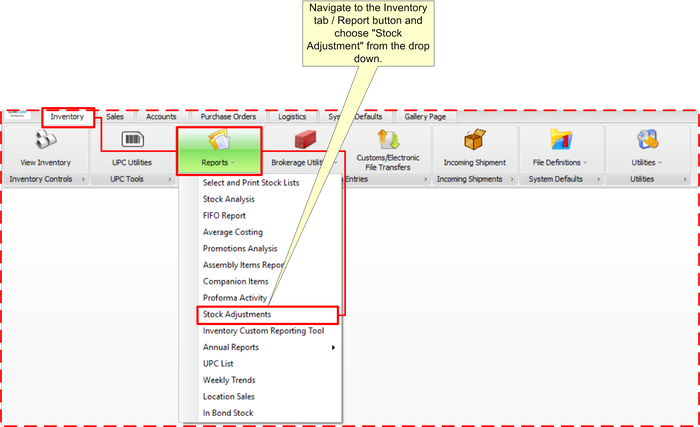
Under UPC Utilities Ribbon, we spoke about stock take; adjust stock and confirm count. This section gives a report on who made the adjustment or count, and when. This report would reflect the quantity short or over after the adjustment has been made.
????? AND INFO TABLE HERE WHEN MS PATT ADD MORE INFO IN SYSTEM???
Inventory Custom Reposting Tool
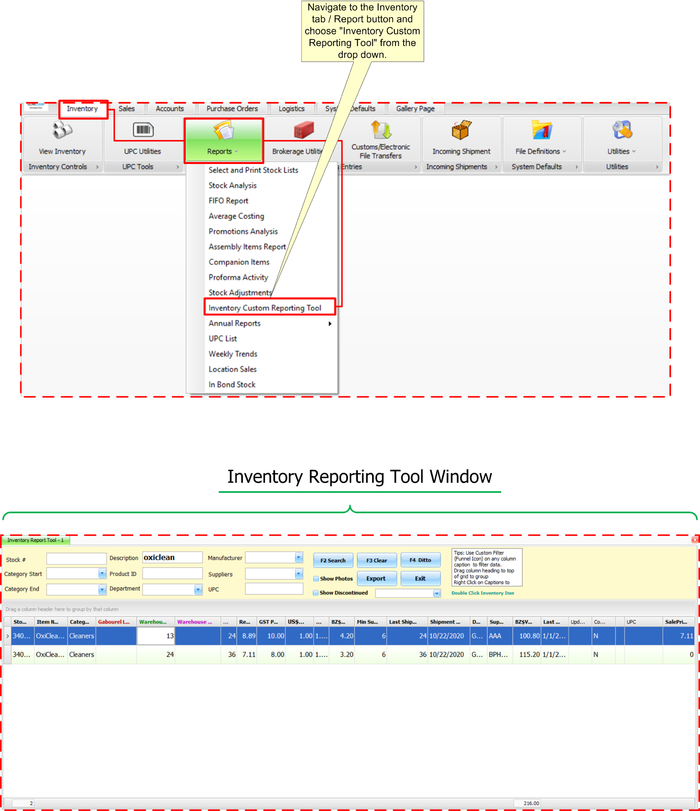
In section 2.2.2, we discuss how to search for an item. Inventory Custom Reposting Tool another method of searching an item. However, the previous method limited users to a number of search results, with this Inventory Custom Reposting Tool users have a wider range of search results, and it hardly restricts users to search results. The various search results are-companion item, updated, and UPC to name a few. Select column chooser for more column choices.
Purchase History Report
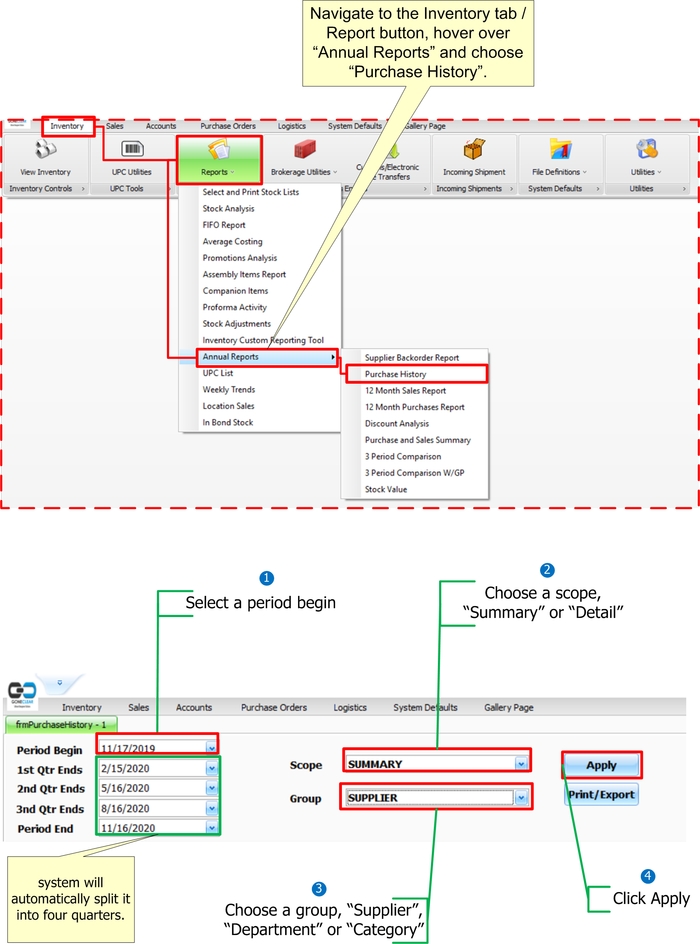
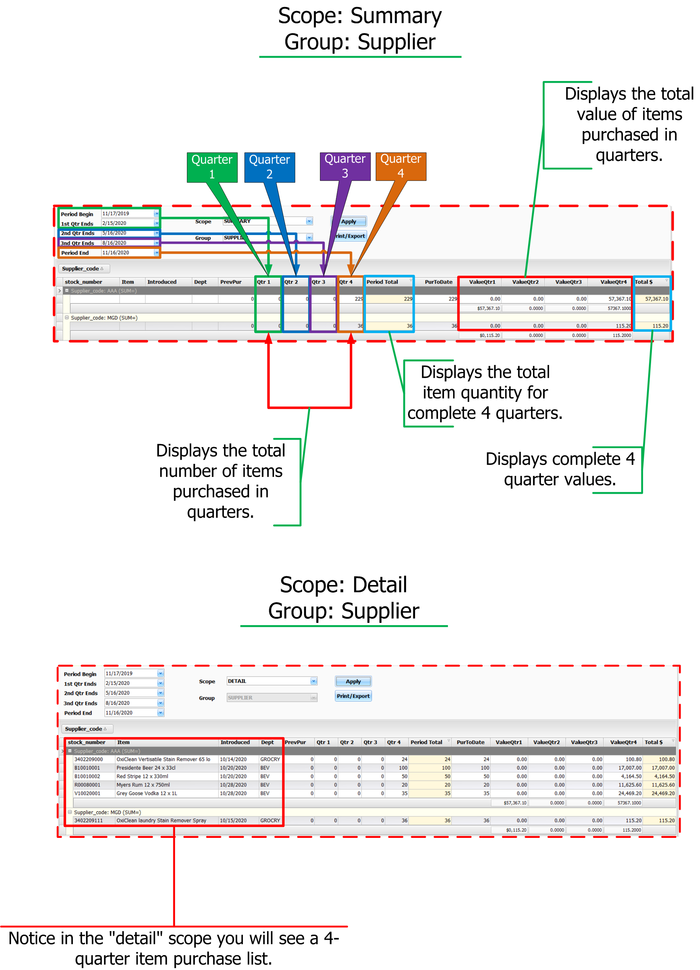
The purchase history segment enables users to view four quarters of the selected history from the beginning period. Simply select a starting date and the system will automatically split it into four quarters.
- Select a Period Beginning (System will automatically split it into four quarters.)
- Choose a scope from the drop down menu. (Summary or Detail)
- Choose a group from the drop down menu. (Supplier, Department or Category)
- Click Apply
Summary Scope displays a total of "purchase history," showing overall amount depending on the selected group, supplier or department.
Detail Scope displays a detailed "purchase history" report, listing items, quantity, department, etc.
See the example for both reports below. (This report may be printed if the user wishes to print.)
12 Month Sales Report
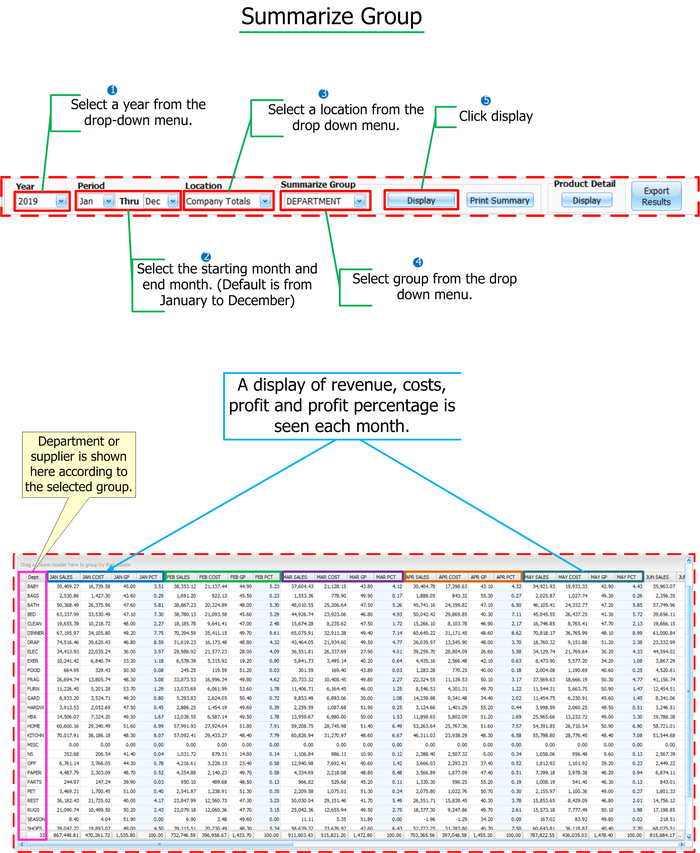
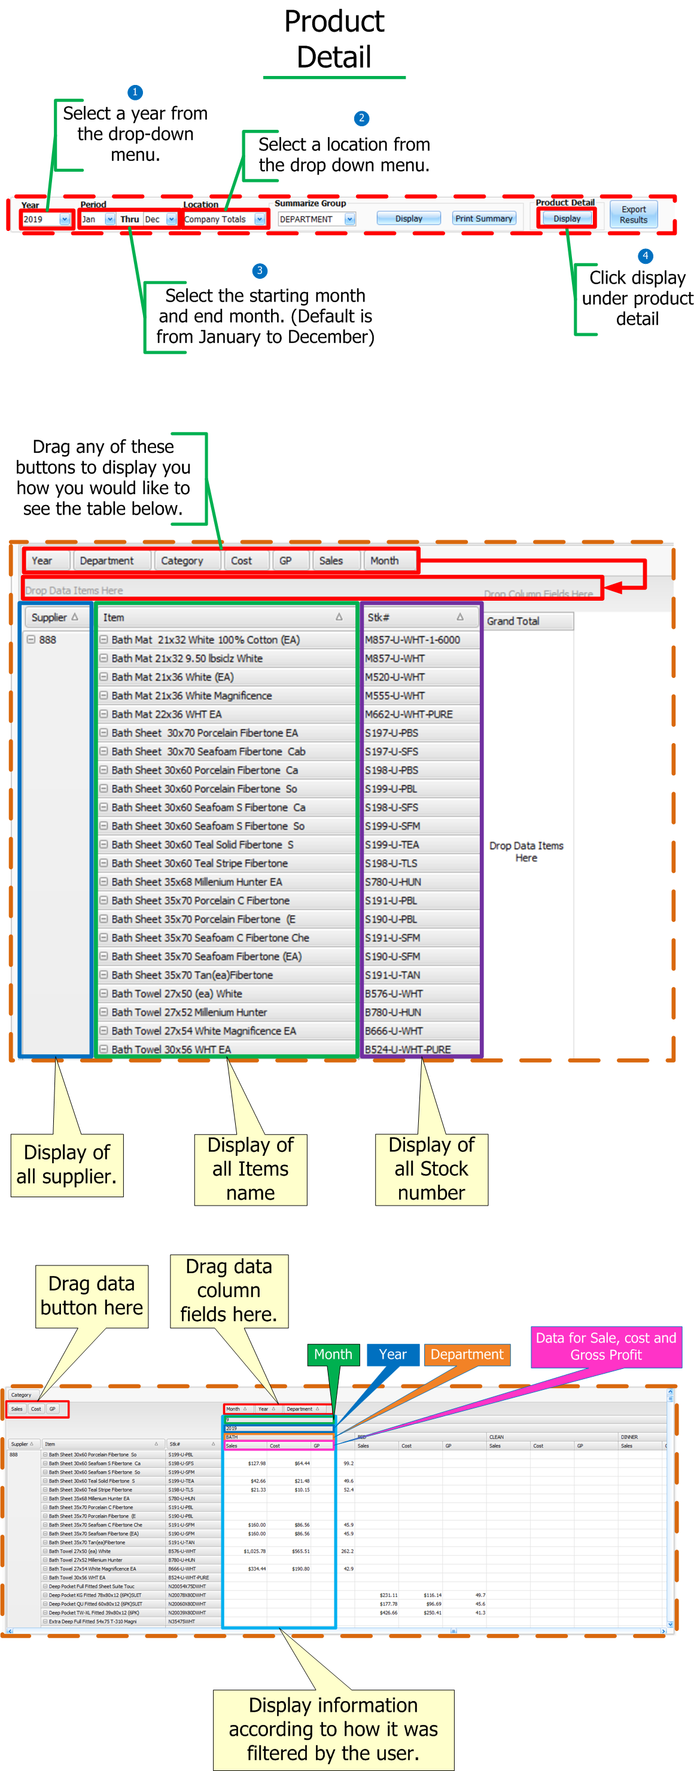
Within each year, users can generate sale reports for 12 months. Report may be displayed in two methods, Summarize Group and Product detail. Let's look at each of them.
Summarize Group: Display of department or supplier sales, cost, and profit, based on the user's choice.
- Select a year from the drop-down menu.
- Select the starting month and end month. (Default is from January to December)
- Select a location from the drop down menu.
- Select group from the drop down menu.
- Click display
Product detail: Shows a detailed report on "Sales". Depending on how it is filtered, users can view item name, stock number, department, sales, cost and gross profit for each month.
12 Month Purchases Report
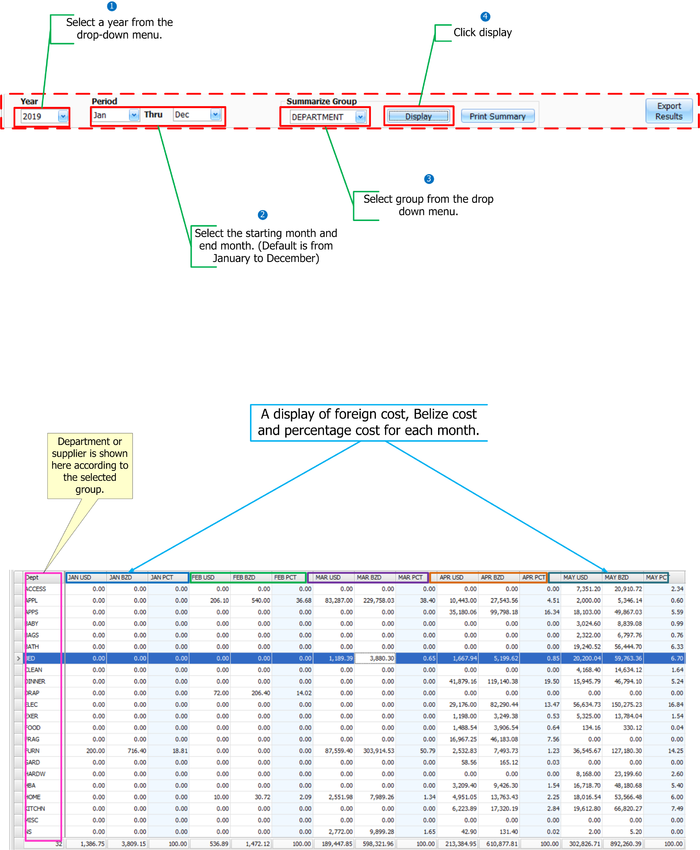
Within each year, users can generate purchase reports for 12 months.
3 Period Comparison W/GP
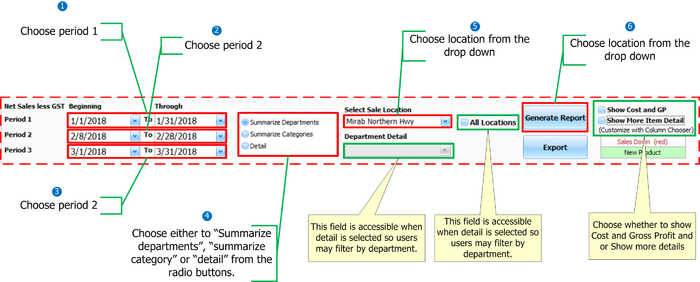
This section enables users to view revenue for 3 selected periods to compare revenues. Based on user option, the table may be sorted by location, department summarization, category summarization or details.
| Terminology | Definition |
|---|---|
| Period 1 | The first period of revenue comparison. Cannot surpass Period 2 and Period 3. |
| Period 2 | The second period of revenue comparison. Cannot surpass Period 3 or less than Period 1. |
| Period 3 | The Third period of revenue comparison. Cannot be less than Period 1 and Period 2. |
| Summarize Department | This allows users to view reports by department in a summary format. |
| Summarize Category | This allows users to view reports by category in a summary format. |
| Detail | This allows users to display reports in full detail for each selected period. Note that this can be sorted by department. |
| Show Cost and GP | Allows the user to include the cost of items and gross profit in the report. |
| Show more Detail | Allows users to customize column with "column chooser." |
- Choose period 1
- Choose period 2
- Choose Period 3
- Choose either to “Summarize departments”, “summarize category” or “detail” from the radio buttons.
- Choose location from the drop down menu (Click the “All location" box to see all locations.)
- Click “generate report” button.
????? AND INFO TABLE HERE WHEN MS PATT ADD MORE INFO IN SYSTEM???
Stock Value
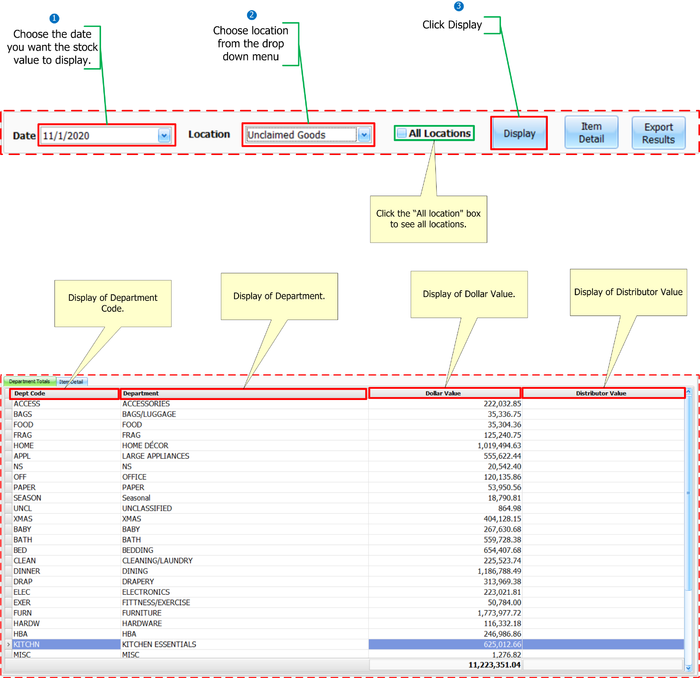
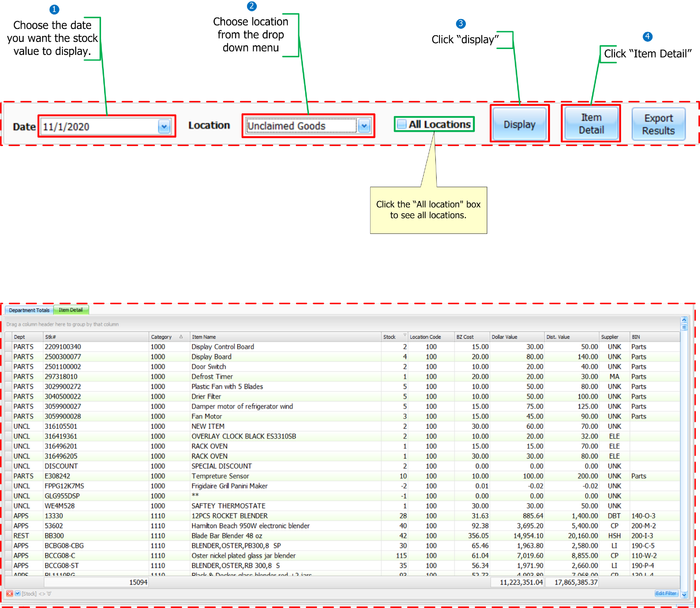
GoneClear Shop front offers users a function to see the value of the items for the selected date. This is shown according to department or item details.
Department: Displays a stock value list per department.
Item Details: Display the amount of the item in stock and its location, the Belize Cost, the dollar value, the value of the distributor, the supplier and the bin.
Dollar value: This is the value of the entire stock including shipment and handling.
- Choose the date you want the stock value to display.
- Choose location from the drop down menu (Click the “All location" box to see all locations.)
- Click Display
????? TABLE WILL NEED TO CHANGE WHEN MS PATT ADD MORE INFO IN SYSTEM???
- Choose the date you want the stock value to display.
- Choose location from the drop down menu (Click the “All location" box to see all locations.)
- Click Display
- Click Item Detail
????? TABLE WILL NEED TO CHANGE WHEN MS PATT ADD MORE INFO IN SYSTEM???
UPC List
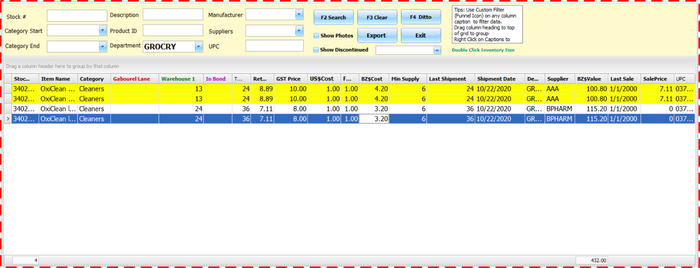
As mentioned earlier, many different UPC codes can be applied to one stock number. Another valuable tool GoneClear Store front offers is the "UPC List" that allows users to view all UPCs for each item.
Using the UPC list tool is quite straightforward; simply input stock number, category, description, department or supplier.
- Enter either stock number, category, description, department or supplier. (We searched by department in this example.)
- Hit f2 on your keyboard or click "search." (Check "show photo" and "show discontinued" if you want these included.)
Weekly Trends
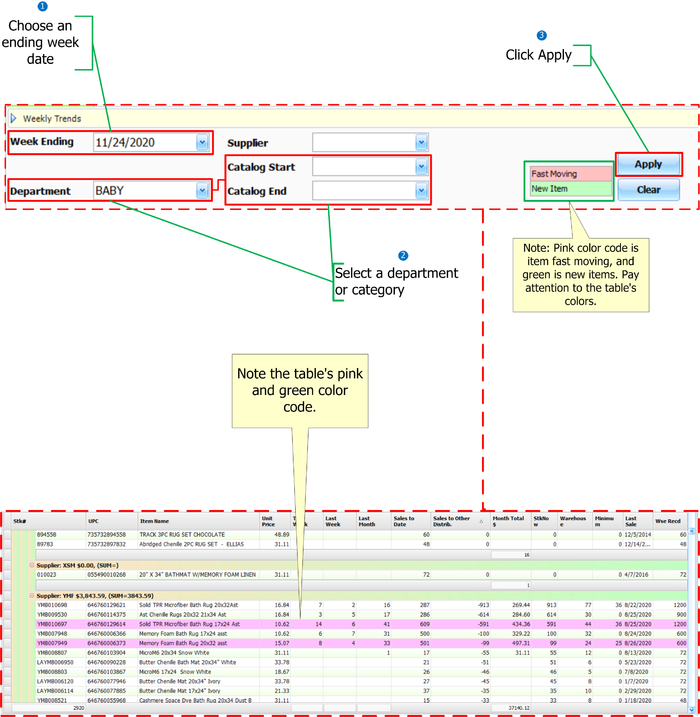
Another useful GoneClear Storefont method is our weekly trends report. Weekly trends report is just that, it provides a weekly trend report. This may be searched by category or department.
- Choose an ending week date
- Select a department or category
- Click Apply
????? AND INFO TABLE HERE WHEN MS PATT ADD MORE INFO IN SYSTEM???
Location Sales
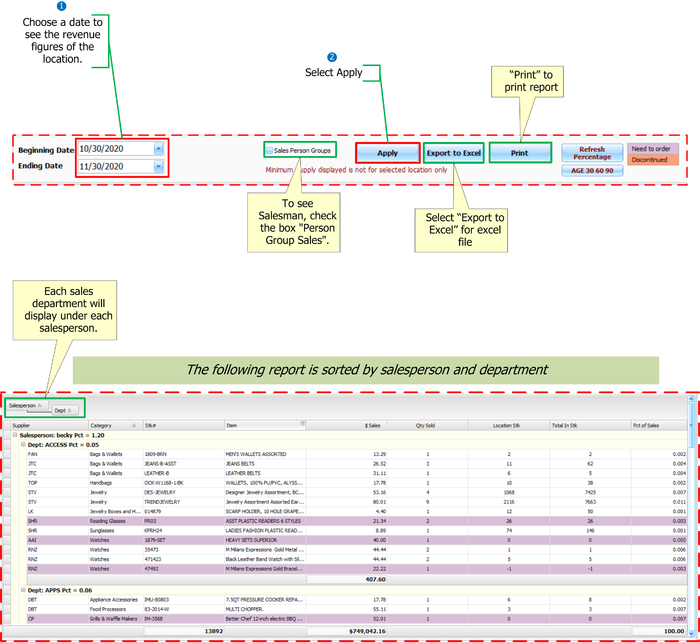
Location Sales is a powerful method to track revenue by relevant location as it allows users select a particular location to display location sales. In this quest, users are able to filter by department to monitor the income of each department at that location.
- Choose a date to see the revenue figures of the location.
- To see Salesman, check the box "Person Group Sales".
- Select Apply
????? AND INFO TABLE HERE WHEN MS PATT ADD MORE INFO IN SYSTEM???
In Bond Stock
Brokerage Utilities
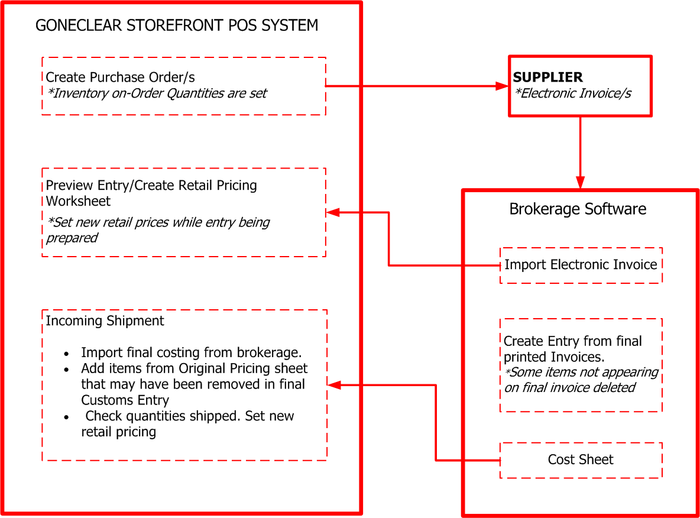
For any company that imports freight, a customs broker is strongly recommended, as there are regulations and clearance specifications that can become rather tedious. A custom broker would save the owner a lot of work and time. However, during the process, you may want to view this custom entry. For this reason, our team provides you with a means of displaying custom entry at your desk utilizing our GoneClear StoreFront POS System. This function not only allows you to view but also to make adjustments to prevent a lengthy wait for the customs broker to finalize the procedure since changes to the price of the product are allowed before the broker completes the process. When the broker completes his entry, he will provide you with the final price list, the Cost Sheet. More regarding the cost sheet is mentioned later in this guide.
| Terminologies | Definitions |
|---|---|
| Custom Broker | Customs brokers are private individuals, partnerships, organizations or businesses that are authorised, regulated and empowered by the Country. Customs and border protection (CBP) assists importers and exporters in complying with Government import and export requirements. |
| Custom Entry | A Customs entry is an official statement of specific information regarding your imported merchandise. If you're working with a Customs broker as the importer, they'll typically fill this out for you. The Customs entry form lists information like: Country of origin. Description of the goods. |
| Electronic Invoice | Electronic invoicing (e-Invoicing) is the transfer of the invoice paper between the supplier and the buyer in an integrated electronic format. |
| Cost Sheet | A cost sheet is a statement displaying the different components of total cost for a product, showing previous information for comparison. This will be provided to you by your broker when the procedure is complete. |
| Retail Pricing Sheet | This is a worksheet listing retail prices. Users with rights can adjust retail price while broker is preparing custom entry. |
| Incoming Shipment | Goods ordered from supplier. |
Here is an overview of how this process operates.
Preview Custom Entry/Create Pricing WorkSheet
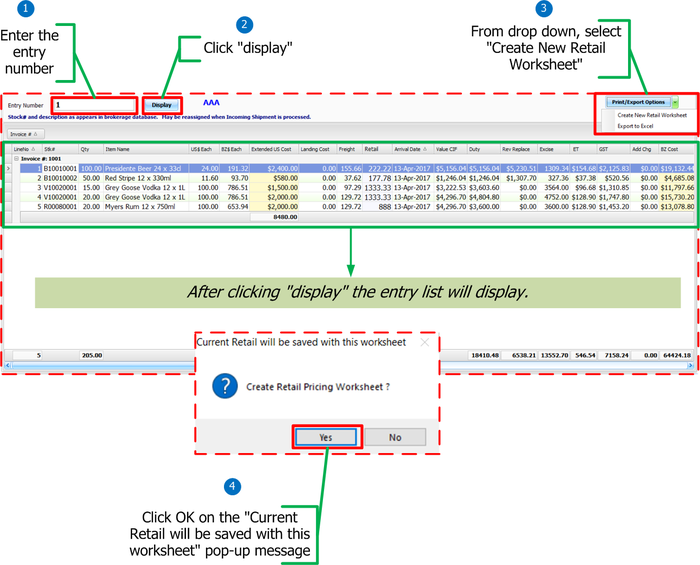
As described above, users may display Electronic Invoice immediately after broker imports into brokerage software utilizing the "Preview Custom Entry" feature.
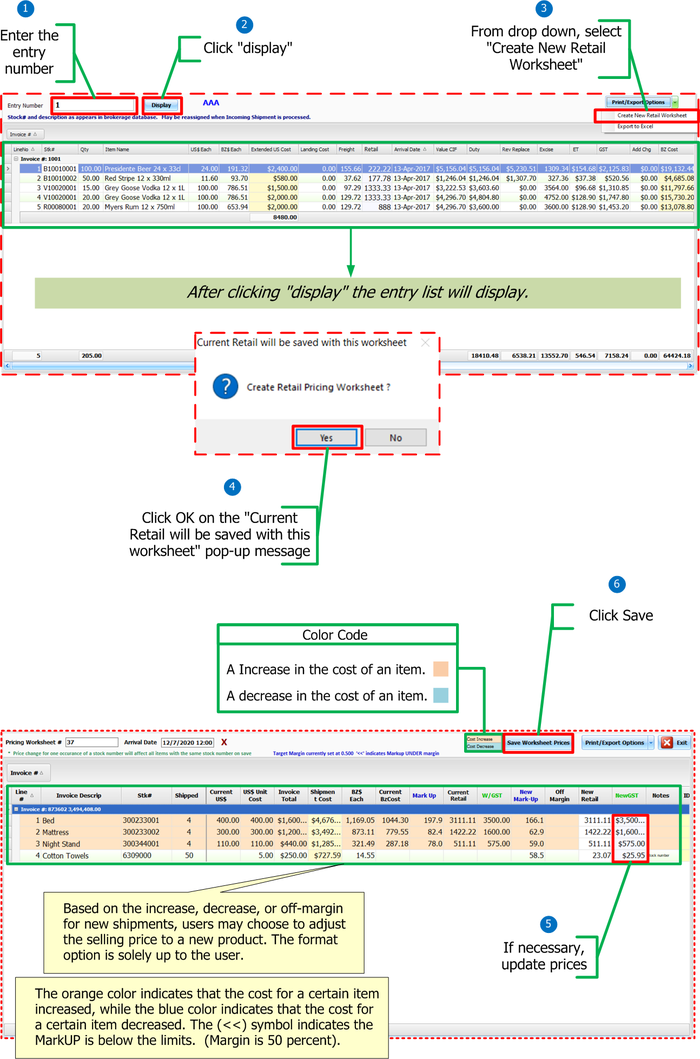
- Enter the entry number (This number is generated in the Goneclear Brokerage Program)
- Click "display"
- From drop down, select "Create New Retail Worksheet"
- Click OK on the "Current Retail will be saved with this worksheet" pop-up message
Open Existing Pricing Worksheet
After creating a new retail sheet, the Preview Entry window closes. In this section we will go through the process of updating this new retail sheet and making appropriate adjustments.
- Hover over "Select Retail Worksheet"
- Select the worksheet corresponding to the entry number on the drop-down panel.
- Select display
| Terminologies | Definitions |
|---|---|
| Current US$ | |
| US$ Unit Cost | |
| Invoice Total | |
| Shipment Cost BZ$ | |
| BZ Cost | |
| Current BZ Cost | |
| Mark Up | |
| Current Retail | |
| W/GST | |
| New Mark Up | |
| Off Margin | |
| New Retail | |
| New GST | |
| ID Rate | |
| Duty | |
| RRD Rate | |
| Duty Rev | |
| Ex Rate | |
| Excise | |
| ET Rate | |
| ET | |
| GST Rate | |
| GST | |
| Supplier | |
| Company | |
| Value CIF | |
| Freight | |
| Landing Cost | |
| Add Chg | |
| Wholesale | |
| Vessel | |
| Ref# | |
| Loss Rate | |
| Importer | |
| Completed |
Customs/Electronic File Transfers
In the previous chapter, we discussed custom entries and the function to view and make adjustments to them while in the brokerage process. Now we'll look at how to transfer the broker's final pricing list, called a cost sheet, to the GoneClear StoreFront POS system utilizing the "Custom/Electronic File Transfers" feature. "Custom/Electronic File Transfers" is a valuable function eliminating the long, tedious process of manually transferring cost sheets. This functionality transfers TXT and Excel data.
Import Cost Sheets
- Hover over the Locate Entries panel
- Select the button New Entry (Import File window will open)
- Choose GoneClear Customs Entry from the option drop-down menu.
- Click the three dots icon under the file location. (File explorer window will open immediately after clicking the three dots button)
- Locate TXT file in the file explorer
- Select TXT-file.
- Click Open on the bottom right corner.
- On the Import File Window, select Import. (Entry header window will open)
- Complete the necessary details in the entry header and click OK.
- On the Import successful pop-up message window, click the OK button.
- Hover over the Locate Entries panel and double click on the entry from the list.
- Hover over the Locate Entries panel
- Select the button New Entry (Import File window will open)
- Choose Excel Cost Sheet Version 1 or Excel Cost Sheet Version 2 from the option drop-down menu.
- Click the three dots icon under the file location. (File explorer window will open immediately after clicking the three dots button)
- Locate Excel File in the file explorer
- Select Excel File.
- Click Open on the bottom right corner. TO BE CONTINUED>>>
Import Customs Entry window
Following the "import cost sheet" procedures, the list of products would appear in the "Import Customs Entry" window. This window allows users to make changes to stock numbers, make changes to category and department, display inventory, repack the item and fragment this list before sending to incoming shipment.
| Button/Field | Function |
|---|---|
| Use Our Stock # | This field allows users to use existing stock number from inventory. This feature can be very useful especially for stock numbers that were entered wrong on the cost sheet by the broker. |
| PO Number | |
| Save | Save button saves any changes made to the item. |
| Inventory | Opens selected item inventory details. |
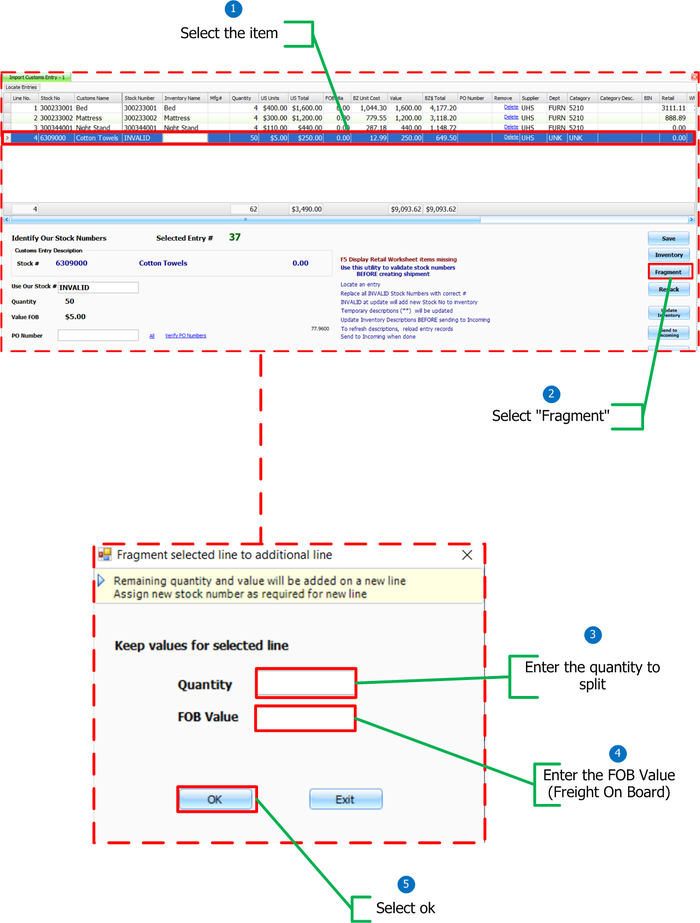
| Fragment | Fragment allows users to separate quantity and value. For example, you might buy a set of pans from your supplier, but your company sells them separately. The fragment function lets you separate and add value to the item. The incoming shipment will also allow you to do this in greater depth. We'll discuss this later in the guide. |
| Repack | This feature allows the user to adjust the quantity and stock value. For example, the supplier can sell a product per case, but the company sells it each. Use this useful tool to display items for each and its price. Enter the number of quantities in one package then the system calculates the cost automatically. |
| Update Inventory | This functionality automatically adds the new stock number. Before clicking "Update Inventory," users need to update department and category. |
| Send to Incoming | After the cost sheet update is complete, the next process is to send your entry to incoming shipments. This feature sends data to the incoming shipment automatically. |
| Exit | To close the “Import Customs Entry” window. |
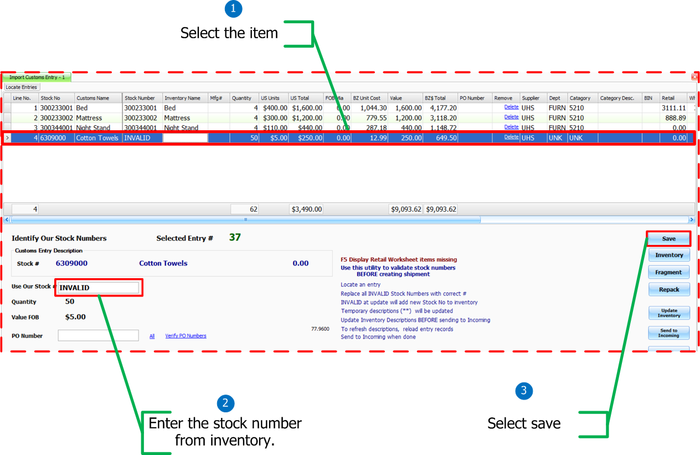
- Select the item
- Enter the stock number in the "Use our Stock #" field
- Select save
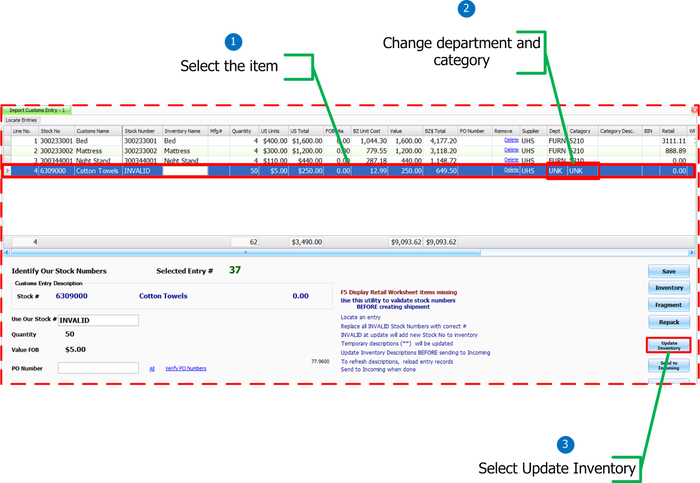
- Select the item
- Change department and category
- Select Update Inventory
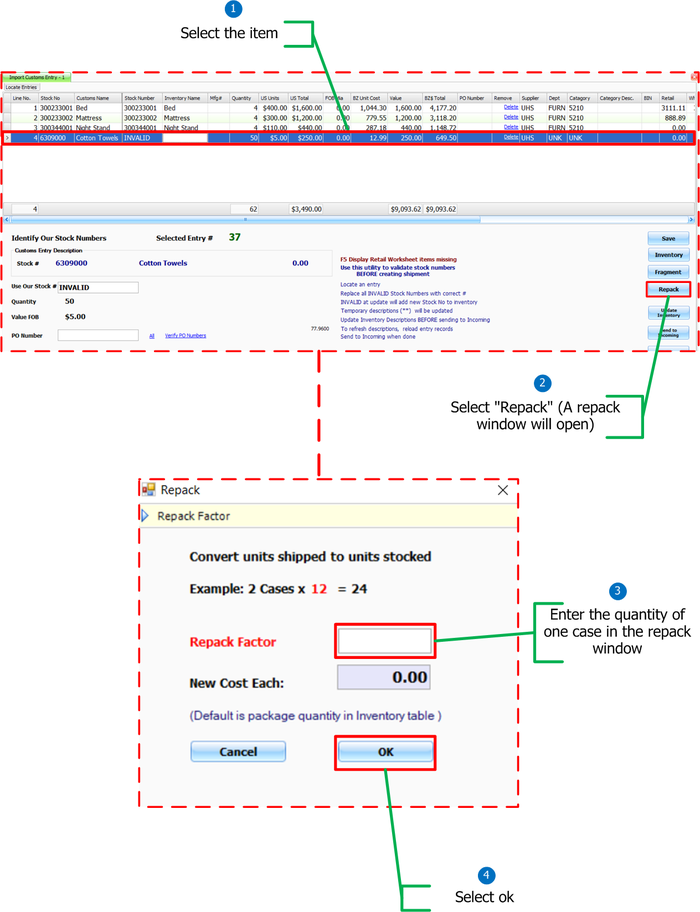
- Select the item
- Select "Repack" (A repack window will open)
- Enter the quantity of one case in the repack window (This will automatically calculate the cost for each)
- Select ok
- Select the item
- Select "Fragment" (A fragment window will open)
- Enter the quantity to split
- Enter the FOB Value (Freight On Board)
- Select ok (This will automatically break it up and make another line)
