Difference between revisions of "GoneClear Storefront"
Tags: Rollback Replaced |
|||
| Line 5: | Line 5: | ||
<br> | <br> | ||
| − | == <span style="color: #004b64"><div style="font-size: 40px; text-align: center;">''' | + | == <span style="color: #004b64"><div style="font-size: 40px; text-align: center;">'''Basics of GoneClear StoreFront'''</div></span> == |
<span style="color: #004b64; font-size: 20px; ">'''In This Chapter'''</span> | <span style="color: #004b64; font-size: 20px; ">'''In This Chapter'''</span> | ||
*<span style="color: #004b64; font-size: 20px;">[[#Getting Started|''Getting Started'']]</span> | *<span style="color: #004b64; font-size: 20px;">[[#Getting Started|''Getting Started'']]</span> | ||
*<span style="color: #004b64; font-size: 20px; ">[[#Knowing Where You Are|''Knowing Where You Are'']]</span> | *<span style="color: #004b64; font-size: 20px; ">[[#Knowing Where You Are|''Knowing Where You Are'']]</span> | ||
| + | *<span style="color: #004b64; font-size: 20px; ">[[#Customizing Column Header|''Customizing Column Header'']]</span> | ||
| Line 20: | Line 21: | ||
<br> | <br> | ||
[[File:Figure 1-1 (Launch Goneclear Store Front).png|700px|frameless|center]] | [[File:Figure 1-1 (Launch Goneclear Store Front).png|700px|frameless|center]] | ||
| − | |||
<div style="color: #004b64; font-size: 20px; text-align: center;">Figure 1-1: Starting GoneClear StoreFront, and logging in.</div> | <div style="color: #004b64; font-size: 20px; text-align: center;">Figure 1-1: Starting GoneClear StoreFront, and logging in.</div> | ||
<br> | <br> | ||
| Line 38: | Line 38: | ||
==== <span style="color: #004b64; font-size: 30px;">The Main Window </span> ==== | ==== <span style="color: #004b64; font-size: 30px;">The Main Window </span> ==== | ||
| − | <div style="color: #004b64; font-size: 20px; ">The main window opens automatically upon launching GoneClear | + | <div style="color: #004b64; font-size: 20px; ">The main window opens automatically upon launching GoneClear StoreFront and is the central place where you can initiate any task. Only the main window has a Ribbon along the top. </div> |
<br> | <br> | ||
<br> | <br> | ||
| Line 47: | Line 47: | ||
<div style="color: #004b64; font-size: 20px; "> The GonClear StoreFront toolbar is displayed across the top of the main window. Clicking on each tool item will show the ribbons that lead to more choices.</div> | <div style="color: #004b64; font-size: 20px; "> The GonClear StoreFront toolbar is displayed across the top of the main window. Clicking on each tool item will show the ribbons that lead to more choices.</div> | ||
| − | |||
| − | |||
| − | |||
| − | |||
<br> | <br> | ||
<br> | <br> | ||
| Line 58: | Line 54: | ||
<div style="color: #004b64; font-size: 20px; text-align: center;">Figure 1-3: Toolbar and Ribbons.</div> | <div style="color: #004b64; font-size: 20px; text-align: center;">Figure 1-3: Toolbar and Ribbons.</div> | ||
<br> | <br> | ||
| − | <div style="color: #004b64; font-size: 20px; ">The Ribbon is just below the toolbar. It is a collection of buttons that provide access to more choices. Active buttons display in color while inactive or unauthorized buttons appear in gray. To display the Ribbon, place your cursor on the toolbar and click one of the tabs. If you forget what a particular button does, | + | <div style="color: #004b64; font-size: 20px; ">The Ribbon is just below the toolbar. It is a collection of buttons that provide access to more choices. Active buttons display in color while inactive or unauthorized buttons appear in gray. To display the Ribbon, place your cursor on the toolbar and click one of the tabs. If you forget what a particular button does, move the cursor over the button to display a tooltip.</div> |
==== <span style="color: #004b64; font-size: 30px;">Quick Access Tool bar</span> ==== | ==== <span style="color: #004b64; font-size: 30px;">Quick Access Tool bar</span> ==== | ||
<div style="color: #004b64; font-size: 20px; "> To minimize or hide the Ribbon, position your cursor over the quick access Toolbar and right-click to see the Options menu. Choose the option "Minimize Ribbon."</div> | <div style="color: #004b64; font-size: 20px; "> To minimize or hide the Ribbon, position your cursor over the quick access Toolbar and right-click to see the Options menu. Choose the option "Minimize Ribbon."</div> | ||
<br> | <br> | ||
| − | [[File: | + | [[File:Quick_Access_Toolbar_Figure_.png|700px|frameless|center]] |
<div style="color: #004b64; font-size: 20px; text-align: center;">Figure 1-4: Quick Access Toolbar.</div> | <div style="color: #004b64; font-size: 20px; text-align: center;">Figure 1-4: Quick Access Toolbar.</div> | ||
==== <span style="color: #004b64; font-size: 30px;">The Status Bar</span> ==== | ==== <span style="color: #004b64; font-size: 30px;">The Status Bar</span> ==== | ||
| − | <div style="color: #004b64; font-size: 20px; "> The status bar runs along the bottom of the GoneClear StoreFront main window and includes | + | <div style="color: #004b64; font-size: 20px; "> The status bar runs along the bottom of the GoneClear StoreFront main window and includes several fields.</div> |
<div style="color: #004b64; font-size: 20px; "> | <div style="color: #004b64; font-size: 20px; "> | ||
<ul> | <ul> | ||
| − | <li>The bottom left-hand side displays the version of GoneClear StoreFront, the user who signed in, | + | <li>The bottom left-hand side displays the version of GoneClear StoreFront, the user who signed in, the computer station's name in </li> |
| − | <li>The bottom left-hand side will also display when a user is in "sales mode" | + | <li>The bottom left-hand side will also display when a user is in "sales mode."</li> |
</ul> </div> | </ul> </div> | ||
<br> | <br> | ||
| − | [[File: | + | [[File:Status_Bar_-.png|700px|frameless|center]] |
<div style="color: #004b64; font-size: 20px; text-align: center;">Figure 1-5: Status Bar.</div> | <div style="color: #004b64; font-size: 20px; text-align: center;">Figure 1-5: Status Bar.</div> | ||
<br> | <br> | ||
| Line 87: | Line 83: | ||
<br> | <br> | ||
{|style="width:100%; background-color: #f8f9fa; border:1px double #eeeeee; text-align:left;" | {|style="width:100%; background-color: #f8f9fa; border:1px double #eeeeee; text-align:left;" | ||
| − | |[[File:Clipart note.png|30px|frameless|left center]] NOTE: Windows may have sub windows to display further options (Same windows will not open twice.) | + | |[[File:Clipart note.png|30px|frameless|left center]] NOTE: Windows may have sub-windows to display further options (Same windows will not open twice.) |
|} | |} | ||
<br> | <br> | ||
| Line 96: | Line 92: | ||
|} | |} | ||
</div> | </div> | ||
| − | |||
<br> | <br> | ||
[[File:New Window (labels).png|700px|frameless|center]] | [[File:New Window (labels).png|700px|frameless|center]] | ||
| Line 102: | Line 97: | ||
[[File:Panel display.png|700px|frameless|center]] | [[File:Panel display.png|700px|frameless|center]] | ||
<div style="color: #004b64; font-size: 20px; text-align: center;">Figure 1-6: Windows and Panel.</div> | <div style="color: #004b64; font-size: 20px; text-align: center;">Figure 1-6: Windows and Panel.</div> | ||
| + | |||
==== <span style="color: #004b64; font-size: 30px;">Window Operation Modes</span> ==== | ==== <span style="color: #004b64; font-size: 30px;">Window Operation Modes</span> ==== | ||
| Line 108: | Line 104: | ||
<li>Add: Add a new record or document </li> | <li>Add: Add a new record or document </li> | ||
<li>View: View an existing record or document</li> | <li>View: View an existing record or document</li> | ||
| − | <li>Update: Modify the data of an existing | + | <li>Update: Modify the data of a current record or document</li> |
| + | </ul> </div> | ||
| + | |||
| + | === <span style="color: #004b64; font-size: 30px;" id="Customizing Column Header">Customizing Column Header</span> === | ||
| + | <div style="color: #004b64; font-size: 20px; "> Users can easily customize the way information is displayed within any of the panels. | ||
| + | <ul> | ||
| + | <li>Users can reorder the columns by clicking and dragging the column headers to new locations. </li> | ||
| + | </ul> | ||
| + | <div style="color: #004b64; font-size: 20px; "> For example, if you want to display the supplier column first, click and drag the supplier header to the first column. See figure 2-5:</div> | ||
| + | <br> | ||
| + | [[File:Arrange_column_header.png|700px|frameless|center]] | ||
| + | <div style="color: #004b64; font-size: 20px; text-align: center;">Figure 1-7: Rearrange columns.</div> | ||
| + | |||
| + | <ul> | ||
| + | <li> Users can apply filters to one or more column headers. </li> | ||
| + | </ul> | ||
| + | <div style="color: #004b64; font-size: 20px; "> Hover over a column header and then click the filter icon located in the upper-right corner. For example:</div> | ||
| + | <br> | ||
| + | [[File:Filter_icon.png|300px|frameless|center]] | ||
| + | <div style="color: #004b64; font-size: 20px; text-align: center;">Figure 1-8: Rearrange columns</div> | ||
| + | <br> | ||
| + | |||
| + | <ul> | ||
| + | <li> Use the filter menu to select which of the values currently in the column should be displayed. When you add a column filter, the description of the filter will be seen below the panel. You may use this to validate which column filters have been added to the current view and you may adjust the filter. For example: </li> | ||
| + | </ul> | ||
| + | <br> | ||
| + | [[File:Edit_and_remove_filter..png|700px|frameless|center]] | ||
| + | <div style="color: #004b64; font-size: 20px; text-align: center;">Figure 1-9: Edit and Remove filter</div> | ||
| + | <br> | ||
| + | |||
| + | {| class="wikitable" | ||
| + | |- | ||
| + | ! Terminology !! Definition | ||
| + | |- | ||
| + | | Sort Ascending || Sorts the selected column in ascending order. | ||
| + | |- | ||
| + | |Sort Descending || Sorts the selected column in descending order. | ||
| + | |- | ||
| + | | Clear Sorting || Clears the ascending or descending sorting criteria currently set for a column. | ||
| + | |- | ||
| + | | Group By This Column || Groups the table using the data in the selected column. It does this by moving the data into expandable lists that are located in the body of the grid. One expandable list will be created for each possible column value. | ||
| + | <br> | ||
| + | If you perform this action on any subsequent columns, that data will be presented as nested groups at increasingly lower levels within the expandable lists. | ||
| + | |||
| + | If '''''Group By Box''''' is enabled, this will also create a "Group By" box in the area immediately above the column headers. | ||
| + | Note: To turn off the Group By This Column feature and revert to the original view: Enable Group By Box, drag the Group By boxes back to the column header. | ||
| + | ::::Note: To turn off the '''Group By This Column''' feature and revert to the original view: Enable '''Group By Box''', drag the Group By boxes back to the column header. | ||
| + | |- | ||
| + | | Group By Box || Displays or hides an area immediately above the column headers that contains "Group By" boxes. One "Group By" box will be displayed for each column header for which Group By This Column is currently enabled. You can also drag column headers to and from this area. | ||
| + | <br> | ||
| + | The table will be grouped according to the data in the box. If there are two or more boxes then the grouping will be nested, with the left-most box presented at the highest level, the second box presented at the second level, etc. | ||
| + | |||
| + | |- | ||
| + | | Column Chooser || Enables you to add and hide information within a table. When you select Column Chooser the Customization dialog is displayed. This dialog is used to store the columns you don't currently want displayed within the table. Simply click and drag the desired column headers from the table to the Customization dialog. For example, if you decide | ||
| + | <br> | ||
| + | [[File:Column_chooser.png|700px|frameless|center]] | ||
| + | <br> | ||
| + | :::'''NOTE: Column Chooser will not work on panels.''' | ||
| + | |||
| + | |- | ||
| + | | Best Fit || Resize the width of the selected column so that the header text is displayed in the optimal amount of space. | ||
| + | |- | ||
| + | | Best Fit (all columns) || Resizing the width of all columns in the table so that the header text is displayed in the optimal amount of space. | ||
| + | |- | ||
| + | | Filter Editor || The '''Filter Editor''' dialog will show any filters that are currently active in the column headers. You can use the editor to modify the existing filter criteria and to build new criteria using the available filter conditions and logical operators. | ||
| + | |} | ||
| + | |||
| + | </div> | ||
| + | |||
| + | == <span style="color: #004b64"><div style="font-size: 40px; text-align: center;">'''Inventory'''</div></span> == | ||
| + | <span style="color: #004b64; font-size: 20px; ">'''In This Chapter'''</span> | ||
| + | *<span style="color: #004b64; font-size: 20px;">[[#Inventory Tab & Ribbon|''Inventory Tab & Ribbon'']]</span> | ||
| + | *<span style="color: #004b64; font-size: 20px; ">[[#View inventory|''View inventory'']]</span> | ||
| + | |||
| + | |||
| + | === <span style="color: #004b64; font-size: 30px;" id="Inventory Tab & Ribbon">Inventory Tab & Ribbon</span> === | ||
| + | |||
| + | |||
| + | <span style="color: #004b64; font-size: 20px;">The inventory tab consists of Eight(8) Ribbons which provide access to more choices. We're going to go over each ribbon as precisely as possible.</span> | ||
| + | <br> | ||
| + | <br> | ||
| + | <br> | ||
| + | [[File:Inventory_tab_and_Ribbons_(updated_version)_.png|700px|frameless|center]] | ||
| + | <div style="color: #004b64; font-size: 20px; text-align: center;">Figure 2-1: Inventory tab and inventory tab ribbons.</div> | ||
| + | <br> | ||
| + | {| class="wikitable" | ||
| + | ! Terminologies !! Definitions | ||
| + | |- | ||
| + | | <span id= "Stock Number"> Stock Number </span> || Identification number used in the physical warehouse or inventory method for the item. | ||
| + | |- | ||
| + | | <span id= "Catalog"> Catalog </span> || A complete collection of products organized with descriptive descriptions systematically. | ||
| + | |- | ||
| + | | <span id= "Catalog Code"> Catalog Code </span> || Code for entering and describing in a catalog a collection of items. | ||
| + | |- | ||
| + | | <span id= "Catalog Description"> Catalog Description </span> || The full descriptions specifics of the item and should include everything you want customer to see. | ||
| + | |- | ||
| + | | <span id= "Item Name"> Item Name </span> || Name provided to the item. This is a smaller field that the item description | ||
| + | |- | ||
| + | | <span id= "Item Description "> Item Description </span> || The descriptions are full specifics of the item and should include everything you want to know. | ||
| + | |- | ||
| + | | <span id= "Packaging Code"> Packaging Code </span> || A packaging code indicates the form of packaging transported. Box, can, bags, bucket, etc. | ||
| + | |- | ||
| + | | <span id= "Manufacturer"> Manufacturer </span> || The person or business that produces products for sale. | ||
| + | |- | ||
| + | | <span id= "Supplier"> Supplier </span> || The entity or association supplying your company's product or service. Note: Manufacturer and Supplier may be the same person or business. | ||
| + | |- | ||
| + | | <span id= "Department"> Department </span> || A part of a store selling a certain class or category of products. Eg. The sportswear department. | ||
| + | |- | ||
| + | | <span id= "Discount"> Discount </span> || A deduction from the usual cost of something. | ||
| + | |- | ||
| + | | <span id= "Promo Code"> Promo code </span> ||A phrase or set of letters and numbers to be used for discount purposes. | ||
| + | |- | ||
| + | | <span id= "GST"> GST </span> || The goods and services tax (GST) is a value-added tax charged on most goods and services sold for domestic consumption. The GST is paid by cutomers, but it is given back to the government by the businesses selling the goods and services. | ||
| + | |- | ||
| + | | <span id= "Target Price"> Target Price </span> || The company's selling price with GST. | ||
| + | |- | ||
| + | | <span id= "US Cost"> US Cost </span> ||The supplier cost price. | ||
| + | |- | ||
| + | | <span id= "FOB Miami"> FOB Miami </span> || Shipping cost for item. | ||
| + | |- | ||
| + | | <span id= "Bz Cost"> Bz Cost </span> || The item's overall cost including US Cost, FOB Miami, and additional cost when it arrives in Belize. | ||
| + | |- | ||
| + | | <span id= "Retail"> Retailed </span> || The sale of goods to the public in relatively small quantities for use or consumption rather than for resale. | ||
| + | |- | ||
| + | | <span id= "Wholesale"> Wholesale </span> || The selling of goods in large quantities to be retailed by others. | ||
| + | |- | ||
| + | | <span id= "Distributor"> Distributor </span> || An agent who supplies goods to stores and other businesses that sell to customers | ||
| + | |- | ||
| + | | <span id= "Duty Free"> Duty Free </span> || Duty-free refers to the act of being able to purchase an item in particular circumstances without paying import, sales, value-added, or other taxes. | ||
| + | |- | ||
| + | | <span id= "Salesman"> Salesman </span> || a man whose job involves selling or promoting commercial products, either in a store or visiting locations to get orders. | ||
| + | |- | ||
| + | | <span id= "Reducible"> Reducible </span> || Inventory deduct in stock amount. For e.g., an oxiclean product may and can be taken out of stock which reduces quantity, whereas a freight charge cannot be taken out of stock in order to reduce quantity. | ||
| + | |- | ||
| + | | <span id= "Warranty"> Warranty </span> ||A written guarantee given by the producer to the customer of the item, agreeing to restore or replace it, if required, within a specified period of time. | ||
| + | |- | ||
| + | | <span id= "Serial Number"> Serial Number </span> || A number showing the position of an item in a series, especially one printed on paper currency or on a manufactured article for the purposes of identification. | ||
| + | |- | ||
| + | | <span id= "Discontinued"> Discontinued </span> || A discontinued product is no longer sold. | ||
| + | |- | ||
| + | | <span id= "Shelf Stable"> Shelf Stable </span> || Items which do not have an expiry date. | ||
| + | |- | ||
| + | | <span id= "Supplier Reorder #"> Supplier Reorder # </span> || This is the Manufacture number. | ||
| + | |- | ||
| + | | <span id= "BAHA Regulated"> BAHA Regulated </span> || Requires license to import an item | ||
| + | |} | ||
| + | <br> | ||
| + | |||
| + | === <span style="color: #004b64; font-size: 30px;" id="View inventory">View inventory</span> === | ||
| + | |||
| + | |||
| + | <span style="color: #004b64; font-size: 20px;">Since we have an idea of what a window is and how it functions. Let's go into the inventory data window for view inventory. Users can check for an item in this window to obtain more details about that specific item, whether it be product updates, prices, etc. Furthermore, a user can quickly add a new item to inventory using this window.</span> | ||
| + | <br> | ||
| + | |||
| + | ==== <span style="color: #004b64; font-size: 30px;" id="Inventory Data Window">Inventory Data Window</span> ==== | ||
| + | |||
| + | <span style="color: #004b64; font-size: 20px;">To open Inventory Data window, click the view inventory ribbon shown in Figure 2-2.</span> | ||
| + | |||
| + | [[File:How_to_open_Inventory_data_window.png|700px|frameless|center]] | ||
| + | [[File:Inventory_Data_Window.png|700px|frameless|center]] | ||
| + | <br> | ||
| + | <div style="color: #004b64; font-size: 20px; text-align: center;">Figure 2-2: View inventory Ribbon and Inventory Data Window.</div> | ||
| + | <br> | ||
| + | |||
| + | <div style="color: #004b64; font-size: 20px; "> The '''Inventory Data''' window allows users to: | ||
| + | <ul> | ||
| + | <li>[[#Search For An Item|''Search for an item'']]</li> | ||
| + | <li>[[#Item Details|''View item details'']]</li> | ||
| + | <li>Add an item</li> | ||
| + | <li>View order information from manufacture </li> | ||
| + | <li>Set Packaging size and weight</li> | ||
| + | <li>View Price and Cost of Item</li> | ||
| + | <li>Add as Assembly</li> | ||
| + | <li>Add as a companion</li> | ||
| + | <li>View Changes to item</li> | ||
| + | <li>Search Serial Number for item</li> | ||
| + | <li>View UPCs</li> | ||
| + | <li>View deliveries for item</li> | ||
| + | </ul> </div> | ||
| + | |||
| + | <span style="color: #004b64; font-size: 20px;">The inventory data consist of 5 forms. Below are figures of these forms and a brief description of its functions </span> | ||
| + | |||
| + | [[File:Inventory_data_label_1.png|700px|frameless|center]] | ||
| + | <div style="color: #004b64; font-size: 20px; text-align: center;">Figure 2-3</div> | ||
| + | <br> | ||
| + | <div style="color: #004b64; font-size: 20px; text-align: center;">Figure 2-3: Information about the item is displayed in this section of the inventory data windows. This is a read-only display, so users can not make modifications to the item here.</div> | ||
| + | <br> | ||
| + | [[File:Inventory data label 2 (update version).png|700px|frameless|center]] | ||
| + | <div style="color: #004b64; font-size: 20px; text-align: center;">Figure 2-4</div> | ||
| + | <br> | ||
| + | <div style="color: #004b64; font-size: 20px; text-align: center;">Figure 2-4: This window contains sub tabs in a form with additional information. More on each of these tabs and their functions will be discussed later in this Guide.</div> | ||
| + | <br> | ||
| + | [[File:Inventory_data_label_3.png|700px|frameless|center]] | ||
| + | <div style="color: #004b64; font-size: 20px; text-align: center;">Figure 2-5</div> | ||
| + | <br> | ||
| + | <div style="color: #004b64; font-size: 20px; text-align: center;" id = "Inventory Option">Figure 2-5: The inventory options form is used to save and display updates, insert a new item and exit inventory data window. These function will be further discuss later in this Guide.</div> | ||
| + | <br> | ||
| + | [[File:Inventory_data_label_4_(updated_version).png|700px|frameless|center]] | ||
| + | <div style="color: #004b64; font-size: 20px; text-align: center;">Figure 2-6</div> | ||
| + | <br> | ||
| + | <div style="color: #004b64; font-size: 20px; text-align: center;">Figure 2-6: Local history form is used to view products transferred and pending orders within and for sales of the company. These function will be further discuss later in this guide.</div> | ||
| + | <br> | ||
| + | [[File:Inventory_data_label_5.png|700px|frameless|center]] | ||
| + | <div style="color: #004b64; font-size: 20px; text-align: center;">Figure 2-7</div> | ||
| + | <br> | ||
| + | <div style="color: #004b64; font-size: 20px; text-align: center;" id="Picture Options">Figure 2-7: Picture Options form allows you to add and remove an item image. This function and how it works will be discussed later in this guide.</div> | ||
| + | <br> | ||
| + | |||
| + | ==== <span style="color: #004b64; font-size: 30px;" id="Search For An Item">Search For An Item</span> ==== | ||
| + | |||
| + | <div style="color: #004b64; font-size: 20px;">It can be very difficult to search for a specific item, particularly if there are thousands of items in the inventory list. The GoneClear StoreFront makes it easier to search for item in the inventory database that is available or discontinued. Furthermore, reports from the data table may be sorted and grouped according to your wishes. (See section [[#Customizing Column Header|''1.3 Customizing Column Header'']] for sorting and grouping)</div> | ||
| + | <br> | ||
| + | <div style="color: #004b64; font-size: 20px;">To search for an item move your cursor over the inventory search panel</div> | ||
| + | <br> | ||
| + | [[File:Panel_for_search.png|700px|frameless|center]] | ||
| + | <div style="color: #004b64; font-size: 20px; text-align: center;">Figure 2-8: Inventory Search Panel</div> | ||
| + | <br> | ||
| + | |||
| + | <div style="color: #004b64; font-size: 20px; "> GoneClear StoreFront provides several avenues to search an item such: | ||
| + | <ul> | ||
| + | <li>[[#Stock Number|''Stock Number'']] Search </li> | ||
| + | <li>[[#Catalog Code|''Catalog Start and Catalog End Code'']] </li> | ||
| + | <li>[[#Item Name|''Item Name'']]</li> | ||
| + | <li>[[#Manufacturer|''Manufacturer'']]</li> | ||
| + | <li>[[#Supplier|''Supplier'']]</li> | ||
| + | <li>[[#Department|''Department'']]</li> | ||
</ul> </div> | </ul> </div> | ||
| + | <br> | ||
| + | [[File:Search.png|700px|frameless|center]] | ||
| + | <br> | ||
| + | [[File:Search_item.png|700px|frameless|center]] | ||
| + | <br> | ||
| + | [[File:Search_Results_table.png|700px|frameless|center]] | ||
| + | <div style="color: #004b64; font-size: 20px; text-align: center;">Figure 2-9: Search item and Search Results Table</div> | ||
| + | <br> | ||
| + | <div style="color: #004b64; font-size: 20px;">Double click on the item you want to view. Item information will be displayed in the [[#Inventory Data Window|''inventory data window'']]. </div> | ||
| + | <br> | ||
| + | {|style="width:100%; background-color: #f8f9fa; border:1px double #eeeeee; text-align:left;" | ||
| + | |[[File:Clipart note.png|30px|frameless|left center]] NOTE: There is another method to search for an item that is discussed later on. This search method is called live data searches. The other approach is delayed by around 20 seconds. | ||
| + | |} | ||
| + | <br> | ||
| + | ==== <span style="color: #004b64; font-size: 30px;" id="Adding a New Item to Inventory">Adding a New Item to Inventory.</span> ==== | ||
| + | |||
| + | <div style="color: #004b64; font-size: 20px;"> | ||
| + | #From the tab inside GoneClear StoreFront navigate to: Inventory > view inventory. | ||
| + | #The Inventory Data window will open navigate to: inventory options>new item. <span id="New Inventory Creation">("New inventory creation” window will open)</span> | ||
| + | [[File:Add_a_new_item.png|700px|frameless|center]] | ||
| + | <br> | ||
| + | [[File:Add_a_new_item_window.png|700px|frameless|center]] | ||
| + | <div style="color: #004b64; font-size: 20px; text-align: center;">Figure 2-10: Inventory Options and New Inventory Creation Table</div> | ||
| + | </div> | ||
| + | <br> | ||
| + | <div style="color: #004b64; font-size: 20px;">'''New Stock Number''' form: input the stock number of the item, the name of the item and the description, then select the catalog code and the packaging code from the drop-down menu. </div> | ||
| + | <br> | ||
| + | [[File:New_stock_number_form.png|700px|frameless|center]] | ||
| + | <div style="color: #004b64; font-size: 20px; text-align: center;">Figure 2-11: New Stock Number</div> | ||
| + | </div> | ||
| + | <br> | ||
| + | <div style="color: #004b64; font-size: 20px;">'''Inventory Item Codes''': select from the drop-down menu the [[#Supplier|''supplier'']],[[#Manufacturer|''manufacturer'']], [[#Department|''department'']], restricted location for item, inventory and [[#Promo Codes|''promo codes'']]. </div> | ||
| + | <br> | ||
| + | {|style="width:100%; background-color: #f8f9fa; border:1px double #eeeeee; text-align:left;" | ||
| + | |[[File:Clipart note.png|30px|frameless|left center]] NOTE: To see context, click on each of those field names. Furthermore, in this scenario, an "inventory" is chosen if the product is for sale, in-house or manufactured by the company. S is for selling, C is for consumption, M is for manufacture. | ||
| + | |} | ||
| + | <br> | ||
| + | [[File:Inventory_item_code.png|700px|frameless|center]] | ||
| + | <div style="color: #004b64; font-size: 20px; text-align: center;">Figure 2-12: Inventory Item codes</div> | ||
| + | </div> | ||
| + | <br> | ||
| + | <div style="color: #004b64; font-size: 20px;"> '''Discount/Reducible Options''': users can add a [[#Discount|''discount'']] to the item with its limit and indicate whether the item is [[#Reducible|''reducible'']]. </div> | ||
| + | <br> | ||
| + | [[File:Discount_and_reducible_option.png|700px|frameless|center]] | ||
| + | <div style="color: #004b64; font-size: 20px; text-align: center;">Figure 2-13: Discount/Reducible Options | ||
| + | </div> | ||
| + | </div> | ||
| + | <br> | ||
| + | <div style="color: #004b64; font-size: 20px;"> '''Warranty Options''': If the item has a [[#Warranty |''warranty '']] on it, the '''warranty options''' are set. User would indicate whether a serial number is required and the number of days for [[#Warranty |''warranty '']]. </div> | ||
| + | <br> | ||
| + | [[File:Warranty_Options.png|700px|frameless|center]] | ||
| + | <div style="color: #004b64; font-size: 20px; text-align: center;">Figure 2-14: Warranty Options </div> | ||
| + | |||
| + | <br> | ||
| + | <div style="color: #004b64; font-size: 20px;"> '''COST/PRICING''': Costs for products and shipping and handling costs are included in this option. Part of this section is a bit like a calculator. The prices without [[#GST|''GST'']] is calculated automatically when a user enters the target price with [[#GST|''GST'']]. </div> | ||
| + | <br> | ||
| + | [[File:Cost_and_pricing.png|700px|frameless|center]] | ||
| + | <div style="color: #004b64; font-size: 20px; text-align: center;">Figure 2-15: Cost/Pricing form</div> | ||
| + | <br> | ||
| + | <div style="color: #004b64; font-size: 20px;"> '''Packaging information''': The packaging information form is set to indicate the package's size, type, quantity and weight. Furthermore, users can set the shelf stock type. For more detail on the fields in the packaging information form, see the [[#Terminology Table|''terminology table']] below to help complete this portion. </div> | ||
| + | <br> | ||
| + | {| class="wikitable" | ||
| + | |- | ||
| + | ! <span id="Terminologies Table"> Terminologies !! Definitions | ||
| + | |- | ||
| + | | Length, width, height || The package length, width and height. An Oxiclean product, for example, may be packed at 10 per box. The box's length, width and height is what is required in the packaging information option. | ||
| + | |- | ||
| + | | <span id="Net Weight"> Net Weight</span> || The weight of the item inside the package. | ||
| + | |- | ||
| + | | <span id="Gross Weight"> Gross Weight </span> || Both item and package weight together. | ||
| + | |- | ||
| + | | <span id="Stock & Price">Stock & Price </span> || The user is asked in this field to indicate how this item is sold in the store. By box, each, bucket, etc. | ||
| + | |- | ||
| + | | <span id="Package Unit"> Package Unit </span> || In this field, the user is asked to enter the type of product package, i.e. box, bucket, etc. For eg, an oxiclean product may be sold "each" in the store, however it is packed 10 per package by the vendor. | ||
| + | |- | ||
| + | | <span id="Package Qty"> Package Qty </span> || The amount that comes in the package. | ||
| + | |- | ||
| + | | <span id="Tariff"> Tariff </span> ||A tariff is tax on imports or exports within sovereign countries. It is a kind of international trade and policy control that taxes external goods in order to promote or protect the internal economy. | ||
| + | |- | ||
| + | | <span id="Tariff Number"> Tariff Number </span> || A tariff number is a product-specific number, as documented in the Belize Customs Organization's Code System. A tariff number guarantees consistency in the country's product classification. For example regular orange juices share the same tariff number. | ||
| + | |- | ||
| + | | <span id="Tax code"> Tax code </span> || This program includes three tax codes: | ||
| + | <ol> | ||
| + | <li>Beverage rate (B) – 15% tax, not the usual 12.5% tax.<li> | ||
| + | <li> GST (S) – regular 12.5% tax <li> | ||
| + | <li> Zero Rated item (Z)-products not liable to tax.<li> | ||
| + | </ol> | ||
| + | |} | ||
| + | [[File:Packing_information.png|700px|frameless|center]] | ||
| + | <br> | ||
| + | <div style="color: #004b64; font-size: 20px; text-align: center;">Figure 2-16:Packaging information</div> | ||
| + | </div> | ||
| + | <br> | ||
| + | <div style="color: #004b64; font-size: 20px;"> '''Commission & Taxes:''' This option allows the user to choose tax and commission codes and enter tariff number. </div> | ||
| + | <br> | ||
| + | [[File:Commision_and_taxes.png|400px|frameless|center]] | ||
| + | <div style="color: #004b64; font-size: 20px; text-align: center;">Figure 2-17: Commission & Taxes</div> | ||
| + | <br> | ||
| + | <div style="color: #004b64; font-size: 20px;"> '''Item options''':In this segment, user may indicate if the new item being added is BAHA regulated and/or stable and add a catalog description.</div> | ||
| + | <br> | ||
| + | [[File:Item_options.png|700px|frameless|center]] | ||
| + | <div style="color: #004b64; font-size: 20px; text-align: center;">Figure 2-18: Item options</div> | ||
| + | |||
| + | <br> | ||
| + | |||
| + | ==== <span style="color: #004b64; font-size: 30px;" id="Item Details">Item details</span> ==== | ||
| + | |||
| + | <div style="color: #004b64; font-size: 20px;">In the item details section, users are not restricted to the information display of the items, but to making quick adjustments to the items. That is, of course, whether the user has the license right to do so. Let's take a brief peek at what's seen in this pane.</div> | ||
| + | <br> | ||
| + | [[File:Item_details_.png|700px|frameless|center]] | ||
| + | <br> | ||
| + | <div style="color: #004b64; font-size: 20px; text-align: center;">Figure 2-19: Item Details</div> | ||
| + | </div> | ||
| + | <br> | ||
| + | <div style="color: #004b64; font-size: 20px;">Let’s discuss each segment of the item detail tab. First of all, a simple view of the current stock number, item name and item summary is given. This section allows licensed rights users to easily modify these areas</div> | ||
| + | {|style="width:100%; background-color: #f8f9fa; border:1px double #eeeeee; text-align:left;" | ||
| + | |[[File:Clipart note.png|30px|frameless|left center]] Note: Remembering that the [[#Item Details|''Item Details'']] is an [[#Inventory Data Window|''Inventory Data'']] subsection, users who have made changes from [[#Item Details|''Item Details'']] have to click on the Save button in the [[#Inventory options|''Inventory options'']] form to update the changes. | ||
| + | |} | ||
| + | <br> | ||
| + | [[File:Item_details_Stock_number.png|700px|frameless|center]] | ||
| + | <br> | ||
| + | [[File:Item details save changes.png|700px|frameless|center]] | ||
| + | <div style="color: #004b64; font-size: 20px; text-align: center;">Figure 2-20: Item Details Stock form and update changes.</div> | ||
| + | <br> | ||
| + | <div style="color: #004b64; font-size: 20px;">'''Item inventory codes''' on [[#Item Details|''Item Details'']] window display manufacturer, supplier, category, department, inventory type, promotion and item location restricted. Again, modifying an item in these areas is often a quick method, if users have licenses to do so. | ||
| + | <br> Remember to always save updates after any adjustments have been made. </div> | ||
| + | <br> | ||
| + | [[File:Item details inventory item codes.png|700px|frameless|center]] | ||
| + | <div style="color: #004b64; font-size: 20px; text-align: center;">Figure 2-21: Item Details: inventory item codes.</div> | ||
| + | <br> | ||
| + | <div style="color: #004b64; font-size: 20px;">'''Stock location:''' In this area, it displays all the company branches that store the item and precisely where the item is held in that branch. It also shows stock quantity at-location and the minimum and maximum number - location can hold. </div> | ||
| + | |||
| + | {| class="wikitable" | ||
| + | ! Terminologies !! Definitions | ||
| + | |- | ||
| + | | <span id= "Max"> Max </span> || Maximum quantity of item that each business location can store. | ||
| + | |- | ||
| + | | <span id= "Min"> Min </span> || Minimum quantity of item that each business location can store. | ||
| + | |- | ||
| + | | <span id= "Bin"> Bin </span> || The name of the storage location where the items are stored. | ||
| + | |- | ||
| + | | <span id= "In Stock"> In Stock </span> || The quantity of item available. | ||
| + | |} | ||
| + | |||
| + | <br> | ||
| + | [[File:Item_detail_STOCK_LOCATION.png|700px|frameless|center]] | ||
| + | <br> | ||
| + | [[File:Item_details_STOCK_LOCATION_(2).png|700px|frameless|center]] | ||
| + | <div style="color: #004b64; font-size: 20px; text-align: center;">Figure 2-22: Item Details: Stock location.</div> | ||
| + | <br> | ||
| + | <div style="color: #004b64; font-size: 20px;">'''Current Item Image:''' Here we can see the item picture and catalog description. To add or remove an image is not done here; it is done in the Picture Options form. We'll explore how to remove and add a picture later. Catalog description can be modified here, however. Remember to save always when updates have been made. </div> | ||
| + | <br> | ||
| + | [[File:Item_details_current_image_item.png|700px|frameless|center]] | ||
| + | <div style="color: #004b64; font-size: 20px; text-align: center;">Figure 2-23: Item Details, Current Item Image.</div> | ||
| + | <br> | ||
| + | <div style="color: #004b64; font-size: 20px;">'''Stock Information:''' This is a read-only display of the overall inventory quantity, amount held for delivery, etc. See the terminology table below for a clearer explanation of all these words. </div> | ||
| + | <br> | ||
| + | {| class="wikitable" | ||
| + | |- | ||
| + | ! <span id="Terminologies Table"> Terminologies !! Definitions | ||
| + | |- | ||
| + | | <span id="Stocked & Price"> Stocked & Price</span> || Shows how items are sold. By package, container, each, etc. | ||
| + | |- | ||
| + | | <span id="Available"> Available </span> || Overall inventory amount in all departments and branches. | ||
| + | <br> | ||
| + | Note: this would not indicate the quantity of item on hold for consumers. | ||
| + | |- | ||
| + | | <span id="Physical">Physical </span> || Physically available for sale. | ||
| + | <br> | ||
| + | Note: The quantity of item held for customer would not be applied to this section. | ||
| + | |- | ||
| + | | <span id="Held for Del."> Held for Del. </span> || Complete sum to be held for delivery. | ||
| + | |- | ||
| + | | <span id="On order"> On order </span> || Pending supplier order. | ||
| + | |- | ||
| + | | <span id="Expected"> Expected </span> || Day when the '''''on order''''' shipment is supposed to arrive. | ||
| + | |- | ||
| + | | <span id="Packed"> Packed </span> || Shows how it is packed by vendor. | ||
| + | |- | ||
| + | | <span id="Committed"> Committed </span> || Displays the entire amount held for delivery, order, salesman, etc. | ||
| + | |- | ||
| + | | <span id="Last Sale"> Last Sale </span> || Last selling date on item. | ||
| + | |} | ||
| + | <br> | ||
| + | [[File:Item_detail_STOCK_INFORMATION.png|700px|frameless|center]] | ||
| + | <div style="color: #004b64; font-size: 20px; text-align: center;">Figure 2-24: Item Details: Stock Information.</div> | ||
| + | <br> | ||
| + | |||
| + | ==== <span style="color: #004b64; font-size: 30px;" id="Add and Remove An Item Image">Add and Remove an Item Image</span> ==== | ||
| + | <ul> | ||
| + | <li> <div style="color: #004b64; font-size: 20px; "> Add an item picture</li> </div> | ||
| + | </ul> | ||
| + | <ol> | ||
| + | <li> <div style="color: #004b64; font-size: 20px; "> Go to [[#Picture Options|''Picture Options'']] Search </div> </li> | ||
| + | <li> <div style="color: #004b64; font-size: 20px; "> Click '''Add Picture''' </div></li> | ||
| + | <li> <div style="color: #004b64; font-size: 20px; "> Select picture from your computer </div></li> | ||
| + | <li><div style="color: #004b64; font-size: 20px; "> Click open or choose.</div> </li> | ||
| + | <li><div style="color: #004b64; font-size: 20px; "> Click Save Picture in Picture Options </div> </li> | ||
| + | </ol> | ||
| + | |||
| + | [[File:Process_to_add_a_picture_item_(updated_version2).png|700px|frameless|center]] | ||
| + | <div style="color: #004b64; font-size: 20px; text-align: center;">Figure 2-26: Process to add an image to item.</div> | ||
| + | |||
| + | <br> | ||
| + | <ul> | ||
| + | <li> <div style="color: #004b64; font-size: 20px; "> Remove an item picture </li> </div> | ||
| + | </ul> | ||
| + | <ol> | ||
| + | <li> <div style="color: #004b64; font-size: 20px; "> Go to [[#Picture Options|''Picture Options'']] Search </div> </li> | ||
| + | <li> <div style="color: #004b64; font-size: 20px; "> Click '''Remove''' </div></li> | ||
| + | <li><div style="color: #004b64; font-size: 20px; "> Click Save Picture in [[#Picture Options|''Picture Options'']] </div> </li> | ||
| + | </ol> | ||
| + | |||
| + | <br> | ||
| + | |||
| + | ==== <span style="color: #004b64; font-size: 30px;" id="Order Information">Order Information</span> ==== | ||
| + | <div style="color: #004b64; font-size: 20px; "> In order information, user may search details regarding recent shipment, item update history, stock calculations, and order & supply levels. Let us discuss each section of the window. </div> | ||
| + | {| class="wikitable" | ||
| + | |- | ||
| + | ! <span id="Terminologies Table"> Terminologies !! Definitions | ||
| + | |- | ||
| + | | <span id="Remaining Stock"> Remaining Stock </span> ||It may also be referred to as "OLD STOCK." In other terms, stock before last shipment. | ||
| + | |- | ||
| + | | <span id="Purchase Order"> PO/Purchase Order </span> || A purchase order is a document submitted from the customer to the supplier to confirm a particular purchase of products. | ||
| + | |- | ||
| + | | <span id="Last Shipment"> Last Shipment </span> || The latest goods from the supplier. | ||
| + | |} | ||
| + | <div style="color: #004b64; font-size: 20px; "> A short overview of the top section of the order information window is shown in Figure 2-27 below.</div> | ||
| + | <br> | ||
| + | [[File:Order_info_-_first_section.png|700px|frameless|center]] | ||
| + | <div style="color: #004b64; font-size: 20px; text-align: center;">Figure 2-27: Order information</div> | ||
| + | <br> | ||
| + | <div style="color: #004b64; font-size: 20px; ">'''Recent Shipments:''' Users can view the amount that came in on the last and prior shipment, as well as the date and time of the shipment. Also, users can see the [[#Remaining Stock|''remaining stock'']] amount.</div> | ||
| + | <br> | ||
| + | [[File:Order_info_-_recent_shipment.png|700px|frameless|center]] | ||
| + | <div style="color: #004b64; font-size: 20px; text-align: center;">Figure 2-28: Order information – Recent Shipment form</div> | ||
| + | <br> | ||
| + | <div style="color: #004b64; font-size: 20px; " id "Order Info Item Options">'''Item Options:''' There are many ways to get more control over products. This segment includes a list of choices. See the terminology table below to help grasp each choice and select wisely.</div> | ||
| + | {| class="wikitable" | ||
| + | |- | ||
| + | ! <span id="Terminologies Order Info, Item Options"> Terminologies !! Definitions | ||
| + | |- | ||
| + | | <span id="Control Retail"> Control Retail </span> ||The governments fixed price per item. Items are not permitted, by law, to exceed government rates. | ||
| + | |- | ||
| + | | <span id="Control Wholesale">Control Wholesale </span> ||The governments fixed price for wholesale products. Items are not permitted, by law, to exceed government rates. | ||
| + | |- | ||
| + | | <span id="Reducible"> Reducible </span> || Inventory deduct in stock amount. For e.g., an oxiclean product may and can be taken out of stock which reduces quantity, whereas a freight charge cannot be taken out of stock in order to reduce quantity. | ||
| + | |- | ||
| + | | <span id="Random Measure">Random Measure </span> || Use to incorporate quantity decimals for goods not determined by whole numbers. E.g. sugar, rice, etc. | ||
| + | |- | ||
| + | | <span id="BAHA Regulated">BAHA Regulated </span> || Requires license to import an item | ||
| + | |- | ||
| + | | <span id="Shelf Stable"> Shelf Stable </span> || Items which do not have an expiry date. | ||
| + | |- | ||
| + | | <span id="Companion Items"> Companion Items</span> || Companion items are priced and sold individually, but mostly purchased together. For eg, a brand smartphone purchase, the case and screen protector may have different prices but purchased together. | ||
| + | |- | ||
| + | | <span id="Assembly Items">Assembly Items </span> || Assembly items are items that are sold together with one package price. This may be a bundled plan the company offers. | ||
| + | |- | ||
| + | | <span id="Discontinued"> Discontinued </span> || A discontinued product is no longer sold. | ||
| + | |} | ||
| + | <br> | ||
| + | [[File:Order_info_-_item_options_(updated_version).png|700px|frameless|center]] | ||
| + | <div style="color: #004b64; font-size: 20px; text-align: center;">Figure 2-29: Order information – Item Option Form</div> | ||
| + | <br> | ||
| + | <div style="color: #004b64; font-size: 20px; ">'''Item Update History:''' This segment displays the date and period of the last update to the item preceded by the user that made the update.</div> | ||
| + | <br> | ||
| + | [[File:Order_info_-_item_update_history.png|700px|frameless|center]] | ||
| + | <div style="color: #004b64; font-size: 20px; text-align: center;">Figure 2-30: Order information – Item Update History </div> | ||
| + | <br> | ||
| + | <div style="color: #004b64; font-size: 20px; ">'''Stock Calculation:''' In stock calculation users can see supplier expense, Belize expense, previous cost, remaining cost, remaining stock, value and expiry date. For a better explanation of these fields, see the illustration below.</div> | ||
| + | <br> | ||
| + | [[File:Order_info_-_stock_calculation.png|700px|frameless|center]] | ||
| + | <div style="color: #004b64; font-size: 20px; text-align: center;">Figure 2-31: Order information – Stock Calculation </div> | ||
| + | <br> | ||
| + | <br> | ||
| + | <div style="color: #004b64; font-size: 20px; ">'''Order & supply levels:''' Within this segment, the user may adjust the maximum and minimum amount the current location can hold. And specify the status of the item, be it clearance, special order, open order etc.</div> | ||
| + | {| class="wikitable" | ||
| + | |- | ||
| + | ! <span id="Terminologies Order Info, Order & supply levels"> Terminologies !! Definitions | ||
| + | |- | ||
| + | | <span id="Minimum Supply"> Minimum Supply </span> ||Minimum amount of item a location should hold. | ||
| + | |- | ||
| + | | <span id="Maximum Order"> Maximum Order </span> ||The maximum quantity a location should hold. | ||
| + | |- | ||
| + | | <span id="Turn Around"> Turn Around </span> || The period it takes to sell the entire item stock. | ||
| + | |- | ||
| + | | <span id="Lead Time">Lead Time </span> || Time it takes to get the goods after ordering from the supplier. | ||
| + | |- | ||
| + | | <span id="Order Status"> Order Status</span> || Specify the status of the item, be it clearance, special order, open order etc. | ||
| + | |- | ||
| + | | <span id="Order multiple ">Order multiple </span> || Minimum quantity to order from supplier. | ||
| + | |- | ||
| + | | <span id="Special Order"> Special Order </span> || Normally, a special order is not sold in store, typically ordered by the company for a customer who requested it. | ||
| + | |} | ||
| + | <br> | ||
| + | [[File:Order_info_-_Order_and_supply_levels.png|700px|frameless|center]] | ||
| + | <div style="color: #004b64; font-size: 20px; text-align: center;">Figure 2-31: Order information – Order and supply levels</div> | ||
| + | <br> | ||
| + | |||
| + | ==== <span style="color: #004b64; font-size: 30px;" id="Packaging Window"> Packaging</span> ==== | ||
| + | <div style="color: #004b64; font-size: 20px; "> GoneClear StoreFront's capacity to store the dimensions, weight and cube of a package is another aspect that makes it such reliable, unique POS software. If correctly implemented, this function can be very useful when making several deliveries to customers and/or ordering several supplier products since it will be easy to calculate how many different items of different measurements can fit in a truck. </div> | ||
| + | <br> | ||
| + | <div style="color: #004b64; font-size: 20px; "> <span id= Dimension>'''Dimensions:'''</span> Enter the length, width and height of the package and the '''cube''' will automatically calculate. Then enter the [[#Gross Weight|''gross weight'']] and [[#Net Weight|''net weight'']] in the weight per unit in pounds form. | ||
| + | <br> | ||
| + | Remember to always save after any updates have been made</div> | ||
| + | [[File:Packaging.PNG|700px|frameless|center]] | ||
| + | <div style="color: #004b64; font-size: 20px; text-align: center;">Figure 2-32: Packaging Size</div> | ||
| + | <br> | ||
| + | <div style="color: #004b64; font-size: 20px; "> '''Full Case/Unit Description and Quantity:''' Choose [[#Stock & Price|''Storage & Price'']], [[#Package Unit|''Package Unit'']] and enter quantity in one unit.</div> | ||
| + | {|style="width:100%; background-color: #f8f9fa; border:1px double #eeeeee; text-align:left;" | ||
| + | |[[File:Clipart note.png|30px|frameless|left center]] NOTE:These fields would have already been filled out when adding item to the inventory. | ||
| + | |} | ||
| + | <br> | ||
| + | <div style="color: #004b64; font-size: 20px; "> '''Other information:''' This segment indicates the date and time of the last item count.</div> | ||
| + | <br> | ||
| + | [[File:Packaging_(2).PNG|700px|frameless|center]] | ||
| + | <div style="color: #004b64; font-size: 20px; text-align: center;">Figure 2-33: Packaging- Full Case/Unit Description and Quantity and Other information: </div> | ||
| + | |||
| + | <br> | ||
| + | |||
| + | ==== <span style="color: #004b64; font-size: 30px;" id="Price/Cost Window">Price/Cost</span> ==== | ||
| + | <div style="color: #004b64; font-size: 20px; "> License rights users can access and change item prices in this window. In this chapter we will address the structure of the forms and not all their meaning. However, you will have links to the section that explains the significance of each field. </div> | ||
| + | <br> | ||
| + | [[File:Price_and_cost_window.png|700px|frameless|center]] | ||
| + | <br> | ||
| + | <div style="color: #004b64; font-size: 20px; text-align: center;">Figure 2-34: Price and Cost Window </div> | ||
| + | </div> | ||
| + | <br> | ||
| + | <div style="color: #004b64; font-size: 20px; ">'''General Pricing Info:''' Users can view or edit Belize Cost, Retail Price, Wholesale, Distributor and duty-free fields in the section. </div> | ||
| + | {|style="width:100%; background-color: #f8f9fa; border:1px double #eeeeee; text-align:left;" | ||
| + | |[[File:Clipart note.png|30px|frameless|left center]] NOTE: These fields are typically completed while adding item to inventory. | ||
| + | |} | ||
| + | <br> | ||
| + | [[File:Price_and_cost_-_general_pricing_info.png|700px|frameless|center]] | ||
| + | <br> | ||
| + | <div style="color: #004b64; font-size: 20px; text-align: center;">Figure 2-35: Price and Cost: General Pricing </div> | ||
| + | </div> | ||
| + | <br> | ||
| + | <div style="color: #004b64; font-size: 20px; "> '''Markup info:''' Markup generally refers to the amount added to the cost price to determine the selling price, in other words, the profit of the item. The markup percentage is calculated automatically when the Belize Cost and retail price is entered. </div> | ||
| + | <br> | ||
| + | [[File:Price_and_cost_-_markup.png|700px|frameless|center]] | ||
| + | <br> | ||
| + | <div style="color: #004b64; font-size: 20px; text-align: center;">Figure 2-36: Price and Cost-Markup Info </div> | ||
| + | </div> | ||
| + | <br> | ||
| + | <div style="color: #004b64; font-size: 20px; "> '''[[#Tariff|''Tariff'']] and Codes:''' Here users may edit [[#Tariff Number|''Tariff number'']], Exemption code, [[#Tax Code|''Tax Code'']], and commission code </div> | ||
| + | <br> | ||
| + | [[File:Price_and_cost_-_Tariff_and_codes.png|700px|frameless|center]] | ||
| + | <div style="color: #004b64; font-size: 20px; text-align: center;">Figure 2-37: Price and Cost: Tariff and Codes </div> | ||
| + | </div> | ||
| + | <br> | ||
| + | <div style="color: #004b64; font-size: 20px; "> '''Other Cost & Pricing Tool:''' This portion is a read-only display of [[#Duty Free|''duty free'']] cost, Remaining Cost, and Target Price. </div> | ||
| + | <br> | ||
| + | <div style="color: #004b64; font-size: 20px; "> '''Sale&Discount info:''' Users can apply a special promotion price and period. This segment may add a discount limit or no discount to this special price. </div> | ||
| + | <br> | ||
| + | [[File:Price_and_cost_-_other_cost_and_pricing_tool_and_sales.png|700px|frameless|center]] | ||
| + | <div style="color: #004b64; font-size: 20px; text-align: center;">Figure 2-38: Price and Cost: Other price and discount </div> | ||
| + | </div> | ||
| + | <br> | ||
| + | <div style="color: #004b64; font-size: 20px; "> '''Other value:''' This segment includes two sections Ending Value and Date Price Changed. The ending-value here applies to the end-of-month stock value. And Date Price Changed is essentially the price adjustment date, if any. </div> | ||
| + | <br> | ||
| + | [[File:Price_and_cost_-_other_values.png|500px|frameless|center]] | ||
| + | <div style="color: #004b64; font-size: 20px; text-align: center;">Figure 2-39: Price and Cost: Other Values </div> | ||
| + | </div> | ||
| + | <br> | ||
| + | ==== <span style="color: #004b64; font-size: 30px;" id="Assembly and Companion ">Assembly and Companion </span> ==== | ||
| + | <div style="color: #004b64; font-size: 20px; "> Goneclear StoreFront's simple-to-use features, assembly and companion provide an easy opportunity for package deals and help sell men upsell an item. </div> | ||
| + | <br> | ||
| + | ===== <span style="color: #004b64; font-size: 25px;" id="Assembly">Assembly </span> ===== | ||
| + | <div style="color: #004b64; font-size: 20px; "> As mentioned earlier in this guide Assembly items are items that are sold together with one package price. This may be a bundled plan the company offers. Let's have a look at how to set up an Assembly. </div> | ||
| + | <br> | ||
| + | <div style="color: #004b64; font-size: 20px; ">Create Assembly for an item.</div> | ||
| + | <ol> | ||
| + | <li>Go to [[#Order Information|''Order info'']] window | ||
| + | </li> | ||
| + | <li>Check the box “Assembly Item” under [[#Order Info Item Options|''item option'']] </li> | ||
| + | <li>Go to Assembly Window</li> | ||
| + | <li>Click New Code button</li> | ||
| + | <li>Type in the [[#Stock Number|''stock number'']] you want to add as an assembly to current item and push enter on your keyboard</li> | ||
| + | <li>Click Save</li> | ||
| + | </ol> | ||
| + | |||
| + | [[File:Add_Assembly.png|700px|frameless|center]] | ||
| + | <div style="color: #004b64; font-size: 20px; text-align: center;">Add Assembly.</div> | ||
| + | |||
| + | <div style="color: #004b64; font-size: 20px; ">Remove an Assembly</div> | ||
| + | <ol> | ||
| + | <li>Go to [[#Order Information|''Order info'']] window | ||
| + | </li> | ||
| + | <li>Uncheck the box “Assembly Item” under [[#Order Info Item Options|''item option'']] </li> | ||
| + | <li>Go to Assembly Window</li> | ||
| + | <li>Click on the item you want to remove</li> | ||
| + | <li>Uncheck “Include” box</li> | ||
| + | <li>Click Save</li> | ||
| + | </ol> | ||
| + | |||
| + | ===== <span style="color: #004b64; font-size: 25px;" id="Companion ">Companion </span> ===== | ||
| + | |||
| + | <div style="color: #004b64; font-size: 20px; "> Companion items are priced and sold individually, but mostly purchased together. For eg, a brand smartphone purchase, the case and screen protector may have different prices but purchased together. </div> | ||
| + | <br> | ||
| + | <div style="color: #004b64; font-size: 20px; ">Create Companion for an item.</div> | ||
| + | <ol> | ||
| + | <li>Go to [[#Order Information|''Order info'']] window | ||
| + | </li> | ||
| + | <li>Check the box “Companion Item” under [[#Order Info Item Options|''item option'']] </li> | ||
| + | <li>Go to companion Window</li> | ||
| + | <li>Click New Code button</li> | ||
| + | <li>Type in the [[#Stock Number|''stock number'']] you want to add as a companion to current item and push enter on your keyboard</li> | ||
| + | <li>Click Save</li> | ||
| + | </ol> | ||
| + | |||
| + | [[File:Add_companion.png|700px|frameless|center]] | ||
| + | <div style="color: #004b64; font-size: 20px; text-align: center;">Add Companion</div> | ||
| + | |||
| + | <div style="color: #004b64; font-size: 20px; ">Remove an Companion</div> | ||
| + | <ol> | ||
| + | <li>Go to [[#Order Information|''Order info'']] window | ||
| + | </li> | ||
| + | <li>Uncheck the box “Companion Item” under [[#Order Info Item Options|''item option'']] </li> | ||
| + | <li>Go to companion Window</li> | ||
| + | <li>Click on the item you want to remove</li> | ||
| + | <li>Uncheck “Include” box</li> | ||
| + | <li>Click Save</li> | ||
| + | </ol> | ||
| + | <br> | ||
| + | |||
| + | ==== <span style="color: #004b64; font-size: 30px;" id="Changes ">Changes</span> ==== | ||
| + | <div style="color: #004b64; font-size: 20px; "> Click on “view changes” in the Inventory option to see changes to item. The changes window will automatically open. | ||
| + | <br> | ||
| + | Below is an example of the view change table | ||
| + | </div> | ||
| + | <br> | ||
| + | [[File:Change.png|700px|frameless|center]] | ||
| + | <div style="color: #004b64; font-size: 20px; text-align: center;">Figure 2-41: Changes</div> | ||
| + | |||
| + | <br> | ||
| + | |||
| + | ==== <span style="color: #004b64; font-size: 30px;" id="Serial Numbers Window ">Serial Numbers Window</span> ==== | ||
| + | <div style="color: #004b64; font-size: 20px; "> Users can access and check all [[#Serial Numbers|''serial numbers '']] for the current item if any. | ||
| + | </div> | ||
| + | <br> | ||
| + | [[File:Serial_Number_(updated_version1)_.png|700px|frameless|center]] | ||
| + | <div style="color: #004b64; font-size: 20px; text-align: center;">Figure 2-42: Serial Numbers window</div> | ||
| + | |||
| + | <div style="color: #004b64; font-size: 20px;"> '''Warranty Options''': If the item has a [[#Warranty |''warranty '']] on it, the '''warranty options''' are set. User would indicate whether a serial number is required and the number of days for [[#Warranty |''warranty '']]. </div> | ||
| + | <br> | ||
| + | [[File:Serial_Number_(updated_version)_.png|700px|frameless|center]] | ||
| + | <div style="color: #004b64; font-size: 20px; text-align: center;"> Warranty Options </div> | ||
| + | |||
| + | ==== <span style="color: #004b64; font-size: 30px;" id="UPC window in Inventory">UPC window in Inventory Data</span> ==== | ||
| + | <div style="color: #004b64; font-size: 20px; ">Another valuable tool in the GoneClear StoreFront is our UPC function. Many different UPC codes may be applied to one [[#Stock Number|''stock number'']]. This is quite useful if the identical item has different UPCs for each item. For Example, if the business purchased 2 box of the same item and both package have different UPCs. The user would not need to add an extra [[#Stock Number|''stock number'']], but may add both under one stock number. This minimizes the chance of overloading the program with excessive stock numbers. | ||
| + | </div> | ||
| + | <br> | ||
| + | {| class="wikitable" | ||
| + | |- | ||
| + | ! <span id="Terminologies Table"> Terminologies !! Definitions | ||
| + | |- | ||
| + | | <span id="UPC"> UPC </span> || A UPC, short for universal product code, is a type of code printed on retail product packaging to help identify an item. It consists of two parts — the machine-readable barcode, a sequence of unique black bars, and the unique 12-digit number beneath. | ||
| + | <br> | ||
| + | [[File:UPCdiag.png|400px|frameless|center]] | ||
| + | |} | ||
| + | <br> | ||
| + | [[File:UPCs.png|700px|frameless|center]] | ||
| + | <div style="color: #004b64; font-size: 20px; text-align: center;">Figure 2-43: UPC window</div> | ||
| + | <br> | ||
| + | |||
| + | ==== <span style="color: #004b64; font-size: 30px;" id="Deliveries window in Inventory">Deliveries in Inventory Data***</span> ==== | ||
| + | |||
| + | === <span style="color: #004b64; font-size: 30px;" id="UPC Utilities Ribbon">UPC Utilities Ribbon</span> === | ||
| + | |||
| + | <span style="color: #004b64; font-size: 20px;">The UPC Utilities Ribbon provides a broad range of options for users utilizing UPCs. Depending on the licensed user, users can scan a UPC code to verify retail price, confirm UPC, display the company purchasing price of the scanned item, take stock and do quick transfer (This transfer method is typically used to quickly correct the stock). Users can also scan orders and shipments here.<br> | ||
| + | <br> | ||
| + | Below is a UPC Utility Startup window that opens after clicking UPC Utilities Ribbon.</span> | ||
| + | [[File:UPC_UTILITY_STARTUP.png|700px|frameless|center]] | ||
| + | <div style="color: #004b64; font-size: 20px; text-align: center;">Figure 2-43: UPC Utility Startup Window</div> | ||
| + | <br> | ||
| + | |||
| + | ==== <span style="color: #004b64; font-size: 30px;" id="UPC Utilities Ribbon- Price Check">UPC Utilities Ribbon- Price Check</span> ==== | ||
| + | <span style="color: #004b64; font-size: 20px;">See the first button, "Price Check." Price check is very straightforward, enabling users to scan UPC code and see item selling price. | ||
| + | <br> | ||
| + | After selecting any of these buttons, a new window labeled <span id="UPC Control">UPC Control</span> would open. Depending on the selected button, choices differ. | ||
| + | <br> | ||
| + | Below is a view of PRICE CHECK operation mode in the UPC Control window</span> | ||
| + | [[File:UPC_Utility_Startup_-_Price_check.png|700px|frameless|center]] | ||
| + | <div style="color: #004b64; font-size: 20px; text-align: center;">Figure 2-44: UPC Utility Startup – price check</div> | ||
| + | <br> | ||
| + | <span style="color: #004b64; font-size: 20px;">[[#UPC Control|''UPC control'']] window first section displays item name and description. Users may print item labels in various formats in this section; moreover, price adjustment can be made here. Below is a display of item details in UPC Control window first section.</span> | ||
| + | [[File:UPC_Utility_Startup_-_Price_check_1.png|700px|frameless|center]] | ||
| + | <div style="color: #004b64; font-size: 20px; text-align: center;">Figure 2-45: UPC Utility Startup – price check first section</div> | ||
| + | <br> | ||
| + | <span style="color: #004b64; font-size: 20px;">As stated earlier, the printing option gives a range of choices to print an item label. Below is an example of the first option, Product label.</span> | ||
| + | [[File:UPC_Utility_Startup_-_Price_check_2.png|700px|frameless|center]] | ||
| + | <div style="color: #004b64; font-size: 20px; text-align: center;">Figure 2-45: Figure 2-45: UPC Utility Startup – price check, Print item labels</div> | ||
| + | <br> | ||
| + | <span style="color: #004b64; font-size: 20px;">To adjust the retail price easily, simply click the three-dot box at the top right corner. This will open the "Adjust Retail Price" window.</span> | ||
| + | [[File:UPC_Utility_Startup_-_Price_check_3.png|700px|frameless|center]] | ||
| + | <br> | ||
| + | [[File:UPC_Utility_Startup_-_Price_check_4.png|700px|frameless|center]] | ||
| + | <div style="color: #004b64; font-size: 20px; text-align: center;">Figure 2-46: UPC Utility Startup – price check, Adjust Retail Price.</div> | ||
| + | <br> | ||
| + | <span style="color: #004b64; font-size: 20px;">As stated earlier, the [[#UPC control|''UPC control'']] window has many tabs, and these tabs are available based on the user's operating mode. In this situation, we're looking at Price Check mode, which gives access to only 3 tabs; scan, packed and bin. | ||
| + | <br> | ||
| + | The scan tab in the Price Check Operation mode displays the item brand, Supplier, Price including Tax, [[#Package Unit|''Package Unit'']], Stock Amount, [[#Bin|''Bin'']] Number and Picture</span> | ||
| + | [[File:UPC_Utility_Startup_-_Price_check_Scan_tab.png|700px|frameless|center]] | ||
| + | <div style="color: #004b64; font-size: 20px; text-align: center;">Figure 2-47: UPC Utility Startup – price check, Scan Tab.</div> | ||
| + | <br> | ||
| + | <span style="color: #004b64; font-size: 20px;">The packed tab displays the item [[#Dimension|''dimensions'']] | ||
| + | ,weight, and expiration date. These are all fields that can be edited. See section 2.2.7 [[#Packaging Window|''Packaging'']] x to better understand their function.</span> | ||
| + | [[File:UPC_Utility_Startup_-_Price_check_Packed_tab.png|700px|frameless|center]] | ||
| + | <div style="color: #004b64; font-size: 20px; text-align: center;">Figure 2-48: UPC Utility Startup – price check, Packed Tab.</div> | ||
<br> | <br> | ||
| + | <span style="color: #004b64; font-size: 20px;">The Bin tab displays the number of the item in stock and the current and previous [[#Bin|''Bin'']]. It also allows users to update [[#Bin|''Bin'']]. | ||
<br> | <br> | ||
| + | To update the [[#Bin|''Bin'']] simple enter the current [[#Bin|''Bin'']] and select update button. When the update completes, the previous [[#Bin|''Bin'']] is added to "[[#Bin|''Bin'']] 2." | ||
<br> | <br> | ||
| + | "[[#Bin|''Bin'']] 2" is where the item was previously kept</span> | ||
| + | [[File:UPC_Utility_Startup_-_Price_check_bin_tab.png|700px|frameless|center]] | ||
| + | <div style="color: #004b64; font-size: 20px; text-align: center;">Figure 2-49: UPC Utility Startup – price check, Bin Tab.</div> | ||
| + | |||
| + | ==== <span style="color: #004b64; font-size: 30px;" id="UPC Utilities Ribbon- UPC Validation">UPC Utilities Ribbon- UPC Validation</span> ==== | ||
| + | |||
| + | <span style="color: #004b64; font-size: 20px;">Since we now have a clear understanding of the [[#UPC Utilities Ribbon- Price Check|''Price Check '']]and [[#UPC Control|''UPC Control'']] window, let 's look at another button; UPC Validation. You may notice that more tabs are accessible under the UPC Control Window, assign tab, and update tab. | ||
<br> | <br> | ||
<br> | <br> | ||
| + | '''Assign Tab:''' under this tab, users may add a new UPC number to an item, or swap an existing UPC code to another item. This tab also enables the user to add a new item to the inventory. | ||
<br> | <br> | ||
<br> | <br> | ||
| + | </span> | ||
| + | <div style="color: #004b64; font-size: 20px; ">'''Assign new UPC Number to Item:''' | ||
| + | <ol> | ||
| + | <li>Scan the UPC number or enter the UPC number manually.</li> | ||
| + | <li>Click the button Scan. (System immediately brings you to '''Assign tab''')</li> | ||
| + | <li>Enter stock number to assign UPC number</li> | ||
| + | <li>Select the search button (The search window will open)</li> | ||
| + | <li>Double click on the item in the search window (Search window would close automatically)</li> | ||
| + | <li>Click the assign button</li> | ||
| + | <li>Click OK on the "Assign UPC" pop-up message</li> | ||
| + | </ol> | ||
| + | </div> | ||
| + | |||
| + | [[File:Assign_new_UPC_number_to_stock_Step_1a_and_2.png|700px|frameless|center]] | ||
| + | <br> | ||
| + | [[File:Assign_new_UPC_number_to_stock_Step_3_and_4.png|700px|frameless|center]] | ||
| + | <br> | ||
| + | [[File:Assign_new_UPC_number_to_stock_Step_5.png|700px|frameless|center]] | ||
| + | <br> | ||
| + | [[File:Assign_new_UPC_number_to_stock_Step_6.png|700px|frameless|center]] | ||
<br> | <br> | ||
| + | [[File:Assign_new_UPC_number_to_stock_Step_7.png|700px|frameless|center]] | ||
<br> | <br> | ||
| + | <div style="color: #004b64; font-size: 20px; text-align: center;">Figure 2-50: UPC Utility Startup – Process of assigning New UPC number to an item.</div> | ||
<br> | <br> | ||
| + | |||
| + | <div style="color: #004b64; font-size: 20px; ">'''Reassign UPC to different Stock Number:''' | ||
| + | <ol> | ||
| + | <li>Scan the UPC number or enter the UPC number manually.</li> | ||
| + | <li>Click the button Scan.</li> | ||
| + | <li>Go to Assign Tab</li> | ||
| + | <li>Enter stock number to assign UPC number</li> | ||
| + | <li>Select the search button (The search window will open)</li> | ||
| + | <li>Double click on the item in the search window (Search window would close automatically)</li> | ||
| + | <li>Click the assign button</li> | ||
| + | <li>Click OK on the "Assign UPC" pop-up message</li> | ||
| + | <li>Click OK on the "Reassign" pop-up message </li> | ||
| + | </ol> | ||
| + | </div> | ||
| + | |||
| + | <div style="color: #004b64; font-size: 20px; ">To add a new stock number using the assign tab, simply insert the stock number and click "New stock number" button and complete the [[#New Inventory Creation|''"new inventory creation"'']] form. See [[#Adding a New Item to Inventory|''section 2.2.3 Adding a New Item to Inventory.'']] to help fill this form accurately.</div> | ||
<br> | <br> | ||
| + | <div style="color: #004b64; font-size: 20px; ">'''Update Tab:''' Update tab allows users to update current item brand and package unit.</div> | ||
<br> | <br> | ||
| + | [[File:UPC_Validation_-_update_tab.png|700px|frameless|center]] | ||
| + | <div style="color: #004b64; font-size: 20px; text-align: center;">Figure 2-51: UPC Utility Startup – UPC Validation, Update Tab</div> | ||
<br> | <br> | ||
| − | == System Control | + | ==== <span style="color: #004b64; font-size: 30px;" id="Utilities Ribbon- Purchasing">Utilities Ribbon- Purchasing</span> ==== |
| − | == | + | |
| − | == Sales == | + | <div style="color: #004b64; font-size: 20px; ">The purchase operation essentially allows users to see the purchase costs for the item and the amount of the last shipment. This form is now visible on Scan tab. Note when in any other mode this form is not visible. However, the form becomes visible in purchase operation </div> |
| − | == Accounts == | + | <br> |
| + | [[File:UPC_purchase_operation.png|700px|frameless|center]] | ||
| + | <div style="color: #004b64; font-size: 20px; text-align: center;">Figure 2-52: UPC Utility Startup – Purchase</div> | ||
| + | |||
| + | <br> | ||
| + | ==== <span style="color: #004b64; font-size: 30px;" id="UPC Utilities Ribbon- Stock Take">UPC Utilities Ribbon- Stock Take</span> ==== | ||
| + | <div style="color: #004b64; font-size: 20px; ">Stock take is done in a business to record the stock amount in the company. GoneClear StoreFont stock-take function is simple to understand and adjust if necessary. The 'count' tab can be viewed under the 'stock take' operation mode. The count tab displays the last count date, the sum on stock at the current location of the user, and the total number of items in the company. Let's take a look at how to confirm and adjust the stock. </div> | ||
| + | <br> | ||
| + | <div style="color: #004b64; font-size: 20px; ">'''Adjust Stock''' | ||
| + | <ol> | ||
| + | <li>Enter correct stock quantity </li> | ||
| + | <li>Click on the button "Adjust Stock"</li> | ||
| + | <li>Click YES on the pop-up message </li> | ||
| + | </ol> | ||
| + | </div> | ||
| + | [[File:Stock_Take_-_Adjust_stock.png|700px|frameless|center]] | ||
| + | <div style="color: #004b64; font-size: 20px; text-align: center;">Figure 2-51: UPC Utility Startup – UPC Validation, Update Tab</div> | ||
| + | <br> | ||
| + | <div style="color: #004b64; font-size: 20px; ">'''Confirm Stock:'''if no adjustment is required, then users simply confirm the stock to document the count date. | ||
| + | <ol> | ||
| + | <li>Click on the button “Confirm Count"</li> | ||
| + | <li>Click YES on the pop-up message </li> | ||
| + | |||
| + | </ol> | ||
| + | </div> | ||
| + | |||
| + | <br> | ||
| + | |||
| + | ==== <span style="color: #004b64; font-size: 30px;" id="UPC Utilities Ribbon- Transfer">UPC Utilities Ribbon- Transfer</span> ==== | ||
| + | <span style="color: #004b64; font-size: 20px;">This section is not designed for large transfers. It is generally used to adjust stocks between locations quickly. For example, if the system records 25 oxiclean in warehouse 1 but only 24 are physically in warehouse 1 and the missing 1 is located in warehouse 2. Users can easily transfer 1 from warehouse 1 to warehouse 2 quickly. That'd balance the stock. See the illustration below.</span> | ||
| + | <br> | ||
| + | <div style="color: #004b64; font-size: 20px; ">'''Transfer from one location to another''' | ||
| + | <ol> | ||
| + | <li>Select the destination for the items to be transferred.</li> | ||
| + | <li>Select where the products come from.</li> | ||
| + | <li>After both locations have been set, click the "transfer" button. ([[#UPC Control|''UPC Control'']] window will open)</li> | ||
| + | <li>Scan the UPC number or enter the UPC number manually.</li> | ||
| + | <li>Click the button Scan.</li> | ||
| + | <li>Under the transfer tab, enter the amount you wish to transfer.</li> | ||
| + | <li>Click transfer button.</li> | ||
| + | <li>Click YES on the pop-up message </li> | ||
| + | </ol> | ||
| + | </div> | ||
| + | [[File:UPC_Utility_-_Transfer.png|700px|frameless|center]] | ||
| + | <br> | ||
| + | [[File:UPC_Utility_-_Transfer2.png|700px|frameless|center]] | ||
| + | <div style="color: #004b64; font-size: 20px; text-align: center;">Figure 2-54: UPC Utility Startup – Transfer</div> | ||
| + | <br> | ||
| + | === <span style="color: #004b64; font-size: 30px;" id="Reports Ribbon">Reports Ribbon</span> === | ||
| + | |||
| + | <span style="color: #004b64; font-size: 20px;">GoneClear StoreFront offers the resources and monitoring features you need to handle the company's financing efficiently and according to Generally Accepted Accounting Principles (GAAP). | ||
| + | <br> | ||
| + | <br> | ||
| + | The main incentive to use Report Ribbon is the opportunity to run reports to evaluate your departments for profitability and performance. Multiple reports are available:</span> | ||
| + | |||
| + | <div style="color: #004b64; font-size: 20px; "> | ||
| + | <ul> | ||
| + | <li>Stock Analysis</li> | ||
| + | <li>FIFO Report</li> | ||
| + | <li>Average Costing</li> | ||
| + | <li>Promotional Analysis</li> | ||
| + | <li>Assembly Items Report</li> | ||
| + | <li>Proforma Activity </li> | ||
| + | <li>Stock Adjustment</li> | ||
| + | <li>Inventory custom Reporting tool</li> | ||
| + | <li>Annual Reports</li> | ||
| + | <li>Weekly Trends</li> | ||
| + | <li>Location Sales</li> | ||
| + | <li>In Bond Stock</li> | ||
| + | </ul> </div> | ||
| + | <br> | ||
| + | ==== <span style="color: #004b64; font-size: 30px;" id="Stock Analysis">Stock Analysis</span> ==== | ||
| + | |||
| + | <span style="color: #004b64; font-size: 20px;">Stock Analysis allows users to monitor stock sales and costs over a selected period. This option also enables you to view which products are sold more steadily than others. | ||
| + | <br> | ||
| + | <br> | ||
| + | See the terminology table below for an understanding of the Stock Analysis table layout.</span> | ||
| + | |||
| + | {| class="wikitable" | ||
| + | |- | ||
| + | ! Terminologies !! Definitions | ||
| + | |- | ||
| + | | <span id= "Quantity Stock Beginning "> Quantity Stock Beginning </span> || Number of stock at the beginning of the period selected. | ||
| + | |- | ||
| + | | <span id= "Value Beginning "> Value Beginning </span> || Value Beginning refers to the company's total expense for the item at the beginning of the period selected. | ||
| + | <br> | ||
| + | Formula: | ||
| + | <br> | ||
| + | '''Quantity Stock Beginning x <span style="color: #004b64; font-size: 16px;">[[#Belize Cost|''Belize Cost'']]</span> = Value Beginning''' | ||
| + | |- | ||
| + | | <span id= "SaleValue Beginning "> SaleValue Beginning </span> || The amount of revenue the company would make if all items were sold at the beginning of the selected period. | ||
| + | <br> | ||
| + | Formula: | ||
| + | <br> | ||
| + | '''''Quantity Stock Beginning x <span style="color: #004b64; font-size: 16px;">[[# Retail|'' Retail Price without GST'']]</span> = Salevalue Beginning | ||
| + | ''''' | ||
| + | |- | ||
| + | | <span id= "Quantity Received "> Quantity Received </span> || The amount of stocks received, if any, at the end of the selected period. | ||
| + | |- | ||
| + | | <span id= "Value Received"> Value Received </span> || Value Received refers to the company's total expense for the item at the ending of the period selected. | ||
| + | <br> | ||
| + | Formula: | ||
| + | <br> | ||
| + | '''''Quantity Received x <span style="color: #004b64; font-size: 16px;">[[# Belize Cost|'' Belize Cost'']]</span> = Value Received''''' | ||
| + | |- | ||
| + | | <span id= "Quantity Sold"> Quantity Sold </span> || Amount of stock sold. | ||
| + | |- | ||
| + | | <span id= "Total Sale"> Total Sale </span> || The company's revenue from Quantity Sold | ||
| + | <br> | ||
| + | Formula: | ||
| + | <br> | ||
| + | '''''Quanity Sold x <span style="color: #004b64; font-size: 16px;">[[#Retail|'' Retail Price without GST'']]</span> = Total Sale''''' | ||
| + | |- | ||
| + | | <span id= "Total Cost"> Total Cost </span> || The company's total expense form Quantity Sold | ||
| + | <br> | ||
| + | Formula: | ||
| + | <br> | ||
| + | '''''Quantity Sold x <span style="color: #004b64; font-size: 16px;">[[#Belize Cos|'' Belize Cost'']]</span> = Total cost''' | ||
| + | '' | ||
| + | |- | ||
| + | | <span id= "Ending Stock"> Ending Stock </span> || This is the number of stock remaining after all transactions at the end of the selected period. | ||
| + | |- | ||
| + | | <span id= "Ending Value"> Ending Value </span> || Ending Value refers to the company's total expense for the item at the ending of the period selected. | ||
| + | <br> | ||
| + | Formula: | ||
| + | <br> | ||
| + | '''''Ending Stock x <span style="color: #004b64; font-size: 16px;">[[#Belize Cos|'' Belize Cost'']]</span> = Total cost = Ending Value''''' | ||
| + | |- | ||
| + | | <span id= "SaleValue Ending"> SaleValue Ending </span> || The amount of revenue the company would make if all items were sold at the end of the selected period. | ||
| + | <br> | ||
| + | Formula: | ||
| + | <br> | ||
| + | '''''Ending Stock x <span style="color: #004b64; font-size: 16px;">[[#Retail|'' Retail Price without GST'']]</span> = SaleValue Ending''''' | ||
| + | |- | ||
| + | | <span id= "Stock Now"> Stock Now </span> || The quantity of item currently in stock. | ||
| + | |- | ||
| + | | <span id= "Replacement Cost"> Replacement Cost </span> || Gross Profit display made in dollars for the selected period. | ||
| + | <br> | ||
| + | Formula: | ||
| + | <br> | ||
| + | '''''Total Sale – Total Cost = GP$''' | ||
| + | '' | ||
| + | |- | ||
| + | | <span id= "GP%"> GP% </span> || Gross Profit display made in percentage for the selected period. | ||
| + | <br> | ||
| + | Formula: | ||
| + | <br> | ||
| + | '''''GP$/Total Sale x 100 = GP%''''' | ||
| + | |- | ||
| + | | <span id= "%Dept Sales"> %Dept Sales </span> || Percentage of sale by department. | ||
| + | |} | ||
| + | <br> | ||
| + | <span style="color: #004b64; font-size: 20px;">Navigate to the Inventory tab / Report button and choose "Stock Analysis" from the drop down. To access the table for stock analysis, enter a start and end date. If you wish, search by department, supplier, and or catalog number. Before clicking on the button “Apply”, choose whether you want to view moved items during selected period or items not moved. The default is set to items moved during selected period.</span> | ||
| + | <br> | ||
| + | [[File:Report_-_Stock_Analysis.png|700px|frameless|center]] | ||
| + | ????? AND INFO TABLE HERE WHEN MS PATT ADD MORE INFO IN SYSTEM??? | ||
| + | <div style="color: #004b64; font-size: 20px; text-align: center;">Figure 2-55: Report – Stock Analysis.</div> | ||
| + | <br> | ||
| + | |||
| + | ==== <span style="color: #004b64; font-size: 30px;" id="Assembly Item Report">Assembly Item Report</span> ==== | ||
| + | |||
| + | <span style="color: #004b64; font-size: 20px;">Earlier in this chapter, we discussed what [[#Assembly|''assembly'']] is and how an item is assembled. We will now discuss how to display a list of all [[#Assembly|''assembly'']] items. Navigate to the Inventory tab / Report button and choose "Assembly Items Report" from the drop down. | ||
| + | <br> | ||
| + | </span> | ||
| + | <br> | ||
| + | [[File:Report_-_Assembly_Item.png|700px|frameless|center]] | ||
| + | ????? AND INFO TABLE HERE WHEN MS PATT ADD MORE INFO IN SYSTEM??? | ||
| + | <div style="color: #004b64; font-size: 20px; text-align: center;">Figure 2-56: Report – Assembly Item Report.</div> | ||
| + | <br> | ||
| + | |||
| + | |||
| + | ==== <span style="color: #004b64; font-size: 30px;" id="Companion Items Report">Companion Items Report</span> ==== | ||
| + | |||
| + | <span style="color: #004b64; font-size: 20px;">Similar to [[#Assembly Item Report|''Assembly Item Report'']], the [[#Companion|''companion'']] item report displays a list of all items under companion. Navigate to the Inventory tab / Report button and choose "Companion Item" from the drop down | ||
| + | <br> | ||
| + | </span> | ||
| + | <br> | ||
| + | [[File:Report_-_Companion_Item.png|700px|frameless|center]] | ||
| + | ????? AND INFO TABLE HERE WHEN MS PATT ADD MORE INFO IN SYSTEM??? | ||
| + | <div style="color: #004b64; font-size: 20px; text-align: center;">Figure 2-57: Report – Companion Item</div> | ||
| + | <br> | ||
| + | |||
| + | ==== <span style="color: #004b64; font-size: 30px;" id="Stock Adjustment">Stock Adjustment</span> ==== | ||
| + | |||
| + | <span style="color: #004b64; font-size: 20px;">Under UPC Utilities Ribbon, we spoke about [[#stock take|''stock take'']]; adjust stock and confirm count. This section gives a report on who made the adjustment or count, and when. This report would reflect the quantity short or over after the adjustment has been made. | ||
| + | <br> | ||
| + | </span> | ||
| + | <br> | ||
| + | [[File:Report_-_Stock_Adjustment.png|700px|frameless|center]] | ||
| + | ????? AND INFO TABLE HERE WHEN MS PATT ADD MORE INFO IN SYSTEM??? | ||
| + | <div style="color: #004b64; font-size: 20px; text-align: center;">Figure 2-58: Report – Stock Adjustment</div> | ||
| + | <br> | ||
| + | |||
| + | ==== <span style="color: #004b64; font-size: 30px;" id="Inventory Custom Reposting Tool">Inventory Custom Reposting Tool</span> ==== | ||
| + | |||
| + | <span style="color: #004b64; font-size: 20px;">In [[#Search For An Item|''section 2.2.2'']], we discuss how to search for an item. Inventory Custom Reposting Tool another method of searching an item. However, the previous method limited users to a number of search results, with this Inventory Custom Reposting Tool users have a wider range of search results, and it hardly restricts users to search results. The various search results are-companion item, updated, and UPC to name a few. Select [[#column chooser|''column chooser'']] for more column choices. | ||
| + | <br> | ||
| + | </span> | ||
| + | |||
| + | {|style="width:100%; background-color: #f8f9fa; border:1px double #eeeeee; text-align:left;" | ||
| + | |[[File:Clipart note.png|30px|frameless|left center]] NOTE: Double-clicking the item opens the inventory data window for the item selected | ||
| + | |} | ||
| + | <br> | ||
| + | [[File:Report_-_Inventory_Custom_Reposting_Tool.png|700px|frameless|center]] | ||
| + | <div style="color: #004b64; font-size: 20px; text-align: center;">Figure 2-59: Report – Inventory Custom Reposting Tool</div> | ||
| + | <br> | ||
| + | |||
| + | ==== <span style="color: #004b64; font-size: 30px;" id="Purchase History Report">Purchase History Report</span> ==== | ||
| + | |||
| + | <span style="color: #004b64; font-size: 20px;">The purchase history segment enables users to view four quarters of the selected history from the beginning period. Simply select a starting date and the system will automatically split it into four quarters. | ||
| + | </span> | ||
| + | <br> | ||
| + | <div style="color: #004b64; font-size: 20px; ">'''Display Purchase History Process'''<br> | ||
| + | <div style="color: #004b64; font-size: 20px; ">''Navigate to the Inventory tab / Report button, hover over “Annual Reports” and choose “Purchase History”.'' | ||
| + | <ol> | ||
| + | <li>Select a Period Beginning (System will automatically split it into four quarters.)</li> | ||
| + | <li>Choose a scope from the drop down menu. (Summary or Detail)</li> | ||
| + | <li>Choose a group from the drop down menu. (Supplier, Department or Category)</li> | ||
| + | <li>Click Apply</li> | ||
| + | </ol> | ||
| + | </div> | ||
| + | <br> | ||
| + | [[File:Report_-_Purchase_history.png|700px|frameless|center]] | ||
| + | <div style="color: #004b64; font-size: 20px; text-align: center;">Figure 2-60: Report – Purchase History</div> | ||
| + | <br> | ||
| + | <span style="color: #004b64; font-size: 20px;">'''Summary Scope''' displays a total of "purchase history," showing overall amount depending on the selected group, supplier or department. | ||
| + | <br> | ||
| + | <br> | ||
| + | '''Detail Scope''' displays a detailed "purchase history" report, listing items, quantity, department, etc. | ||
| + | <br> | ||
| + | <br> | ||
| + | See the example for both reports below. (This report may be printed if the user wishes to print.) | ||
| + | </span> | ||
| + | [[File:Report_-_Purchase_history_(detail_and_summary_or_scope).png|700px|frameless|center]] | ||
| + | <div style="color: #004b64; font-size: 20px; text-align: center;">Figure 2-61: Report – Purchase History (Summary and detail)</div> | ||
| + | <br> | ||
| + | |||
| + | ==== <span style="color: #004b64; font-size: 30px;" id="12 Month Sales Report">12 Month Sales Report</span> ==== | ||
| + | |||
| + | <span style="color: #004b64; font-size: 20px;">Within each year, users can generate sale reports for 12 months. Report may be displayed in two methods, Summarize Group and Product detail. Let's look at each of them. | ||
| + | <br> | ||
| + | <br> | ||
| + | '''Summarize Group:''' Display of department or supplier sales, cost, and profit, based on the user's choice. | ||
| + | </span> | ||
| + | <div style="color: #004b64; font-size: 20px; ">'''Summarize Group Process:'''<br> | ||
| + | <div style="color: #004b64; font-size: 20px; ">''Navigate to the Inventory tab / Report button, hover over “Annual Reports” and choose “12 Month Sales Report”.'' | ||
| + | <ol> | ||
| + | <li>Select a year from the drop-down menu.</li> | ||
| + | <li>Select the starting month and end month. (Default is from January to December)</li> | ||
| + | <li>Select a location from the drop down menu. </li> | ||
| + | <li>Select group from the drop down menu.</li> | ||
| + | <li>Click display</li> | ||
| + | </ol> | ||
| + | </div> | ||
| + | [[File:Report_-_12_Month_Sales_Report,_Summarize_Group.png|700px|frameless|center]] | ||
| + | <div style="color: #004b64; font-size: 20px; text-align: center;">Figure 2-62: Report – 12 Month Sales Report, Summarize Group.</div> | ||
| + | <br> | ||
| + | <span style="color: #004b64; font-size: 20px;">'''Product detail:''' Shows a detailed report on "Sales". Depending on how it is filtered, users can view item name, stock number, department, sales, cost and gross profit for each month. | ||
| + | </span> | ||
| + | <br> | ||
| + | </div> | ||
| + | [[File:Report_-_12_Month_Sales_Report,_Product_Detail.png|700px|frameless|center]] | ||
| + | <div style="color: #004b64; font-size: 20px; text-align: center;">Figure 2-63: Report – 12 Month Sales Report, Product Detail.</div> | ||
| + | |||
| + | <br> | ||
| + | ==== <span style="color: #004b64; font-size: 30px;" id="12 Month Purchases Report">12 Month Purchases Report</span> ==== | ||
| + | |||
| + | <span style="color: #004b64; font-size: 20px;">Within each year, users can generate purchase reports for 12 months. | ||
| + | </span> | ||
| + | |||
| + | <br> | ||
| + | </div> | ||
| + | [[File:Report_-_12_Month_Purcahse__Report.png|700px|frameless|center]] | ||
| + | <div style="color: #004b64; font-size: 20px; text-align: center;">Figure 2-63: Report – 12 Month Sales Report, Product Detail.</div> | ||
| + | <br> | ||
| + | ==== <span style="color: #004b64; font-size: 30px;" id="3 Period Comparison W/GP">3 Period Comparison W/GP</span> ==== | ||
| + | |||
| + | <span style="color: #004b64; font-size: 20px;">This section enables users to view revenue for 3 selected periods to compare revenues. Based on user option, the table may be sorted by location, department summarization, category summarization or details. | ||
| + | </span> | ||
| + | {| class="wikitable sortable" | ||
| + | |- | ||
| + | ! Terminology !! Definition | ||
| + | |- | ||
| + | | <span id= "Period 1"> Period 1 </span> || The first period of revenue comparison. Cannot surpass Period 2 and Period 3. | ||
| + | |- | ||
| + | | <span id= "Period 2"> Period 2 </span> || The second period of revenue comparison. Cannot surpass Period 3 or less than Period 1. | ||
| + | |- | ||
| + | | <span id= "Period 3"> Period 3 </span> || The Third period of revenue comparison. Cannot be less than Period 1 and Period 2. | ||
| + | |- | ||
| + | | <span id= "Summarize Department"> Summarize Department </span> || This allows users to view reports by department in a summary format. | ||
| + | |- | ||
| + | | <span id= "Summarize Category"> Summarize Category </span> || This allows users to view reports by category in a summary format. | ||
| + | |- | ||
| + | | <span id= "Detail"> Detail </span> || This allows users to display reports in full detail for each selected period. Note that this can be sorted by department. | ||
| + | |- | ||
| + | | <span id= "Show Cost and GP"> Show Cost and GP </span> || Allows the user to include the cost of items and gross profit in the report. | ||
| + | |- | ||
| + | | <span id= "Show more Detail"> Show more Detail </span> || Allows users to customize column with [[#column chooser|''"column chooser."'']] | ||
| + | |} | ||
| + | |||
| + | <br> | ||
| + | <div style="color: #004b64; font-size: 20px; ">'''3 Period Comparison W/GP display'''<br> | ||
| + | <div style="color: #004b64; font-size: 20px; ">''Navigate to the Inventory tab / Report button, hover over “Annual Reports” and choose “3 Period Comparison W/GP”.'' | ||
| + | <ol> | ||
| + | <li>Choose period 1</li> | ||
| + | <li>Choose period 2 </li> | ||
| + | <li>Choose Period 3</li> | ||
| + | <li>Choose either to “Summarize departments”, “summarize category” or “detail” from the radio buttons.</li> | ||
| + | <li>Choose location from the drop down menu (Click the “All location" box to see all locations.)</li> | ||
| + | <li>Click “generate report” button.</li> | ||
| + | </ol> | ||
| + | </div> | ||
| + | <br> | ||
| + | [[File:Report_-_3_Period_Comparison_WGP.png|700px|frameless|center]] | ||
| + | <br> | ||
| + | ????? AND INFO TABLE HERE WHEN MS PATT ADD MORE INFO IN SYSTEM??? | ||
| + | <div style="color: #004b64; font-size: 20px; text-align: center;">Figure 2-66: Report – 3 Period Comparison W/GP</div> | ||
| + | <br> | ||
| + | |||
| + | ==== <span style="color: #004b64; font-size: 30px;" id="Stock Value">Stock Value</span> ==== | ||
| + | |||
| + | <span style="color: #004b64; font-size: 20px;">GoneClear Shop front offers users a function to see the value of the items for the selected date. This is shown according to department or item details. | ||
| + | <br> | ||
| + | <br> | ||
| + | '''Department:''' Displays a stock value list per department. | ||
| + | <br> | ||
| + | <br> | ||
| + | '''Item Details:''' Display the amount of the item in stock and its location, the Belize Cost, the dollar value, the value of the distributor, the supplier and the bin. | ||
| + | <br> | ||
| + | <br> | ||
| + | '''Dollar value:''' This is the value of the entire stock including shipment and handling. | ||
| + | </span> | ||
| + | <br> | ||
| + | <div style="color: #004b64; font-size: 20px; ">'''Method for displaying "Stock Value" by department.'''<br> | ||
| + | <div style="color: #004b64; font-size: 20px; ">''Navigate to the Inventory tab / Report button, hover over “Annual Reports” and choose “Stock Value”.'' | ||
| + | <ol> | ||
| + | <li>Choose the date you want the stock value to display.</li> | ||
| + | <li>Choose location from the drop down menu (Click the “All location" box to see all locations.)</li> | ||
| + | <li>Click Display</li> | ||
| + | |||
| + | </ol> | ||
| + | |||
| + | </div> | ||
| + | <br> | ||
| + | [[File:Report_-_Stock_Value,_Department.png|700px|frameless|center]] | ||
| + | <br> | ||
| + | ????? TABLE WILL NEED TO CHANGE WHEN MS PATT ADD MORE INFO IN SYSTEM??? | ||
| + | <div style="color: #004b64; font-size: 20px; text-align: center;">Figure 2-67: Report – Stock Value, Department</div> | ||
| + | |||
| + | |||
| + | <br> | ||
| + | <div style="color: #004b64; font-size: 20px; ">'''Method for displaying "Stock Value" by Item Detail.'''<br> | ||
| + | <ol> | ||
| + | <li>Choose the date you want the stock value to display.</li> | ||
| + | <li>Choose location from the drop down menu (Click the “All location" box to see all locations.)</li> | ||
| + | <li>Click Display</li> | ||
| + | <li>Click Item Detail</li> | ||
| + | </ol> | ||
| + | </div> | ||
| + | <br> | ||
| + | [[File:Report_-_Stock_Value,_Item_Detail.png|700px|frameless|center]] | ||
| + | <br> | ||
| + | ????? TABLE WILL NEED TO CHANGE WHEN MS PATT ADD MORE INFO IN SYSTEM??? | ||
| + | <div style="color: #004b64; font-size: 20px; text-align: center;">Figure 2-67:Figure 2-67: Report – Stock Value, Item Detail</div> | ||
| + | <br> | ||
| + | ==== <span style="color: #004b64; font-size: 30px;" id="UPC List">UPC List</span> ==== | ||
| + | |||
| + | <span style="color: #004b64; font-size: 20px;">As mentioned earlier, many different UPC codes can be applied to one stock number. Another valuable tool GoneClear Store front offers is the "UPC List" that allows users to view all UPCs for each item. | ||
| + | <br> | ||
| + | <br> | ||
| + | Using the UPC list tool is quite straightforward; simply input stock number, category, description, department or supplier. | ||
| + | </span> | ||
| + | <br> | ||
| + | <div style="color: #004b64; font-size: 20px; ">'''UPC List Process:'''<br> | ||
| + | <div style="color: #004b64; font-size: 20px; ">''Navigate to the Inventory tab / Report button and choose "UPC List" from the drop down.'' | ||
| + | <ol> | ||
| + | <li>Enter either stock number, category, description, department or supplier. (We searched by department in this example.)</li> | ||
| + | <li>Hit f2 on your keyboard or click "search." (Check "show photo" and "show discontinued" if you want these included.)</li> | ||
| + | </ol> | ||
| + | <div style="color: #004b64; font-size: 20px; ">''This will display a list of items with all their UPCs''. | ||
| + | </div> | ||
| + | <br> | ||
| + | [[File:UPC_LIST.png|700px|frameless|center]] | ||
| + | <div style="color: #004b64; font-size: 20px; text-align: center;">Figure 2-68: Report – UPC LIST</div> | ||
| + | <br> | ||
| + | |||
| + | ==== <span style="color: #004b64; font-size: 30px;" id="Weekly Trends">Weekly Trends</span> ==== | ||
| + | |||
| + | <span style="color: #004b64; font-size: 20px;">Another useful GoneClear Storefont method is our weekly trends report. Weekly trends report is just that, it provides a weekly trend report. This may be searched by category or department. | ||
| + | </span> | ||
| + | <br> | ||
| + | <div style="color: #004b64; font-size: 20px; ">'''Process to display weekly trends'''<br> | ||
| + | <div style="color: #004b64; font-size: 20px; ">''Navigate to the Inventory tab / Report button and choose "Weekly Trends" from the drop down.'' | ||
| + | <ol> | ||
| + | <li>Choose an ending week date</li> | ||
| + | <li>Select a department or category</li> | ||
| + | <li>Click Apply</li> | ||
| + | </ol> | ||
| + | </div> | ||
| + | <br> | ||
| + | |||
| + | {|style="width:100%; background-color: #f8f9fa; border:1px double #eeeeee; text-align:left;" | ||
| + | |[[File:Clipart note.png|30px|frameless|left center]] NOTE: Pink color code is item fast moving, and green is new items. Pay attention to the table's colors. | ||
| + | |} | ||
| + | <br> | ||
| + | [[File:Report_-_weekly_trends.png|700px|frameless|center]] | ||
| + | <br> | ||
| + | ????? AND INFO TABLE HERE WHEN MS PATT ADD MORE INFO IN SYSTEM??? | ||
| + | <div style="color: #004b64; font-size: 20px; text-align: center;">Figure 2-69: Report – Weekly Trends</div> | ||
| + | <br> | ||
| + | ==== <span style="color: #004b64; font-size: 30px;" id="Location Sales">Location Sales</span> ==== | ||
| + | |||
| + | <span style="color: #004b64; font-size: 20px;">Location Sales is a powerful method to track revenue by relevant location as it allows users select a particular location to display location sales. In this quest, users are able to filter by department to monitor the income of each department at that location. | ||
| + | </span> | ||
| + | |||
| + | <br> | ||
| + | <div style="color: #004b64; font-size: 20px; ">'''Process to view Sales for location'''<br> | ||
| + | <div style="color: #004b64; font-size: 20px; ">''Navigate to the Inventory tab / Report button and choose "Location Sales" from the drop down.'' | ||
| + | <ol> | ||
| + | <li>Choose a date to see the revenue figures of the location.</li> | ||
| + | <li>To see Salesman, check the box "Person Group Sales".</li> | ||
| + | <li>Select Apply</li> | ||
| + | </ol> | ||
| + | </div> | ||
| + | <br> | ||
| + | |||
| + | {|style="width:100%; background-color: #f8f9fa; border:1px double #eeeeee; text-align:left;" | ||
| + | |[[File:Clipart note.png|30px|frameless|left center]] NOTE: Select “Export to Excel” for excel file or Select “Print” to print report. | ||
| + | |} | ||
| + | <br> | ||
| + | [[File:Report_-_Location_Sales.png|700px|frameless|center]] | ||
| + | <br> | ||
| + | ????? AND INFO TABLE HERE WHEN MS PATT ADD MORE INFO IN SYSTEM??? | ||
| + | <div style="color: #004b64; font-size: 20px; text-align: center;">Figure 2-70: Report – Location Sales</div> | ||
| + | <br> | ||
| + | ==== <span style="color: #004b64; font-size: 30px;" id="In Bond Stock">In Bond Stock</span> ==== | ||
| + | |||
| + | |||
| + | |||
| + | === <span style="color: #004b64; font-size: 30px;" id="Brokerage Utilities">Brokerage Utilities</span> === | ||
| + | |||
| + | <span style="color: #004b64; font-size: 20px;">For any company that imports freight, a customs broker is strongly recommended, as there are regulations and clearance specifications that can become rather tedious. A custom broker would save the owner a lot of work and time. However, during the process, you may want to view this custom entry. For this reason, our team provides you with a means of displaying custom entry at your desk utilizing our GoneClear StoreFront POS System. This function not only allows you to view but also to make adjustments to prevent a lengthy wait for the customs broker to finalize the procedure since changes to the price of the product are allowed before the broker completes the process. When the broker completes his entry, he will provide you with the final price list, the [[#Cost Sheet|''Cost Sheet'']]. More regarding the [[#cost sheet|''cost sheet'']] is mentioned later in this guide.</span> | ||
| + | |||
| + | {|style="width:100%; background-color: #f8f9fa; border:1px double #eeeeee; text-align:left;" | ||
| + | |[[File:Clipart note.png|30px|frameless|left center]] NOTE: This option is only accessible to customers who purchased our brokerage program. | ||
| + | |} | ||
| + | <br> | ||
| + | {| class="wikitable" | ||
| + | |- | ||
| + | ! scope="col" style="width: 20%;" | <span id="Terminologies Table"> Terminologies </span> | ||
| + | ! scope="col" style="width: 80%;" | <span id="Terminologies Table"> Definitions </span> | ||
| + | |- | ||
| + | | <span id="Custom Broker"> Custom Broker </span> ||Customs brokers are private individuals, partnerships, organizations or businesses that are authorised, regulated and empowered by the Country. Customs and border protection (CBP) assists importers and exporters in complying with Government import and export requirements. | ||
| + | |- | ||
| + | | <span id="Custom Entry">Custom Entry</span> || A Customs entry is an official statement of specific information regarding your imported merchandise. If you're working with a Customs broker as the importer, they'll typically fill this out for you. The Customs entry form lists information like: Country of origin. Description of the goods. | ||
| + | |- | ||
| + | | <span id="Electronic Invoice">Electronic Invoice</span> || Electronic invoicing (e-Invoicing) is the transfer of the invoice paper between the supplier and the buyer in an integrated electronic format. | ||
| + | |- | ||
| + | | <span id="Cost Sheet">Cost Sheet</span> || A cost sheet is a statement displaying the different components of total cost for a product, showing previous information for comparison. This will be provided to you by your broker when the procedure is complete. | ||
| + | |- | ||
| + | | <span id="Retail Pricing Sheet"> Retail Pricing Sheet</span> || This is a worksheet listing retail prices. Users with rights can adjust retail price while broker is preparing custom entry. | ||
| + | |- | ||
| + | | <span id="Incoming Shipment">Incoming Shipment</span> || Goods ordered from supplier. | ||
| + | |} | ||
| + | <br> | ||
| + | <span style="color: #004b64; font-size: 20px;">Here is an overview of how this process operates.</span> | ||
| + | <br> | ||
| + | [[File:Process of brokerage to POS.png|700px|frameless|center]] | ||
| + | <div style="color: #004b64; font-size: 20px; text-align: center;">Figure : Process of Brokerage entry to POS</div> | ||
| + | <br> | ||
| + | ==== <span style="color: #004b64; font-size: 30px;" id="Preview Custom Entry/Create Pricing WorkSheet">Preview Custom Entry/Create Pricing WorkSheet</span> ==== | ||
| + | <span style="color: #004b64; font-size: 20px;">As described above, users may display Electronic Invoice immediately after broker imports into brokerage software utilizing the "Preview Custom Entry" feature.</span> | ||
| + | <br> | ||
| + | <div style="color: #004b64; font-size: 20px; ">'''Process to Preview custom Entry and Create Pricing Worksheet'''<br> | ||
| + | <div style="color: #004b64; font-size: 20px; ">''Navigate to the Inventory tab / Brokerage Utilities button and choose "Preview Custom Entry in Process/Create Pricing Sheet" from the drop down.'' | ||
| + | <ol> | ||
| + | <li>Enter the entry number (This number is generated in the Goneclear Brokerage Program)</li> | ||
| + | <li>Click "display"</li> | ||
| + | <li>From drop down, select "Create New Retail Worksheet"</li> | ||
| + | <li>Click OK on the "Current Retail will be saved with this worksheet" pop-up message</li> | ||
| + | </ol> | ||
| + | </div> | ||
| + | <br> | ||
| + | <br> | ||
| + | [[File:Preview_brokerage_utilities.png|700px|frameless|center]] | ||
| + | <br> | ||
| + | <div style="color: #004b64; font-size: 20px; text-align: center;">Figure ???: Brokerage Utilities-Preview Custom Entry in Process/Create Pricing Sheet</div> | ||
| + | <br> | ||
| + | ==== <span style="color: #004b64; font-size: 30px;" id="Open Existing Pricing Worksheet">Open Existing Pricing Worksheet</span> ==== | ||
| + | <span style="color: #004b64; font-size: 20px;">After creating a new retail sheet, the Preview Entry window closes. In this section, we will go through the process of updating this new retail sheet and making appropriate adjustments. The table below gives a clearer understanding of the Pricing Worksheet columns and their functions. </span> | ||
| + | |||
| + | <div style="color: #004b64; font-size: 20px; ">'''Understanding "Existing Pricing Worksheet" and how it works.''' | ||
| + | {| class="wikitable" | ||
| + | |- | ||
| + | ! scope="col" style="width: 20%;" | <span id="Terminologies Table"> Column Name </span> | ||
| + | ! scope="col" style="width: 80%;" | <span id="Terminologies Table"> Functions </span> | ||
| + | |- | ||
| + | | <span id="Current US$"> Current US$ </span> || This is the current cost for the item from its previous shipment. | ||
| + | |- | ||
| + | | <span id="US$ Unit Cost"> US$ Unit Cost </span> || This is the unit price of the item in the current shipment. The amount shown is in US currency. | ||
| + | |- | ||
| + | | <span id="Invoice Total"> Invoice Total </span> || This is the total cost of the item in the current shipment. The amount shown is in US currency. | ||
| + | |- | ||
| + | | <span id="Shipment Cost BZ$"> Shipment Cost BZ$ </span> ||This is the total shipping cost in Belize currency that includes all duty charges. (No GST added). | ||
| + | |- | ||
| + | | <span id="BZ Cost"> BZ Cost </span> ||This is the unit price of the item in the current shipment that includes all duty charges. The amount shown is in Belize currency. (NO GST added) | ||
| + | |- | ||
| + | | <span id="Current BZ Cost"> Current BZ Cost </span> || This is the current cost for the item from its previous shipment in belize currency. This total includes all duty charges. | ||
| + | |- | ||
| + | | <span id="Mark Up"> Mark Up </span> || The current markup percentage on the last shipment. | ||
| + | |- | ||
| + | | <span id="Current Retail"> Current Retail </span> || The current selling price before GST. | ||
| + | |- | ||
| + | | <span id="W/GST"> W/GST </span> || The current selling price with GST. | ||
| + | |- | ||
| + | | <span id="New Mark Up"> New Mark Up </span> || This is the new markup. The new markup percentage calculates immediately after entering the "NewGST" column. | ||
| + | |- | ||
| + | | <span id="Off Margin"> Off Margin </span> || This is the target margin. The (<<) sign indicates that the MarkUP is under margin. (Margin is 50%) | ||
| + | |- | ||
| + | | <span id="New Retail"> New Retail </span> || This is the new updated retail price. The column is set to the current retail price by default that changes immediately after entering the "NewGST" column. | ||
| + | |- | ||
| + | | <span id="New GST"> New GST </span> || Users are allowed to adjust the current price of the item in this column. Enter your new price with GST and the new retail, and the markup will calculate instantaneously. | ||
| + | |- | ||
| + | | <span id="Notes"> Notes </span> ||This column allows users to enter notes for an item. | ||
| + | |- | ||
| + | | <span id="ID Rate"> ID Rate </span> || Import Duty is one of the main duties applied to imported products. This column displays percentage of import duty. | ||
| + | |- | ||
| + | | <span id="Duty"> Duty </span> || This column displays import duty in currency. | ||
| + | |- | ||
| + | | <span id="RRD Rate"> RRD Rate </span> || Revenue Replacement Duty (RRD) is one of the main duties applied to imported products. This is installed as a cost recovery mechanism for the Government. | ||
| + | This column displays the percentage of RRD. | ||
| + | |- | ||
| + | | <span id="Duty Rev"> Duty Rev </span> || This column displays RRD in currency. | ||
| + | |- | ||
| + | | <span id="Ex Rate"> Ex Rate </span> || Excise (Ex) taxes are taxes required on specific goods like fuel, tobacco, and alcohol. It is designed to discourage the purchase of products that are deemed to be detrimental to consumers' health or the environment. This column displays the percentage of Excise Tax. | ||
| + | |- | ||
| + | | <span id="Excise"> Excise </span> || This column displays Excise Tax in currency. | ||
| + | |- | ||
| + | | <span id="ET Rate"> ET Rate </span> || Environmental tax (ET) measures aim to place a tax cost on products or any activity that may be detrimental to the environment. This column displays the percentage of ET. | ||
| + | |- | ||
| + | | <span id="ET"> ET </span> || This column displays Environmental tax (ET) in currency. | ||
| + | |- | ||
| + | | <span id="GST Rate"> GST Rate </span> || This column displays the percentage of [[#GST|''GST'']]. | ||
| + | |- | ||
| + | | <span id="GST"> GST </span> || This column displays [[#GST|''GST'']] in currency. | ||
| + | |- | ||
| + | | <span id="Supplier"> Supplier </span> || This column displays the item supplier. | ||
| + | |- | ||
| + | | <span id="Company"> Company </span> || This column displays the item company. | ||
| + | |- | ||
| + | | <span id="Value CIF"> Value CIF </span> || The Cost, Insurance, and Freight (CIF) value is the actual cost of the goods when they are shipped. As duties are calculated based on the CIF value, it is vital that it is calculated correctly. This column displays the Value CIF. | ||
| + | |} | ||
| + | |||
| + | <div style="color: #004b64; font-size: 20px; ">'''Method for opening the Pricing Worksheet and adjusting prices.'''<br> | ||
| + | <div style="color: #004b64; font-size: 20px; ">''To access this worksheet or any other current worksheet, go to the Inventory tab/Brokerage Utilities button and select "Open existing pricing worksheet" from the drop down.'' | ||
| + | <ol> | ||
| + | <li>Hover over "Select Retail Worksheet"</li> | ||
| + | <li>Select the worksheet corresponding to the entry number on the drop-down panel.</li> | ||
| + | <li>Select display (The worksheet will display)</li> | ||
| + | <li>Update the price as necessary.</li> | ||
| + | <li>Click Save WorksheetPrices</li> | ||
| + | </ol> | ||
| + | </div> | ||
| + | |||
| + | <br> | ||
| + | [[File:Brokerage_utilities_-_open_exciting_worksheet.png|700px|frameless|center]] | ||
| + | <br> | ||
| + | <div style="color: #004b64; font-size: 20px; text-align: center;">Figure ???: Open Existing Pricing Worksheet</div> | ||
| + | <br> | ||
| + | |||
| + | === <span style="color: #004b64; font-size: 30px;" id="Customs/Electronic File Transfers">Customs/Electronic File Transfers</span>=== | ||
| + | |||
| + | <span style="color: #004b64; font-size: 20px;">In the previous chapter, we discussed custom entries and the function to view and make adjustments to them while in the brokerage process. Now we'll look at how to transfer the broker's final pricing list, called a cost sheet, to the GoneClear StoreFront POS system utilizing the "Custom/Electronic File Transfers" feature. "Custom/Electronic File Transfers" is a valuable function eliminating the long, tedious process of manually transferring cost sheets. This functionality transfers TXT and Excel data.</span> | ||
| + | |||
| + | |||
| + | [[File:Customs_and_Electronic_File_Transfer_(.png|700px|frameless|center]] | ||
| + | <div style="color: #004b64; font-size: 20px; text-align: center;">Figure ???: Customs/Electronic File Transfers</div> | ||
| + | <br> | ||
| + | ====<span style="color: #004b64; font-size: 30px;" id="Import Cost Sheets">Import Cost Sheets</span>==== | ||
| + | <div style="color: #004b64; font-size: 20px; ">'''Import new TXT files Cost Sheet to GoneClear Storefront POS system'''<br> | ||
| + | <div style="color: #004b64; font-size: 20px; ">''Navigate to the Inventory tab and click Customs/Electronic File Transfers.'' | ||
| + | <ol> | ||
| + | <li>Hover over the '''Locate Entries''' panel</li> | ||
| + | <li>Select the button '''New Entry''' ''(Import File window will open)''</li> | ||
| + | <li>Choose '''GoneClear Customs Entry''' from the '''''option''''' drop-down menu.</li> | ||
| + | <li>Click the three dots icon under the '''''file location'''''. ''(File explorer window will open immediately after clicking the three dots button)''</li> | ||
| + | <li>Locate '''TXT file''' in the '''''file explorer'''''</li> | ||
| + | <li>Select '''TXT-file'''.</li> | ||
| + | <li>Click '''Open''' on the bottom right corner.</li> | ||
| + | <li>On the '''''Import File Window''''', select '''Import'''. ''(Entry header window will open)''</li> | ||
| + | <li>Complete the necessary details in the '''''entry header''''' and click '''OK'''. </li> | ||
| + | <li>On the '''''Import successful''''' pop-up message window, click the '''OK''' button.</li> | ||
| + | <li>Hover over the '''''Locate Entries''''' panel and '''double click on the entry''' from the list.</li> | ||
| + | </ol> | ||
| + | </div> | ||
| + | <br> | ||
| + | [[File:Customs and Electronic File Transfer -Steps to import TXT file.png |700px|frameless|center]] | ||
| + | <div style="color: #004b64; font-size: 20px; text-align: center;">Figure ???: Import new TXT files Cost Sheet to GoneClear Storefront POS system</div> | ||
| + | <br> | ||
| + | |||
| + | <div style="color: #004b64; font-size: 20px; ">'''Import new EXCEL files Cost Sheet to GoneClear Storefront POS system'''<br> | ||
| + | <div style="color: #004b64; font-size: 20px; ">''Navigate to the Inventory tab and click Customs/Electronic File Transfers.'' | ||
| + | <ol> | ||
| + | <li>Hover over the '''Locate Entries''' panel</li> | ||
| + | <li>Select the button '''New Entry''' ''(Import File window will open)''</li> | ||
| + | <li>Choose '''Excel Cost Sheet Version 1''' or '''Excel Cost Sheet Version 2''' from the '''''option''''' drop-down menu.</li> | ||
| + | <li>Click the three dots icon under the '''''file location'''''. ''(File explorer window will open immediately after clicking the three dots button)''</li> | ||
| + | <li>Locate '''Excel File''' in the '''''file explorer'''''</li> | ||
| + | <li>Select '''Excel File'''.</li> | ||
| + | <li>Click '''Open''' on the bottom right corner.</li> | ||
| + | TO BE CONTINUED>>> | ||
| + | </ol> | ||
| + | </div> | ||
| + | |||
| + | ====<span style="color: #004b64; font-size: 30px;" id="Import Customs Entry window">Import Customs Entry window</span>==== | ||
| + | |||
| + | <span style="color: #004b64; font-size: 20px;">Following the "import cost sheet" procedures, the list of products would appear in the "Import Customs Entry" window. This window allows users to make changes to stock numbers, make changes to category and department, display inventory, repack the item and fragment this list before sending to incoming shipment.</span> | ||
| + | |||
| + | {|style="width:100%; background-color: #f8f9fa; border:1px double #eeeeee; text-align:left;" | ||
| + | |[[File:Clipart note.png|30px|frameless|left center]] NOTE:All stock numbers unrecognized by the system would have "invalid" next to them. The reason for this is because it's probably a few numbers incorrect with the stock number entered, or it's a new item. To fix this, users must correct or update the stock number. | ||
| + | |} | ||
| + | |||
| + | {| class="wikitable" | ||
| + | |- | ||
| + | ! scope="col" style="width: 20%;" | <span> Button/Field </span> | ||
| + | ! scope="col" style="width: 80%;" | <span> Function </span> | ||
| + | |- | ||
| + | | <span id="Use Our Stock #"> Use Our Stock # </span> || This field allows users to use existing stock number from inventory. This feature can be very useful especially for stock numbers that were entered wrong on the cost sheet by the broker. | ||
| + | |- | ||
| + | | <span id="PO Number for cost sheet"> PO Number </span> || | ||
| + | |- | ||
| + | | <span id="Save"> Save </span> || Save button saves any changes made to the item. | ||
| + | |- | ||
| + | | <span id="Inventory"> Inventory </span> || Opens selected item inventory details. | ||
| + | |- | ||
| + | | <span id="Fragment"> Fragment </span> || Fragment allows users to separate quantity and value. For example, you might buy a set of pans from your supplier, but your company sells them separately. The fragment function lets you separate and add value to the item. The incoming shipment will also allow you to do this in greater depth. We'll discuss this later in the guide. | ||
| + | |- | ||
| + | | <span id="Repack"> Repack </span> || This feature allows the user to adjust the quantity and stock value. For example, the supplier can sell a product per case, but the company sells it each. Use this useful tool to display items for each and its price. Enter the number of quantities in one package then the system calculates the cost automatically. | ||
| + | |- | ||
| + | | <span id="Update Inventory"> Update Inventory </span> || This functionality automatically adds the new stock number. Before clicking "Update Inventory," users need to update department and category. | ||
| + | |- | ||
| + | | <span id="Send to Incoming"> Send to Incoming </span> || After the cost sheet update is complete, the next process is to send your entry to incoming shipments. This feature sends data to the incoming shipment automatically. | ||
| + | |- | ||
| + | | <span id="Exit"> Exit </span> || To close the “Import Customs Entry” window. | ||
| + | |} | ||
| + | <div style="color: #004b64; font-size: 20px; ">'''Process to add existing stock number to an item'''<br> | ||
| + | <ol> | ||
| + | <li>Select the item</li> | ||
| + | <li>Enter the stock number in the "Use our Stock #" field</li> | ||
| + | <li>Select save</li> | ||
| + | </ol> | ||
| + | </div> | ||
| + | |||
| + | [[File:User_existing_stock_number.png|700px|frameless|center]] | ||
| + | <div style="color: #004b64; font-size: 20px; text-align: center;">Figure ???: Add existing stock number to an item.</div> | ||
| + | <br> | ||
| + | <div style="color: #004b64; font-size: 20px; ">'''Process to update stock number for new item'''<br> | ||
| + | <ol> | ||
| + | <li>Select the item</li> | ||
| + | <li>Change department and category</li> | ||
| + | <li>Select Update Inventory</li> | ||
| + | </ol> | ||
| + | </div> | ||
| + | |||
| + | [[File:Update_stock_number_in_cost_sheet.png|700px|frameless|center]] | ||
| + | <div style="color: #004b64; font-size: 20px; text-align: center;">Figure ???: Update stock number in cost sheet</div> | ||
| + | |||
| + | <br> | ||
| + | <div style="color: #004b64; font-size: 20px; ">'''Process to Repack item in cost sheet'''<br> | ||
| + | <ol> | ||
| + | <li>Select the item</li> | ||
| + | <li>Select "Repack" (A repack window will open)</li> | ||
| + | <li>Enter the quantity of one case in the repack window (This will automatically calculate the cost for each)</li> | ||
| + | <li>Select ok</li> | ||
| + | </ol> | ||
| + | </div> | ||
| + | |||
| + | [[File:Repack_cost_sheet.png|700px|frameless|center]] | ||
| + | <div style="color: #004b64; font-size: 20px; text-align: center;">Figure ???: Repack in cost sheet</div> | ||
| + | |||
| + | <br> | ||
| + | <div style="color: #004b64; font-size: 20px; ">'''Process to Fragment item in cost sheet'''<br> | ||
| + | <ol> | ||
| + | <li>Select the item</li> | ||
| + | <li>Select "Fragment" (A fragment window will open)</li> | ||
| + | <li>Enter the quantity to split</li> | ||
| + | <li>Enter the FOB Value (Freight On Board)</li> | ||
| + | <li>Select ok (This will automatically break it up and make another line) </li> | ||
| + | </ol> | ||
| + | </div> | ||
| + | |||
| + | [[File:Fragment_cost_sheet.png|700px|frameless|center]] | ||
| + | <div style="color: #004b64; font-size: 20px; text-align: center;">Figure ???: Fragment in cost sheet</div> | ||
| + | <br> | ||
| + | |||
| + | {|style="width:100%; background-color: #f8f9fa; border:1px double #eeeeee; text-align:left;" | ||
| + | |[[File:Clipart note.png|30px|frameless|left center]] NOTE: After correcting all invalid numbers and making necessary adjustments, click on "Send to Incoming" to start the next step. | ||
| + | |} | ||
| + | |||
| + | === <span style="color: #004b64; font-size: 30px;" id="Incoming Shipment">Incoming Shipment</span>=== | ||
| + | |||
| + | <span style="color: #004b64; font-size: 20px;">When a shipment arrives, users can track and receive the orders in GoneClear StoreFront POS with the “Incoming Shipment” function. Our GoneClear team worked tirelessly to develop four different methods of importing orders that would reduce the time wasted rewriting orders made to the supplier.</span> | ||
| + | |||
| + | {| class="wikitable" | ||
| + | |- | ||
| + | ! scope="col" style="width: 20%;" | <span> Term </span> | ||
| + | ! scope="col" style="width: 80%;" | <span> Definition/Function</span> | ||
| + | |- | ||
| + | | <span id="Purchase Order"> Purchase Order (PO) </span> || Purchase Orders (POs) are documents provided by you, as a buyer, to a supplier requesting goods or services as an order. | ||
| + | |- | ||
| + | | <span id="Backorder "> Backorder </span> || A request for goods that are not available now but will be available in the | ||
| + | |- | ||
| + | | <span id="Orphan List "> Orphan List </span> || An “orphan list” is a list of items that were not on the order sheet but was sent by the supplier. | ||
| + | |- | ||
| + | | <span id="Repack"> Repack </span> || This feature allows the user to adjust the quantity and stock value. For example, the supplier can sell a product per case, but the company sells it each. Use this useful tool to display items for each and its price. Enter the number of quantities in one package then the system calculates the cost automatically. | ||
| + | |- | ||
| + | | <span id="Reconciliation">Reconciliation</span> || Reconciliation is an accounting procedure that combines two information sets to ensure that the documents are accurate and consistent. Reconciliation of accounts often guarantees consistency, precision and completeness of reports in the general ledger. | ||
| + | |- | ||
| + | | <span id="Variance Report">Variance Report</span> || Variance reports are meant to compare the amount of the initial invoice and the cost with the actual quantity received. | ||
| + | |- | ||
| + | | <span id="Multi-line Variance Report">Multi-line Variance Report</span> || If multiple invoices are in a shipment with the same item on multiple invoice lines, the multi-line variance report compares the total shipped for the item with the total received. The user is likely to enter the total amount received on the first occurrence of the invoice line item, but it must be reconciled with the total amount invoiced. | ||
| + | |} | ||
| + | |||
| + | |||
| + | <span style="color: #004b64; font-size: 20px; ">'''In This Chapter'''</span> | ||
| + | *<span style="color: #004b64; font-size: 20px;">[[#Incoming Shipment Window|''Incoming Shipment Window'']]</span> | ||
| + | *<span style="color: #004b64; font-size: 20px; ">[[#Four methods for generating the incoming shipment|''Four methods for generating the incoming shipment'']]</span> | ||
| + | *<span style="color: #004b64; font-size: 20px; ">[[#Add Serial Numbers|''Add Serial Numbers'']]</span> | ||
| + | *<span style="color: #004b64; font-size: 20px; ">[[#Add Expiration Dates|''Add Expiration Dates'']]</span> | ||
| + | |||
| + | ==== <span style="color: #004b64; font-size: 30px;" id="Incoming Shipment Window">Incoming Shipment Window</span> ==== | ||
| + | |||
| + | <span style="color: #004b64; font-size: 20px;">To open Incoming shipment window, click the Incoming Shipment ribbon shown in Figure below. The Incoming Shipment Window contains 2 panels and 6 sub-tabs. It also displays the batch number, order number, reference number, quantity in the entire order (item count), line count, shipping cost, and freight on board (FOB). </span> | ||
| + | |||
| + | <div style="color: #004b64; font-size: 20px; ">'''Two Panels:'''<br> | ||
| + | <ol> | ||
| + | <li>[[#Create/Shipment Panel|''Create/Shipment'']]</li> | ||
| + | <li>[[#Select Item panel|''Select Item'']]</li> | ||
| + | </ol> | ||
| + | |||
| + | <div style="color: #004b64; font-size: 20px; ">'''Six Sub Tabs:'''<br> | ||
| + | <ol> | ||
| + | <li>[[#Item Editor Tab|''Item Editor Tab'']]</li> | ||
| + | <li>[[#Customs Detail Tab|''Customs Detail Tab'']]</li> | ||
| + | <li>[[#Serial Number Tab|''Serial Number Tab'']]</li> | ||
| + | <li>[[#Expiration Dates Tab|''Expiration Dates Tab'']]</li> | ||
| + | <li>[[#Item PO Records|''Item PO Records'']]</li> | ||
| + | <li>[[#Sales/Receiving History Tab|''Sales/Receiving History Tab'']]</li> | ||
| + | </ol> | ||
| + | [[File:Incoming_shipment_window.png|700px|frameless|center]] | ||
| + | <div style="color: #004b64; font-size: 20px; text-align: center;">Figure??: Incoming Shipment Window .</div> | ||
| + | <br> | ||
| + | |||
| + | ==== <span style="color: #004b64; font-size: 30px;" id="Create Shipment">Create Shipment (Create/Shipment Panel)</span> ==== | ||
| + | |||
| + | <span style="color: #004b64; font-size: 20px;">There are four methods of creating an incoming shipment: Import from Purchased Orders, Import from Custom Entry, Import from Subsidiary Business Server, and Import without a PO. In this segment, we will discuss the layout of the “create/shipment” panel and how to create a shipment using any of the four methods.</span> | ||
| + | |||
| + | ===== <span style="color: #004b64; font-size: 25px;" id="Create/Shipment Panel"> Create/Shipment Panel </span> ===== | ||
| + | |||
| + | <span style="color: #004b64; font-size: 20px;">The '''create/select shipment''' panel enables users to create a shipment using any of the four shipping methods. To open, hover over it. This panel consist of 5 tabs: Shipments Pending, Pending Orders, New Shipment from Electronic File types, and New Shipment Not from PO.</span> | ||
| + | |||
| + | [[File:Create_and_select_shipment_panel.png|700px|frameless|center]] | ||
| + | <div style="color: #004b64; font-size: 20px; text-align: center;">Figure??: Create/Select shipment panel .</div> | ||
| + | <br> | ||
| + | |||
| + | ===== <span style="color: #004b64; font-size: 25px;" id="Create/Shipment Panel"> Create Incoming Shipment Methods </span> ===== | ||
| + | |||
| + | <div style="color: #004b64; font-size: 20px; ">'''As mentioned earlier, there are four ways to create a shipment:'''<br> | ||
| + | <ul> | ||
| + | <li>[[#Import from Purchase Order|''Import from Purchase Order'']]</li> | ||
| + | <li>[[#Import from Custom Entry|''Import from Custom Entry'']] </li> | ||
| + | <li>[[#Import from Subsidiary Business Server|''Import from Subsidiary Business Server'']]</li> | ||
| + | <li>[[#Import without a PO or order sheet|''Import without a PO or order sheet'']]</li> | ||
| + | </ul> | ||
| + | </div> | ||
| + | |||
| + | ====== <span style="color: #004b64; font-size: 25px;" id="Import from Purchase Order">Import from Purchase Order</span> ====== | ||
| + | <span style="color: #004b64; font-size: 20px;">After forming a Purchase Order and closing it, the P.O. will be listed under the Pending Orders tab.</span> | ||
| + | |||
| + | <div style="color: #004b64; font-size: 20px; ">'''Create Incoming Shipment from POs.'''<br> | ||
| + | <div style="color: #004b64; font-size: 20px; ">''Navigate to the Inventory tab/click the incoming shipment button/hover over the “create/select shipment” panel and Click the Pending Order tab.'' | ||
| + | <ol> | ||
| + | <li>Double click on the Purchase order.</li> | ||
| + | <li>Enter Reference Number.</li> | ||
| + | <li>Select the transaction date.</li> | ||
| + | <li>Select Create New Shipment.</li> | ||
| + | </ol> | ||
| + | </div> | ||
| + | [[File:Create_shipment_using_PO.png|700px|frameless|center]] | ||
| + | <div style="color: #004b64; font-size: 20px; text-align: center;">Figure ???: Create incoming shipment using PO</div> | ||
| + | <br> | ||
| + | |||
| + | ====== <span style="color: #004b64; font-size: 25px;" id="Import from Custom Entry">Customs Entry Shipment</span> ====== | ||
| + | |||
| + | <span style="color: #004b64; font-size: 20px;">After generating a cost sheet or an excel sheet, the document is then listed under the New Shipment from Electronic File types tab.</span> | ||
| + | |||
| + | <div style="color: #004b64; font-size: 20px; ">'''Create incoming shipment from Custom Entry'''<br> | ||
| + | <div style="color: #004b64; font-size: 20px; ">''Navigate to the Inventory tab/click the incoming shipment button/hover over the “create/select shipment” panel and Click the New Shipment from Electronic files type.'' | ||
| + | <ol> | ||
| + | <li>Double click on the Cost Sheet</li> | ||
| + | <li>Enter Reference Number.</li> | ||
| + | <li>Select the transaction date.</li> | ||
| + | <li>Select Create New Shipment.</li> | ||
| + | </ol> | ||
| + | </div> | ||
| + | [[File:Create_shipment_with_new_shipment_from_electronic_file_type.png|700px|frameless|center]] | ||
| + | <div style="color: #004b64; font-size: 20px; text-align: center;">Figure ???: Create New Shipment from electronic file types </div> | ||
| + | |||
| + | ====== <span style="color: #004b64; font-size: 25px;" id="Import from Subsidiary Business Server">Import from Subsidiary Business Server</span> ====== | ||
| + | |||
| + | <span style="color: #004b64; font-size: 20px;">This approach is used for subsidiary business with different servers.</span> | ||
| + | |||
| + | <div style="color: #004b64; font-size: 20px; ">'''Create incoming shipment from different server'''<br> | ||
| + | <div style="color: #004b64; font-size: 20px; ">''Navigate to the Inventory tab/click incoming shipment button/hover over “create/select shipment” panel and Click DC Invoice.'' | ||
| + | <ol> | ||
| + | <li>Enter invoice number.</li> | ||
| + | <li>Choose the server.</li> | ||
| + | <li>Select “Get Invoice”</li> | ||
| + | <li>Type the reference number.</li> | ||
| + | <li>Enter the date of goods received.</li> | ||
| + | <li>Choose the right supplier from a drop down menu.</li> | ||
| + | <li>Select "Create Shipment"</li> | ||
| + | </ol> | ||
| + | </div> | ||
| + | [[File:Create_shipment_from_business_server.png|700px|frameless|center]] | ||
| + | <div style="color: #004b64; font-size: 20px; text-align: center;">Figure ???: Create incoming shipment from Subsidiary Business Server</div> | ||
| + | <br> | ||
| + | |||
| + | ====== <span style="color: #004b64; font-size: 25px;" id="Import without a PO or order sheet">Import without PO</span> ====== | ||
| + | |||
| + | <span style="color: #004b64; font-size: 20px;">This approach may be used to do a quick incoming shipment without PO’s.</span> | ||
| + | |||
| + | <div style="color: #004b64; font-size: 20px; ">'''Create incoming shipment without PO'''<br> | ||
| + | <div style="color: #004b64; font-size: 20px; ">''Navigate to the Inventory tab/click incoming shipment button/hover over “create/select shipment” panel and Click New Shipment Not from PO.'' | ||
| + | <ol> | ||
| + | <li>Enter the quantity of the items</li> | ||
| + | <li>Tap on the drop-down menu to search for a specific item. (The search box will be lowered).</li> | ||
| + | <li>Select Go Search on the search engine.</li> | ||
| + | <li>Enter reference number</li> | ||
| + | <li>Enter the transaction date.</li> | ||
| + | <li>From the drop-down menu, choose the supplier.</li> | ||
| + | <li>Click the Add button.</li> | ||
| + | <li>Select the "Create New Shipment" button.</li> | ||
| + | </ol> | ||
| + | </div> | ||
| + | [[File:Create_shipment_without_PO.png|700px|frameless|center]] | ||
| + | <div style="color: #004b64; font-size: 20px; text-align: center;">Figure ???: Create incoming shipment without PO</div> | ||
| + | <br> | ||
| + | |||
| + | ==== <span style="color: #004b64; font-size: 30px;" id="Open and Receive Shipment">Open and Receive Shipment</span>==== | ||
| + | |||
| + | <span style="color: #004b64; font-size: 20px;">Once a shipment has been created, it remains in pending status, enabling the user to make necessary adjustments to each item on the shipment. When all changes are accurate and complete, the user must receive stock to update the Goneclear StoreFront POS. In this segment, we will cover the steps to open a shipment, and all the precautions a user may take before receiving the shipment.</span> | ||
| + | |||
| + | <div style="color: #004b64; font-size: 20px; ">'''Open Shipment'''<br> | ||
| + | <div style="color: #004b64; font-size: 20px; ">''After processing the shipment through either of the methods listed in the last tutorial, it will be sent to the "shipment payment" tab.'' | ||
| + | |||
| + | <ol> | ||
| + | <li>Hover over “create/select shipment” panel</li> | ||
| + | <li>Click the shipment pending tab</li> | ||
| + | <li>Double click on shipment. (This will automatically close panel and display item editor)</li> | ||
| + | </ol> | ||
| + | </div> | ||
| + | ===== <span style="color: #004b64; font-size: 25px;" id="Item Editor Tab"> Item Editor Tab </span> ===== | ||
| + | |||
| + | <span style="color: #004b64; font-size: 20px;">The item editor window will display by default when the incoming shipment is open. The purpose of the item editor is to display each item and make appropriate adjustments such as quantity, supplier and pricing before receiving it in stock. (Items are viewed individually)</span> | ||
| + | |||
| + | <span style="color: #004b64; font-size: 20px;">Item editor tab is consisting of several forms. Let us discuss each.</span> | ||
| + | |||
| + | [[File:Item_editor_form1.png|700px|frameless|center]] | ||
| + | <div style="color: #004b64; font-size: 20px; text-align: center;">Figure ???: Item editor, Stock number and description</div> | ||
| + | <br> | ||
| + | <span style="color: #004b64; font-size: 20px;">'''Stock number and description:''' The item editor displays one item at a time, and this section of the window is a description of the item.</span> | ||
| + | |||
| + | [[File:Item_editor_form2.png|700px|frameless|center]] | ||
| + | <div style="color: #004b64; font-size: 20px; text-align: center;">Figure ???: Item editor, Quantity display</div> | ||
| + | <br> | ||
| + | <span style="color: #004b64; font-size: 20px;">'''Quantity display:''' This portion of the window allows users to change the amount received, repack the item, and set the item on backorder. It also indicates the overall sum on order and the amount in stock. </span> | ||
| + | |||
| + | [[File:Item_editor_form3.png|700px|frameless|center]] | ||
| + | <div style="color: #004b64; font-size: 20px; text-align: center;">Figure ???: Item editor, Cost and pricing</div> | ||
| + | <br> | ||
| + | <span style="color: #004b64; font-size: 20px;">'''Cost and pricing:''' This segment enables users to adjust the item's price. All shipments that are generated using the PO option, the supplier's cost, and the Belize cost must be entered.</span> | ||
| + | |||
| + | |||
| + | [[File:Item_editor_form4.png|700px|frameless|center]] | ||
| + | <div style="color: #004b64; font-size: 20px; text-align: center;">Figure ???: Item editor, Navigation Arrows</div> | ||
| + | <br> | ||
| + | <span style="color: #004b64; font-size: 20px;">'''Navigation Arrows:''' The navigation arrows allow users to navigate easily through the items of the shipment.</span> | ||
| + | |||
| + | |||
| + | |||
| + | [[File:Item_editor_expiration_date.png|700px|frameless|center]] | ||
| + | <div style="color: #004b64; font-size: 20px; text-align: center;">Figure ???: Item editor, Expiration date:</div> | ||
| + | <br> | ||
| + | <span style="color: #004b64; font-size: 20px;">'''Expiration date:''' The expiry date must be indicated in this section and entered correctly. A single item can have multiple expiry dates, but on this part of the window, it only displays the first date entered. In another tab, the other dates can be added. We will discuss how to include more expiry date later in this guide.</span> | ||
| + | |||
| + | [[File:Item Editor Mark up and PO-.png|700px|frameless|center]] | ||
| + | <div style="color: #004b64; font-size: 20px; text-align: center;">Figure ???: Item editor, Mark up and PO#</div> | ||
| + | <br> | ||
| + | <span style="color: #004b64; font-size: 20px;">'''Mark up and PO#:''' This section a read-only display of current percentage markup and suggested retail price. It also allows users to add originating PO. | ||
| + | NOTE: All "Pending Order" values must correctly reference to its original PO. Using PO option to create shipment will be updated automatically.</span> | ||
| + | |||
| + | |||
| + | [[File:Item_editor_Manufacturer_Number.png|700px|frameless|center]] | ||
| + | <div style="color: #004b64; font-size: 20px; text-align: center;">Figure ???: Item editor, Manufacturer Number:</div> | ||
| + | <br> | ||
| + | <span style="color: #004b64; font-size: 20px;">'''Manufacturer Number:''' In this section it displays the manufacturer number of the item. It also allows users to add a new manufacturer number. The form below displays the status and date of the item. </span> | ||
| + | |||
| + | |||
| + | |||
| + | [[File:Item_editor_Bin_location.png|700px|frameless|center]] | ||
| + | <div style="color: #004b64; font-size: 20px; text-align: center;">Figure ???: Item editor, Bin location</div> | ||
| + | <br> | ||
| + | <span style="color: #004b64; font-size: 20px;">'''Bin location:''' This section of the item editor shows the item's current and previous bins. It also allows the user to add a new location if the location has to be updated. </span> | ||
| + | |||
| + | |||
| + | [[File:Item_editor_Inventory_Supplier.png|700px|frameless|center]] | ||
| + | <div style="color: #004b64; font-size: 20px; text-align: center;">Figure ???: Item editor, Inventory Supplier</div> | ||
| + | <br> | ||
| + | <span style="color: #004b64; font-size: 20px;">'''Inventory Supplier:''' The name of the item's supplier is stated in this section of the item's editor. </span> | ||
| + | |||
| + | [[File:Item_editor_Shipment_information.png|700px|frameless|center]] | ||
| + | <div style="color: #004b64; font-size: 20px; text-align: center;">Figure ???: Item editor, Shipment information</div> | ||
| + | <br> | ||
| + | <span style="color: #004b64; font-size: 20px;">'''Shipment information:''' The shipment details can be found above. This section can be changed at any moment. It is necessary to remember, though, that the supplier can only update with this shipment, not those already in stock.</span> | ||
| + | |||
| + | [[File:Item_editor_Selected_Item.png|700px|frameless|center]] | ||
| + | <div style="color: #004b64; font-size: 20px; text-align: center;">Figure ???: Item editor, Selected Item</div> | ||
| + | <br> | ||
| + | <span style="color: #004b64; font-size: 20px;">'''Selected Item:''' This section only impacts the item in the item editor and does not extend to the whole shipment. It provides the user with the ability to save, view inventory, view history, and print labels.</span> | ||
| + | |||
| + | [[File:Item_editor_Process_shipment.png|700px|frameless|center]] | ||
| + | <div style="color: #004b64; font-size: 20px; text-align: center;">Figure ???: Item editor, Process shipment</div> | ||
| + | <br> | ||
| + | <span style="color: #004b64; font-size: 20px;">'''Process shipment:''' This portion impacts the whole shipment, not the item in the item editor. It provides the user with the ability to print report, add other options, and receive stock.</span> | ||
| + | |||
| + | <br> | ||
| + | |||
| + | <span style="color: #004b64; font-size: 20px;">'''Print Options for Reports:''' A variety of shipping reports may be printed under the process shipment, below is a table with a summary of each report. </span> | ||
| + | |||
| + | [[File:Item_editor_print_reports.png|400px|frameless|center]] | ||
| + | |||
| + | {| class="wikitable" | ||
| + | |- | ||
| + | ! scope="col" style="width: 20%;" | <span> Term </span> | ||
| + | ! scope="col" style="width: 80%;" | <span> Definition/Function</span> | ||
| + | |- | ||
| + | | <span id="Register by Invoices"> Register by Invoices </span> || After the shipping has been prepared and received, this report provides users with the complete shipping list, indicates whether an item is on backorder, and displays the shipment value. | ||
| + | |- | ||
| + | | <span id="Cost reconciliation"> Cost reconciliation </span> || This report allows users to [[#Reconciliation|''reconcile'']] the cost of shipment. | ||
| + | |- | ||
| + | | <span id="Warehouse receiving sheet"> Warehouse receiving sheet </span> || If the warehouse cannot scan the items received from the shipment, the warehouse sheet may be used to receive the goods manually. | ||
| + | |- | ||
| + | | <span id="Unscanned items "> Unscanned items </span> || Allows users to print a report of all items that were not scanned. | ||
| + | |- | ||
| + | | <span id="Stock Worksheet ">Stock Worksheet </span> || Allows users to print a sheet to take stock of the shipment. | ||
| + | |- | ||
| + | | <span id="Orphan List2 ">Orphan List</span> || Allow users to print an [[#Orphan List|''orphan list'']] report. | ||
| + | |- | ||
| + | | <span id="Shelf Labels">Shelf Labels </span> || Allows users to print labels for items from shipment. | ||
| + | |- | ||
| + | | <span id="Print all multiline items"> Print all multiline items</span> || Allows users to print all multiline items. | ||
| + | |- | ||
| + | | <span id="Multiline Variance Report">Multiline Variance Report </span> || allow user to print [[#Multi-line Variance Report|''multiline variance'']]. | ||
| + | |- | ||
| + | | <span id="Variance Report">Variance Report </span> || Allows users to print [[#Variance Report|''variance report'']]. | ||
| + | |- | ||
| + | | <span id="Serial Worksheet ">Serial Worksheet </span> || Allows users to print a sheet to fill in serial numbers for all items form the shipment. | ||
| + | |- | ||
| + | | <span id="Attached Serial Number ">Attached Serial Number </span> || Displays a record of all serial numbers added to the shipment. | ||
| + | |- | ||
| + | | <span id="Repack Price List ">Repack Price List </span> || (DON’T DO ANYTHING IN POS – MS P WILL CHECK) | ||
| + | |- | ||
| + | | <span id="Export to Excel ">Export to Excel </span> || Allows user to export shipment list to excel. | ||
| + | |- | ||
| + | | <span id="Quick Print/ Export to Excel ">Quick Print/ Export to Excel </span> || Allows user to print shipment list or export to excel. | ||
| + | |} | ||
| + | <br> | ||
| + | |||
| + | <span style="color: #004b64; font-size: 20px;">'''The Utilities Options:''' A variety of shipping utilities may be selected under the process shipment, below is a table with a summary of each utility. </span> | ||
| + | |||
| + | [[File:Item_editor_utilities.png|400px|frameless|center]] | ||
| + | |||
| + | {| class="wikitable" | ||
| + | |- | ||
| + | ! scope="col" style="width: 20%;" | <span> Term </span> | ||
| + | ! scope="col" style="width: 80%;" | <span> Definition/Function</span> | ||
| + | |- | ||
| + | | <span id="Set Received to Zero "> Set Received to Zero </span> || This method is used to set all items to 0. It can be convenient when checking goods. For e.g., you might not want the individual you sent to check the product to know the amount. | ||
| + | |- | ||
| + | | <span id="Default US Cost ">Default US Cost </span> || Apply the previous supplier prices to the items. (MS PAT WASN’T SURE ABOUT THIS BECAUSE OF THE “0” MESSAGE. Will have to look at it over) | ||
| + | |- | ||
| + | | <span id="Retail Price Changes ">Retail Price Changes </span> || Display all items that have changed retail prices. | ||
| + | |- | ||
| + | | <span id="Orphan List3">Orphan List </span> || Use to add any item that is considered [[#Orphan List|''orphaned'']]. | ||
| + | |- | ||
| + | | <span id="Get New Retail Prices from Worksheet ">Get New Retail Prices from Worksheet </span> || (WAS NOT CLEARLY DEFINE… MS P NEEDS TO GO OVER) | ||
| + | |- | ||
| + | | <span id="Update New Prices">Update New Prices </span> || This tool was designed to update all items with new shipping prices. | ||
| + | |- | ||
| + | | <span id="Reset Original Costs "> Reset Original Costs </span> || - (WAS NOT CLEARLY DEFINE… MS P NEEDS TO GO OVER) | ||
| + | |} | ||
| + | |||
| + | ===== <span style="color: #004b64; font-size: 25px;" id="Select Item panel"> Select Item panel </span> ===== | ||
| + | |||
| + | <span style="color: #004b64; font-size: 20px;">After shipment is open each item will be displayed on the item editor. The select item panel allows the user to access and select items in this shipment.</span> | ||
| + | |||
| + | [[File:Select_panel.png|700px|frameless|center]] | ||
| + | <div style="color: #004b64; font-size: 20px; text-align: center;">Figure ???: Select Item Panel</div> | ||
| + | <br> | ||
| + | |||
| + | ====== <span style="color: #004b64; font-size: 25px;" id="Select Item panel"> Add Item from another P.O to current shipment </span> ====== | ||
| + | |||
| + | <div style="color: #004b64; font-size: 20px; ">''In the select item panel, users can add an item from another P.O to the current shipment. Below are the steps.'' | ||
| + | <ol> | ||
| + | <li>In the search item engine, enter the stock number.</li> | ||
| + | <li>Enter the quantity of the item.</li> | ||
| + | <li>Enter the price of the item.</li> | ||
| + | <li>From the down-menu, choose the P.O.</li> | ||
| + | </ol> | ||
| + | |||
| + | [[File:Select_panel,_add_item.png|700px|frameless|center]] | ||
| + | <div style="color: #004b64; font-size: 20px; text-align: center;">Figure ???: Select Item Panel, Add item</div> | ||
| + | <br> | ||
| + | |||
| + | ===== <span style="color: #004b64; font-size: 25px;" id="Customs Detail Tab"> Customs Detail Tab </span> ===== | ||
| + | |||
| + | <span style="color: #004b64; font-size: 20px;">The customs detail tab displays the selected item prices and rate of customs such as FOB and CIF.</span> | ||
| + | |||
| + | [[File:Customs_details.png|700px|frameless|center]] | ||
| + | <div style="color: #004b64; font-size: 20px; text-align: center;">Figure ???: Incoming shipment, customs detail tab</div> | ||
| + | |||
| + | ===== <span style="color: #004b64; font-size: 25px;" id="Serial Number Tab "> Serial Number Tab </span> ===== | ||
| + | |||
| + | <span style="color: #004b64; font-size: 20px;">The serial tab is a sub-tab of the incoming shipment window. This tab allows users to enter more than one serial number for a single item. It shows whether or not it requires a serial number, and how many are expected.</span> | ||
| + | |||
| + | [[File:Serial_number_tab.png|700px|frameless|center]] | ||
| + | <div style="color: #004b64; font-size: 20px; text-align: center;">Figure ???: Serial Number Tab</div> | ||
| + | |||
| + | ====== <span style="color: #004b64; font-size: 25px;" id="How to add serial number to an item in shipment?"> How to add serial number to an item in shipment? </span> ====== | ||
| + | |||
| + | <div style="color: #004b64; font-size: 20px; ">''Navigate to the Inventory tab/click incoming shipment button and click serial numbers sub tab.'' | ||
| + | <ol> | ||
| + | <li>Enter the serial number.</li> | ||
| + | <li>Click the add button.</li> | ||
| + | |||
| + | </ol> | ||
| + | </div> | ||
| + | [[File:Serial_numbers_(Adding).png|700px|frameless|center]] | ||
| + | <div style="color: #004b64; font-size: 20px; text-align: center;">Figure ???: Serial Number, Adding</div> | ||
| + | |||
| + | ====== <span style="color: #004b64; font-size: 25px;" id="How to remove serial number to an item in shipment?"> How to remove serial number to an item in shipment? </span> ====== | ||
| + | |||
| + | <div style="color: #004b64; font-size: 20px; ">''Navigate to the Inventory tab/click incoming shipment button and click serial numbers sub tab.'' | ||
| + | |||
| + | <ol> | ||
| + | <li>Click on the number you want to delete from the list.</li> | ||
| + | <li>Click the remove button.</li> | ||
| + | |||
| + | </ol> | ||
| + | </div> | ||
| + | [[File:Serial_number_(Remove).png|700px|frameless|center]] | ||
| + | <div style="color: #004b64; font-size: 20px; text-align: center;">Figure ???: Serial Number, Remove number</div> | ||
| + | |||
| + | ===== <span style="color: #004b64; font-size: 25px;" id="Expiration Dates tab"> Expiration Dates tab </span> ===== | ||
| + | |||
| + | <span style="color: #004b64; font-size: 20px;">This tab allows users to enter more than expiration dates for a single item. It shows whether or not it requires an expiry date, and how many are expected.</span> | ||
| + | |||
| + | [[File:Expiration_date_tab.png|700px|frameless|center]] | ||
| + | <div style="color: #004b64; font-size: 20px; text-align: center;">Figure ???: Expiration Date Tab</div> | ||
| + | |||
| + | |||
| + | ====== <span style="color: #004b64; font-size: 25px;" id="How to add expiration dates to an item in shipment?">How to add expiration dates to an item in shipment? </span> ====== | ||
| + | |||
| + | <div style="color: #004b64; font-size: 20px; ">''Go to the “select item” panel after opening the shipment. Then, click the item to add expiration dates.'' | ||
| + | <ol> | ||
| + | <li>Add the expiration date</li> | ||
| + | <li>Enter quantity of the item</li> | ||
| + | <li>Click the add button</li> | ||
| + | |||
| + | </ol> | ||
| + | </div> | ||
| + | [[File:Expiration_date_tab_(ADD).png|700px|frameless|center]] | ||
| + | <div style="color: #004b64; font-size: 20px; text-align: center;">Figure ???: Add Expiration Date</div> | ||
| + | |||
| + | |||
| + | ====== <span style="color: #004b64; font-size: 25px;" id="How to remove expiration date from an item in shipment?">How to remove expiration date from an item in shipment? </span> ====== | ||
| + | |||
| + | <div style="color: #004b64; font-size: 20px; ">''Go to the “select item” panel after opening the shipment. Then, click the item to remove expiration dates.'' | ||
| + | |||
| + | <ol> | ||
| + | <li>Click on the date you want to delete from the list.</li> | ||
| + | <li>Click the remove button.</li> | ||
| + | |||
| + | </ol> | ||
| + | </div> | ||
| + | [[File:Expiration_date_tab_(Remove).png|700px|frameless|center]] | ||
| + | <div style="color: #004b64; font-size: 20px; text-align: center;">Figure ???: Remove Expiration Date</div> | ||
| + | |||
| + | |||
| + | ===== <span style="color: #004b64; font-size: 25px;" id="Item PO Records Tab"> Item PO Records Tab </span> ===== | ||
| + | |||
| + | <span style="color: #004b64; font-size: 20px;">This tab allows users to view Purchase Order records of shipment that was created using the [[#Import from Purchase Order|''PO method'']].</span> | ||
| + | |||
| + | [[File:Item_PO_Records.png|700px|frameless|center]] | ||
| + | <div style="color: #004b64; font-size: 20px; text-align: center;">Figure ???: Item PO Records</div> | ||
| + | |||
| + | ===== <span style="color: #004b64; font-size: 25px;" id="Sales/ Receiving History"> Sales/ Receiving History </span> ===== | ||
| + | |||
| + | <span style="color: #004b64; font-size: 20px;">This tab allows users to view sales and receiving history.(NEEED MS P TO EXPLAIN MORE) .</span> | ||
| + | |||
| + | === <span style="color: #004b64; font-size: 30px;" id="File Definitions">File Definitions</span> === | ||
| + | |||
| + | <span style="color: #004b64; font-size: 20px;">Tables that populate the inventory controls are all found under the File Definitions tab. These controls are Department, Headings, Categories, Suppliers, Manufacturers, Commission Codes, and currency codes.</span> | ||
| + | |||
| + | <span style="color: #004b64; font-size: 20px;">''To view file definitions options: Navigate to the Inventory tab and click the file definitions button.''</span> | ||
| + | |||
| + | [[File:File_definitions.png|700px|frameless|center]] | ||
| + | <div style="color: #004b64; font-size: 20px; text-align: center;">Figure ???: File Definitions button</div> | ||
| + | <br> | ||
| + | |||
| + | <span style="color: #004b64; font-size: 20px;">***Department, Heading and Category is being update. When new codes publish need to add. (Ms P)</span> | ||
| + | |||
| + | ==== <span style="color: #004b64; font-size: 25px;" id="File Definitions, Supplier"> Supplier (File Definitions) </span> ==== | ||
| + | |||
| + | |||
| + | <span style="color: #004b64; font-size: 20px;">The supplier tab enables users to maintain a list of [[#Supplier|''suppliers''']] contact details and addresses. In this section, we will address the method of introducing new suppliers and editing current suppliers.</span> | ||
| + | |||
| + | <span style="color: #004b64; font-size: 20px;">''To open the supplier window: Navigate to the Inventory tab/click the file definitions button and click supplier.''</span> | ||
| + | |||
| + | [[File:File_definitions_(supplier_window).png|700px|frameless|center]] | ||
| + | <div style="color: #004b64; font-size: 20px; text-align: center;">File Definitions, Supplier Window</div> | ||
| + | |||
| + | ===== <span style="color: #004b64; font-size: 25px;" id="How to add a New Supplier? "> How to add a New Supplier? </span> ===== | ||
| + | |||
| + | <div style="color: #004b64; font-size: 20px; "> | ||
| + | <ol> | ||
| + | <li>Click the New Code button on the side. This would clear the bottom segment fields, allowing them able to be filled.</li> | ||
| + | <li>Enter details regarding the supplier. </li> | ||
| + | <li>Click the save button.</li> | ||
| + | </ol> | ||
| + | </div> | ||
| + | [[File:File_definitions_(ADD_supplier).png|700px|frameless|center]] | ||
| + | <div style="color: #004b64; font-size: 20px; text-align: center;">File Definitions, Add New Supplier</div> | ||
| + | |||
| + | |||
| + | ===== <span style="color: #004b64; font-size: 25px;" id="How to edit existing Supplier information? "> How to edit existing Supplier information? </span> ===== | ||
| + | |||
| + | <div style="color: #004b64; font-size: 20px; "> | ||
| + | <ol> | ||
| + | <li>Choose the supplier from the list that you want to modify.</li> | ||
| + | <li>Navigate to the field you want to edit.</li> | ||
| + | <li>After making adjustments, click the Save button</li> | ||
| + | |||
| + | </ol> | ||
| + | </div> | ||
| + | [[File:File_definitions_(EDIT_supplier).png|700px|frameless|center]] | ||
| + | <div style="color: #004b64; font-size: 20px; text-align: center;">File Definitions, Edit Supplier</div> | ||
| + | |||
| + | |||
| + | ===== <span style="color: #004b64; font-size: 25px;" id="How to Remove existing supplier?"> How to Remove existing supplier? </span> ===== | ||
| + | |||
| + | <div style="color: #004b64; font-size: 20px; "> | ||
| + | <ol> | ||
| + | <li>Choose the supplier from the list that you want to remove.</li> | ||
| + | <li>Click the delete button </li> | ||
| + | |||
| + | </ol> | ||
| + | </div> | ||
| + | [[File:File_definitions_(REMOVE_supplier).png|700px|frameless|center]] | ||
| + | <div style="color: #004b64; font-size: 20px; text-align: center;">File Definitions, Remove Supplier</div> | ||
| + | |||
| + | |||
| + | ==== <span style="color: #004b64; font-size: 25px;" id="File Definitions, Manufacturer"> Manufacturer (File Definitions) </span> ==== | ||
| + | |||
| + | |||
| + | <span style="color: #004b64; font-size: 20px;">The manufacturer tab enables users to maintain a list of [[#Manufacturers|''manufacturers'']]. In this section, we will address the method of introducing new manufacturer and editing current manufacturers.</span> | ||
| + | |||
| + | <span style="color: #004b64; font-size: 20px;">''To open the manufacturer window: Navigate to the Inventory tab/click the file definitions button and click manufacturer.''</span> | ||
| + | |||
| + | [[File:File_definitions_(Manufacturer_window).png|700px|frameless|center]] | ||
| + | <div style="color: #004b64; font-size: 20px; text-align: center;">File Definitions, Manufacturer Window</div> | ||
| + | |||
| + | ===== <span style="color: #004b64; font-size: 25px;" id="How to add a New Manufacturer? "> How to add a New Manufacturer? </span> ===== | ||
| + | |||
| + | <div style="color: #004b64; font-size: 20px; "> | ||
| + | <ol> | ||
| + | <li>Click the New Code button on the side. This would clear the bottom segment fields, allowing them able to be filled.</li> | ||
| + | <li>Enter manufacturer name and manufacturer of code. </li> | ||
| + | <li>Click the save button.</li> | ||
| + | |||
| + | </ol> | ||
| + | </div> | ||
| + | [[File:File_definitions_(ADD_Manufacturer).png|700px|frameless|center]] | ||
| + | <div style="color: #004b64; font-size: 20px; text-align: center;">File Definitions, Add New Manufacturer</div> | ||
| + | |||
| + | |||
| + | ===== <span style="color: #004b64; font-size: 25px;" id="How to edit existing Manufacturer information?"> How to edit existing Manufacturer information?</span> ===== | ||
| + | |||
| + | <div style="color: #004b64; font-size: 20px; "> | ||
| + | <ol> | ||
| + | <li>Choose the manufacture from the list that you want to modify.</li> | ||
| + | <li>Navigate to the field you want to edit.</li> | ||
| + | <li>After making adjustments, click the Save button</li> | ||
| + | |||
| + | </ol> | ||
| + | </div> | ||
| + | [[File:File_definitions_(EDIT_Manufacturer).png|700px|frameless|center]] | ||
| + | <div style="color: #004b64; font-size: 20px; text-align: center;">File Definitions, Edit Manufacturer</div> | ||
| + | |||
| + | |||
| + | ===== <span style="color: #004b64; font-size: 25px;" id="How to Remove existing Manufacturer? "> How to Remove existing Manufacturer? </span> ===== | ||
| + | |||
| + | <div style="color: #004b64; font-size: 20px; "> | ||
| + | <ol> | ||
| + | <li>Choose the manufacturer from the list that you want to remove.</li> | ||
| + | <li>Click the delete button </li> | ||
| + | |||
| + | </ol> | ||
| + | </div> | ||
| + | [[File:File_definitions_(REMOVE_Manufacturer).png|700px|frameless|center]] | ||
| + | <div style="color: #004b64; font-size: 20px; text-align: center;">File Definitions, Remove Manufacturer</div> | ||
| + | |||
| + | |||
| + | |||
| + | ==== <span style="color: #004b64; font-size: 25px;" id="File Definitions, Package Description"> Package Description (File Definitions) </span> ==== | ||
| + | |||
| + | |||
| + | <span style="color: #004b64; font-size: 20px;">The package description tab enables users to maintain a list of package type. In this section, we will address the method of introducing new [[#Package Unit|''package type'']], removing and editing current package type. </span> | ||
| + | |||
| + | <span style="color: #004b64; font-size: 20px;">''To open the Package Descriptions window: Navigate to the Inventory tab/click the file definitions button and click Package Descriptions.''</span> | ||
| + | |||
| + | [[File:File_definitions_(Package_Description_window).png|700px|frameless|center]] | ||
| + | <div style="color: #004b64; font-size: 20px; text-align: center;">File Definitions, Package Description Window</div> | ||
| + | |||
| + | ===== <span style="color: #004b64; font-size: 25px;" id="How to add a New Package Type?"> How to add a New Package Type? </span> ===== | ||
| + | |||
| + | <div style="color: #004b64; font-size: 20px; "> | ||
| + | <ol> | ||
| + | <li>Click the New Code button on the side. This would clear the bottom segment fields, allowing them able to be filled.</li> | ||
| + | <li>Enter package code and package description.</li> | ||
| + | <li>Click the save button.</li> | ||
| + | |||
| + | </ol> | ||
| + | </div> | ||
| + | [[File:File_definitions_(ADD_Package_Description).png|700px|frameless|center]] | ||
| + | <div style="color: #004b64; font-size: 20px; text-align: center;">File Definitions, Add New Package Description</div> | ||
| + | |||
| + | |||
| + | ===== <span style="color: #004b64; font-size: 25px;" id="How to edit existing package description? ">How to edit existing package description?</span> ===== | ||
| + | |||
| + | <div style="color: #004b64; font-size: 20px; "> | ||
| + | <ol> | ||
| + | <li>Choose the package from the list that you want to modify.</li> | ||
| + | <li>Navigate to the field you want to edit.</li> | ||
| + | <li>After making adjustments, click the Save button</li> | ||
| + | |||
| + | </ol> | ||
| + | </div> | ||
| + | [[File:File_definitions_(EDIT_Package_Description).png|700px|frameless|center]] | ||
| + | <div style="color: #004b64; font-size: 20px; text-align: center;">File Definitions, Edit Package Description</div> | ||
| + | |||
| + | |||
| + | ===== <span style="color: #004b64; font-size: 25px;" id="How to Remove existing package description?"> How to Remove existing package description?</span> ===== | ||
| + | |||
| + | <div style="color: #004b64; font-size: 20px; "> | ||
| + | <ol> | ||
| + | <li>Choose the package from the list that you want to remove.</li> | ||
| + | <li>Click the delete button </li> | ||
| + | </ol> | ||
| + | </div> | ||
| + | [[File:File_definitions_(REMOVE_Package_Description).png|700px|frameless|center]] | ||
| + | <div style="color: #004b64; font-size: 20px; text-align: center;">File Definitions, Remove Package Description</div> | ||
| + | |||
| + | |||
| + | ==== <span style="color: #004b64; font-size: 25px;" id="File Definitions, Commission> Commission (File Definitions) </span> ==== | ||
| + | |||
| + | |||
| + | <span style="color: #004b64; font-size: 20px;">The commission tab provides the possibility of setting a commission rate for sales clerks. The commission rate may reflect the amount of discount that the sales clerk has offered.</span> | ||
| + | |||
| + | <span style="color: #004b64; font-size: 20px;">*MS. P have to fix because as of right now this tab does nothing in the system.</span> | ||
| + | |||
| + | <span style="color: #004b64; font-size: 20px;">*Will skip currency code for now because Ms. P is still deciding if it is needed in the POS</span> | ||
| + | |||
| + | === <span style="color: #004b64; font-size: 30px;" id="Utilities (Inventory)">Utilities (Inventory)</span> === | ||
| + | |||
| + | <span style="color: #004b64; font-size: 20px;">The inventory utilities are various collections of tools that enable the user to carry out a number of inventory-related activities. Users who do not have the license right to access certain reports but may have the duty of completing the list of utilities can use it.</span> | ||
| + | |||
| + | ==== <span style="color: #004b64; font-size: 25px;" id="Label Maker"> Label Maker </span> ==== | ||
| + | |||
| + | |||
| + | <span style="color: #004b64; font-size: 20px;">The GoneClear StoreFront POS system offers users a way to create a random list of any stock numbers to print a batch of labels in varying quantities, or perhaps one of a variety of reports. This feature is called a label maker.</span> | ||
| + | |||
| + | |||
| + | <span style="color: #004b64; font-size: 20px;">*To be continued</span> | ||
| + | |||
| + | ==== <span style="color: #004b64; font-size: 25px;" id="Missing Pictures"> Missing Pictures </span> ==== | ||
| + | |||
| + | <span style="color: #004b64; font-size: 20px;">This tool provides users with a list of all items that do not have pictures.</span> | ||
| + | |||
| + | <span style="color: #004b64; font-size: 20px;">''To open the missing pictures window: Navigate to the Inventory tab/click the utilities button and click missing pictures.''</span> | ||
| + | |||
| + | ===== <span style="color: #004b64; font-size: 25px;" id="How to view the list of missing pictures? "> How to view the list of missing pictures? </span> ===== | ||
| + | |||
| + | <div style="color: #004b64; font-size: 20px; "> | ||
| + | <ol> | ||
| + | <li>Navigate to the Inventory tab</li> | ||
| + | <li>Select the utilities button</li> | ||
| + | <li>Click missing pictures. (The missing pictures window will open)</li> | ||
| + | <li>Click the View all photo records button</li> | ||
| + | <li>Click the export to excel button. (You can copy stock number and search for items on inventory to add images.)</li> | ||
| + | |||
| + | </ol> | ||
| + | </div> | ||
| + | [[File:Missing_Pictures.png|700px|frameless|center]] | ||
| + | <div style="color: #004b64; font-size: 20px; text-align: center;">Utilities, Missing Pictures</div> | ||
| + | |||
| + | |||
| + | ==== <span style="color: #004b64; font-size: 25px;" id="Price changes/new item"> Price changes/new item </span> ==== | ||
| + | |||
| + | <span style="color: #004b64; font-size: 20px;">This section allows users to view new products as well as changes in prices on a particular date. It also allows users to filter by supplier or/and category.</span> | ||
| + | |||
| + | <span style="color: #004b64; font-size: 20px;">''To open the ‘price changes/new item’ window: Navigate to the Inventory tab/click the utilities button and click missing pictures.''</span> | ||
| + | |||
| + | ===== <span style="color: #004b64; font-size: 25px;" id="How to view new items and prices? "> How to view new items and prices?</span> ===== | ||
| + | |||
| + | <div style="color: #004b64; font-size: 20px; "> | ||
| + | <ol> | ||
| + | <li>Navigate to the Inventory tab</li> | ||
| + | <li>Select the utilities button</li> | ||
| + | <li>Click “price changes/new item”</li> | ||
| + | <li>Enter date under the form ‘New items’. (The date entered would show all new items applied to the system from the date entered to the current date.)</li> | ||
| + | <li>Click the 'Generate Report' button. (A new window will open with the list of new items and their prices.)</li> | ||
| + | |||
| + | </ol> | ||
| + | </div> | ||
| + | [[File:Price_changes_new_item_(new_item).png|700px|frameless|center]] | ||
| + | <div style="color: #004b64; font-size: 20px; text-align: center;">Utilities, New item list</div> | ||
| + | |||
| + | |||
| + | ===== <span style="color: #004b64; font-size: 25px;" id="How to view price changes? "> How to view price changes?</span> ===== | ||
| + | |||
| + | <div style="color: #004b64; font-size: 20px; "> | ||
| + | <ol> | ||
| + | <li>Navigate to the Inventory tab</li> | ||
| + | <li>Select the utilities button</li> | ||
| + | <li>Click “price changes/new item”</li> | ||
| + | <li>Enter date under the form ‘Price changes’. (The date entered would show all new items applied to the system from the date entered to the current date.)</li> | ||
| + | <li>Click the 'Generate Report' button. (A new window will open with the list of new items and their prices.)</li> | ||
| + | </ol> | ||
| + | </div> | ||
| + | [[File:Price_changes_new_item_(price_change).png|700px|frameless|center]] | ||
| + | <div style="color: #004b64; font-size: 20px; text-align: center;">Utilities, Price Change list</div> | ||
| + | |||
| + | == <span style="color: #004b64"><div style="font-size: 40px; text-align: center;" id="Sales">'''Sales'''</div></span> == | ||
| + | <span style="color: #004b64; font-size: 20px;">Nowadays, the sales process is not relatively as easy as selling a product to one customer one at a time over the counter. Instead, it has become a dynamic network of connected processes that can require any, if not all, of the following: inventory, and logistics management, ordering, billing, and customer relationship management, as well as searching out new sales opportunities. The sales phase begins with sales opportunities being nurtured, sales quotes being generated, sales orders being entered, and customers being invoiced. This chapter addresses the crucial measures that must be completed after a transaction has been concluded, including how to turn a quote into a sales order, guarantee that an order is delivered correctly, and maintain prompt invoicing to improve positive cash flow.</span> | ||
| + | |||
| + | ==== <span style="color: #004b64; font-size: 30px;" id="Create Cashier Session"> Create Cashier Session </span> ==== | ||
| + | |||
| + | <span style="color: #004b64; font-size: 20px;">The cashier session ribbon launches the 'salesmain' cashier window used for cashiers to process transactions. To open the salemain window, a supervisor or someone with access must create a cashier session. The session is quite critical as it maintains track of all cashier transactions. Let us explore how to create a cashier's session.</span> | ||
| + | |||
| + | ===== <span style="color: #004b64; font-size: 25px;" id="How to create a cashier session?"> How to create a cashier session? </span> ===== | ||
| + | |||
| + | <div style="color: #004b64; font-size: 20px; "> | ||
| + | <ol> | ||
| + | <li>Navigate to the Accounts tab</li> | ||
| + | <li>Select the 'Cashier Transmittals' button.</li> | ||
| + | <li>Click New</li> | ||
| + | <li>Select the date for session. (The current date is displayed by default.)</li> | ||
| + | <li>Choose the name you want to create the session in the 'cashier' drop-down menu.</li> | ||
| + | <li>Click the 'save' button (a popup window titled "confirmation" will appear)</li> | ||
| + | <li>On the popup window, select 'Ok.'</li> | ||
| + | |||
| + | </ol> | ||
| + | </div> | ||
| + | [[File:Create_cashier_session.png|700px|frameless|center]] | ||
| + | <div style="color: #004b64; font-size: 20px; text-align: center;">Create Cashier Session</div> | ||
| + | |||
| + | ==== <span style="color: #004b64; font-size: 25px;" id="Cashier Session/Sales Order UI"> Cashier Session/Sales Order UI </span> ==== | ||
| + | |||
| + | <span style="color: #004b64; font-size: 20px;">As previously mentioned, the cashier session ribbon launches the 'salesmain' cashier window used for cashiers to process transactions and to create sales orders. In this section, we will look at the interface of this window and its features.</span> | ||
| + | |||
| + | <span style="color: #004b64; font-size: 20px;">The ‘salesmain' window is used for cashier, retail, and wholesale transactions. Features vary based on which session is selected. </span> | ||
| + | |||
| + | [[File:Salesmain.png|700px|frameless|center]] | ||
| + | <div style="color: #004b64; font-size: 20px; text-align: center;">Transactions that uses Salesmain window</div> | ||
| + | |||
| + | ===== <span style="color: #004b64; font-size: 25px;" id="Salemain Window"> Salesmain Window </span> ===== | ||
| + | |||
| + | <span style="color: #004b64; font-size: 20px;">The'salesmain' window has eight sections. Let us review each section and its roles.</span> | ||
| + | |||
| + | [[File:Salesmain_Window.png|700px|frameless|center]] | ||
| + | <div style="color: #004b64; font-size: 20px; text-align: center;">Salesmain window</div> | ||
| + | <br> | ||
| + | |||
| + | <span style="color: #004b64; font-size: 20px;">'''Section One:''' This section consists of three panels; customer search panel, estimate panel, and finance panel. See section (…CONT) to learn about these panels.</span> | ||
| + | |||
| + | [[File:Section_1_of_salesmain_window.png|700px|frameless|center]] | ||
| + | <div style="color: #004b64; font-size: 20px; text-align: center;">Salesmain window</div> | ||
| + | <br> | ||
| + | |||
| + | <span style="color: #004b64; font-size: 20px;">'''Section Two:''' This section is used to scan all items purchased from the customer. There is a quantity, scan code, and stock number field accompanied by a lookup button and three checkboxes. Following are the functions for each:</span> | ||
| + | |||
| + | |||
| + | |||
| + | [[File:Section_2_of_salesmain_window.png|700px|frameless|center]] | ||
| + | <div style="color: #004b64; font-size: 20px; text-align: center;">Salesmain window, Section 2</div> | ||
| + | <br> | ||
| + | |||
| + | {| class="wikitable" | ||
| + | |- | ||
| + | ! scope="col" style="width: 20%;" | <span> Fields </span> | ||
| + | ! scope="col" style="width: 80%;" | <span> Function</span> | ||
| + | |- | ||
| + | | <span id="Quantity Field"> Quantity Field </span> || requires users to add the amount of the item that the customer purchases. | ||
| + | |- | ||
| + | | <span id="Scan Code Field"> Scan Code Field </span> || scan an item with its UPC. It is also possible for users to manually input the item's UPC or stock number in this field. | ||
| + | |- | ||
| + | | <span id=" Stock Number Field "> Stock Number Field </span> || allows users to enter a stock number manually. | ||
| + | |- | ||
| + | | <span id="Lookup Button"> Lookup Button </span> || Searching for a particular item is the key objective of the lookup button. | ||
| + | |- | ||
| + | | <span id="Add On Scan">Add On Scan</span> || Enabling the "add on scan" checkbox will add any scanned products to the order list. | ||
| + | |- | ||
| + | | <span id="Quantity First">Quantity First</span> || Enabling the “quantity first” checkbox will set the starting point on the quantity field instead of the default scan code field. | ||
| + | |- | ||
| + | | <span id="Scan Off">Scan Off</span> || Enabling the “scan off” checkbox will take off the scan code field | ||
| + | |} | ||
| + | |||
| + | |||
| + | <span style="color: #004b64; font-size: 20px;">'''Section Three:''' This section of the salemain window consists of eight sub-tabs; the invoice tab, Estimate tab, Invoices tab, Item History tab, Availability tab, Delivery Instructions tab, Estimate Record, Terms/Condition tab, and locations test tab.</span> | ||
| + | |||
| + | |||
| + | [[File:Section_3_of_salesmain_window.png|700px|frameless|center]] | ||
| + | <div style="color: #004b64; font-size: 20px; text-align: center;">Salesmain window, Section 3</div> | ||
| + | <br> | ||
| + | |||
| + | <span style="color: #004b64; font-size: 20px;">Let us go through the eight sub tabs in section 3 briefly and their function.</span> | ||
| + | |||
| + | <div style="color: #004b64; font-size: 20px; "> | ||
| + | <ol> | ||
| + | <li>'''This invoice tab:''' This window shows a selection of the items that customers have ordered. It displays the quantity for each item, retail price, special price, rate, delivery type, unit code, discount, discount code, and, if necessary, serial numbers. | ||
| + | [[File:Section_3_(invoice_tab).png|700px|frameless|center]] | ||
| + | <div style="color: #004b64; font-size: 20px; text-align: center;">Section 3, This Invoice tab</div> </li> | ||
| + | <br> | ||
| + | <li>'''Estimate tab:''' Allow users to locate all other Sales Order current customer has in the system. The Pending Orders All Customers button on this page locates all other customers who are wanting on the selected product – can be useful when there is a limited supply of the item and sales person may need to do some bargaining about who is going to get the item first. | ||
| + | [[File:Section_3_(Estimate_Tab).png|700px|frameless|center]] | ||
| + | <div style="color: #004b64; font-size: 20px; text-align: center;">Section 3, Estimate tab</div> </li> | ||
| + | <br> | ||
| + | <li>'''Invoices tab''' Display a list of invoices issued to the selected customer.</li> | ||
| + | <li>'''Item History tab:''' This tab lists the selected item's sales history as well as other items recently purchased by the current customer. | ||
| + | [[File:Section_3_(Item_history_tab).png|700px|frameless|center]] | ||
| + | <div style="color: #004b64; font-size: 20px; text-align: center;">Section 3, Item History Tab</div> | ||
| + | <br> | ||
| + | </li> | ||
| + | <li>'''Availability tab:''' Display the selected item location as well as the quantity in stock at each location. | ||
| + | <br> | ||
| + | <br> | ||
| + | [[File:Section_3_(Availability_tab).png|700px|frameless|center]] | ||
| + | <div style="color: #004b64; font-size: 20px; text-align: center;">Section 3, Availability tab</div> | ||
| + | <br> | ||
| + | </li> | ||
| + | <li>'''Delivery Instructions tab:''' Users may enter any delivery instructions in this tab. This instruction would be included in the delivery order. | ||
| + | [[File:Section_3_(Delivery_Instructions_tab).png|700px|frameless|center]] | ||
| + | <div style="color: #004b64; font-size: 20px; text-align: center;">Section 3, Delivery Instructions tab</div> | ||
| + | <br> | ||
| + | </li> | ||
| + | <li>'''Estimate Record:''' This tab provides a list of events connected with the latest order, such as estimate printed, discounts added, change of sale type (Case or Credit), change of account, deleted items, and any other notable events associated with the invoice. Additionally, a date and time stamp will be shown, as well as the user name ID. | ||
| + | [[File:Section_3_(Estimate_Record).png|700px|frameless|center]] | ||
| + | <div style="color: #004b64; font-size: 20px; text-align: center;">Section 3, Estimate Record</div> | ||
| + | </li> | ||
| + | <li>'''Terms/Condition tab:''' </li> | ||
| + | |||
| + | </ol> | ||
| + | </div> | ||
| + | |||
| + | <span style="color: #004b64; font-size: 20px;">'''Section Five:''' Nine action buttons and an exit button consist of this section. Let us examine the action buttons and their functions.</span> | ||
| + | |||
| + | {| class="wikitable" | ||
| + | |- | ||
| + | ! scope="col" style="width: 20%;" | <span> Term </span> | ||
| + | ! scope="col" style="width: 80%;" | <span> Definition/Function</span> | ||
| + | |- | ||
| + | | <span id="Cash Sales"> Cash Sales </span> || This action button is to start a sale transaction. Ergo users must click this button to initiate any sale transaction. The defined "f2" is the shortcut key for this feature. | ||
| + | |- | ||
| + | | <span id="Clone"> Clone </span> || An invoice order can be cloned, and changes can be made to the new order. The clone button is used to create a duplicate sales order. Users have the choice to clone the entire order or to split the order by using the select option. | ||
| + | |- | ||
| + | | <span id="Cancel"> Cancel </span> || Enables users to cancel selected orders. | ||
| + | |- | ||
| + | | <span id="Customer for sales window section 4 "> Customer</span> || Provides access to client details and makes adjustments to the information such as selecting a new account or choosing a sales transaction type, i.e., credit card, cash, preferred. | ||
| + | |- | ||
| + | | <span id="Cashier Release "> Cashier Release </span> || This action button enables cashiers to access sales orders. Ergo, after a salesperson completes an order and the warehouse verifies that all products are in stock, "Release to Cashier" changes the status to CASHIER so that the sales order will then be accessible for the cashier. | ||
| + | |- | ||
| + | | <span id="Price Change">Price Change</span> || Allow the salesperson to see if the price of the selected item has changed. The salesperson may allow the invoice to proceed with the current price or adjust the price to reflect the new value. | ||
| + | |- | ||
| + | | <span id="Reset">Reset </span> || this action button enables users to reassign/assign a discount, delivery type, and sales type. | ||
| + | |- | ||
| + | | <span id="Reassign">Reassign </span> || Enables users to reassign the salesperson, P.O number, and the "referred by." (After clicking, the button will change to "save" to enable users to save changes.) | ||
| + | |- | ||
| + | | <span id="Quick Print">Quick Print </span> || Allows users to print Proforma listing. | ||
| + | |} | ||
| + | <br> | ||
| + | [[File:Section_4.png|700px|frameless|center]] | ||
| + | <div style="color: #004b64; font-size: 20px; text-align: center;">Section 4, Action buttons</div> | ||
| + | <br> | ||
| + | <span style="color: #004b64; font-size: 20px;">'''Section Five:''' This section is a view of the total cost, GST cost and total count of items. Here is also, where users issue invoice. </span> | ||
| + | |||
| + | [[File:Section_5.png|700px|frameless|center]] | ||
| + | <div style="color: #004b64; font-size: 20px; text-align: center;">Section 5, Price Display</div> | ||
| + | <br> | ||
| + | |||
| + | <span style="color: #004b64; font-size: 20px;">'''Section 6:''' A brief description and price of the selected item is displayed in this section. Users are allowed create a new item line, save adjustments to a selected item, remove a selected item, add a new item to the system, issue a serial number and expiration date if necessary. </span> | ||
| + | |||
| + | [[File:Section_6.png|700px|frameless|center]] | ||
| + | <div style="color: #004b64; font-size: 20px; text-align: center;">Section 6, Description of Selected Item</div> | ||
| + | <br> | ||
| + | |||
| + | <span style="color: #004b64; font-size: 20px;">'''Section 7:'''This section displays the account number, sale type, account codes, discount codes, credit limits, and account balance. This section is color coded to indicate the form of transaction. </span> | ||
| + | |||
| + | {| class="wikitable" | ||
| + | |- | ||
| + | ! scope="col" style="width: 20%;" | <span> Color Code </span> | ||
| + | ! scope="col" style="width: 80%;" | <span> Definition</span> | ||
| + | |- | ||
| + | | <span id=""> Green </span> || preferred or cash transaction | ||
| + | |- | ||
| + | | <span id=""> Red </span> || Credit transaction | ||
| + | |- | ||
| + | | <span id=""> Peach </span> || Layaway transaction | ||
| + | |} | ||
| + | <br> | ||
| + | [[File:Section_7.png|700px|frameless|center]] | ||
| + | <div style="color: #004b64; font-size: 20px; text-align: center;">Section 7</div> | ||
| + | <br> | ||
| + | |||
| + | <span style="color: #004b64; font-size: 20px;">'''Section 8:''' Displays the PO number, invoice number, referred by, user status, sales order number, and the name of the salesperson selling the products. Using the reassign button in section four, you may adjust the PO#, referred option, and salesperson. </span> | ||
| + | |||
| + | [[File:Section_8.png|700px|frameless|center]] | ||
| + | <div style="color: #004b64; font-size: 20px; text-align: center;">Section 8</div> | ||
| + | <br> | ||
| + | |||
| + | ==== <span style="color: #004b64; font-size: 25px;" id="Sales transaction for cashiers"> Sales Transaction (cashiers) </span> ==== | ||
| + | |||
| + | <span style="color: #004b64; font-size: 20px;">In the previous section, we covered the sections of the sales window and their associated functions. In this chapter, we will go over how to start and complete a sale transaction and the process of return items.</span> | ||
| + | |||
| + | ===== <span style="color: #004b64; font-size: 25px;" id="How to start a sale transaction"> How to start a sale transaction (Cashier) </span> ===== | ||
| + | |||
| + | <span style="color: #004b64; font-size: 20px;">''Note: Before any cashier may initiate a sale transaction, a cashier session must be created. (See [[#How to create a cashier session?|''section 2.10'']] to learn how to create a cashier session)''</span> | ||
| + | |||
| + | <div style="color: #004b64; font-size: 20px; "> | ||
| + | <ol> | ||
| + | <li>Navigate to the Sales tab.</li> | ||
| + | <li>Choose the "cashier session" ribbon. (The salesmain window will open)</li> | ||
| + | <li>At the bottom of the window, click the 'cash sales button or hit 'f2' on your keyboard.</li> | ||
| + | <li>Scan your products or manually input the product's stock number.</li> | ||
| + | <li>Add the product's quantity.</li> | ||
| + | <li>Press enter on your keyboard to add the scanned item to the order list.</li> | ||
| + | <li>Click the "new line" button or press f4 on your keyboard to add another item to the order.</li> | ||
| + | <li>Click the "save" button or press f6 on your keyboard to save item list.</li> | ||
| + | <li>Click the "invoice" button to invoice sale. </li> | ||
| + | <li>Choose a method of payment.</li> | ||
| + | <li>Apply the amount paid by customer </li> | ||
| + | <li>Click "Pay to Acct"</li> | ||
| + | </ol> | ||
| + | </div> | ||
| + | <br> | ||
| + | [[File:Steps_to_doing_a_sale_transaction.png|700px|frameless|center]] | ||
| + | <div style="color: #004b64; font-size: 20px; text-align: center;">Sales transaction (cashier)</div> | ||
| + | |||
| + | ===== <span style="color: #004b64; font-size: 25px;" id="How to process multiple payment mode?"> How to process multiple payment mode? </span> ===== | ||
| + | |||
| + | |||
| + | <div style="color: #004b64; font-size: 20px; "> | ||
| + | <ol> | ||
| + | <li>Click the "begin entering payments" button.</li> | ||
| + | <li>In the "amt of this payment" field, enter the amount paid.</li> | ||
| + | <li>Select the payment method from the drop-down menu </li> | ||
| + | <li>Enter the check number if necessary and choose the bank form from the drop-down menu.</li> | ||
| + | <li>Click the "enter next payment method" button</li> | ||
| + | <li>Repeat this procedure until all payment options have been entered. After that, print the sale.</li> | ||
| + | |||
| + | </ol> | ||
| + | </div> | ||
| + | |||
| + | [[File:Multiple_payment_mode.png|700px|frameless|center]] | ||
| + | <div style="color: #004b64; font-size: 20px; text-align: center;">Multiple Payment Mode (cashier)</div> | ||
| + | |||
| + | ===== <span style="color: #004b64; font-size: 25px;" id="Manually look up a stock number (Sales Screen)"> Manually look up a stock number (Sales Screen) </span> ===== | ||
| + | |||
| + | <span style="color: #004b64; font-size: 20px;">Users can also use the "lookup" feature to perform a manual search for an item. The following are the steps for using the "lookup" function:</span> | ||
| + | |||
| + | <div style="color: #004b64; font-size: 20px; "> | ||
| + | <ol> | ||
| + | <li>Select the 'lookup' option. (The item search window would appear.)</li> | ||
| + | <li>Enter a description, a supplier, or a manufacturer, for example. (There are several ways to search for an item in this window.)</li> | ||
| + | <li>After you've entered your search method, click the search button or f2 on your keyboard.</li> | ||
| + | <li>Select the item from the table.</li> | ||
| + | <li>Click the “Add item” button.</li> | ||
| + | <li>Press enter on your keyboard to add the item to the order list.</li> | ||
| + | </ol> | ||
| + | </div> | ||
| + | <br> | ||
| + | [[File:Steps_to_use_lookup_function.png|700px|frameless|center]] | ||
| + | <div style="color: #004b64; font-size: 20px; text-align: center;">Lookup function</div> | ||
| + | |||
| + | ===== <span style="color: #004b64; font-size: 25px;" id="Add new stock number (Sales Screen)"> Add new stock number (Sales Screen) </span> ===== | ||
| + | |||
| + | <span style="color: #004b64; font-size: 20px;">How do I add a stock number that does not exist in the system?</span> | ||
| + | <div style="color: #004b64; font-size: 20px; "> | ||
| + | <ol> | ||
| + | <li>Click the "newline" button or press f4 on your keyboard.</li> | ||
| + | <li>Click the “Non Stocked” button (The new inventory creation window will open)</li> | ||
| + | <li>Enter the item information.(See [[#Adding a New Item to Inventory|''Section 2.2.3'']] to understand this window.) | ||
| + | </li> | ||
| + | <li>Click the “save” button.</li> | ||
| + | </ol> | ||
| + | </div> | ||
| + | <br> | ||
| + | [[File:Non_stocked.png|700px|frameless|center]] | ||
| + | <div style="color: #004b64; font-size: 20px; text-align: center;">Non Stocked Feature</div> | ||
| + | |||
| + | ===== <span style="color: #004b64; font-size: 25px;" id="Process Return(Sales Screen)"> Process Return(Sales Screen) </span> ===== | ||
| + | |||
| + | <span style="color: #004b64; font-size: 20px;">How to process return?</span> | ||
| + | |||
| + | <div style="color: #004b64; font-size: 20px; "> | ||
| + | <ol> | ||
| + | <li>Click the ‘cash sales’ button or hit 'f2' on your keyboard to activate the sales screen</li> | ||
| + | <li>Locate the customer account number or the item's invoice number.</li> | ||
| + | <li>Select the client or invoice by double-clicking on it and selecting chosen.</li> | ||
| + | <li>Enter a negative value for the return amount in the quantity field. For example, -2.</li> | ||
| + | <li>Scan the item or enter the stock number manually. (If you are unable to locate an item in stock via scan, navigate to item history, click the "show all items" button, and conduct a search there.)</li> | ||
| + | <li>On the "return an item" pop-up message, click "ok."</li> | ||
| + | <li>Double-click on the line under the "item history" tab (a pop-up window titled "item return" will appear).</li> | ||
| + | <li>If required, enter a charging fee.</li> | ||
| + | </ol> | ||
| + | </div> | ||
| + | <br> | ||
| + | [[File:Return_goods1.png|700px|frameless|center]] | ||
| + | [[File:Return_goods2.png|700px|frameless|center]] | ||
| + | |||
| + | <div style="color: #004b64; font-size: 20px; text-align: center;">Return Goods</div> | ||
| + | |||
| + | ===== <span style="color: #004b64; font-size: 25px;" id="Sales Order Entry"> Sales Order Entry </span> ===== | ||
| + | |||
| + | <span style="color: #004b64; font-size: 20px;">This feature enables users to generate estimates for customers and then invoice those estimates. Additionally, it allows users to look up items bought by customers and check inventory prices and availability.</span> | ||
| + | |||
| + | |||
| + | <span style="color: #004b64; font-size: 20px;">How to create a sales order?</span> | ||
| + | |||
| + | <div style="color: #004b64; font-size: 20px; "> | ||
| + | <ol> | ||
| + | <li>Navigate to the Sales tab.</li> | ||
| + | <li>Choose the "Retail" ribbon. (The salesmain window will open)</li> | ||
| + | <li>At the bottom of the window, click the 'cash sales button or hit 'f2' on your keyboard.</li> | ||
| + | <li>Scan your products or manually input the product's stock number.</li> | ||
| + | <li>Add the product's quantity.</li> | ||
| + | <li>Press enter on your keyboard to add the scanned item to the order list.</li> | ||
| + | <li>Click the "new line" button or press f4 on your keyboard to add another item to the order.</li> | ||
| + | <li>Click the "save" button or press f6 on your keyboard to save item list.</li> | ||
| + | <li>When the estimate is ready to be charged, click the "release to cashier" button to enable it for the cashier.</li> | ||
| + | |||
| + | </ol> | ||
| + | </div> | ||
| + | |||
| + | [[File:Sales_Order_Entry.png|700px|frameless|center]] | ||
| + | <div style="color: #004b64; font-size: 20px; text-align: center;">Sales Order Entry (cashier)</div> | ||
| + | |||
| + | ===== <span style="color: #004b64; font-size: 25px;" id="Customer Search (sales)"> Customer Search (Sales Panel) </span> ===== | ||
| + | |||
| + | <span style="color: #004b64; font-size: 20px;">This panel is used to locate an existing customer in the database. Users may create an order on credit, cash, or make a payment to a customer account.</span> | ||
| + | |||
| + | <span style="color: #004b64; font-size: 20px;">To use this panel, simply insert the customer account number or name and click credit, preferred (cash), layaway, or make a payment to initiate a transaction.</span> | ||
| + | |||
| + | {| class="wikitable" | ||
| + | |- | ||
| + | ! scope="col" style="width: 20%;" | <span> Terms </span> | ||
| + | ! scope="col" style="width: 80%;" | <span> Definition</span> | ||
| + | |- | ||
| + | | <span id="Credit"> Credit </span> || Credit purchases are those in which the customer agrees to pay the balance of the purchase price at a later date. | ||
| + | |- | ||
| + | | <span id="Prefered"> Prefered </span> || A preferred sale is completed and paid for immediately. | ||
| + | |- | ||
| + | | <span id=" Pay Acct."> Pay Acct. </span> || Pay Account is for those customers who owe the company money and want to deposit that owed amount. | ||
| + | |- | ||
| + | | <span id="Layaway"> Layaway </span> || Layaway is a payment system through which a customer deposits an item to "lay it away" before they are physically able to settle the balance. | ||
| + | |- | ||
| + | | <span id="Gift Certificate">Gift Certificate</span> || A store can sometimes sell gift coupons (and gift cards) for cash to a customer. The customer may then redeem the gift card or transfer it to another person who may redeem it for goods or services. | ||
| + | |} | ||
| + | |||
| + | [[File:Customer_search_panel.png|700px|frameless|center]] | ||
| + | |||
| + | <div style="color: #004b64; font-size: 20px; text-align: center;">Customer Search Panel (Sales)</div> | ||
| + | |||
| + | ===== <span style="color: #004b64; font-size: 25px;" id="How to apply a payment to a customer account?"> How to apply a payment to a customer account? </span> ===== | ||
| + | |||
| + | <div style="color: #004b64; font-size: 20px; "> | ||
| + | <ol> | ||
| + | <li>Locate the customer account using the customer's name or account number.</li> | ||
| + | <li>Double click on the customer information.</li> | ||
| + | <li>Click the "Pay Acct." button. (The sales transaction window will open.)</li> | ||
| + | <li>Under the "Outstanding invoices/Invoice listing" tab. Double-click the invoice on which you want to apply for the payment </li> | ||
| + | <li>Choose a method of payment.</li> | ||
| + | <li>Apply the amount paid to the customer account.</li> | ||
| + | <li>Click the "Pay to Acct" button.</li> | ||
| + | </ol> | ||
| + | </div> | ||
| + | |||
| + | [[File:Apply_payment_to_customer_account.png|700px|frameless|center]] | ||
| + | <div style="color: #004b64; font-size: 20px; text-align: center;">Apply payment to customer account</div> | ||
| + | |||
| + | ===== <span style="color: #004b64; font-size: 25px;" id="Customer Search (sales)"> Estimate Search Panel (Sales) </span> ===== | ||
| + | |||
| + | <span style="color: #004b64; font-size: 20px;">This panel is used to search for pending, canceled, or issued invoices.Users may conduct an invoice search using the proforma number, the salesperson's name, or the document's status.</span> | ||
| + | |||
| + | [[File:Estimate_Search_Panel_(Sales).png|700px|frameless|center]] | ||
| + | |||
| + | <div style="color: #004b64; font-size: 20px; text-align: center;">Estimate Search Panel (Sales)</div> | ||
| + | |||
| + | |||
| + | ===== <span style="color: #004b64; font-size: 25px;"Finance Manager"> Finance Manager</span> ===== | ||
| + | |||
| + | <span style="color: #004b64; font-size: 20px;">Financing is a matter between the customer and the lender; the Finance Manager utility provides an estimation of the additional cost of financing, creates a record for the lender, and when invoiced, it keeps note of how much the lender owes the business for the purchased goods while these invoices are billed to the loan agency for payment.</span> | ||
| + | |||
| + | ====== <span style="color: #004b64; font-size: 25px;" id="How to get a quote in Finance Manager?"> How to get a quote in Finance Manager? </span> ====== | ||
| + | <div style="color: #004b64; font-size: 20px; "> | ||
| + | <ol> | ||
| + | <li>Locate the customer account using the customer's name or account number. (User is allowed to skip this option)</li> | ||
| + | <li>Scan item</li> | ||
| + | <li>Enter the amount of months for finance. (Default is set at 12 months)</li> | ||
| + | <li>Click “Get Quote” button</li> | ||
| + | <li>If the customer agrees to finance, then click the “submit application” button.</li> | ||
| + | <li>Fill out customer information </li> | ||
| + | </ol> | ||
| + | </div> | ||
| + | |||
| + | |||
| + | [[File:Finance_Manager_Panel.png|700px|frameless|center]] | ||
| + | |||
| + | <div style="color: #004b64; font-size: 20px; text-align: center;">Finance Manager Panel (Sales)</div> | ||
| + | |||
| + | ==== <span style="color: #004b64; font-size: 25px;" id="Supervisor Utilities"> Supervisor Utilities </span> ==== | ||
| + | |||
| + | <span style="color: #004b64; font-size: 20px;">The Supervisor Utilities feature enables users to create invoice-related records such as delivery, shipment, and reprint promotions after invoicing. This chapter would address three key components: suplimental delivery, file for shipment, and reward document.</span> | ||
| + | |||
| + | ===== <span style="color: #004b64; font-size: 25px;" id="suplimental delivery"> Suplimental Delivery </span> ===== | ||
| + | |||
| + | <span style="color: #004b64; font-size: 20px;">This feature enables users to create a delivery after currently invoiced items. It may be advantageous for a customer who has already purchased merchandise and realized that not all products would fit in his car, requiring the delivery of an item.</span> | ||
| + | |||
| + | ====== <span style="color: #004b64; font-size: 25px;" id="How to create a delivery after the goods have been invoiced?"> How to create a delivery after the goods have been invoiced? </span> ====== | ||
| + | |||
| + | <div style="color: #004b64; font-size: 20px; "> | ||
| + | <ol> | ||
| + | <li>Navigate to the Sales tab </li> | ||
| + | <li>Click the supervisor utilities ribbon</li> | ||
| + | <li>Click suplimental delivery</li> | ||
| + | <li>Enter the invoice number and click search</li> | ||
| + | <li>Select the items you wish to deliver</li> | ||
| + | <li>Click the create delivery button</li> | ||
| + | </ol> | ||
| + | </div> | ||
| + | |||
| + | |||
| + | [[File:Suplimental_Delivery.png|700px|frameless|center]] | ||
| + | <div style="color: #004b64; font-size: 20px; text-align: center;">Suplimental Delivery</div> | ||
| + | |||
| + | ===== <span style="color: #004b64; font-size: 25px;" id="File for Shipment"> File for Shipment </span> ===== | ||
| + | |||
| + | |||
| + | <span style="color: #004b64; font-size: 20px;">This feature exports invoice data in a comma-delimited format. In other words, it exports invoice details to a file that can be interpreted and recognized by the Goneclear Storefront software. The user will create a file shipment for companies that use GoneClear StoreFront POS on different servers. For instance, if location A purchases merchandise from location B but the two locations do not share servers, location B will take the invoice data and convert it to a format that can be conveniently saved electronically for location A's GoneClear StoreFront software.</span> | ||
| + | |||
| + | |||
| + | ====== <span style="color: #004b64; font-size: 25px;" id="How to create a shipment file for DC invoice"> How to create a shipment file for DC invoice </span> ====== | ||
| + | |||
| + | <div style="color: #004b64; font-size: 20px; "> | ||
| + | <ol> | ||
| + | <li>Navigate to the Sales tab </li> | ||
| + | <li>Click the supervisor utilities ribbon</li> | ||
| + | <li>Click File for Shipment</li> | ||
| + | <li>Enter invoice number</li> | ||
| + | <li>Choose the location to save the file</li> | ||
| + | <li>Click the ‘create file’ button to save the file</li> | ||
| + | |||
| + | </ol> | ||
| + | </div> | ||
| + | |||
| + | [[File:File_for_shipment_(Dc_Invoice).png|700px|frameless|center]] | ||
| + | <br> | ||
| + | <div style="color: #004b64; font-size: 20px; text-align: center;">File for Shipment</div> | ||
| + | |||
| + | ===== <span style="color: #004b64; font-size: 25px;" id="Reward Document"> Reward Document </span> ===== | ||
| + | |||
| + | <span style="color: #004b64; font-size: 20px;">Designed to allow for the reprinting of promotions such as coupons, raffle tickets, and gifts after goods are invoiced.</span> | ||
| + | |||
| + | ====== <span style="color: #004b64; font-size: 25px;" id="How to reprint promotions after invoiced?"> How to reprint promotions after invoiced? </span> ====== | ||
| + | |||
| + | <div style="color: #004b64; font-size: 20px; "> | ||
| + | <ol> | ||
| + | <li>Navigate to the Sales tab</li> | ||
| + | <li>Click the supervisor utilities ribbon</li> | ||
| + | <li>Click Reward Document</li> | ||
| + | <li>To find invoices, click the magnifying glass icon.</li> | ||
| + | <li>Enter the invoice number.</li> | ||
| + | <li>Click the promotion you wish to reprint. (Users can also view invoice details and reprint invoices by double-clicking on the customer's arrow line.)</li> | ||
| + | </ol> | ||
| + | </div> | ||
| + | |||
| + | |||
| + | [[File:Reward_Document.png|700px|frameless|center]] | ||
| + | <div style="color: #004b64; font-size: 20px; text-align: center;">Reward Document</div> | ||
| + | |||
| + | ===== <span style="color: #004b64; font-size: 25px;" id="Credit Notes"> Credit Notes </span> ===== | ||
| + | |||
| + | <span style="color: #004b64; font-size: 20px;">This feature enables a customer to receive a refund of a certain amount due to an error on the initial invoice or other reasons.</span> | ||
| + | |||
| + | ====== <span style="color: #004b64; font-size: 25px;" id="How to create a Credit Note?"> How to create a Credit Note? </span> ====== | ||
| + | |||
| + | <div style="color: #004b64; font-size: 20px; "> | ||
| + | <ol> | ||
| + | <li>Navigate to the Sales tab.</li> | ||
| + | <li>Click the Credit Note ribbon.</li> | ||
| + | <li>Enter the invoice number.</li> | ||
| + | <li>Click the search button or press the enter key on your keyboard.</li> | ||
| + | <li>Choose whether the customer paid in cash from the drop-down menu.</li> | ||
| + | <li>Enter the amount of the discount. (The system will calculate the tax).</li> | ||
| + | <li>Enter the name of the person who approved the refund.</li> | ||
| + | <li>Choose a credit type from the drop-down menu.</li> | ||
| + | <li>Click the "approve" button.</li> | ||
| + | </ol> | ||
| + | </div> | ||
| + | |||
| + | [[File:Credit_note.png|700px|frameless|center]] | ||
| + | <div style="color: #004b64; font-size: 20px; text-align: center;">Credit Note</div> | ||
| + | |||
| + | ===== <span style="color: #004b64; font-size: 25px;" id="Re-Print Documents"> Re-Print Documents </span> ===== | ||
| + | |||
| + | <span style="color: #004b64; font-size: 20px;">Users may use this feature to reprint a sales document such as an invoice, credit note, special order, delivery control form, and so on.</span> | ||
| + | |||
| + | ====== <span style="color: #004b64; font-size: 25px;" id="How to rep-rint sales document?"> How to rep-rint sales document?</span> ====== | ||
| + | |||
| + | <div style="color: #004b64; font-size: 20px; "> | ||
| + | <ol> | ||
| + | <li>Navigate to the Sales tab.</li> | ||
| + | <li>Click the Re-print ribbon.</li> | ||
| + | <li>Choose the document type from the drop-down menu.</li> | ||
| + | <li>Enter the document number.</li> | ||
| + | <li>Click the "Print" button. (A preview window would automatically open).</li> | ||
| + | <li>On the toolbar, click the print button.</li> | ||
| + | |||
| + | </ol> | ||
| + | </div> | ||
| + | |||
| + | [[File:Re-print_Sale_document.png|700px|frameless|center]] | ||
| + | <div style="color: #004b64; font-size: 20px; text-align: center;">Re-print Sale document</div> | ||
| + | |||
| + | ===== <span style="color: #004b64; font-size: 25px;" id="Return Merchandise Authorization"> Return Merchandise Authorization (RMA) </span> ===== | ||
| + | |||
| + | <span style="color: #004b64; font-size: 20px;">Goneclear developed this feature to facilitate the tracking of returned items. It can be advantageous for businesses to use a manufacturer's warranty, among other factors.</span> | ||
| + | |||
| + | == <span style="color: #004b64"><div style="font-size: 40px; text-align: center;">'''Accounts'''</div></span> == | ||
| + | |||
| + | === <span style="color: #004b64; font-size: 30px;" id="Customers (Accounts)">Customers (Accounts)</span> === | ||
| + | |||
| + | <span style="color: #004b64; font-size: 20px;">This feature enables users to create new customer accounts and update existing ones. Additionally, it allows users to view customer invoice history, sales history, unpaid invoices, customer memos, and modifications made to the customer account.</span> | ||
| + | |||
| + | <span style="color: #004b64; font-size: 20px;">A window labeled customers will open when you click the customer ribbon. There is one panel and eight tabs in this window. Let us examine these attributes.</span> | ||
| + | |||
| + | |||
| + | [[File:Customer_account_window.png|700px|frameless|center]] | ||
| + | <div style="color: #004b64; font-size: 20px; text-align: center;">Customers window in accounts tab</div> | ||
| + | |||
| + | |||
| + | <br> | ||
| + | ==== <span style="color: #004b64; font-size: 30px;" id="Customer Search Panel (Accounts)">Customer Search Panel (Accounts)</span> ==== | ||
| + | |||
| + | <span style="color: #004b64; font-size: 20px;">This panel is used to do a customer account search. Users may conduct searches using the customer number, the customer's name, the customer's address, or the account type.</span> | ||
| + | |||
| + | |||
| + | <br> | ||
| + | [[File:Customer_search_panel_(accounts).png|700px|frameless|center]] | ||
| + | <div style="color: #004b64; font-size: 20px; text-align: center;">Customer Search Panel</div> | ||
| + | </div> | ||
| + | <br> | ||
| + | |||
| + | <br> | ||
| + | ====== <span style="color: #004b64; font-size: 25px;" id="How to search for customer account?"> How to search for customer account?</span> ====== | ||
| + | |||
| + | <div style="color: #004b64; font-size: 20px; "> | ||
| + | <ol> | ||
| + | <li>Navigate to the Accounts tab.</li> | ||
| + | <li>Choose the "Customers" ribbon. (The customers' window will open)</li> | ||
| + | <li>Hover your cursor over the "customer search panel."</li> | ||
| + | <li>You may search by customer number, customer name, customer address, or account type. Enter data into any field.</li> | ||
| + | <li>Click Search.</li> | ||
| + | </ol> | ||
| + | </div> | ||
| + | |||
| + | [[File:How_to_search_for_customer_account.png|700px|frameless|center]] | ||
| + | <div style="color: #004b64; font-size: 20px; text-align: center;">Search for customer account</div> | ||
| + | |||
| + | ==== <span style="color: #004b64; font-size: 30px;" id="Customer Account Window's Tab">Customer Account Window's Tab</span> ==== | ||
| + | |||
| + | <span style="color: #004b64; font-size: 20px;">As previously stated, this window contains eight tabs. These tabs allow users to view a customer's sales history, outstanding balance, and changes to their account, among other things. See the table below for a complete list of tabs and their associated functions.</span> | ||
| + | |||
| + | |||
| + | {| class="wikitable" | ||
| + | |- | ||
| + | ! scope="col" style="width: 20%;" | <span> Tab label </span> | ||
| + | ! scope="col" style="width: 80%;" | <span> Function</span> | ||
| + | |- | ||
| + | | <span id="Customer Information Tab"> Customer Information Tab </span> || This tab allows users to view and edit customer account information, generate new customer accounts and merge existing customer accounts. | ||
| + | |- | ||
| + | | <span id="Invoice History Tab"> Invoice History Tab </span> || This tab allows users to search for and print any invoices generated for a particular customer. | ||
| + | |- | ||
| + | | <span id="Customer Sales History Tab"> Customer Sales History Tab </span> || This tab allows users to search for items by date and view a list of items purchased by the customer on the selected date. | ||
| + | |- | ||
| + | | <span id="Daily Balances Tab"> Daily Balances Tab </span> || This tab allows users to view payment transactions and outstanding balances for the selected customer. | ||
| + | |- | ||
| + | | <span id="Customer Memo Tab"> Customer Memo Tab </span> || Users can use this tab to create memos for specific customer accounts. | ||
| + | |- | ||
| + | | <span id="Changes Tab"> Changes Tab </span> || This tab allows users to view any changes made to the customer's account and who made them. | ||
| + | |- | ||
| + | | <span id="Upaid Invoice Tab"> Upaid Invoice Tab </span> || This tab allows users to view the selected customer's unpaid invoices. | ||
| + | |- | ||
| + | | <span id="Archives Tab"> Archives Tab </span> || Searching for extremely old transactions made under the customer account is made possible via this tab. | ||
| + | |} | ||
| + | |||
| + | [[File:8_tabs.png|700px|frameless|center]] | ||
| + | <div style="color: #004b64; font-size: 20px; text-align: center;">Customer Account Window tabs</div> | ||
| + | </div> | ||
| + | <br> | ||
| + | |||
| + | ===== <span style="color: #004b64; font-size: 25px;" id="Customer Information Tab (accounts)"> Customer Information Tab (accounts)</span> ===== | ||
| + | |||
| + | <span style="color: #004b64; font-size: 20px;">This tab allows users to view and edit customer account information, generate new customer accounts and merge existing customer accounts. Let's take a look at the four forms under this tab.</span> | ||
| + | |||
| + | [[File:Customer_information_Tab_(forms).png|700px|frameless|center]] | ||
| + | <div style="color: #004b64; font-size: 20px; text-align: center;">Customer Information Tab (forms)</div> | ||
| + | </div> | ||
| + | <br> | ||
| + | |||
| + | <div style="color: #004b64; font-size: 20px;">'''Customer Information form''': Under this form, the customer's general information, such as the customer/company name, address, and email address, is displayed. </div> | ||
| + | <br> | ||
| + | [[File:Customer_information_form.png|700px|frameless|center]] | ||
| + | <div style="color: #004b64; font-size: 20px; text-align: center;">Customer Information Form</div> | ||
| + | </div> | ||
| + | <br> | ||
| + | |||
| + | <div style="color: #004b64; font-size: 20px;">'''Marketing Information form''': Users may edit or view the customer's business type and assigned salesperson using this form.</div> | ||
| + | <br> | ||
| + | [[File:Marketing_Information_form.png|700px|frameless|center]] | ||
| + | <div style="color: #004b64; font-size: 20px; text-align: center;">Marketing Information Form</div> | ||
| + | </div> | ||
| + | |||
| + | |||
| + | <div style="color: #004b64; font-size: 20px;">'''Account Information form''': Under this form, users may update or view the customer's account type, tax code, tax id, payment terms, discount amount, and account balance.</div> | ||
| + | <br> | ||
| + | [[File:Account_information_form.png|700px|frameless|center]] | ||
| + | <div style="color: #004b64; font-size: 20px; text-align: center;">Account Information Form</div> | ||
| + | </div> | ||
| + | |||
| + | {| class="wikitable" | ||
| + | |- | ||
| + | ! scope="col" style="width: 20%;" | <span> Terms </span> | ||
| + | ! scope="col" style="width: 80%;" | <span> Defintion</span> | ||
| + | |- | ||
| + | | <span id="Account Type"> Account Type </span> || Users may choose a customer account type from the drop-down menu in this field. There are about five types listed. | ||
| + | <ul> | ||
| + | <li>Accounts Receivable </li> | ||
| + | <li>Gift Certificate</li> | ||
| + | <li>Layaway</li> | ||
| + | <li>Stock Removal</li> | ||
| + | <li>Written OFF</li> | ||
| + | </ul> | ||
| + | |- | ||
| + | | <span id="Tax Code"> Tax Code </span> || In this scenario, a tax code is utilized to determine whether the customer is required to pay tax or is tax-exempt. There are two types of tax codes listed under this field: | ||
| + | <ul> | ||
| + | <li>GST - When customers are required to pay tax, the general sales tax (GST) is selected.</li> | ||
| + | <li>EXEMPT FROM TAX - When customer transactions are tax-free, the exempt from tax option is selected.</li> | ||
| + | </ul> | ||
| + | |- | ||
| + | | <span id="Tax ID"> Tax ID </span> || Identification number for tax. | ||
| + | |- | ||
| + | | <span id="Exemption Type"> Exemption Type </span> || If a customer is tax-exempt, there are many types of tax exemptions allowed. To activate this option, the discount code must be set to "duty-free." The user is prompted to select a type: | ||
| + | <ul> | ||
| + | <li>Exempt from all duties - This option is selected for customers who are not obliged to pay any kind of tax, including GST, shipping taxes, and so on. Therefore, customers will pay the price charged by the company for the goods before any duty tax is applied.</li> | ||
| + | <li>Embassies (GST Only) - When customers are not required to pay general sales tax (GST) on any purchase, this option is selected. </li> | ||
| + | <li>Honorary Consul (Pay RRD and ET) - This option is available to customers who have the title of honorary consul. They are tax-exempt except for Revenue Replacement Duty (RRD) and Environmental Tax (ET).</li> | ||
| + | </ul> | ||
| + | |- | ||
| + | | <span id="Control Goods Type"> Control Goods Type </span> || This option is available to customers who need a GOB permit to purchase certain products. | ||
| + | |- | ||
| + | | <span id="License Expires"> License Expires </span> || This is where users input the expiry date of the customer's license for the GOB permit under 'control goods type'. | ||
| + | |- | ||
| + | | <span id="Payment Terms"> Payment Terms </span> || This is where you may specify the number of days a customer has to pay their bill. | ||
| + | |- | ||
| + | | <span id="Discount Code"> Discount Code </span> || As the name implies, this is a promotional code. Whether it's a wholesale discount, a retail discount, or a duty-free discount, etc. | ||
| + | |- | ||
| + | | <span id="Discount %"> Discount % </span> || As implied by the name, here is where you enter the percentage for the discount you want to apply to the customer account. | ||
| + | |- | ||
| + | | <span id="Preferred Delivery Agent"> Preferred Delivery Agent </span> || This option allows you to choose the customer delivery agent, if applicable. | ||
| + | |- | ||
| + | | <span id="Current Balance"> Current Balance </span> || The current balance of the customer account is displayed here. | ||
| + | |- | ||
| + | | <span id="Credit Limit2"> Credit Limit </span> || This option enables you to set the customer account's credit limit. | ||
| + | |- | ||
| + | | <span id="Available"> Available </span> || | ||
| + | |- | ||
| + | | <span id="Previous Balance"> Previous Balance </span> || | ||
| + | |- | ||
| + | | <span id="Payments to date"> Payments to date </span> || | ||
| + | |- | ||
| + | | <span id="Last Paid"> Last Paid </span> || The date of the most recent payment made to the customer's account is displayed here. | ||
| + | |- | ||
| + | | <span id="Invoice format"> Invoice format </span> || The term "invoice format" refers to the layout of an invoice. There are two types of layouts available: | ||
| + | <ul> | ||
| + | <li>Standard - The invoice layout in the standard option is small and may be printed on thermal paper. </li> | ||
| + | <li>Wholescale - The wholesale option's invoice layout is formatted for A4 paper. </li> | ||
| + | </ul> | ||
| + | |- | ||
| + | | <span id="Statement Option"> Statement Option </span> || This option enables users to choose how their customers will receive their statements, whether printed or sent through email. | ||
| + | |- | ||
| + | | <span id="Email Stmt Sent"> Email Stmt Sent </span> || The date of the most recent email statement is displayed here. | ||
| + | |- | ||
| + | | <span id="Include Invoice Copy with Stmt"> Include Invoice Copy with Stmt </span> || Enabling this option will include a copy of all invoices in the email statement. | ||
| + | |- | ||
| + | | <span id="Track Paid Invoice"> Track Paid Invoice </span> || When a customer makes a payment, it is applied to an outstanding invoice. Enabling this option keeps track of all invoices that have been paid. | ||
| + | |- | ||
| + | | <span id="Allow Cash Sale"> Allow Cash Sale </span> || As the name suggests, this option enables the customer to make a cash payment. (By default, this is enabled). | ||
| + | |- | ||
| + | | <span id="Allow Charge Sale"> Allow Charge Sale </span> || As implied by the name, this option enables the customer to do a charge sale. (By default, this is enabled). | ||
| + | |- | ||
| + | | <span id="Accept Paym. to Acct."> Accept Paym. to Acct. </span> || As indicated by the name, this option allows payment to be accepted on the customer account. (This is enabled by default). | ||
| + | |- | ||
| + | | <span id="Account Status"> Account Status </span> || Users may utilize this option to activate or deactivate a customer account. | ||
| + | |- | ||
| + | | <span id="Date Open"> Date Open </span> || This section details the date the customer's account was opened. | ||
| + | |} | ||
| + | |||
| + | |||
| + | <div style="color: #004b64; font-size: 20px;">'''Control buttons form''': Users may utilize the buttons on this form to create a new customer account, save changes to an existing customer account, perform a miscellaneous adjustment, and merge accounts.</div> | ||
| + | <br> | ||
| + | [[File:Control_buttons_(accounts).png|300px|frameless|center]] | ||
| + | <div style="color: #004b64; font-size: 20px; text-align: center;">Control Buttons (accounts)</div> | ||
| + | </div> | ||
| + | |||
| + | ====== <span style="color: #004b64; font-size: 25px;" id="How to create a customer account?">How to create a customer account? </span> ====== | ||
| + | |||
| + | |||
| + | <div style="color: #004b64; font-size: 20px; "> | ||
| + | <ol> | ||
| + | <li>Navigate to the Accounts tab. </li> | ||
| + | <li>Choose the "Customers" ribbon. (The customers' window will open) </li> | ||
| + | <li>Select the "New Customer" button. </li> | ||
| + | <li>Fill in all the necessary information. (For a description of these forms, see [[#Customer Information Tab (accounts)|''Section 4.1.1'']] )</li> | ||
| + | <li>Select the "save customer" button.</li> | ||
| + | |||
| + | </ol> | ||
| + | </div> | ||
| + | |||
| + | [[File:How_to_create_a_customer_account.png|700px|frameless|center]] | ||
| + | <div style="color: #004b64; font-size: 20px; text-align: center;">How to create a customer account?</div> | ||
| + | |||
| + | ===== <span style="color: #004b64; font-size: 25px;" id="Invoice History Tab (accounts)"> Invoice History Tab (accounts)</span> ===== | ||
| + | |||
| + | <span style="color: #004b64; font-size: 20px;">This tab allows users to search for and print any invoices generated for a particular customer. It is developed in a search engine manner to allow users to search for invoices by date.</span> | ||
| + | |||
| + | [[File:Invoice_History_(customer_account).png|700px|frameless|center]] | ||
| + | <div style="color: #004b64; font-size: 20px; text-align: center;">Invoice History (customer account)</div> | ||
| + | |||
| + | ====== <span style="color: #004b64; font-size: 25px;" id="How to view customer account invoice history?"> How to view customer account invoice history?</span> ====== | ||
| + | |||
| + | <div style="color: #004b64; font-size: 20px; "> | ||
| + | <ol> | ||
| + | <li>Navigate to the Accounts tab. </li> | ||
| + | <li> Choose the "Customers" ribbon. (The customers' window will open)</li> | ||
| + | <li> Search for the required customer in the "customer search" panel.(To learn how to do a customer search, see [[#Customer Search Panel (Accounts)|''"Customer Search Panel"'']])</li> | ||
| + | <li>Go to the "invoice history" tab. </li> | ||
| + | <li>Choose the dates you'd like to view. </li> | ||
| + | <li> Select "display".</li> | ||
| + | **''Note that you may print this list by selecting the "print/export" button.'' | ||
| + | </ol> | ||
| + | </div> | ||
| + | |||
| + | [[File:How_to_view_customer_account_invoice_history.png|700px|frameless|center]] | ||
| + | <div style="color: #004b64; font-size: 20px; text-align: center;">How to create a customer account?</div> | ||
| + | |||
| + | |||
| + | ===== <span style="color: #004b64; font-size: 25px;" id="Customer Sales History Tab">Customer Sales History Tab </span> ===== | ||
| + | |||
| + | <span style="color: #004b64; font-size: 20px;">This tab allows users to search for items by date and view a list of items purchased by the customer on the selected date </span> | ||
| + | |||
| + | [[File:Customer_Sales_History_(Customer_Account).png|700px|frameless|center]] | ||
| + | <div style="color: #004b64; font-size: 20px; text-align: center;">Customer Sales History (Customer Account)</div> | ||
| + | |||
| + | ====== <span style="color: #004b64; font-size: 25px;" id="How to view a list of items purchased by the customer?"> How to view a list of items purchased by the customer?</span> ====== | ||
| + | |||
| + | <div style="color: #004b64; font-size: 20px; "> | ||
| + | <ol> | ||
| + | <li>Navigate to the Accounts tab. </li> | ||
| + | <li> Choose the "Customers" ribbon. (The customers' window will open)</li> | ||
| + | <li> Search for the required customer in the "customer search" panel.(To learn how to do a customer search, see [[#Customer Search Panel (Accounts)|''"Customer Search Panel"'']])</li> | ||
| + | <li>Go to the "Customer Sales History" tab. </li> | ||
| + | <li>Choose the dates you'd like to view. </li> | ||
| + | <li> Select "display".</li> | ||
| + | **''Note that you may print this list by selecting the "print/export" button.'' | ||
| + | </ol> | ||
| + | </div> | ||
| + | |||
| + | [[File:How_to_view_a_list_of_items_purchased_by_the_customer.png|700px|frameless|center]] | ||
| + | <div style="color: #004b64; font-size: 20px; text-align: center;">How to view a list of items purchased by the customer?</div> | ||
| + | |||
| + | ===== <span style="color: #004b64; font-size: 25px;" id="Daily Balances Tab">Daily Balances Tab </span> ===== | ||
| + | |||
| + | <span style="color: #004b64; font-size: 20px;">This tab allows users to view payment transactions and outstanding balances for the selected customer</span> | ||
| + | |||
| + | ====== <span style="color: #004b64; font-size: 25px;" id="How to view customer account payment transactions and outstanding balance?"> How to view customer account payment transactions and outstanding balance? </span> ====== | ||
| + | |||
| + | <div style="color: #004b64; font-size: 20px; "> | ||
| + | <ol> | ||
| + | <li>Navigate to the Accounts tab. </li> | ||
| + | <li> Choose the "Customers" ribbon. (The customers' window will open)</li> | ||
| + | <li> Search for the required customer in the "customer search" panel.(To learn how to do a customer search, see [[#Customer Search Panel (Accounts)|''"Customer Search Panel"'']])</li> | ||
| + | <li>Go to the "Daily Balances" tab. </li> | ||
| + | <li>Choose the dates you'd like to view. </li> | ||
| + | <li> Select "display".</li> | ||
| + | **''Note that you may print this list by selecting the "print report" button.'' | ||
| + | |||
| + | </ol> | ||
| + | </div> | ||
| + | |||
| + | [[File:Daily_Balances_Tab.png|700px|frameless|center]] | ||
| + | <div style="color: #004b64; font-size: 20px; text-align: center;">Daily Balances Tab</div> | ||
| + | |||
| + | ===== <span style="color: #004b64; font-size: 25px;" id="Customer Memos Tab">Customer Memos Tab </span> ===== | ||
| + | |||
| + | <span style="color: #004b64; font-size: 20px;">Users can use this tab to create memos for specific customer accounts.</span> | ||
| + | |||
| + | ====== <span style="color: #004b64; font-size: 25px;" id="How to create memos in customer account?"> How to create memos in customer account? </span> ====== | ||
| + | |||
| + | <div style="color: #004b64; font-size: 20px; "> | ||
| + | <ol> | ||
| + | <li>Navigate to the Accounts tab. </li> | ||
| + | <li> Choose the "Customers" ribbon. (The customers' window will open)</li> | ||
| + | <li> Search for the required customer in the "customer search" panel.(To learn how to do a customer search, see [[#Customer Search Panel (Accounts)|''"Customer Search Panel"'']])</li> | ||
| + | <li>Go to the "Customer Memos" tab. </li> | ||
| + | <li>Enter your memo in the "notes" box. </li> | ||
| + | <li> Select "save memo information".</li> | ||
| + | </ol> | ||
| + | </div> | ||
| + | |||
| + | [[File:Customer_Memos_Tab.png|700px|frameless|center]] | ||
| + | <div style="color: #004b64; font-size: 20px; text-align: center;">Customer Memos Tab"</div> | ||
| + | |||
| + | ===== <span style="color: #004b64; font-size: 25px;" id="Changes Tab">Changes Tab</span> ===== | ||
| + | |||
| + | <span style="color: #004b64; font-size: 20px;"> This tab allows users to view any changes made to the customer's account and who made them.</span> | ||
| + | |||
| + | ====== <span style="color: #004b64; font-size: 25px;" id="How to view the modifications made to a customer's account?"> How to view the modifications made to a customer's account? </span> ====== | ||
| + | |||
| + | <div style="color: #004b64; font-size: 20px; "> | ||
| + | <ol> | ||
| + | <li>Navigate to the Accounts tab. </li> | ||
| + | <li> Choose the "Customers" ribbon. (The customers' window will open)</li> | ||
| + | <li> Search for the required customer in the "customer search" panel.(To learn how to do a customer search, see [[#Customer Search Panel (Accounts)|''"Customer Search Panel"'']])</li> | ||
| + | <li>Go to the "Changes" tab. </li> | ||
| + | <li> Select "display changes".</li> | ||
| + | </ol> | ||
| + | </div> | ||
| + | |||
| + | [[File:Changes_Tab.png|700px|frameless|center]] | ||
| + | <div style="color: #004b64; font-size: 20px; text-align: center;">Changes Tab</div> | ||
| + | |||
| + | ===== <span style="color: #004b64; font-size: 25px;" id="Unpaid Invoices Tab">Unpaid Invoices Tab</span> ===== | ||
| + | |||
| + | <span style="color: #004b64; font-size: 20px;">This tab enables users to examine the unpaid invoices of the specified customer as well as any invoices made under the selected account.</span> | ||
| + | |||
| + | ====== <span style="color: #004b64; font-size: 25px;" id="How to view a customer's unpaid invoices?"> How to view a customer's unpaid invoices? </span> ====== | ||
| + | |||
| + | <div style="color: #004b64; font-size: 20px; "> | ||
| + | <ol> | ||
| + | <li>Navigate to the Accounts tab. </li> | ||
| + | <li> Choose the "Customers" ribbon. (The customers' window will open)</li> | ||
| + | <li> Search for the required customer in the "customer search" panel.(To learn how to do a customer search, see [[#Customer Search Panel (Accounts)|''"Customer Search Panel"'']])</li> | ||
| + | <li>Go to the "Unpaid Ivoices" tab. </li> | ||
| + | <li> Select "outstanding invoice".</li> | ||
| + | </ol> | ||
| + | </div> | ||
| + | |||
| + | [[File:Unpaid_Invoices_Tab.png|700px|frameless|center]] | ||
| + | <div style="color: #004b64; font-size: 20px; text-align: center;">Unpaid Invoices Tab</div> | ||
| + | |||
| + | |||
| + | ===== <span style="color: #004b64; font-size: 25px;" id="Archives Tab">Archives Tab</span> ===== | ||
| + | |||
| + | <span style="color: #004b64; font-size: 20px;">Searching for extremely old transactions made under the customer account is made possible via this tab.</span> | ||
| + | |||
| + | ====== <span style="color: #004b64; font-size: 25px;" id="How to do a customer account archive search?"> How to do a customer account archive search? </span> ====== | ||
| + | |||
| + | <div style="color: #004b64; font-size: 20px; "> | ||
| + | <ol> | ||
| + | <li>Navigate to the Accounts tab. </li> | ||
| + | <li> Choose the "Customers" ribbon. (The customers' window will open)</li> | ||
| + | <li> Search for the required customer in the "customer search" panel.(To learn how to do a customer search, see [[#Customer Search Panel (Accounts)|''"Customer Search Panel"'']])</li> | ||
| + | <li>Go to the "Archives" tab. </li> | ||
| + | <li> Select the date range you wish to view.</li> | ||
| + | <li> Click the display button.</li> | ||
| + | |||
| + | </ol> | ||
| + | </div> | ||
| + | |||
| + | [[File:Archives_Tab.png|700px|frameless|center]] | ||
| + | <div style="color: #004b64; font-size: 20px; text-align: center;">Archives Tab</div> | ||
| + | |||
| + | === <span style="color: #004b64; font-size: 30px;" id="Reports(Accounts)">Reports (Accounts)</span> === | ||
| + | |||
| + | <span style="color: #004b64; font-size: 20px;">This feature enables users to see a list of all customer accounts in the POS system and produce reports on product sales analysis, annual customer sales, and customer payments that are past due. Additionally, it enables users to print statements, email them, and reconcile payments.</span> | ||
| + | |||
| + | ==== <span style="color: #004b64; font-size: 30px;" id="Customer List (Accounts)">Customer List (Accounts)</span> ==== | ||
| + | |||
| + | <span style="color: #004b64; font-size: 20px;">The customer list reports enable users to search for customer accounts and see a list of all accounts created in the POS system.</span> | ||
| + | |||
| + | <span style="color: #004b64; font-size: 20px;">*To view a list of all clients in the GoneClear Storefront POS, click "show all."</span> | ||
| + | |||
| + | ====== <span style="color: #004b64; font-size: 25px;" id="Search for customer account"> Search for customer account </span> ====== | ||
| + | |||
| + | <div style="color: #004b64; font-size: 20px; "> | ||
| + | <ol> | ||
| + | <li>Navigate to the Accounts tab. </li> | ||
| + | <li> Choose the "customer list" from the report drop-down menu. (The customer list will open) </li> | ||
| + | <li> You may search by customer number, customer name, customer address, business type, or account type. Enter data into any field.</li> | ||
| + | <li>Click Search.</li> | ||
| + | |||
| + | </ol> | ||
| + | </div> | ||
| + | |||
| + | ==== <span style="color: #004b64; font-size: 30px;" id="Customer Product Sales Analysis (Accounts)">Customer Product Sales Analysis (Accounts)</span> ==== | ||
| + | |||
| + | <span style="color: #004b64; font-size: 20px;"></span> | ||
| + | |||
| + | ==== <span style="color: #004b64; font-size: 30px;" id="Annual Customer Report (Accounts)">Annual Customer Report (Accounts)</span> ==== | ||
| + | |||
| + | <span style="color: #004b64; font-size: 20px;">A customer product analysis is a monthly and yearly financial overview of a customer's activities over a specified year.</span> | ||
| + | |||
| + | ====== <span style="color: #004b64; font-size: 25px;" id="view annual customer report"> view annual customer report </span> ====== | ||
| + | |||
| + | <div style="color: #004b64; font-size: 20px; "> | ||
| + | <ol> | ||
| + | <li>Navigate to the Accounts tab.</li> | ||
| + | <li> Choose the "annual customer report" from the report drop-down menu. (The customer sales report window will open) </li> | ||
| + | <li> Choose format type | ||
| + | <ul> | ||
| + | <li> Customer 12 month report - </li> | ||
| + | <li> Customer Sales Summary - </li> | ||
| + | </ul> | ||
| + | </li> | ||
| + | <li>Click Search.</li> | ||
| + | |||
| + | </ol> | ||
| + | </div> | ||
| + | |||
| + | ==== <span style="color: #004b64; font-size: 30px;" id="Print Statement (Accounts)">Print Statement (Accounts)</span> ==== | ||
| + | |||
| + | <span style="color: #004b64; font-size: 20px;">The print statement function enables users to print hardcopies of customer statements or electronically send them through email.</span> | ||
| + | |||
| + | <span style="color: #004b64; font-size: 20px;">There are five tabs under this window that we will discuss in this section: customer hardcopy statement, email statement, email settings, sent email history, and email error.</span> | ||
| + | |||
| + | ==== <span style="color: #004b64; font-size: 30px;" id="Customer Hardcopy Statement Tab">Customer Hardcopy Statement Tab (Accounts)</span> ==== | ||
| + | |||
| + | <span style="color: #004b64; font-size: 20px;">Users may print hardcopies under customer statements from this tab. It enables users to print a single customer statement, a range of customer statements, or all customer statements in the GoneClear Storefront POS.</span> | ||
| + | |||
| + | ====== <span style="color: #004b64; font-size: 25px;" id="How to print customer statement"> How to print customer statement </span> ====== | ||
| + | |||
| + | <div style="color: #004b64; font-size: 20px; "> | ||
| + | <ol> | ||
| + | <li>Navigate to the Accounts tab.</li> | ||
| + | <li> Choose the "annual customer report" from the report drop-down menu. (The customer sales report window will open) </li> | ||
| + | <li>Go to Customer Hardcopy Statement Tab.</li> | ||
| + | <li>Choose your printer from the drop-down menu.</li> | ||
| + | <li>Select the account type.</li> | ||
| + | <li> Choose an option from the drop-down menu | ||
| + | <ul> | ||
| + | <li> Single - Select this option to print a statement for a specific customer. </li> | ||
| + | <li> Customer range - This option allows you to print a range of customer statements based on the account number. </li> | ||
| + | <li> All Customer - This option allows you to view and print a list of all customer statements in the system.</li> | ||
| + | </ul> | ||
| + | </li> | ||
| + | <li>Click apply.</li> | ||
| + | <li>Click the "print hard copy statement" button. </li> | ||
| + | |||
| + | </ol> | ||
| + | </div> | ||
| + | |||
| + | ==== <span style="color: #004b64; font-size: 30px;" id="Email Statement Tab">Email Statement Tab </span> ==== | ||
| + | |||
| + | <span style="color: #004b64; font-size: 20px;">Users may send statements through email under this tab. It enables users to email a single customer statement, a range of customer statements, or all customer statements in the GoneClear Storefront POS.</span> | ||
| + | |||
| + | ====== <span style="color: #004b64; font-size: 25px;" id="How to send email statement?"> How to send email statement? </span> ====== | ||
| + | |||
| + | <span style="color: #004b64; font-size: 20px;">*Note: Only customers who have their customer account defined as EMAIL Statements are grouped in the Email batch. It is recommended that you configure your email settings before sending statements. </span> | ||
| + | |||
| + | <div style="color: #004b64; font-size: 20px; "> | ||
| + | <ol> | ||
| + | <li>Navigate to the Accounts tab.</li> | ||
| + | <li> Choose the "annual customer report" from the report drop-down menu. (The customer sales report window will open) </li> | ||
| + | <li>Go to Email Statement Tab.</li> | ||
| + | <li>Select the account type.</li> | ||
| + | <li> Choose an option from the drop-down menu | ||
| + | <ul> | ||
| + | <li> Single - Select this option to email a statement for a specific customer. </li> | ||
| + | <li> Customer range - This option allows you to email a range of customer statements based on the account number. </li> | ||
| + | <li> All Customer - This option allows you to email all customer statements in the system.</li> | ||
| + | </ul> | ||
| + | </li> | ||
| + | <li>Click apply.</li> | ||
| + | <li>Click Group Email Batch (If there is a customer in the batch to whom you do not want to send a statement, uncheck the Send Email box to omit them from the batch.)</li> | ||
| + | <li>Click Send Statement Email Batch</li> | ||
| + | |||
| + | </ol> | ||
| + | </div> | ||
| + | |||
| + | ==== <span style="color: #004b64; font-size: 30px;" id="Email Settings Tab">Email Settings Tab</span> ==== | ||
| + | |||
| + | <span style="color: #004b64; font-size: 20px;">This tab allows users to create an email subject line and a message to include in the body of the email. It is recommended that you configure your email settings before sending statements.</span> | ||
| + | |||
| + | ====== <span style="color: #004b64; font-size: 25px;" id="Create subject line and message for statement emails."> Create subject line and message for statement emails.</span> ====== | ||
| + | |||
| + | <div style="color: #004b64; font-size: 20px; "> | ||
| + | <ol> | ||
| + | <li>Navigate to the Accounts tab.</li> | ||
| + | <li> Choose the "annual customer report" from the report drop-down menu. (The customer sales report window will open) </li> | ||
| + | <li>Go to Email Setting Tab.</li> | ||
| + | <li>Enter your email subject and body.</li> | ||
| + | <li>Click Save Email Settings</li> | ||
| + | |||
| + | </ol> | ||
| + | </div> | ||
| + | |||
| + | ==== <span style="color: #004b64; font-size: 30px;" id="Sent Email History Tab">Sent Email History Tab</span> ==== | ||
| + | |||
| + | <span style="color: #004b64; font-size: 20px;">This feature enables users to view an email history based on the dates selected.</span> | ||
| + | |||
| + | <span style="color: #004b64; font-size: 20px;">*NOTE: Microsoft Outlook must be installed on the workstation.</span> | ||
| + | |||
| + | ====== <span style="color: #004b64; font-size: 25px;" id="How to view email history?"> How to view email history? </span> ====== | ||
| + | |||
| + | <div style="color: #004b64; font-size: 20px; "> | ||
| + | <ol> | ||
| + | <li>Navigate to the Accounts tab.</li> | ||
| + | <li> Choose the "annual customer report" from the report drop-down menu. (The customer sales report window will open) </li> | ||
| + | <li>Go to Sent Email History Tab.</li> | ||
| + | <li>Choose the dates for which you wish to view history.</li> | ||
| + | <li>Click Search</li> | ||
| + | Simply click the "export" button to export this list to an excel file. | ||
| + | </ol> | ||
| + | </div> | ||
| + | |||
| + | ==== <span style="color: #004b64; font-size: 30px;" id="Email Error Tab">Email Error Tab</span> ==== | ||
| + | |||
| + | <span style="color: #004b64; font-size: 20px;">This feature enables users to view a history of email errors based on the dates selected.</span> | ||
| + | |||
| + | ====== <span style="color: #004b64; font-size: 25px;" id="How to view history of email errors?"> How to view history of email errors? </span> ====== | ||
| + | |||
| + | <div style="color: #004b64; font-size: 20px; "> | ||
| + | <ol> | ||
| + | <li>Navigate to the Accounts tab.</li> | ||
| + | <li> Choose the "annual customer report" from the report drop-down menu. (The customer sales report window will open) </li> | ||
| + | <li>Go to Sent Email Error Log Tab.</li> | ||
| + | <li>Choose the dates for which you wish to view history.</li> | ||
| + | <li>Click Search</li> | ||
| + | Simply click the "export" button to export this list to an excel file. | ||
| + | </ol> | ||
| + | </div> | ||
| + | |||
| + | ==== <span style="color: #004b64; font-size: 30px;" id="Aged Accounts(Accounts)">Aged Accounts (Accounts)</span> ==== | ||
| + | |||
| + | <span style="color: #004b64; font-size: 20px;">An aging account report summarizes customers' outstanding balances and the length of time the bills have been overdue.</span> | ||
| + | |||
| + | {| class="wikitable" | ||
| + | |- | ||
| + | ! <span id="Terminologies Table"> Terminologies !! Definitions | ||
| + | |- | ||
| + | | <span id="Collections "> Collections </span> || | ||
| + | |- | ||
| + | | <span id="Last Ending Period"> Last Ending Period </span> || | ||
| + | |- | ||
| + | | <span id="Statement List "> Statement List </span> || | ||
| + | |} | ||
| + | |||
| + | ==== <span style="color: #004b64; font-size: 30px;" id="Reconcile Payment/Invoices (Accounts)">Reconcile Payment/Invoices (Accounts)</span> ==== | ||
| + | |||
| + | <span style="color: #004b64; font-size: 20px;"></span> | ||
| + | |||
== Purchase Orders == | == Purchase Orders == | ||
== Logistics == | == Logistics == | ||
== System Defaults == | == System Defaults == | ||
== Gallery Page == | == Gallery Page == | ||
Revision as of 16:01, 6 July 2021
Contents
- 1 Basics of GoneClear StoreFront
- 2 Inventory
- 2.1 Inventory Tab & Ribbon
- 2.2 View inventory
- 2.2.1 Inventory Data Window
- 2.2.2 Search For An Item
- 2.2.3 Adding a New Item to Inventory.
- 2.2.4 Item details
- 2.2.5 Add and Remove an Item Image
- 2.2.6 Order Information
- 2.2.7 Packaging
- 2.2.8 Price/Cost
- 2.2.9 Assembly and Companion
- 2.2.10 Changes
- 2.2.11 Serial Numbers Window
- 2.2.12 UPC window in Inventory Data
- 2.2.13 Deliveries in Inventory Data***
- 2.3 UPC Utilities Ribbon
- 2.4 Reports Ribbon
- 2.4.1 Stock Analysis
- 2.4.2 Assembly Item Report
- 2.4.3 Companion Items Report
- 2.4.4 Stock Adjustment
- 2.4.5 Inventory Custom Reposting Tool
- 2.4.6 Purchase History Report
- 2.4.7 12 Month Sales Report
- 2.4.8 12 Month Purchases Report
- 2.4.9 3 Period Comparison W/GP
- 2.4.10 Stock Value
- 2.4.11 UPC List
- 2.4.12 Weekly Trends
- 2.4.13 Location Sales
- 2.4.14 In Bond Stock
- 2.5 Brokerage Utilities
- 2.6 Customs/Electronic File Transfers
- 2.7 Incoming Shipment
- 2.7.1 Incoming Shipment Window
- 2.7.2 Create Shipment (Create/Shipment Panel)
- 2.7.3 Open and Receive Shipment
- 2.8 File Definitions
- 2.9 Utilities (Inventory)
- 3 Sales
- 3.1 Create Cashier Session
- 3.2 Cashier Session/Sales Order UI
- 3.3 Sales Transaction (cashiers)
- 3.3.1 How to start a sale transaction (Cashier)
- 3.3.2 How to process multiple payment mode?
- 3.3.3 Manually look up a stock number (Sales Screen)
- 3.3.4 Add new stock number (Sales Screen)
- 3.3.5 Process Return(Sales Screen)
- 3.3.6 Sales Order Entry
- 3.3.7 Customer Search (Sales Panel)
- 3.3.8 How to apply a payment to a customer account?
- 3.3.9 Estimate Search Panel (Sales)
- 3.3.10 Finance Manager
- 3.4 Supervisor Utilities
- 4 Accounts
- 4.1 Customers (Accounts)
- 4.1.1 Customer Search Panel (Accounts)
- 4.1.2 Customer Account Window's Tab
- 4.2 Reports (Accounts)
- 4.2.1 Customer List (Accounts)
- 4.2.2 Customer Product Sales Analysis (Accounts)
- 4.2.3 Annual Customer Report (Accounts)
- 4.2.4 Print Statement (Accounts)
- 4.2.5 Customer Hardcopy Statement Tab (Accounts)
- 4.2.6 Email Statement Tab
- 4.2.7 Email Settings Tab
- 4.2.8 Sent Email History Tab
- 4.2.9 Email Error Tab
- 4.2.10 Aged Accounts (Accounts)
- 4.2.11 Reconcile Payment/Invoices (Accounts)
- 4.1 Customers (Accounts)
- 5 Purchase Orders
- 6 Logistics
- 7 System Defaults
- 8 Gallery Page
Basics of GoneClear StoreFront
In This Chapter
Getting Started
To start GoneClear StoreFront, double-click the icon shown in Figure 1-1
.png)
A user name and a password must be entered in order to log into the company database. For audit purposes, user information is recorded in every new record or modification to an existing record that a user performs.
Knowing Where You Are
The Main Window
.png)
Toolbar and Ribbon

Quick Access Tool bar

The Status Bar
- The bottom left-hand side displays the version of GoneClear StoreFront, the user who signed in, the computer station's name in
- The bottom left-hand side will also display when a user is in "sales mode."

Windows and Panel
A new window will open by clicking on an active Ribbon. All windows would include the exit button to exit the active window. As mentioned earlier in this guide, it is possible to have many windows open at once.
Several windows have a panel that gives access to more choices within the active window.
.png)

Window Operation Modes
- Add: Add a new record or document
- View: View an existing record or document
- Update: Modify the data of a current record or document
Customizing Column Header
- Users can reorder the columns by clicking and dragging the column headers to new locations.

- Users can apply filters to one or more column headers.
- Use the filter menu to select which of the values currently in the column should be displayed. When you add a column filter, the description of the filter will be seen below the panel. You may use this to validate which column filters have been added to the current view and you may adjust the filter. For example:

| Terminology | Definition |
|---|---|
| Sort Ascending | Sorts the selected column in ascending order. |
| Sort Descending | Sorts the selected column in descending order. |
| Clear Sorting | Clears the ascending or descending sorting criteria currently set for a column. |
| Group By This Column | Groups the table using the data in the selected column. It does this by moving the data into expandable lists that are located in the body of the grid. One expandable list will be created for each possible column value.
If Group By Box is enabled, this will also create a "Group By" box in the area immediately above the column headers. Note: To turn off the Group By This Column feature and revert to the original view: Enable Group By Box, drag the Group By boxes back to the column header.
|
| Group By Box | Displays or hides an area immediately above the column headers that contains "Group By" boxes. One "Group By" box will be displayed for each column header for which Group By This Column is currently enabled. You can also drag column headers to and from this area.
|
| Column Chooser | Enables you to add and hide information within a table. When you select Column Chooser the Customization dialog is displayed. This dialog is used to store the columns you don't currently want displayed within the table. Simply click and drag the desired column headers from the table to the Customization dialog. For example, if you decide

|
| Best Fit | Resize the width of the selected column so that the header text is displayed in the optimal amount of space. |
| Best Fit (all columns) | Resizing the width of all columns in the table so that the header text is displayed in the optimal amount of space. |
| Filter Editor | The Filter Editor dialog will show any filters that are currently active in the column headers. You can use the editor to modify the existing filter criteria and to build new criteria using the available filter conditions and logical operators. |
Inventory
In This Chapter
Inventory Tab & Ribbon
The inventory tab consists of Eight(8) Ribbons which provide access to more choices. We're going to go over each ribbon as precisely as possible.
_.png)
| Terminologies | Definitions |
|---|---|
| Stock Number | Identification number used in the physical warehouse or inventory method for the item. |
| Catalog | A complete collection of products organized with descriptive descriptions systematically. |
| Catalog Code | Code for entering and describing in a catalog a collection of items. |
| Catalog Description | The full descriptions specifics of the item and should include everything you want customer to see. |
| Item Name | Name provided to the item. This is a smaller field that the item description |
| Item Description | The descriptions are full specifics of the item and should include everything you want to know. |
| Packaging Code | A packaging code indicates the form of packaging transported. Box, can, bags, bucket, etc. |
| Manufacturer | The person or business that produces products for sale. |
| Supplier | The entity or association supplying your company's product or service. Note: Manufacturer and Supplier may be the same person or business. |
| Department | A part of a store selling a certain class or category of products. Eg. The sportswear department. |
| Discount | A deduction from the usual cost of something. |
| Promo code | A phrase or set of letters and numbers to be used for discount purposes. |
| GST | The goods and services tax (GST) is a value-added tax charged on most goods and services sold for domestic consumption. The GST is paid by cutomers, but it is given back to the government by the businesses selling the goods and services. |
| Target Price | The company's selling price with GST. |
| US Cost | The supplier cost price. |
| FOB Miami | Shipping cost for item. |
| Bz Cost | The item's overall cost including US Cost, FOB Miami, and additional cost when it arrives in Belize. |
| Retailed | The sale of goods to the public in relatively small quantities for use or consumption rather than for resale. |
| Wholesale | The selling of goods in large quantities to be retailed by others. |
| Distributor | An agent who supplies goods to stores and other businesses that sell to customers |
| Duty Free | Duty-free refers to the act of being able to purchase an item in particular circumstances without paying import, sales, value-added, or other taxes. |
| Salesman | a man whose job involves selling or promoting commercial products, either in a store or visiting locations to get orders. |
| Reducible | Inventory deduct in stock amount. For e.g., an oxiclean product may and can be taken out of stock which reduces quantity, whereas a freight charge cannot be taken out of stock in order to reduce quantity. |
| Warranty | A written guarantee given by the producer to the customer of the item, agreeing to restore or replace it, if required, within a specified period of time. |
| Serial Number | A number showing the position of an item in a series, especially one printed on paper currency or on a manufactured article for the purposes of identification. |
| Discontinued | A discontinued product is no longer sold. |
| Shelf Stable | Items which do not have an expiry date. |
| Supplier Reorder # | This is the Manufacture number. |
| BAHA Regulated | Requires license to import an item |
View inventory
Since we have an idea of what a window is and how it functions. Let's go into the inventory data window for view inventory. Users can check for an item in this window to obtain more details about that specific item, whether it be product updates, prices, etc. Furthermore, a user can quickly add a new item to inventory using this window.
Inventory Data Window
To open Inventory Data window, click the view inventory ribbon shown in Figure 2-2.


- Search for an item
- View item details
- Add an item
- View order information from manufacture
- Set Packaging size and weight
- View Price and Cost of Item
- Add as Assembly
- Add as a companion
- View Changes to item
- Search Serial Number for item
- View UPCs
- View deliveries for item
The inventory data consist of 5 forms. Below are figures of these forms and a brief description of its functions

.png)

.png)

Search For An Item


Adding a New Item to Inventory.
- From the tab inside GoneClear StoreFront navigate to: Inventory > view inventory.
- The Inventory Data window will open navigate to: inventory options>new item. ("New inventory creation” window will open)


| Terminologies | Definitions |
|---|---|
| Length, width, height | The package length, width and height. An Oxiclean product, for example, may be packed at 10 per box. The box's length, width and height is what is required in the packaging information option. |
| Net Weight | The weight of the item inside the package. |
| Gross Weight | Both item and package weight together. |
| Stock & Price | The user is asked in this field to indicate how this item is sold in the store. By box, each, bucket, etc. |
| Package Unit | In this field, the user is asked to enter the type of product package, i.e. box, bucket, etc. For eg, an oxiclean product may be sold "each" in the store, however it is packed 10 per package by the vendor. |
| Package Qty | The amount that comes in the package. |
| Tariff | A tariff is tax on imports or exports within sovereign countries. It is a kind of international trade and policy control that taxes external goods in order to promote or protect the internal economy. |
| Tariff Number | A tariff number is a product-specific number, as documented in the Belize Customs Organization's Code System. A tariff number guarantees consistency in the country's product classification. For example regular orange juices share the same tariff number. |
| Tax code | This program includes three tax codes:
|


Item details


Remember to always save updates after any adjustments have been made.

| Terminologies | Definitions |
|---|---|
| Max | Maximum quantity of item that each business location can store. |
| Min | Minimum quantity of item that each business location can store. |
| Bin | The name of the storage location where the items are stored. |
| In Stock | The quantity of item available. |

.png)

| Terminologies | Definitions |
|---|---|
| Stocked & Price | Shows how items are sold. By package, container, each, etc. |
| Available | Overall inventory amount in all departments and branches.
|
| Physical | Physically available for sale.
|
| Held for Del. | Complete sum to be held for delivery. |
| On order | Pending supplier order. |
| Expected | Day when the on order shipment is supposed to arrive. |
| Packed | Shows how it is packed by vendor. |
| Committed | Displays the entire amount held for delivery, order, salesman, etc. |
| Last Sale | Last selling date on item. |

Add and Remove an Item Image
- Add an item picture
- Go to Picture Options Search
- Click Add Picture
- Select picture from your computer
- Click open or choose.
- Click Save Picture in Picture Options
.png)
- Remove an item picture
- Go to Picture Options Search
- Click Remove
- Click Save Picture in Picture Options
Order Information
| Terminologies | Definitions |
|---|---|
| Remaining Stock | It may also be referred to as "OLD STOCK." In other terms, stock before last shipment. |
| PO/Purchase Order | A purchase order is a document submitted from the customer to the supplier to confirm a particular purchase of products. |
| Last Shipment | The latest goods from the supplier. |


| Terminologies | Definitions |
|---|---|
| Control Retail | The governments fixed price per item. Items are not permitted, by law, to exceed government rates. |
| Control Wholesale | The governments fixed price for wholesale products. Items are not permitted, by law, to exceed government rates. |
| Reducible | Inventory deduct in stock amount. For e.g., an oxiclean product may and can be taken out of stock which reduces quantity, whereas a freight charge cannot be taken out of stock in order to reduce quantity. |
| Random Measure | Use to incorporate quantity decimals for goods not determined by whole numbers. E.g. sugar, rice, etc. |
| BAHA Regulated | Requires license to import an item |
| Shelf Stable | Items which do not have an expiry date. |
| Companion Items | Companion items are priced and sold individually, but mostly purchased together. For eg, a brand smartphone purchase, the case and screen protector may have different prices but purchased together. |
| Assembly Items | Assembly items are items that are sold together with one package price. This may be a bundled plan the company offers. |
| Discontinued | A discontinued product is no longer sold. |
.png)


| Terminologies | Definitions |
|---|---|
| Minimum Supply | Minimum amount of item a location should hold. |
| Maximum Order | The maximum quantity a location should hold. |
| Turn Around | The period it takes to sell the entire item stock. |
| Lead Time | Time it takes to get the goods after ordering from the supplier. |
| Order Status | Specify the status of the item, be it clearance, special order, open order etc. |
| Order multiple | Minimum quantity to order from supplier. |
| Special Order | Normally, a special order is not sold in store, typically ordered by the company for a customer who requested it. |

Packaging

.PNG)
Price/Cost


Assembly and Companion
Assembly
- Go to Order info window
- Check the box “Assembly Item” under item option
- Go to Assembly Window
- Click New Code button
- Type in the stock number you want to add as an assembly to current item and push enter on your keyboard
- Click Save

- Go to Order info window
- Uncheck the box “Assembly Item” under item option
- Go to Assembly Window
- Click on the item you want to remove
- Uncheck “Include” box
- Click Save
Companion
- Go to Order info window
- Check the box “Companion Item” under item option
- Go to companion Window
- Click New Code button
- Type in the stock number you want to add as a companion to current item and push enter on your keyboard
- Click Save

- Go to Order info window
- Uncheck the box “Companion Item” under item option
- Go to companion Window
- Click on the item you want to remove
- Uncheck “Include” box
- Click Save
Changes
Below is an example of the view change table

Serial Numbers Window
_.png)
_.png)
UPC window in Inventory Data
| Terminologies | Definitions |
|---|---|
| UPC | A UPC, short for universal product code, is a type of code printed on retail product packaging to help identify an item. It consists of two parts — the machine-readable barcode, a sequence of unique black bars, and the unique 12-digit number beneath.
 |

Deliveries in Inventory Data***
UPC Utilities Ribbon
The UPC Utilities Ribbon provides a broad range of options for users utilizing UPCs. Depending on the licensed user, users can scan a UPC code to verify retail price, confirm UPC, display the company purchasing price of the scanned item, take stock and do quick transfer (This transfer method is typically used to quickly correct the stock). Users can also scan orders and shipments here.
Below is a UPC Utility Startup window that opens after clicking UPC Utilities Ribbon.

UPC Utilities Ribbon- Price Check
See the first button, "Price Check." Price check is very straightforward, enabling users to scan UPC code and see item selling price.
After selecting any of these buttons, a new window labeled UPC Control would open. Depending on the selected button, choices differ.
Below is a view of PRICE CHECK operation mode in the UPC Control window

UPC control window first section displays item name and description. Users may print item labels in various formats in this section; moreover, price adjustment can be made here. Below is a display of item details in UPC Control window first section.

As stated earlier, the printing option gives a range of choices to print an item label. Below is an example of the first option, Product label.

To adjust the retail price easily, simply click the three-dot box at the top right corner. This will open the "Adjust Retail Price" window.


As stated earlier, the UPC control window has many tabs, and these tabs are available based on the user's operating mode. In this situation, we're looking at Price Check mode, which gives access to only 3 tabs; scan, packed and bin.
The scan tab in the Price Check Operation mode displays the item brand, Supplier, Price including Tax, Package Unit, Stock Amount, Bin Number and Picture

The packed tab displays the item dimensions
,weight, and expiration date. These are all fields that can be edited. See section 2.2.7 Packaging x to better understand their function.

The Bin tab displays the number of the item in stock and the current and previous Bin. It also allows users to update Bin.
To update the Bin simple enter the current Bin and select update button. When the update completes, the previous Bin is added to "Bin 2."
"Bin 2" is where the item was previously kept

UPC Utilities Ribbon- UPC Validation
Since we now have a clear understanding of the Price Check and UPC Control window, let 's look at another button; UPC Validation. You may notice that more tabs are accessible under the UPC Control Window, assign tab, and update tab.
Assign Tab: under this tab, users may add a new UPC number to an item, or swap an existing UPC code to another item. This tab also enables the user to add a new item to the inventory.
- Scan the UPC number or enter the UPC number manually.
- Click the button Scan. (System immediately brings you to Assign tab)
- Enter stock number to assign UPC number
- Select the search button (The search window will open)
- Double click on the item in the search window (Search window would close automatically)
- Click the assign button
- Click OK on the "Assign UPC" pop-up message


- Scan the UPC number or enter the UPC number manually.
- Click the button Scan.
- Go to Assign Tab
- Enter stock number to assign UPC number
- Select the search button (The search window will open)
- Double click on the item in the search window (Search window would close automatically)
- Click the assign button
- Click OK on the "Assign UPC" pop-up message
- Click OK on the "Reassign" pop-up message

Utilities Ribbon- Purchasing

UPC Utilities Ribbon- Stock Take
- Enter correct stock quantity
- Click on the button "Adjust Stock"
- Click YES on the pop-up message

- Click on the button “Confirm Count"
- Click YES on the pop-up message
UPC Utilities Ribbon- Transfer
This section is not designed for large transfers. It is generally used to adjust stocks between locations quickly. For example, if the system records 25 oxiclean in warehouse 1 but only 24 are physically in warehouse 1 and the missing 1 is located in warehouse 2. Users can easily transfer 1 from warehouse 1 to warehouse 2 quickly. That'd balance the stock. See the illustration below.
- Select the destination for the items to be transferred.
- Select where the products come from.
- After both locations have been set, click the "transfer" button. (UPC Control window will open)
- Scan the UPC number or enter the UPC number manually.
- Click the button Scan.
- Under the transfer tab, enter the amount you wish to transfer.
- Click transfer button.
- Click YES on the pop-up message


Reports Ribbon
GoneClear StoreFront offers the resources and monitoring features you need to handle the company's financing efficiently and according to Generally Accepted Accounting Principles (GAAP).
The main incentive to use Report Ribbon is the opportunity to run reports to evaluate your departments for profitability and performance. Multiple reports are available:
- Stock Analysis
- FIFO Report
- Average Costing
- Promotional Analysis
- Assembly Items Report
- Proforma Activity
- Stock Adjustment
- Inventory custom Reporting tool
- Annual Reports
- Weekly Trends
- Location Sales
- In Bond Stock
Stock Analysis
Stock Analysis allows users to monitor stock sales and costs over a selected period. This option also enables you to view which products are sold more steadily than others.
See the terminology table below for an understanding of the Stock Analysis table layout.
| Terminologies | Definitions |
|---|---|
| Quantity Stock Beginning | Number of stock at the beginning of the period selected. |
| Value Beginning | Value Beginning refers to the company's total expense for the item at the beginning of the period selected.
|
| SaleValue Beginning | The amount of revenue the company would make if all items were sold at the beginning of the selected period.
|
| Quantity Received | The amount of stocks received, if any, at the end of the selected period. |
| Value Received | Value Received refers to the company's total expense for the item at the ending of the period selected.
|
| Quantity Sold | Amount of stock sold. |
| Total Sale | The company's revenue from Quantity Sold
|
| Total Cost | The company's total expense form Quantity Sold
|
| Ending Stock | This is the number of stock remaining after all transactions at the end of the selected period. |
| Ending Value | Ending Value refers to the company's total expense for the item at the ending of the period selected.
|
| SaleValue Ending | The amount of revenue the company would make if all items were sold at the end of the selected period.
|
| Stock Now | The quantity of item currently in stock. |
| Replacement Cost | Gross Profit display made in dollars for the selected period.
|
| GP% | Gross Profit display made in percentage for the selected period.
|
| %Dept Sales | Percentage of sale by department. |
Navigate to the Inventory tab / Report button and choose "Stock Analysis" from the drop down. To access the table for stock analysis, enter a start and end date. If you wish, search by department, supplier, and or catalog number. Before clicking on the button “Apply”, choose whether you want to view moved items during selected period or items not moved. The default is set to items moved during selected period.

????? AND INFO TABLE HERE WHEN MS PATT ADD MORE INFO IN SYSTEM???
Assembly Item Report
Earlier in this chapter, we discussed what assembly is and how an item is assembled. We will now discuss how to display a list of all assembly items. Navigate to the Inventory tab / Report button and choose "Assembly Items Report" from the drop down.

????? AND INFO TABLE HERE WHEN MS PATT ADD MORE INFO IN SYSTEM???
Companion Items Report
Similar to Assembly Item Report, the companion item report displays a list of all items under companion. Navigate to the Inventory tab / Report button and choose "Companion Item" from the drop down

????? AND INFO TABLE HERE WHEN MS PATT ADD MORE INFO IN SYSTEM???
Stock Adjustment
Under UPC Utilities Ribbon, we spoke about stock take; adjust stock and confirm count. This section gives a report on who made the adjustment or count, and when. This report would reflect the quantity short or over after the adjustment has been made.

????? AND INFO TABLE HERE WHEN MS PATT ADD MORE INFO IN SYSTEM???
Inventory Custom Reposting Tool
In section 2.2.2, we discuss how to search for an item. Inventory Custom Reposting Tool another method of searching an item. However, the previous method limited users to a number of search results, with this Inventory Custom Reposting Tool users have a wider range of search results, and it hardly restricts users to search results. The various search results are-companion item, updated, and UPC to name a few. Select column chooser for more column choices.

Purchase History Report
The purchase history segment enables users to view four quarters of the selected history from the beginning period. Simply select a starting date and the system will automatically split it into four quarters.
- Select a Period Beginning (System will automatically split it into four quarters.)
- Choose a scope from the drop down menu. (Summary or Detail)
- Choose a group from the drop down menu. (Supplier, Department or Category)
- Click Apply

Summary Scope displays a total of "purchase history," showing overall amount depending on the selected group, supplier or department.
Detail Scope displays a detailed "purchase history" report, listing items, quantity, department, etc.
See the example for both reports below. (This report may be printed if the user wishes to print.)
.png)
12 Month Sales Report
Within each year, users can generate sale reports for 12 months. Report may be displayed in two methods, Summarize Group and Product detail. Let's look at each of them.
Summarize Group: Display of department or supplier sales, cost, and profit, based on the user's choice.
- Select a year from the drop-down menu.
- Select the starting month and end month. (Default is from January to December)
- Select a location from the drop down menu.
- Select group from the drop down menu.
- Click display

Product detail: Shows a detailed report on "Sales". Depending on how it is filtered, users can view item name, stock number, department, sales, cost and gross profit for each month.

12 Month Purchases Report
Within each year, users can generate purchase reports for 12 months.

3 Period Comparison W/GP
This section enables users to view revenue for 3 selected periods to compare revenues. Based on user option, the table may be sorted by location, department summarization, category summarization or details.
| Terminology | Definition |
|---|---|
| Period 1 | The first period of revenue comparison. Cannot surpass Period 2 and Period 3. |
| Period 2 | The second period of revenue comparison. Cannot surpass Period 3 or less than Period 1. |
| Period 3 | The Third period of revenue comparison. Cannot be less than Period 1 and Period 2. |
| Summarize Department | This allows users to view reports by department in a summary format. |
| Summarize Category | This allows users to view reports by category in a summary format. |
| Detail | This allows users to display reports in full detail for each selected period. Note that this can be sorted by department. |
| Show Cost and GP | Allows the user to include the cost of items and gross profit in the report. |
| Show more Detail | Allows users to customize column with "column chooser." |
- Choose period 1
- Choose period 2
- Choose Period 3
- Choose either to “Summarize departments”, “summarize category” or “detail” from the radio buttons.
- Choose location from the drop down menu (Click the “All location" box to see all locations.)
- Click “generate report” button.

????? AND INFO TABLE HERE WHEN MS PATT ADD MORE INFO IN SYSTEM???
Stock Value
GoneClear Shop front offers users a function to see the value of the items for the selected date. This is shown according to department or item details.
Department: Displays a stock value list per department.
Item Details: Display the amount of the item in stock and its location, the Belize Cost, the dollar value, the value of the distributor, the supplier and the bin.
Dollar value: This is the value of the entire stock including shipment and handling.
- Choose the date you want the stock value to display.
- Choose location from the drop down menu (Click the “All location" box to see all locations.)
- Click Display

????? TABLE WILL NEED TO CHANGE WHEN MS PATT ADD MORE INFO IN SYSTEM???
- Choose the date you want the stock value to display.
- Choose location from the drop down menu (Click the “All location" box to see all locations.)
- Click Display
- Click Item Detail

????? TABLE WILL NEED TO CHANGE WHEN MS PATT ADD MORE INFO IN SYSTEM???
UPC List
As mentioned earlier, many different UPC codes can be applied to one stock number. Another valuable tool GoneClear Store front offers is the "UPC List" that allows users to view all UPCs for each item.
Using the UPC list tool is quite straightforward; simply input stock number, category, description, department or supplier.
- Enter either stock number, category, description, department or supplier. (We searched by department in this example.)
- Hit f2 on your keyboard or click "search." (Check "show photo" and "show discontinued" if you want these included.)

Weekly Trends
Another useful GoneClear Storefont method is our weekly trends report. Weekly trends report is just that, it provides a weekly trend report. This may be searched by category or department.
- Choose an ending week date
- Select a department or category
- Click Apply

????? AND INFO TABLE HERE WHEN MS PATT ADD MORE INFO IN SYSTEM???
Location Sales
Location Sales is a powerful method to track revenue by relevant location as it allows users select a particular location to display location sales. In this quest, users are able to filter by department to monitor the income of each department at that location.
- Choose a date to see the revenue figures of the location.
- To see Salesman, check the box "Person Group Sales".
- Select Apply

????? AND INFO TABLE HERE WHEN MS PATT ADD MORE INFO IN SYSTEM???
In Bond Stock
Brokerage Utilities
For any company that imports freight, a customs broker is strongly recommended, as there are regulations and clearance specifications that can become rather tedious. A custom broker would save the owner a lot of work and time. However, during the process, you may want to view this custom entry. For this reason, our team provides you with a means of displaying custom entry at your desk utilizing our GoneClear StoreFront POS System. This function not only allows you to view but also to make adjustments to prevent a lengthy wait for the customs broker to finalize the procedure since changes to the price of the product are allowed before the broker completes the process. When the broker completes his entry, he will provide you with the final price list, the Cost Sheet. More regarding the cost sheet is mentioned later in this guide.
| Terminologies | Definitions |
|---|---|
| Custom Broker | Customs brokers are private individuals, partnerships, organizations or businesses that are authorised, regulated and empowered by the Country. Customs and border protection (CBP) assists importers and exporters in complying with Government import and export requirements. |
| Custom Entry | A Customs entry is an official statement of specific information regarding your imported merchandise. If you're working with a Customs broker as the importer, they'll typically fill this out for you. The Customs entry form lists information like: Country of origin. Description of the goods. |
| Electronic Invoice | Electronic invoicing (e-Invoicing) is the transfer of the invoice paper between the supplier and the buyer in an integrated electronic format. |
| Cost Sheet | A cost sheet is a statement displaying the different components of total cost for a product, showing previous information for comparison. This will be provided to you by your broker when the procedure is complete. |
| Retail Pricing Sheet | This is a worksheet listing retail prices. Users with rights can adjust retail price while broker is preparing custom entry. |
| Incoming Shipment | Goods ordered from supplier. |
Here is an overview of how this process operates.

Preview Custom Entry/Create Pricing WorkSheet
As described above, users may display Electronic Invoice immediately after broker imports into brokerage software utilizing the "Preview Custom Entry" feature.
- Enter the entry number (This number is generated in the Goneclear Brokerage Program)
- Click "display"
- From drop down, select "Create New Retail Worksheet"
- Click OK on the "Current Retail will be saved with this worksheet" pop-up message

Open Existing Pricing Worksheet
After creating a new retail sheet, the Preview Entry window closes. In this section, we will go through the process of updating this new retail sheet and making appropriate adjustments. The table below gives a clearer understanding of the Pricing Worksheet columns and their functions.
| Column Name | Functions |
|---|---|
| Current US$ | This is the current cost for the item from its previous shipment. |
| US$ Unit Cost | This is the unit price of the item in the current shipment. The amount shown is in US currency. |
| Invoice Total | This is the total cost of the item in the current shipment. The amount shown is in US currency. |
| Shipment Cost BZ$ | This is the total shipping cost in Belize currency that includes all duty charges. (No GST added). |
| BZ Cost | This is the unit price of the item in the current shipment that includes all duty charges. The amount shown is in Belize currency. (NO GST added) |
| Current BZ Cost | This is the current cost for the item from its previous shipment in belize currency. This total includes all duty charges. |
| Mark Up | The current markup percentage on the last shipment. |
| Current Retail | The current selling price before GST. |
| W/GST | The current selling price with GST. |
| New Mark Up | This is the new markup. The new markup percentage calculates immediately after entering the "NewGST" column. |
| Off Margin | This is the target margin. The (<<) sign indicates that the MarkUP is under margin. (Margin is 50%) |
| New Retail | This is the new updated retail price. The column is set to the current retail price by default that changes immediately after entering the "NewGST" column. |
| New GST | Users are allowed to adjust the current price of the item in this column. Enter your new price with GST and the new retail, and the markup will calculate instantaneously. |
| Notes | This column allows users to enter notes for an item. |
| ID Rate | Import Duty is one of the main duties applied to imported products. This column displays percentage of import duty. |
| Duty | This column displays import duty in currency. |
| RRD Rate | Revenue Replacement Duty (RRD) is one of the main duties applied to imported products. This is installed as a cost recovery mechanism for the Government.
This column displays the percentage of RRD. |
| Duty Rev | This column displays RRD in currency. |
| Ex Rate | Excise (Ex) taxes are taxes required on specific goods like fuel, tobacco, and alcohol. It is designed to discourage the purchase of products that are deemed to be detrimental to consumers' health or the environment. This column displays the percentage of Excise Tax. |
| Excise | This column displays Excise Tax in currency. |
| ET Rate | Environmental tax (ET) measures aim to place a tax cost on products or any activity that may be detrimental to the environment. This column displays the percentage of ET. |
| ET | This column displays Environmental tax (ET) in currency. |
| GST Rate | This column displays the percentage of GST. |
| GST | This column displays GST in currency. |
| Supplier | This column displays the item supplier. |
| Company | This column displays the item company. |
| Value CIF | The Cost, Insurance, and Freight (CIF) value is the actual cost of the goods when they are shipped. As duties are calculated based on the CIF value, it is vital that it is calculated correctly. This column displays the Value CIF. |
- Hover over "Select Retail Worksheet"
- Select the worksheet corresponding to the entry number on the drop-down panel.
- Select display (The worksheet will display)
- Update the price as necessary.
- Click Save WorksheetPrices

Customs/Electronic File Transfers
In the previous chapter, we discussed custom entries and the function to view and make adjustments to them while in the brokerage process. Now we'll look at how to transfer the broker's final pricing list, called a cost sheet, to the GoneClear StoreFront POS system utilizing the "Custom/Electronic File Transfers" feature. "Custom/Electronic File Transfers" is a valuable function eliminating the long, tedious process of manually transferring cost sheets. This functionality transfers TXT and Excel data.

Import Cost Sheets
- Hover over the Locate Entries panel
- Select the button New Entry (Import File window will open)
- Choose GoneClear Customs Entry from the option drop-down menu.
- Click the three dots icon under the file location. (File explorer window will open immediately after clicking the three dots button)
- Locate TXT file in the file explorer
- Select TXT-file.
- Click Open on the bottom right corner.
- On the Import File Window, select Import. (Entry header window will open)
- Complete the necessary details in the entry header and click OK.
- On the Import successful pop-up message window, click the OK button.
- Hover over the Locate Entries panel and double click on the entry from the list.

- Hover over the Locate Entries panel
- Select the button New Entry (Import File window will open)
- Choose Excel Cost Sheet Version 1 or Excel Cost Sheet Version 2 from the option drop-down menu.
- Click the three dots icon under the file location. (File explorer window will open immediately after clicking the three dots button)
- Locate Excel File in the file explorer
- Select Excel File.
- Click Open on the bottom right corner. TO BE CONTINUED>>>
Import Customs Entry window
Following the "import cost sheet" procedures, the list of products would appear in the "Import Customs Entry" window. This window allows users to make changes to stock numbers, make changes to category and department, display inventory, repack the item and fragment this list before sending to incoming shipment.
| Button/Field | Function |
|---|---|
| Use Our Stock # | This field allows users to use existing stock number from inventory. This feature can be very useful especially for stock numbers that were entered wrong on the cost sheet by the broker. |
| PO Number | |
| Save | Save button saves any changes made to the item. |
| Inventory | Opens selected item inventory details. |
| Fragment | Fragment allows users to separate quantity and value. For example, you might buy a set of pans from your supplier, but your company sells them separately. The fragment function lets you separate and add value to the item. The incoming shipment will also allow you to do this in greater depth. We'll discuss this later in the guide. |
| Repack | This feature allows the user to adjust the quantity and stock value. For example, the supplier can sell a product per case, but the company sells it each. Use this useful tool to display items for each and its price. Enter the number of quantities in one package then the system calculates the cost automatically. |
| Update Inventory | This functionality automatically adds the new stock number. Before clicking "Update Inventory," users need to update department and category. |
| Send to Incoming | After the cost sheet update is complete, the next process is to send your entry to incoming shipments. This feature sends data to the incoming shipment automatically. |
| Exit | To close the “Import Customs Entry” window. |
- Select the item
- Enter the stock number in the "Use our Stock #" field
- Select save

- Select the item
- Change department and category
- Select Update Inventory

- Select the item
- Select "Repack" (A repack window will open)
- Enter the quantity of one case in the repack window (This will automatically calculate the cost for each)
- Select ok

- Select the item
- Select "Fragment" (A fragment window will open)
- Enter the quantity to split
- Enter the FOB Value (Freight On Board)
- Select ok (This will automatically break it up and make another line)

Incoming Shipment
When a shipment arrives, users can track and receive the orders in GoneClear StoreFront POS with the “Incoming Shipment” function. Our GoneClear team worked tirelessly to develop four different methods of importing orders that would reduce the time wasted rewriting orders made to the supplier.
| Term | Definition/Function |
|---|---|
| Purchase Order (PO) | Purchase Orders (POs) are documents provided by you, as a buyer, to a supplier requesting goods or services as an order. |
| Backorder | A request for goods that are not available now but will be available in the |
| Orphan List | An “orphan list” is a list of items that were not on the order sheet but was sent by the supplier. |
| Repack | This feature allows the user to adjust the quantity and stock value. For example, the supplier can sell a product per case, but the company sells it each. Use this useful tool to display items for each and its price. Enter the number of quantities in one package then the system calculates the cost automatically. |
| Reconciliation | Reconciliation is an accounting procedure that combines two information sets to ensure that the documents are accurate and consistent. Reconciliation of accounts often guarantees consistency, precision and completeness of reports in the general ledger. |
| Variance Report | Variance reports are meant to compare the amount of the initial invoice and the cost with the actual quantity received. |
| Multi-line Variance Report | If multiple invoices are in a shipment with the same item on multiple invoice lines, the multi-line variance report compares the total shipped for the item with the total received. The user is likely to enter the total amount received on the first occurrence of the invoice line item, but it must be reconciled with the total amount invoiced. |
In This Chapter
- Incoming Shipment Window
- Four methods for generating the incoming shipment
- Add Serial Numbers
- Add Expiration Dates
Incoming Shipment Window
To open Incoming shipment window, click the Incoming Shipment ribbon shown in Figure below. The Incoming Shipment Window contains 2 panels and 6 sub-tabs. It also displays the batch number, order number, reference number, quantity in the entire order (item count), line count, shipping cost, and freight on board (FOB).
- Item Editor Tab
- Customs Detail Tab
- Serial Number Tab
- Expiration Dates Tab
- Item PO Records
- Sales/Receiving History Tab

Create Shipment (Create/Shipment Panel)
There are four methods of creating an incoming shipment: Import from Purchased Orders, Import from Custom Entry, Import from Subsidiary Business Server, and Import without a PO. In this segment, we will discuss the layout of the “create/shipment” panel and how to create a shipment using any of the four methods.
Create/Shipment Panel
The create/select shipment panel enables users to create a shipment using any of the four shipping methods. To open, hover over it. This panel consist of 5 tabs: Shipments Pending, Pending Orders, New Shipment from Electronic File types, and New Shipment Not from PO.

Create Incoming Shipment Methods
Import from Purchase Order
After forming a Purchase Order and closing it, the P.O. will be listed under the Pending Orders tab.
- Double click on the Purchase order.
- Enter Reference Number.
- Select the transaction date.
- Select Create New Shipment.

Customs Entry Shipment
After generating a cost sheet or an excel sheet, the document is then listed under the New Shipment from Electronic File types tab.
- Double click on the Cost Sheet
- Enter Reference Number.
- Select the transaction date.
- Select Create New Shipment.

Import from Subsidiary Business Server
This approach is used for subsidiary business with different servers.
- Enter invoice number.
- Choose the server.
- Select “Get Invoice”
- Type the reference number.
- Enter the date of goods received.
- Choose the right supplier from a drop down menu.
- Select "Create Shipment"

Import without PO
This approach may be used to do a quick incoming shipment without PO’s.
- Enter the quantity of the items
- Tap on the drop-down menu to search for a specific item. (The search box will be lowered).
- Select Go Search on the search engine.
- Enter reference number
- Enter the transaction date.
- From the drop-down menu, choose the supplier.
- Click the Add button.
- Select the "Create New Shipment" button.

Open and Receive Shipment
Once a shipment has been created, it remains in pending status, enabling the user to make necessary adjustments to each item on the shipment. When all changes are accurate and complete, the user must receive stock to update the Goneclear StoreFront POS. In this segment, we will cover the steps to open a shipment, and all the precautions a user may take before receiving the shipment.
- Hover over “create/select shipment” panel
- Click the shipment pending tab
- Double click on shipment. (This will automatically close panel and display item editor)
Item Editor Tab
The item editor window will display by default when the incoming shipment is open. The purpose of the item editor is to display each item and make appropriate adjustments such as quantity, supplier and pricing before receiving it in stock. (Items are viewed individually)
Item editor tab is consisting of several forms. Let us discuss each.

Stock number and description: The item editor displays one item at a time, and this section of the window is a description of the item.

Quantity display: This portion of the window allows users to change the amount received, repack the item, and set the item on backorder. It also indicates the overall sum on order and the amount in stock.

Cost and pricing: This segment enables users to adjust the item's price. All shipments that are generated using the PO option, the supplier's cost, and the Belize cost must be entered.

Navigation Arrows: The navigation arrows allow users to navigate easily through the items of the shipment.

Expiration date: The expiry date must be indicated in this section and entered correctly. A single item can have multiple expiry dates, but on this part of the window, it only displays the first date entered. In another tab, the other dates can be added. We will discuss how to include more expiry date later in this guide.

Mark up and PO#: This section a read-only display of current percentage markup and suggested retail price. It also allows users to add originating PO.
NOTE: All "Pending Order" values must correctly reference to its original PO. Using PO option to create shipment will be updated automatically.

Manufacturer Number: In this section it displays the manufacturer number of the item. It also allows users to add a new manufacturer number. The form below displays the status and date of the item.

Bin location: This section of the item editor shows the item's current and previous bins. It also allows the user to add a new location if the location has to be updated.

Inventory Supplier: The name of the item's supplier is stated in this section of the item's editor.

Shipment information: The shipment details can be found above. This section can be changed at any moment. It is necessary to remember, though, that the supplier can only update with this shipment, not those already in stock.

Selected Item: This section only impacts the item in the item editor and does not extend to the whole shipment. It provides the user with the ability to save, view inventory, view history, and print labels.

Process shipment: This portion impacts the whole shipment, not the item in the item editor. It provides the user with the ability to print report, add other options, and receive stock.
Print Options for Reports: A variety of shipping reports may be printed under the process shipment, below is a table with a summary of each report.

| Term | Definition/Function |
|---|---|
| Register by Invoices | After the shipping has been prepared and received, this report provides users with the complete shipping list, indicates whether an item is on backorder, and displays the shipment value. |
| Cost reconciliation | This report allows users to reconcile the cost of shipment. |
| Warehouse receiving sheet | If the warehouse cannot scan the items received from the shipment, the warehouse sheet may be used to receive the goods manually. |
| Unscanned items | Allows users to print a report of all items that were not scanned. |
| Stock Worksheet | Allows users to print a sheet to take stock of the shipment. |
| Orphan List | Allow users to print an orphan list report. |
| Shelf Labels | Allows users to print labels for items from shipment. |
| Print all multiline items | Allows users to print all multiline items. |
| Multiline Variance Report | allow user to print multiline variance. |
| Variance Report | Allows users to print variance report. |
| Serial Worksheet | Allows users to print a sheet to fill in serial numbers for all items form the shipment. |
| Attached Serial Number | Displays a record of all serial numbers added to the shipment. |
| Repack Price List | (DON’T DO ANYTHING IN POS – MS P WILL CHECK) |
| Export to Excel | Allows user to export shipment list to excel. |
| Quick Print/ Export to Excel | Allows user to print shipment list or export to excel. |
The Utilities Options: A variety of shipping utilities may be selected under the process shipment, below is a table with a summary of each utility.

| Term | Definition/Function |
|---|---|
| Set Received to Zero | This method is used to set all items to 0. It can be convenient when checking goods. For e.g., you might not want the individual you sent to check the product to know the amount. |
| Default US Cost | Apply the previous supplier prices to the items. (MS PAT WASN’T SURE ABOUT THIS BECAUSE OF THE “0” MESSAGE. Will have to look at it over) |
| Retail Price Changes | Display all items that have changed retail prices. |
| Orphan List | Use to add any item that is considered orphaned. |
| Get New Retail Prices from Worksheet | (WAS NOT CLEARLY DEFINE… MS P NEEDS TO GO OVER) |
| Update New Prices | This tool was designed to update all items with new shipping prices. |
| Reset Original Costs | - (WAS NOT CLEARLY DEFINE… MS P NEEDS TO GO OVER) |
Select Item panel
After shipment is open each item will be displayed on the item editor. The select item panel allows the user to access and select items in this shipment.

Add Item from another P.O to current shipment
- In the search item engine, enter the stock number.
- Enter the quantity of the item.
- Enter the price of the item.
- From the down-menu, choose the P.O.

Customs Detail Tab
The customs detail tab displays the selected item prices and rate of customs such as FOB and CIF.

Serial Number Tab
The serial tab is a sub-tab of the incoming shipment window. This tab allows users to enter more than one serial number for a single item. It shows whether or not it requires a serial number, and how many are expected.

How to add serial number to an item in shipment?
- Enter the serial number.
- Click the add button.
.png)
How to remove serial number to an item in shipment?
- Click on the number you want to delete from the list.
- Click the remove button.
.png)
Expiration Dates tab
This tab allows users to enter more than expiration dates for a single item. It shows whether or not it requires an expiry date, and how many are expected.

How to add expiration dates to an item in shipment?
- Add the expiration date
- Enter quantity of the item
- Click the add button
.png)
How to remove expiration date from an item in shipment?
- Click on the date you want to delete from the list.
- Click the remove button.
.png)
Item PO Records Tab
This tab allows users to view Purchase Order records of shipment that was created using the PO method.

Sales/ Receiving History
This tab allows users to view sales and receiving history.(NEEED MS P TO EXPLAIN MORE) .
File Definitions
Tables that populate the inventory controls are all found under the File Definitions tab. These controls are Department, Headings, Categories, Suppliers, Manufacturers, Commission Codes, and currency codes.
To view file definitions options: Navigate to the Inventory tab and click the file definitions button.

***Department, Heading and Category is being update. When new codes publish need to add. (Ms P)
Supplier (File Definitions)
The supplier tab enables users to maintain a list of suppliers' contact details and addresses. In this section, we will address the method of introducing new suppliers and editing current suppliers.
To open the supplier window: Navigate to the Inventory tab/click the file definitions button and click supplier.
.png)
How to add a New Supplier?
- Click the New Code button on the side. This would clear the bottom segment fields, allowing them able to be filled.
- Enter details regarding the supplier.
- Click the save button.
.png)
How to edit existing Supplier information?
- Choose the supplier from the list that you want to modify.
- Navigate to the field you want to edit.
- After making adjustments, click the Save button
.png)
How to Remove existing supplier?
- Choose the supplier from the list that you want to remove.
- Click the delete button
.png)
Manufacturer (File Definitions)
The manufacturer tab enables users to maintain a list of manufacturers. In this section, we will address the method of introducing new manufacturer and editing current manufacturers.
To open the manufacturer window: Navigate to the Inventory tab/click the file definitions button and click manufacturer.
.png)
How to add a New Manufacturer?
- Click the New Code button on the side. This would clear the bottom segment fields, allowing them able to be filled.
- Enter manufacturer name and manufacturer of code.
- Click the save button.
.png)
How to edit existing Manufacturer information?
- Choose the manufacture from the list that you want to modify.
- Navigate to the field you want to edit.
- After making adjustments, click the Save button
.png)
How to Remove existing Manufacturer?
- Choose the manufacturer from the list that you want to remove.
- Click the delete button
.png)
Package Description (File Definitions)
The package description tab enables users to maintain a list of package type. In this section, we will address the method of introducing new package type, removing and editing current package type.
To open the Package Descriptions window: Navigate to the Inventory tab/click the file definitions button and click Package Descriptions.
.png)
How to add a New Package Type?
- Click the New Code button on the side. This would clear the bottom segment fields, allowing them able to be filled.
- Enter package code and package description.
- Click the save button.
.png)
How to edit existing package description?
- Choose the package from the list that you want to modify.
- Navigate to the field you want to edit.
- After making adjustments, click the Save button
.png)
How to Remove existing package description?
- Choose the package from the list that you want to remove.
- Click the delete button
.png)
Commission (File Definitions)
The commission tab provides the possibility of setting a commission rate for sales clerks. The commission rate may reflect the amount of discount that the sales clerk has offered.
*MS. P have to fix because as of right now this tab does nothing in the system.
*Will skip currency code for now because Ms. P is still deciding if it is needed in the POS
Utilities (Inventory)
The inventory utilities are various collections of tools that enable the user to carry out a number of inventory-related activities. Users who do not have the license right to access certain reports but may have the duty of completing the list of utilities can use it.
Label Maker
The GoneClear StoreFront POS system offers users a way to create a random list of any stock numbers to print a batch of labels in varying quantities, or perhaps one of a variety of reports. This feature is called a label maker.
*To be continued
Missing Pictures
This tool provides users with a list of all items that do not have pictures.
To open the missing pictures window: Navigate to the Inventory tab/click the utilities button and click missing pictures.
How to view the list of missing pictures?
- Navigate to the Inventory tab
- Select the utilities button
- Click missing pictures. (The missing pictures window will open)
- Click the View all photo records button
- Click the export to excel button. (You can copy stock number and search for items on inventory to add images.)

Price changes/new item
This section allows users to view new products as well as changes in prices on a particular date. It also allows users to filter by supplier or/and category.
To open the ‘price changes/new item’ window: Navigate to the Inventory tab/click the utilities button and click missing pictures.
How to view new items and prices?
- Navigate to the Inventory tab
- Select the utilities button
- Click “price changes/new item”
- Enter date under the form ‘New items’. (The date entered would show all new items applied to the system from the date entered to the current date.)
- Click the 'Generate Report' button. (A new window will open with the list of new items and their prices.)
.png)
How to view price changes?
- Navigate to the Inventory tab
- Select the utilities button
- Click “price changes/new item”
- Enter date under the form ‘Price changes’. (The date entered would show all new items applied to the system from the date entered to the current date.)
- Click the 'Generate Report' button. (A new window will open with the list of new items and their prices.)
.png)
Sales
Nowadays, the sales process is not relatively as easy as selling a product to one customer one at a time over the counter. Instead, it has become a dynamic network of connected processes that can require any, if not all, of the following: inventory, and logistics management, ordering, billing, and customer relationship management, as well as searching out new sales opportunities. The sales phase begins with sales opportunities being nurtured, sales quotes being generated, sales orders being entered, and customers being invoiced. This chapter addresses the crucial measures that must be completed after a transaction has been concluded, including how to turn a quote into a sales order, guarantee that an order is delivered correctly, and maintain prompt invoicing to improve positive cash flow.
Create Cashier Session
The cashier session ribbon launches the 'salesmain' cashier window used for cashiers to process transactions. To open the salemain window, a supervisor or someone with access must create a cashier session. The session is quite critical as it maintains track of all cashier transactions. Let us explore how to create a cashier's session.
How to create a cashier session?
- Navigate to the Accounts tab
- Select the 'Cashier Transmittals' button.
- Click New
- Select the date for session. (The current date is displayed by default.)
- Choose the name you want to create the session in the 'cashier' drop-down menu.
- Click the 'save' button (a popup window titled "confirmation" will appear)
- On the popup window, select 'Ok.'

Cashier Session/Sales Order UI
As previously mentioned, the cashier session ribbon launches the 'salesmain' cashier window used for cashiers to process transactions and to create sales orders. In this section, we will look at the interface of this window and its features.
The ‘salesmain' window is used for cashier, retail, and wholesale transactions. Features vary based on which session is selected.

Salesmain Window
The'salesmain' window has eight sections. Let us review each section and its roles.

Section One: This section consists of three panels; customer search panel, estimate panel, and finance panel. See section (…CONT) to learn about these panels.

Section Two: This section is used to scan all items purchased from the customer. There is a quantity, scan code, and stock number field accompanied by a lookup button and three checkboxes. Following are the functions for each:

| Fields | Function |
|---|---|
| Quantity Field | requires users to add the amount of the item that the customer purchases. |
| Scan Code Field | scan an item with its UPC. It is also possible for users to manually input the item's UPC or stock number in this field. |
| Stock Number Field | allows users to enter a stock number manually. |
| Lookup Button | Searching for a particular item is the key objective of the lookup button. |
| Add On Scan | Enabling the "add on scan" checkbox will add any scanned products to the order list. |
| Quantity First | Enabling the “quantity first” checkbox will set the starting point on the quantity field instead of the default scan code field. |
| Scan Off | Enabling the “scan off” checkbox will take off the scan code field |
Section Three: This section of the salemain window consists of eight sub-tabs; the invoice tab, Estimate tab, Invoices tab, Item History tab, Availability tab, Delivery Instructions tab, Estimate Record, Terms/Condition tab, and locations test tab.

Let us go through the eight sub tabs in section 3 briefly and their function.
- This invoice tab: This window shows a selection of the items that customers have ordered. It displays the quantity for each item, retail price, special price, rate, delivery type, unit code, discount, discount code, and, if necessary, serial numbers.
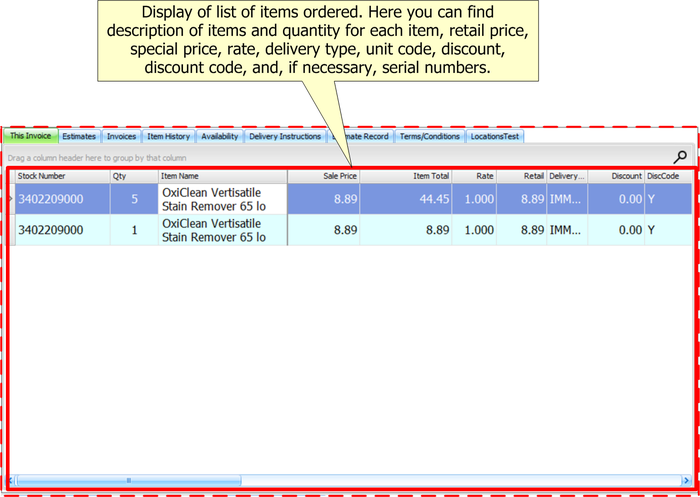 Section 3, This Invoice tab
 - Estimate tab: Allow users to locate all other Sales Order current customer has in the system. The Pending Orders All Customers button on this page locates all other customers who are wanting on the selected product – can be useful when there is a limited supply of the item and sales person may need to do some bargaining about who is going to get the item first.
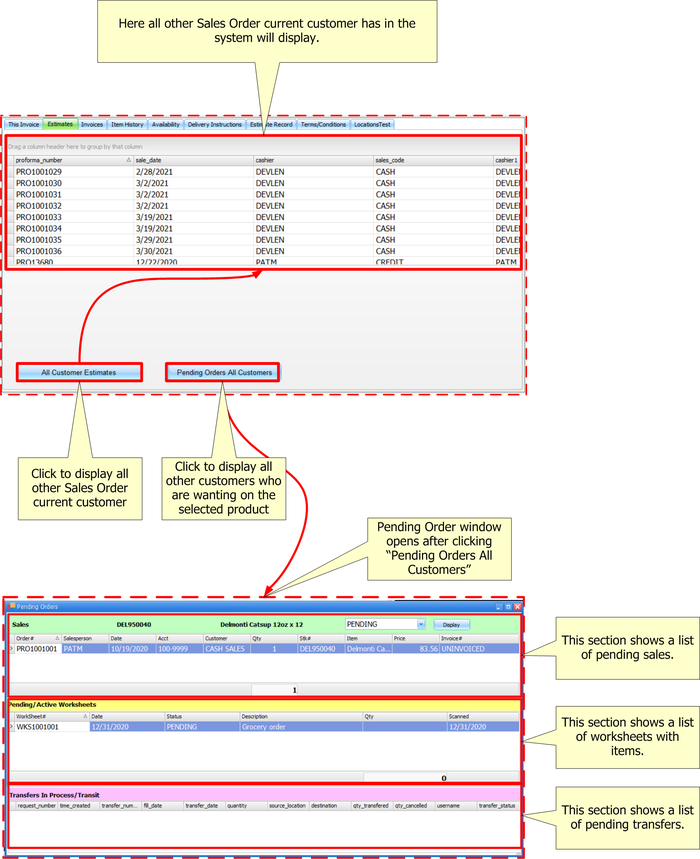 Section 3, Estimate tab
 - Invoices tab Display a list of invoices issued to the selected customer.
- Item History tab: This tab lists the selected item's sales history as well as other items recently purchased by the current customer.
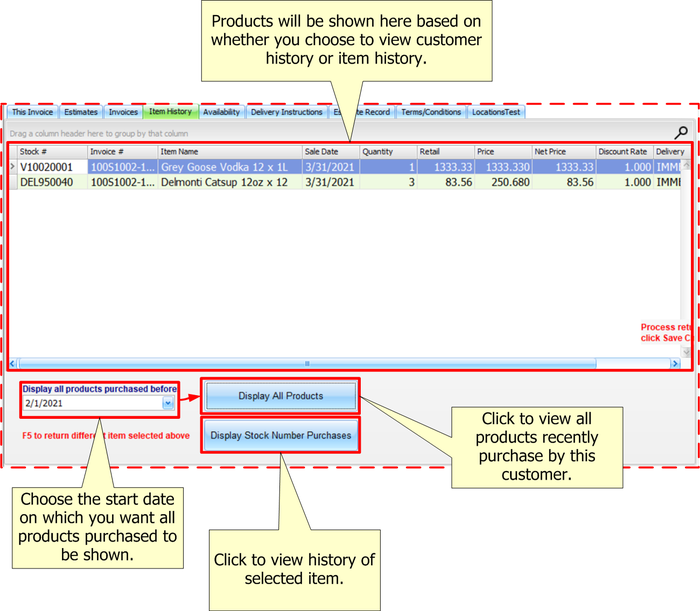 Section 3, Item History Tab
- Availability tab: Display the selected item location as well as the quantity in stock at each location.
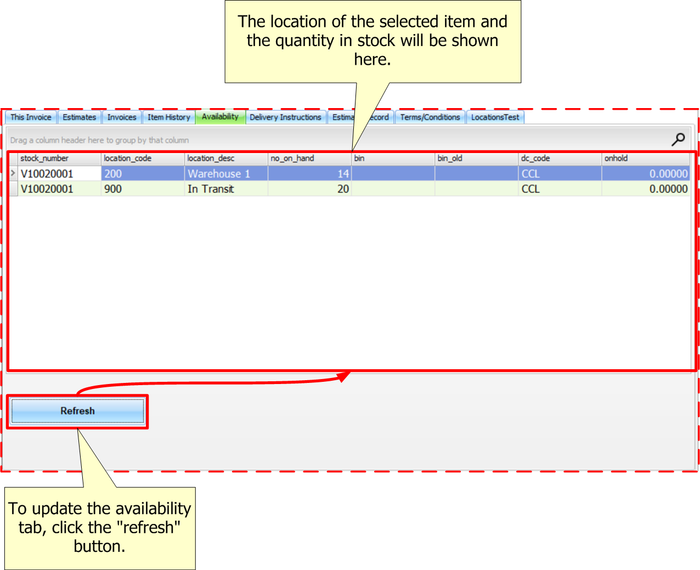 Section 3, Availability tab
- Delivery Instructions tab: Users may enter any delivery instructions in this tab. This instruction would be included in the delivery order.
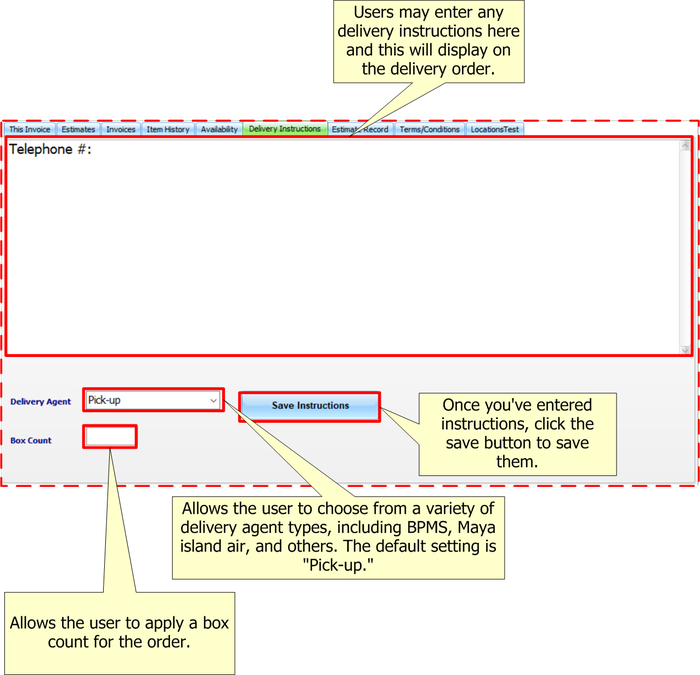 Section 3, Delivery Instructions tab
- Estimate Record: This tab provides a list of events connected with the latest order, such as estimate printed, discounts added, change of sale type (Case or Credit), change of account, deleted items, and any other notable events associated with the invoice. Additionally, a date and time stamp will be shown, as well as the user name ID.
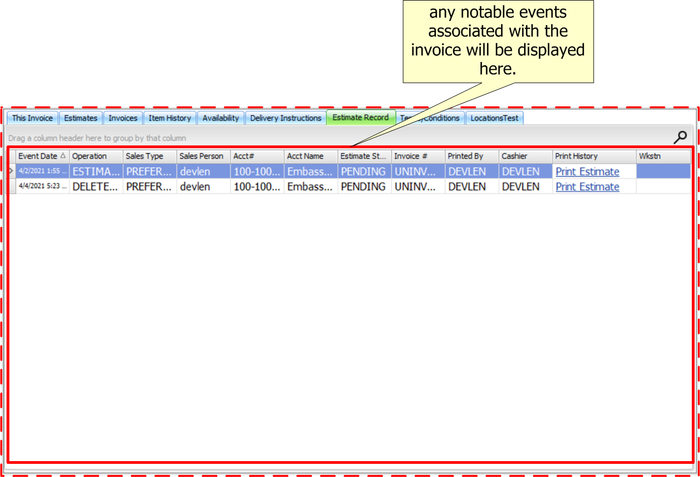 Section 3, Estimate Record
 - Terms/Condition tab:
.png)
.png)
.png)
.png)
.png)
.png)
Section Five: Nine action buttons and an exit button consist of this section. Let us examine the action buttons and their functions.
| Term | Definition/Function |
|---|---|
| Cash Sales | This action button is to start a sale transaction. Ergo users must click this button to initiate any sale transaction. The defined "f2" is the shortcut key for this feature. |
| Clone | An invoice order can be cloned, and changes can be made to the new order. The clone button is used to create a duplicate sales order. Users have the choice to clone the entire order or to split the order by using the select option. |
| Cancel | Enables users to cancel selected orders. |
| Customer | Provides access to client details and makes adjustments to the information such as selecting a new account or choosing a sales transaction type, i.e., credit card, cash, preferred. |
| Cashier Release | This action button enables cashiers to access sales orders. Ergo, after a salesperson completes an order and the warehouse verifies that all products are in stock, "Release to Cashier" changes the status to CASHIER so that the sales order will then be accessible for the cashier. |
| Price Change | Allow the salesperson to see if the price of the selected item has changed. The salesperson may allow the invoice to proceed with the current price or adjust the price to reflect the new value. |
| Reset | this action button enables users to reassign/assign a discount, delivery type, and sales type. |
| Reassign | Enables users to reassign the salesperson, P.O number, and the "referred by." (After clicking, the button will change to "save" to enable users to save changes.) |
| Quick Print | Allows users to print Proforma listing. |

Section Five: This section is a view of the total cost, GST cost and total count of items. Here is also, where users issue invoice.

Section 6: A brief description and price of the selected item is displayed in this section. Users are allowed create a new item line, save adjustments to a selected item, remove a selected item, add a new item to the system, issue a serial number and expiration date if necessary.

Section 7:This section displays the account number, sale type, account codes, discount codes, credit limits, and account balance. This section is color coded to indicate the form of transaction.
| Color Code | Definition |
|---|---|
| Green | preferred or cash transaction |
| Red | Credit transaction |
| Peach | Layaway transaction |

Section 8: Displays the PO number, invoice number, referred by, user status, sales order number, and the name of the salesperson selling the products. Using the reassign button in section four, you may adjust the PO#, referred option, and salesperson.

Sales Transaction (cashiers)
In the previous section, we covered the sections of the sales window and their associated functions. In this chapter, we will go over how to start and complete a sale transaction and the process of return items.
How to start a sale transaction (Cashier)
Note: Before any cashier may initiate a sale transaction, a cashier session must be created. (See section 2.10 to learn how to create a cashier session)
- Navigate to the Sales tab.
- Choose the "cashier session" ribbon. (The salesmain window will open)
- At the bottom of the window, click the 'cash sales button or hit 'f2' on your keyboard.
- Scan your products or manually input the product's stock number.
- Add the product's quantity.
- Press enter on your keyboard to add the scanned item to the order list.
- Click the "new line" button or press f4 on your keyboard to add another item to the order.
- Click the "save" button or press f6 on your keyboard to save item list.
- Click the "invoice" button to invoice sale.
- Choose a method of payment.
- Apply the amount paid by customer
- Click "Pay to Acct"

How to process multiple payment mode?
- Click the "begin entering payments" button.
- In the "amt of this payment" field, enter the amount paid.
- Select the payment method from the drop-down menu
- Enter the check number if necessary and choose the bank form from the drop-down menu.
- Click the "enter next payment method" button
- Repeat this procedure until all payment options have been entered. After that, print the sale.

Manually look up a stock number (Sales Screen)
Users can also use the "lookup" feature to perform a manual search for an item. The following are the steps for using the "lookup" function:
- Select the 'lookup' option. (The item search window would appear.)
- Enter a description, a supplier, or a manufacturer, for example. (There are several ways to search for an item in this window.)
- After you've entered your search method, click the search button or f2 on your keyboard.
- Select the item from the table.
- Click the “Add item” button.
- Press enter on your keyboard to add the item to the order list.

Add new stock number (Sales Screen)
How do I add a stock number that does not exist in the system?
- Click the "newline" button or press f4 on your keyboard.
- Click the “Non Stocked” button (The new inventory creation window will open)
- Enter the item information.(See Section 2.2.3 to understand this window.)
- Click the “save” button.

Process Return(Sales Screen)
How to process return?
- Click the ‘cash sales’ button or hit 'f2' on your keyboard to activate the sales screen
- Locate the customer account number or the item's invoice number.
- Select the client or invoice by double-clicking on it and selecting chosen.
- Enter a negative value for the return amount in the quantity field. For example, -2.
- Scan the item or enter the stock number manually. (If you are unable to locate an item in stock via scan, navigate to item history, click the "show all items" button, and conduct a search there.)
- On the "return an item" pop-up message, click "ok."
- Double-click on the line under the "item history" tab (a pop-up window titled "item return" will appear).
- If required, enter a charging fee.


Sales Order Entry
This feature enables users to generate estimates for customers and then invoice those estimates. Additionally, it allows users to look up items bought by customers and check inventory prices and availability.
How to create a sales order?
- Navigate to the Sales tab.
- Choose the "Retail" ribbon. (The salesmain window will open)
- At the bottom of the window, click the 'cash sales button or hit 'f2' on your keyboard.
- Scan your products or manually input the product's stock number.
- Add the product's quantity.
- Press enter on your keyboard to add the scanned item to the order list.
- Click the "new line" button or press f4 on your keyboard to add another item to the order.
- Click the "save" button or press f6 on your keyboard to save item list.
- When the estimate is ready to be charged, click the "release to cashier" button to enable it for the cashier.

Customer Search (Sales Panel)
This panel is used to locate an existing customer in the database. Users may create an order on credit, cash, or make a payment to a customer account.
To use this panel, simply insert the customer account number or name and click credit, preferred (cash), layaway, or make a payment to initiate a transaction.
| Terms | Definition |
|---|---|
| Credit | Credit purchases are those in which the customer agrees to pay the balance of the purchase price at a later date. |
| Prefered | A preferred sale is completed and paid for immediately. |
| Pay Acct. | Pay Account is for those customers who owe the company money and want to deposit that owed amount. |
| Layaway | Layaway is a payment system through which a customer deposits an item to "lay it away" before they are physically able to settle the balance. |
| Gift Certificate | A store can sometimes sell gift coupons (and gift cards) for cash to a customer. The customer may then redeem the gift card or transfer it to another person who may redeem it for goods or services. |

How to apply a payment to a customer account?
- Locate the customer account using the customer's name or account number.
- Double click on the customer information.
- Click the "Pay Acct." button. (The sales transaction window will open.)
- Under the "Outstanding invoices/Invoice listing" tab. Double-click the invoice on which you want to apply for the payment
- Choose a method of payment.
- Apply the amount paid to the customer account.
- Click the "Pay to Acct" button.

Estimate Search Panel (Sales)
This panel is used to search for pending, canceled, or issued invoices.Users may conduct an invoice search using the proforma number, the salesperson's name, or the document's status.
.png)
Finance Manager
Financing is a matter between the customer and the lender; the Finance Manager utility provides an estimation of the additional cost of financing, creates a record for the lender, and when invoiced, it keeps note of how much the lender owes the business for the purchased goods while these invoices are billed to the loan agency for payment.
How to get a quote in Finance Manager?
- Locate the customer account using the customer's name or account number. (User is allowed to skip this option)
- Scan item
- Enter the amount of months for finance. (Default is set at 12 months)
- Click “Get Quote” button
- If the customer agrees to finance, then click the “submit application” button.
- Fill out customer information

Supervisor Utilities
The Supervisor Utilities feature enables users to create invoice-related records such as delivery, shipment, and reprint promotions after invoicing. This chapter would address three key components: suplimental delivery, file for shipment, and reward document.
Suplimental Delivery
This feature enables users to create a delivery after currently invoiced items. It may be advantageous for a customer who has already purchased merchandise and realized that not all products would fit in his car, requiring the delivery of an item.
How to create a delivery after the goods have been invoiced?
- Navigate to the Sales tab
- Click the supervisor utilities ribbon
- Click suplimental delivery
- Enter the invoice number and click search
- Select the items you wish to deliver
- Click the create delivery button

File for Shipment
This feature exports invoice data in a comma-delimited format. In other words, it exports invoice details to a file that can be interpreted and recognized by the Goneclear Storefront software. The user will create a file shipment for companies that use GoneClear StoreFront POS on different servers. For instance, if location A purchases merchandise from location B but the two locations do not share servers, location B will take the invoice data and convert it to a format that can be conveniently saved electronically for location A's GoneClear StoreFront software.
How to create a shipment file for DC invoice
- Navigate to the Sales tab
- Click the supervisor utilities ribbon
- Click File for Shipment
- Enter invoice number
- Choose the location to save the file
- Click the ‘create file’ button to save the file
.png)
Reward Document
Designed to allow for the reprinting of promotions such as coupons, raffle tickets, and gifts after goods are invoiced.
How to reprint promotions after invoiced?
- Navigate to the Sales tab
- Click the supervisor utilities ribbon
- Click Reward Document
- To find invoices, click the magnifying glass icon.
- Enter the invoice number.
- Click the promotion you wish to reprint. (Users can also view invoice details and reprint invoices by double-clicking on the customer's arrow line.)

Credit Notes
This feature enables a customer to receive a refund of a certain amount due to an error on the initial invoice or other reasons.
How to create a Credit Note?
- Navigate to the Sales tab.
- Click the Credit Note ribbon.
- Enter the invoice number.
- Click the search button or press the enter key on your keyboard.
- Choose whether the customer paid in cash from the drop-down menu.
- Enter the amount of the discount. (The system will calculate the tax).
- Enter the name of the person who approved the refund.
- Choose a credit type from the drop-down menu.
- Click the "approve" button.

Re-Print Documents
Users may use this feature to reprint a sales document such as an invoice, credit note, special order, delivery control form, and so on.
How to rep-rint sales document?
- Navigate to the Sales tab.
- Click the Re-print ribbon.
- Choose the document type from the drop-down menu.
- Enter the document number.
- Click the "Print" button. (A preview window would automatically open).
- On the toolbar, click the print button.

Return Merchandise Authorization (RMA)
Goneclear developed this feature to facilitate the tracking of returned items. It can be advantageous for businesses to use a manufacturer's warranty, among other factors.
Accounts
Customers (Accounts)
This feature enables users to create new customer accounts and update existing ones. Additionally, it allows users to view customer invoice history, sales history, unpaid invoices, customer memos, and modifications made to the customer account.
A window labeled customers will open when you click the customer ribbon. There is one panel and eight tabs in this window. Let us examine these attributes.

Customer Search Panel (Accounts)
This panel is used to do a customer account search. Users may conduct searches using the customer number, the customer's name, the customer's address, or the account type.
.png)
How to search for customer account?
- Navigate to the Accounts tab.
- Choose the "Customers" ribbon. (The customers' window will open)
- Hover your cursor over the "customer search panel."
- You may search by customer number, customer name, customer address, or account type. Enter data into any field.
- Click Search.

Customer Account Window's Tab
As previously stated, this window contains eight tabs. These tabs allow users to view a customer's sales history, outstanding balance, and changes to their account, among other things. See the table below for a complete list of tabs and their associated functions.
| Tab label | Function |
|---|---|
| Customer Information Tab | This tab allows users to view and edit customer account information, generate new customer accounts and merge existing customer accounts. |
| Invoice History Tab | This tab allows users to search for and print any invoices generated for a particular customer. |
| Customer Sales History Tab | This tab allows users to search for items by date and view a list of items purchased by the customer on the selected date. |
| Daily Balances Tab | This tab allows users to view payment transactions and outstanding balances for the selected customer. |
| Customer Memo Tab | Users can use this tab to create memos for specific customer accounts. |
| Changes Tab | This tab allows users to view any changes made to the customer's account and who made them. |
| Upaid Invoice Tab | This tab allows users to view the selected customer's unpaid invoices. |
| Archives Tab | Searching for extremely old transactions made under the customer account is made possible via this tab. |
Customer Information Tab (accounts)
This tab allows users to view and edit customer account information, generate new customer accounts and merge existing customer accounts. Let's take a look at the four forms under this tab.
.png)


| Terms | Defintion |
|---|---|
| Account Type | Users may choose a customer account type from the drop-down menu in this field. There are about five types listed.
|
| Tax Code | In this scenario, a tax code is utilized to determine whether the customer is required to pay tax or is tax-exempt. There are two types of tax codes listed under this field:
|
| Tax ID | Identification number for tax. |
| Exemption Type | If a customer is tax-exempt, there are many types of tax exemptions allowed. To activate this option, the discount code must be set to "duty-free." The user is prompted to select a type:
|
| Control Goods Type | This option is available to customers who need a GOB permit to purchase certain products. |
| License Expires | This is where users input the expiry date of the customer's license for the GOB permit under 'control goods type'. |
| Payment Terms | This is where you may specify the number of days a customer has to pay their bill. |
| Discount Code | As the name implies, this is a promotional code. Whether it's a wholesale discount, a retail discount, or a duty-free discount, etc. |
| Discount % | As implied by the name, here is where you enter the percentage for the discount you want to apply to the customer account. |
| Preferred Delivery Agent | This option allows you to choose the customer delivery agent, if applicable. |
| Current Balance | The current balance of the customer account is displayed here. |
| Credit Limit | This option enables you to set the customer account's credit limit. |
| Available | |
| Previous Balance | |
| Payments to date | |
| Last Paid | The date of the most recent payment made to the customer's account is displayed here. |
| Invoice format | The term "invoice format" refers to the layout of an invoice. There are two types of layouts available:
|
| Statement Option | This option enables users to choose how their customers will receive their statements, whether printed or sent through email. |
| Email Stmt Sent | The date of the most recent email statement is displayed here. |
| Include Invoice Copy with Stmt | Enabling this option will include a copy of all invoices in the email statement. |
| Track Paid Invoice | When a customer makes a payment, it is applied to an outstanding invoice. Enabling this option keeps track of all invoices that have been paid. |
| Allow Cash Sale | As the name suggests, this option enables the customer to make a cash payment. (By default, this is enabled). |
| Allow Charge Sale | As implied by the name, this option enables the customer to do a charge sale. (By default, this is enabled). |
| Accept Paym. to Acct. | As indicated by the name, this option allows payment to be accepted on the customer account. (This is enabled by default). |
| Account Status | Users may utilize this option to activate or deactivate a customer account. |
| Date Open | This section details the date the customer's account was opened. |
.png)
How to create a customer account?
- Navigate to the Accounts tab.
- Choose the "Customers" ribbon. (The customers' window will open)
- Select the "New Customer" button.
- Fill in all the necessary information. (For a description of these forms, see Section 4.1.1 )
- Select the "save customer" button.

Invoice History Tab (accounts)
This tab allows users to search for and print any invoices generated for a particular customer. It is developed in a search engine manner to allow users to search for invoices by date.
.png)
How to view customer account invoice history?
- Navigate to the Accounts tab.
- Choose the "Customers" ribbon. (The customers' window will open)
- Search for the required customer in the "customer search" panel.(To learn how to do a customer search, see "Customer Search Panel")
- Go to the "invoice history" tab.
- Choose the dates you'd like to view.
- Select "display". **Note that you may print this list by selecting the "print/export" button.

Customer Sales History Tab
This tab allows users to search for items by date and view a list of items purchased by the customer on the selected date
.png)
How to view a list of items purchased by the customer?
- Navigate to the Accounts tab.
- Choose the "Customers" ribbon. (The customers' window will open)
- Search for the required customer in the "customer search" panel.(To learn how to do a customer search, see "Customer Search Panel")
- Go to the "Customer Sales History" tab.
- Choose the dates you'd like to view.
- Select "display". **Note that you may print this list by selecting the "print/export" button.

Daily Balances Tab
This tab allows users to view payment transactions and outstanding balances for the selected customer
How to view customer account payment transactions and outstanding balance?
- Navigate to the Accounts tab.
- Choose the "Customers" ribbon. (The customers' window will open)
- Search for the required customer in the "customer search" panel.(To learn how to do a customer search, see "Customer Search Panel")
- Go to the "Daily Balances" tab.
- Choose the dates you'd like to view.
- Select "display". **Note that you may print this list by selecting the "print report" button.

Customer Memos Tab
Users can use this tab to create memos for specific customer accounts.
How to create memos in customer account?
- Navigate to the Accounts tab.
- Choose the "Customers" ribbon. (The customers' window will open)
- Search for the required customer in the "customer search" panel.(To learn how to do a customer search, see "Customer Search Panel")
- Go to the "Customer Memos" tab.
- Enter your memo in the "notes" box.
- Select "save memo information".

Changes Tab
This tab allows users to view any changes made to the customer's account and who made them.
How to view the modifications made to a customer's account?
- Navigate to the Accounts tab.
- Choose the "Customers" ribbon. (The customers' window will open)
- Search for the required customer in the "customer search" panel.(To learn how to do a customer search, see "Customer Search Panel")
- Go to the "Changes" tab.
- Select "display changes".

Unpaid Invoices Tab
This tab enables users to examine the unpaid invoices of the specified customer as well as any invoices made under the selected account.
How to view a customer's unpaid invoices?
- Navigate to the Accounts tab.
- Choose the "Customers" ribbon. (The customers' window will open)
- Search for the required customer in the "customer search" panel.(To learn how to do a customer search, see "Customer Search Panel")
- Go to the "Unpaid Ivoices" tab.
- Select "outstanding invoice".

Archives Tab
Searching for extremely old transactions made under the customer account is made possible via this tab.
How to do a customer account archive search?
- Navigate to the Accounts tab.
- Choose the "Customers" ribbon. (The customers' window will open)
- Search for the required customer in the "customer search" panel.(To learn how to do a customer search, see "Customer Search Panel")
- Go to the "Archives" tab.
- Select the date range you wish to view.
- Click the display button.

Reports (Accounts)
This feature enables users to see a list of all customer accounts in the POS system and produce reports on product sales analysis, annual customer sales, and customer payments that are past due. Additionally, it enables users to print statements, email them, and reconcile payments.
Customer List (Accounts)
The customer list reports enable users to search for customer accounts and see a list of all accounts created in the POS system.
*To view a list of all clients in the GoneClear Storefront POS, click "show all."
Search for customer account
- Navigate to the Accounts tab.
- Choose the "customer list" from the report drop-down menu. (The customer list will open)
- You may search by customer number, customer name, customer address, business type, or account type. Enter data into any field.
- Click Search.
Customer Product Sales Analysis (Accounts)
Annual Customer Report (Accounts)
A customer product analysis is a monthly and yearly financial overview of a customer's activities over a specified year.
view annual customer report
- Navigate to the Accounts tab.
- Choose the "annual customer report" from the report drop-down menu. (The customer sales report window will open)
- Choose format type
- Customer 12 month report -
- Customer Sales Summary -
- Click Search.
Print Statement (Accounts)
The print statement function enables users to print hardcopies of customer statements or electronically send them through email.
There are five tabs under this window that we will discuss in this section: customer hardcopy statement, email statement, email settings, sent email history, and email error.
Customer Hardcopy Statement Tab (Accounts)
Users may print hardcopies under customer statements from this tab. It enables users to print a single customer statement, a range of customer statements, or all customer statements in the GoneClear Storefront POS.
How to print customer statement
- Navigate to the Accounts tab.
- Choose the "annual customer report" from the report drop-down menu. (The customer sales report window will open)
- Go to Customer Hardcopy Statement Tab.
- Choose your printer from the drop-down menu.
- Select the account type.
- Choose an option from the drop-down menu
- Single - Select this option to print a statement for a specific customer.
- Customer range - This option allows you to print a range of customer statements based on the account number.
- All Customer - This option allows you to view and print a list of all customer statements in the system.
- Click apply.
- Click the "print hard copy statement" button.
Email Statement Tab
Users may send statements through email under this tab. It enables users to email a single customer statement, a range of customer statements, or all customer statements in the GoneClear Storefront POS.
How to send email statement?
*Note: Only customers who have their customer account defined as EMAIL Statements are grouped in the Email batch. It is recommended that you configure your email settings before sending statements.
- Navigate to the Accounts tab.
- Choose the "annual customer report" from the report drop-down menu. (The customer sales report window will open)
- Go to Email Statement Tab.
- Select the account type.
- Choose an option from the drop-down menu
- Single - Select this option to email a statement for a specific customer.
- Customer range - This option allows you to email a range of customer statements based on the account number.
- All Customer - This option allows you to email all customer statements in the system.
- Click apply.
- Click Group Email Batch (If there is a customer in the batch to whom you do not want to send a statement, uncheck the Send Email box to omit them from the batch.)
- Click Send Statement Email Batch
Email Settings Tab
This tab allows users to create an email subject line and a message to include in the body of the email. It is recommended that you configure your email settings before sending statements.
Create subject line and message for statement emails.
- Navigate to the Accounts tab.
- Choose the "annual customer report" from the report drop-down menu. (The customer sales report window will open)
- Go to Email Setting Tab.
- Enter your email subject and body.
- Click Save Email Settings
Sent Email History Tab
This feature enables users to view an email history based on the dates selected.
*NOTE: Microsoft Outlook must be installed on the workstation.
How to view email history?
- Navigate to the Accounts tab.
- Choose the "annual customer report" from the report drop-down menu. (The customer sales report window will open)
- Go to Sent Email History Tab.
- Choose the dates for which you wish to view history.
- Click Search Simply click the "export" button to export this list to an excel file.
Email Error Tab
This feature enables users to view a history of email errors based on the dates selected.
How to view history of email errors?
- Navigate to the Accounts tab.
- Choose the "annual customer report" from the report drop-down menu. (The customer sales report window will open)
- Go to Sent Email Error Log Tab.
- Choose the dates for which you wish to view history.
- Click Search Simply click the "export" button to export this list to an excel file.
Aged Accounts (Accounts)
An aging account report summarizes customers' outstanding balances and the length of time the bills have been overdue.
| Terminologies | Definitions |
|---|---|
| Collections | |
| Last Ending Period | |
| Statement List |
Reconcile Payment/Invoices (Accounts)